Composites are wonderful once you learn a few tricks. Sure, there are builders who despise the stuff, just as there are those who wouldn’t work with anything else. In the past, KITPLANES has featured a series of articles by Bob Fritz covering composites basics, so lets take the subject to the next level, if you will.
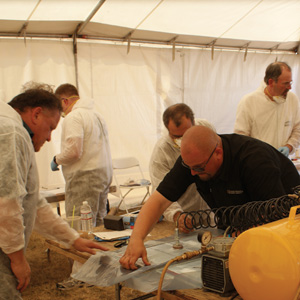
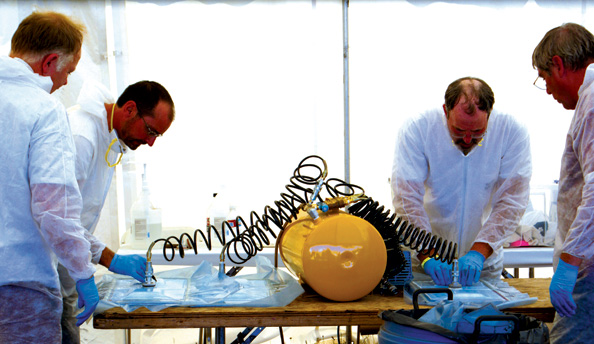
When applying vacuum, a second set of hands is always useful to make sure that you get the proper seal. Here the instructor is helping the student stretch the sealant tape.
Over the next few issues we will be discussing vacuum-bagging materials, vacuum-bagging processes and how to troubleshoot common vacuum-bagging problems. We will provide all of the basic knowledge you’ll need to perform composite layups using simple vacuum-bag techniques, and well then go through a simple project to get your feet wet. Why bother? Because vacuum bagging reduces the weight of the part and increases its quality.
Lets start by discussing the materials and equipment that you will need.
Fluorinated Ethylene Propylene (FEP)
The first material that we are going to talk about is FEP. When we use this term in our classes, we often see a confused look on the students faces and have to laugh as we remember what it was like the first time we heard it. Here is what it essentially means: Nothing sticks to it! This material is used as a separation layer between the vacuum-bagging materials and the composite part that you are vacuum bagging. It comes in perforated and non-perforated variations, depending on application. We use perf (the perforated version) most often, as it is used to regulate or control the bleed out of excess resins from the composite part. The size of the perforations and the spacing between them determine the amount of bleed out. There are circumstances when we do not require any bleed out from the part, and thats when well use a non-perforated FEP product.
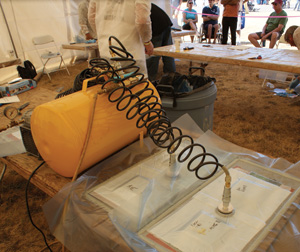
This is a possible homebuilders vacuum setup. This one is for doing five bagging projects at the same time using a storage tank and one pump.
Peel Ply
Imagine if an orange did not have the pith between the orange and the peel. How difficult would it be to remove the peel? Just like the pith of an orange, the peel ply in a vacuum bag creates a separation layer that releases the part from the vacuum-bag materials. Peel ply comes in a variety of styles and material constructions. Like many fabrics, there are numerous weaves and densities, but there are some common styles that are easy to use and readily available.
The most common is a Dacron made of rayon fibers that are tough enough to resist breaking even when the fibers are being held in place by epoxy resin. The material used is similar to that of aircraft fabric covering. It is so similar in fact that when actual peel ply is not available, wing-covering Dacron can be used. Peel ply works and lives up to its name because it provides a layer that is composed of thousands of miniature holes (built into the fabrics over/under construction) and a series of perforated lines in every direction to create a breakable surface that can be peeled away. Peel ply can also be used as a bleeder in the stack up as it does soak up excess resin. (Stack up refers to the materials to be bonded and the order in which they are layered.)
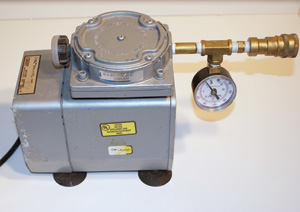
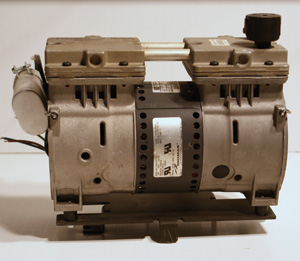
The backbone of every vacuum bag is the vacuum pump. This is a diaphragm-style vacuum pump that works well for most small to medium size projects.
Bleeder Fabric
When you hear the name bleeder fabric, the first thing that may come to mind is something used in the ER of your local hospital. As the name implies, this fabric is used to soak up excess resins. Almost anything that absorbs liquid can be used as bleeder. Some people have used t-shirts in a pinch and had reasonable success.
Of course there are many materials that are made specifically for removing excess resins. Whenever you use any bleeder, a sample should be done before performing a final bond to make sure that the correct result is produced. We will discuss what the correct result looks like next time.
You need to be aware of how much bleeder fabric to use. Bleeder fabric will normally try and soak up as much resin as it can until it becomes saturated. This can be a problem, as too much bleeder in the stack up can create a resin-starved part. Be careful.
Common materials used as bleeders include peel ply, fiberglass (varying thicknesses or weights depending on the required draw), breather and of course specifically designed bleeder fabrics. We tend to use either peel ply or fiberglass in our vacuum bags, as both are readily available and fairly inexpensive. They have also given consistent results on a number of projects.
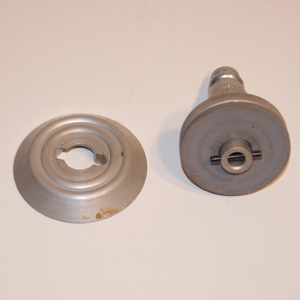
Shown here is a twist-style, two-part vacuum port. The bottom half goes in the vacuum bag, and the upper half twists into the lower half through a small cut that is made in the bagging film.
What you choose to use in your vacuum bag stack up will most likely depend on availability of materials, cost and test results. The really important thing to remember is don’t hurry. The choice you make can mean the difference between success and failure of the final product.
Caul Plates and Molds
This is a huge subject that I could devote an entire article to, but the objective is to give you some thoughts that can be used to create the finished product that you are looking for. For most of my classes, I use silicone caul plates because of their ease of use and final finish (we will show the silicone and its capabilities in the next article). If you have ever experimented with vacuum bagging without using a caul plate or mold, you probably found that the completed part had an inconsistent and sometimes pillowy surface texture. This can be eliminated with the use of the silicone sheet or a caul plate/mold. (A caul plate is a pressure plate, rigid or flexible, placed over the surface being bonded and allows the pressure from the vacuum to be evenly and efficiently distributed over the entire surface of the part.)
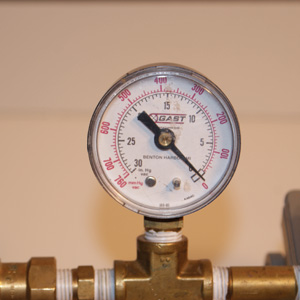
Keeping track of the pressure inside the vacuum bag is important. This is a vacuum gauge and shows its units of measurement in inches of mercury.
Caul plates and molds can be made of many different materials ranging from silicone to solid aluminum and composites. The decision of which to use is based largely on the desired finished product. If the part is going to be surface prepped and painted, then caul plates can often be used. If the finish requires a specific shape and finish, then most times a mold should be used. For example, if you are trying to make a carbon-fiber instrument panel for your RV-6 and you want a perfect finish, then using glass caul plates would be your best choice, as glass produces the best finish.
Breather Material
As we all know, the earth has atmospheric pressure. Imagine the imbalance this would bring if all of this pressure was applied to just a small point on the earth. To eliminate problems like this in our parts, we use breather to equally distribute the vacuum pressure over the entire surface of the part. Breather material is normally a fluffy nylon that will allow the vacuum (air) to flow freely through it over the surface of the part. Many different materials have been used as breather such as fiberglass, t-shirts, winter jacket insulation, etc. Just remember most of these will not allow a good flow of vacuum. The proper breather material is inexpensive and always delivers consistent results when used correctly.
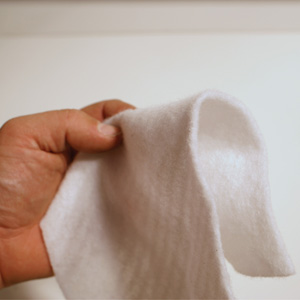
Breather material, normally the last layer in the vacuum bag stack up, is a fluffy nylon material that is quite thick to allow good air (vacuum) flow.
Breather can also be used as bleeder as mentioned. You must be careful when using breather as a bleeder, as it will draw a large amount of resin, and you could end up with a resin-starved part. Choosing a breather will require some trial and error until you find one that you like and will work for your application. You can make most of them work; it just takes some preparation and planning.
Vacuum Bagging Film
Vacuum bagging film is made of various materials depending on supplier and application. The most common is nylon bagging film, and you can find it in many colors and temperature ratings as well as stretch factors. The color of the film doesn’t make a difference and is normally used to identify the temperature or manufacturer of the material.
When selecting a bagging material, ask yourself some questions. For example, what temperature must this bagging material be able to withstand? Many composite parts are placed into ovens or will have heat blankets in the vacuum bag to provide elevated temperatures for curing, and they must be able to withstand the temperature it takes to cure the part. Common temperature ratings for vacuum bagging materials are 250 and 400 F.
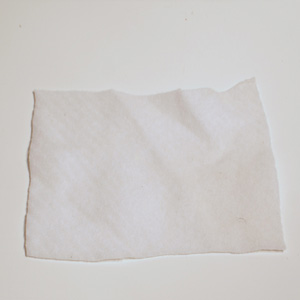
To make sure that the vacuum pressure flows evenly across the part, breather material is used.
Not all layups require elevated temperature cures, though. For these applications, depending on the size of the part, I have used plastic bag tubing that would be used for vacuum sealing of food or other items. The plastic tubing comes in a variety of sizes and is stretchable to conform to the parts shape. Do not apply heat to this vacuum bag, as it will melt. The only difficulty when using this technique is that you will require a heat sealer to seal off the bag, because some sealant tapes will not stick to this style of bag. Do some experimenting and see what works for you.
The next question to ask is: What shape is the part that the bagging film will need to stretch over? Some extreme shapes are difficult to bag, and this can result in pooling resin and even air pockets. Most bagging films are reasonably stretchy, but they do have their limits. One manufacturer produces a bagging film that you can stretch over a boat hull mold and it will suck down to the bottom of the mold. Now that is stretch! Normally, a good way of thinking about bagging film and stretch is that the higher the temperature it has to resist, the less stretch it will have.
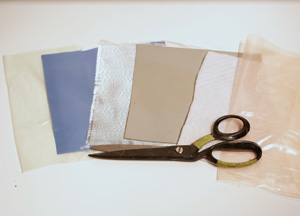
Shown here is the vacuum bag materials stack up. From left to right in order: FEP, peel ply, bleeder, silicone caul plate, breather and vacuum bagging film.
Bagging film has another use as well. It can be used as another kind of separation layer. Bagging film does not stick to anything that you will be bonding, so it can act as a release film as well, if one is required. Always ask yourself, What do I need the vacuum bag to accomplish?
Sealant Tape
Just like chewing gum left on the street, sealant tape sticks to almost anything, so much so that it is also called tacky tape. Sealant tape is the material that seals your vacuum bag so that no vacuum pressure can leak. It comes in a variety of colors, temperatures and adhesiveness. Sealant tape is rubber based and can stay soft and pliable even when placed into a composite oven at temperatures in excess of 350 F. This allows the user to manipulate the tape when problems such as vacuum leaks occur. There are many manufacturers of tacky tape, and most tapes are similar in function, so a product from one supplier should be as good as the next.
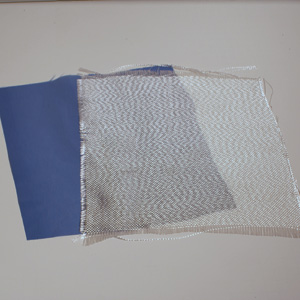
Resin draw can come from both the breather and the peel ply shown here, but the peel ply is used primarily as a separator.
The Stack Up
Now that we know the materials we will be working with and what they do, we need to know how it goes down onto the materials to be bonded. This is what we call the stack up. Normally this would include the actual materials that would be bonded together (or part being vacuumed), but for the purposes of this series, it will be only the vacuum-bagging materials. The stack up is the order in which the materials will go down from the bottom layer up. It would normally look similar to what you see in Figure 1. The first item in a vacuum bag would most often be a mold of some sort, and the final layer (bagging film) would be sealed to it; however, sometimes the vacuum bag will completely enclose even the mold. When a moldless style construction is used or if the mold itself is to be placed into the vacuum bag, the bottom layer then becomes a layer of vacuum-bagging film and the top layer of vacuum-bagging film will be sealed to it. When using this style of vacuum bag, there needs to be a layer of breather material on both sides of the materials to be vacuumed. This allows for an even flow of vacuum and gives an even pressure over the surface of the part.
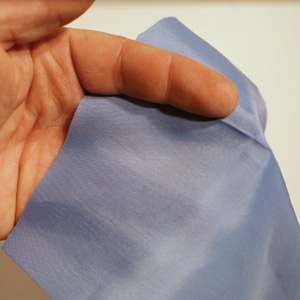
Peel ply is a Dacron fabric similar to that which is used for the fabric covering on wings. It is so close that in a pinch fabric covering can be used in the place of peel ply.
For those who have composite experience, I would like to address a common misunderstanding with regard to the placement of peel ply. You might notice that in the stack up shown I have placed the FEP down first onto the part and not the peel ply. Many people have told me that they prefer to put the peel ply down first so that they have a bondable surface without sanding. It creates a coarse finish that looks like you would get a good bond with it, but by doing this you are actually putting the material that acts as the best separator and regulator for the resin flow on top of the material that is used as a bleeder/separator. Also, the coarse surface that they figure would give a good bond still needs to be properly prepped (sanded) for the best adherence. Failure to prepare the surface properly could result in a poor bonding surface and failure.
I don’t know about you, but I prefer not to have any chance of failure on my composite aircraft at 10,000 feet. That being said, at the homebuilt level of construction (where the stack up is not dictated), people still firmly believe in the peel ply down first stack up method and claim it works for them.

| FEP or Fluorinated Ethylene Propylene is used to control the amount of resin bleed out, and it also acts as a separator in the stack up. What is difficult to see in this photo are the many small perforations that allow the resin to bleed through at a controlled rate. | Silicone caul plates are pretty much the most versatile way of applying an even amount of pressure across the surface of a part. As you can see it is flexible and will not crack during its normal lifespan. | Sealant tape or tacky tape is used to seal the bag around its periphery. It is available in many levels of tackiness and temperature ratings. Shown here are two examples. Both are rated for 400 F. Note the protective paper backing to stop foreign objects from sticking to it and to keep it from sticking to itself. |
Conclusion
Well, now you know the basic materials and equipment that you will need to complete a simple or complex vacuum bag. Remember, the biggest question you need to ask yourself when considering materials and equipment is, What do I need this material/equipment to do, and can it do what I need efficiently? Choose wisely, because during the cure you are always working against the clock, and you want to avoid complications.
Next time well look at how to use the equipment and materials and how to put together a simple vacuum bag that you can use for your next composite project. Until then, keep your resins in a fireproof cabinet and your workspace clean.

