 “Do you think I could win an award?” Karen looked up from the backpack she was rustling through next to the airplane and told Stan, “I don’t see why not; it looks great to me. Why don’t you go ahead and put a ‘judge me’ card on it?”
“Well, this was my first project, I might have missed something,” said Stan. “When we went to that class, they said it was easy.”
“Yeah, they said that, and they were right, it wasn’t hard, but it sure was time consuming.”

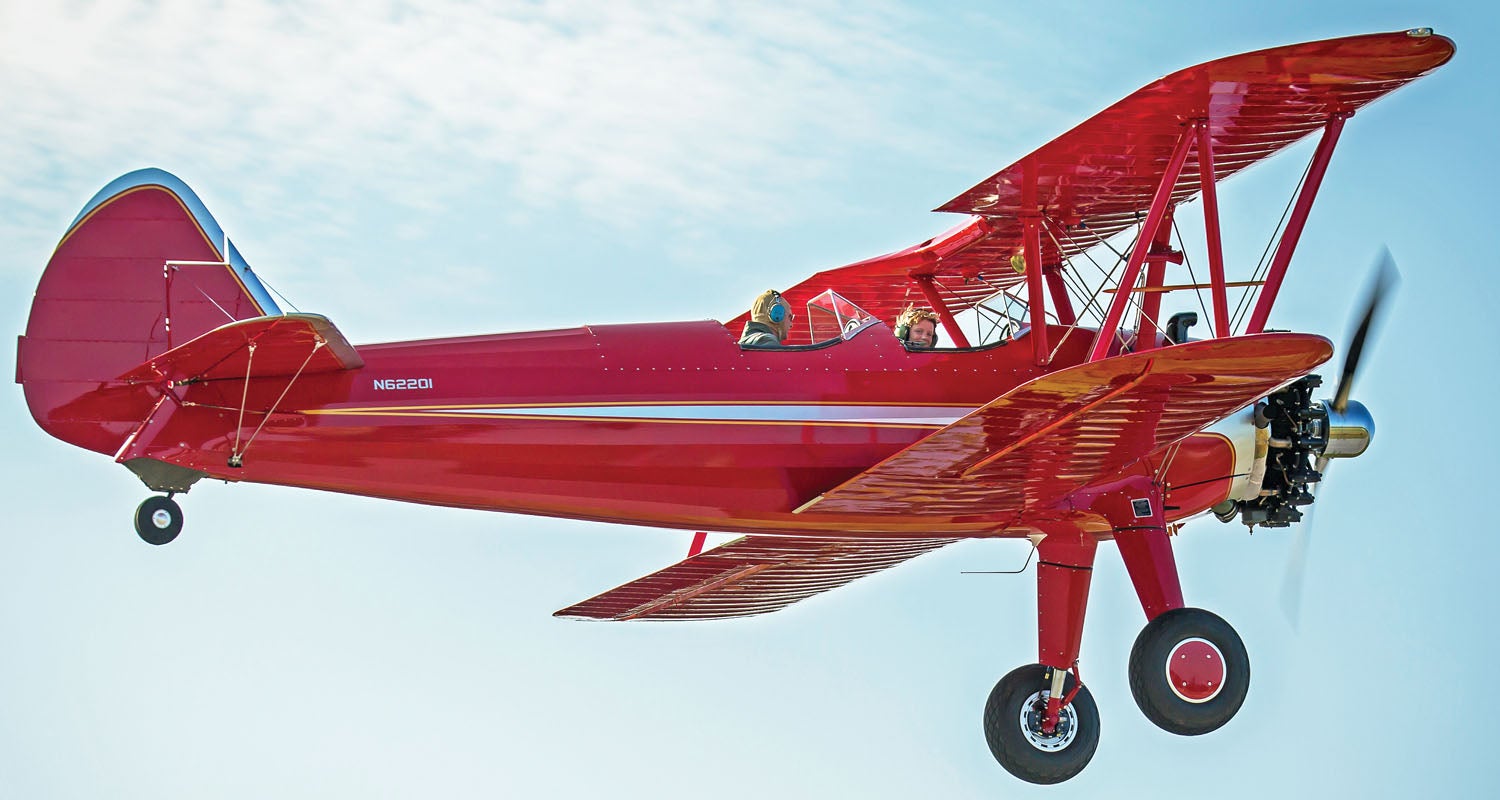
Stan and Karen were camping at a large fly-in, their sunshade and lawn chairs next to a 1979 Christen Eagle. They had spent two years restoring the airplane they bought as a project. It was flying when they bought it and most of the work had been to recover it.
“I’ll go find out when the judges are coming through and polish it up one more time.” Later that day, as the summer heat began to fade across the field of airplanes, Stan spotted a friend walking down the line. John came up to Stan and Karen and looked at the Eagle gleaming in the fading sunlight. “Hey John, you used to be an aircraft judge. Should I get this judged?”
“Do you want me to look at it? You might not be happy with what I tell you.”
“We’re friends. It’s OK. Here, let me get my book out.” Stan grabbed his book of restoration pictures and John walked a slow circle around the airplane, inspecting the photos and the airplane.
“What do you think? Should I get it judged?”
“Of course you should; it can’t hurt.”
“Do you think I have a chance at winning an award?”
“Ah. You’re asking me to be honest about this,” John said.
“Well, yes. I won’t get mad. I need to learn.”
“It is a great first effort. It’s airworthy. But it doesn’t have the detail or precision for an award.” Stan looked confused. “OK, let’s see,” John said, and started walking around the airplane again. “You missed a tape here and it looks like you oversanded here, and it looks like you put the old hardware back on over here. It’s a pretty complicated paint scheme to get right on a first project. See over here, the trim doesn’t line up, and these lines are wavy…” John kept walking around the airplane, pointing things out. Stan and Karen just shook their heads. “That’s enough! We had no idea,” said Stan.
“You can’t expect to be this detailed the first time you cover something. You should still get it judged,” said John. “Really?”
“Absolutely. It’s a great way to learn.”
The week ended without an award, but Stan and Karen were fine with that, now that they understood the detail that they would have to achieve if they wanted a show plane.
The Reality
You may not want to invest your time and effort in a show plane cover job. New cover by beginners looks just fine and can be just as airworthy as an award winner. And to the untrained eye, most covers look terrific. In fact, many people walking up to a fabric covered airplane think the material is metal or fiberglass.
Professional restorers, on the other hand, see every little defect. These people can be very annoying to the rest of us who are just loving our airworthy airplane and really don’t want to hear about the “edges of the flying wire grommet.”
But if you are interested in producing the finest cover job possible, then I have six tips for you. These are actually based on the top six mistakes that we see in our restoration shop. These are not the only problems we see, but they are at the top of the list because of severity and frequency.
So whether you want to find out how to produce a “show plane” cover job on your Kitfox or tackle a certified restoration and have it judged, the following tips will help you meet your goal.
1. Preparation for cover.
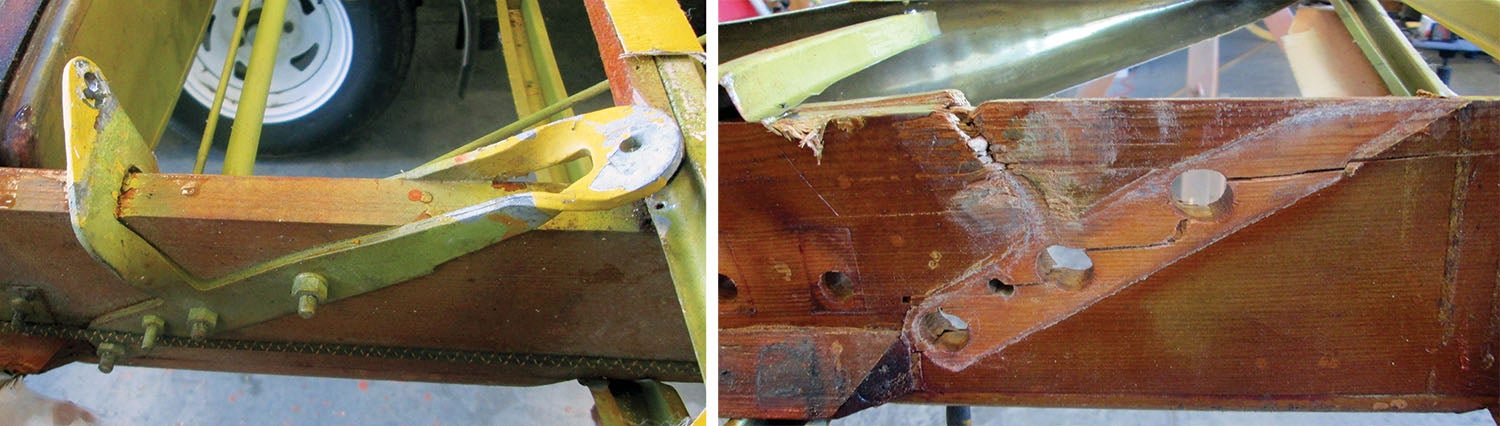
Of course, you could have guessed this one. What happens is that we get excited about the project, and as we uncover our basket case fuselage, we are shocked at what we find. Seeing that the structure is going to take a lot of work, we realize how much time and effort we are going to have to invest in the airplane. It is at this point where we need to take a deep breath and stand back.
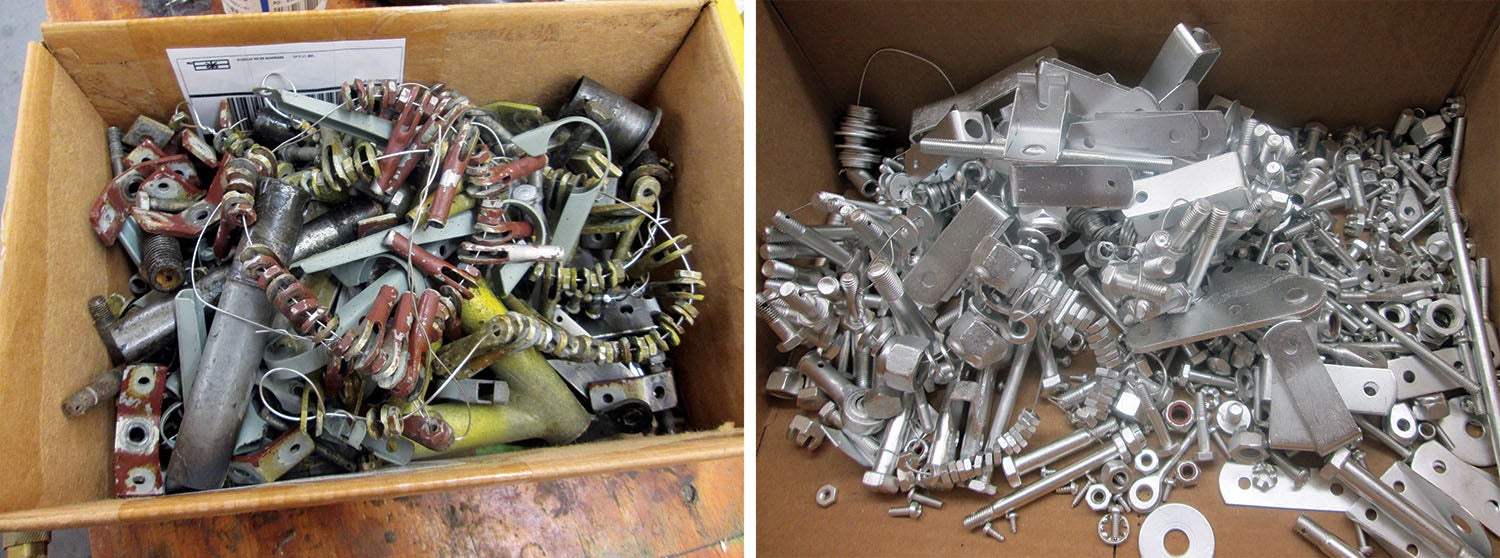
If we try to shortcut this phase, we end up shortchanging the entire project. Unless you are building a brand new airplane and covering it, you can count on some repair work to the understructure on most re-coverings.
Tear the cover off your project knowing that it’s going to be a big project. Major aircraft restorers in this country charge $35K for a basic aircraft, such as a Champ, for a reason. It’s a lot of work but, more importantly, the professionals know that they will find work in the structure underneath. With quality cover jobs lasting 20–30 years or more, it only makes sense to get the frame and attached components returned to like-new condition. We’ve seen airplanes come in for cover jobs that were ready to fall apart underneath the fabric. Don’t let this be your airplane.
The Details
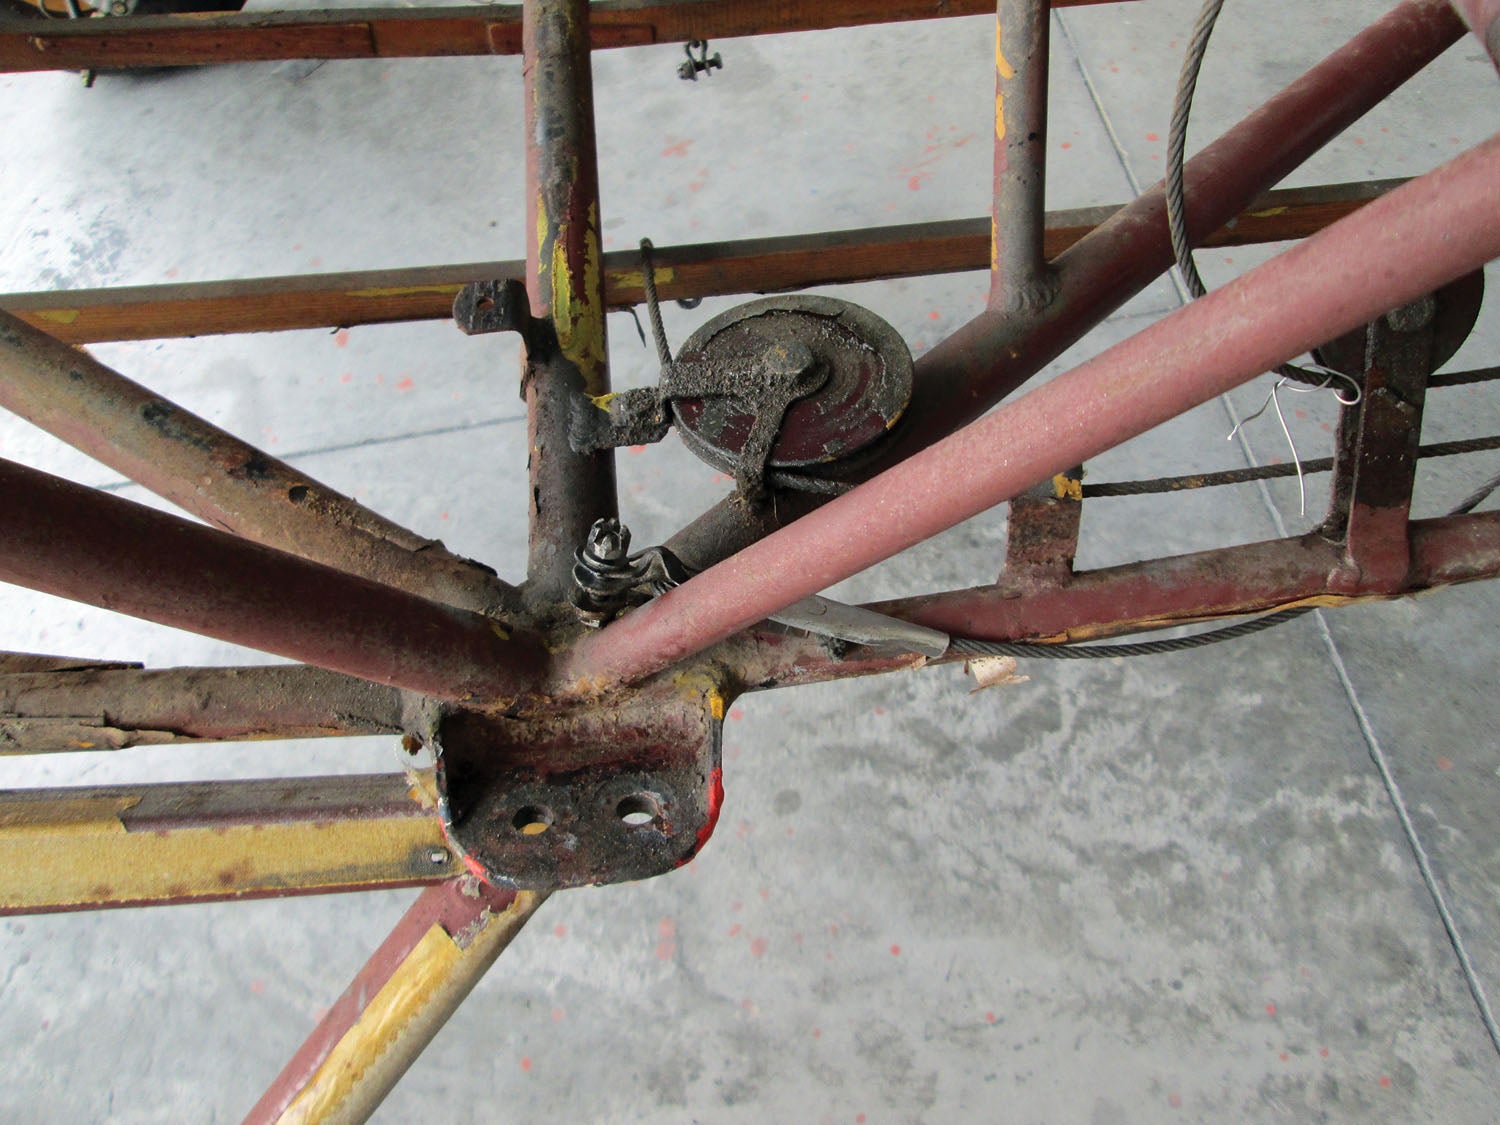
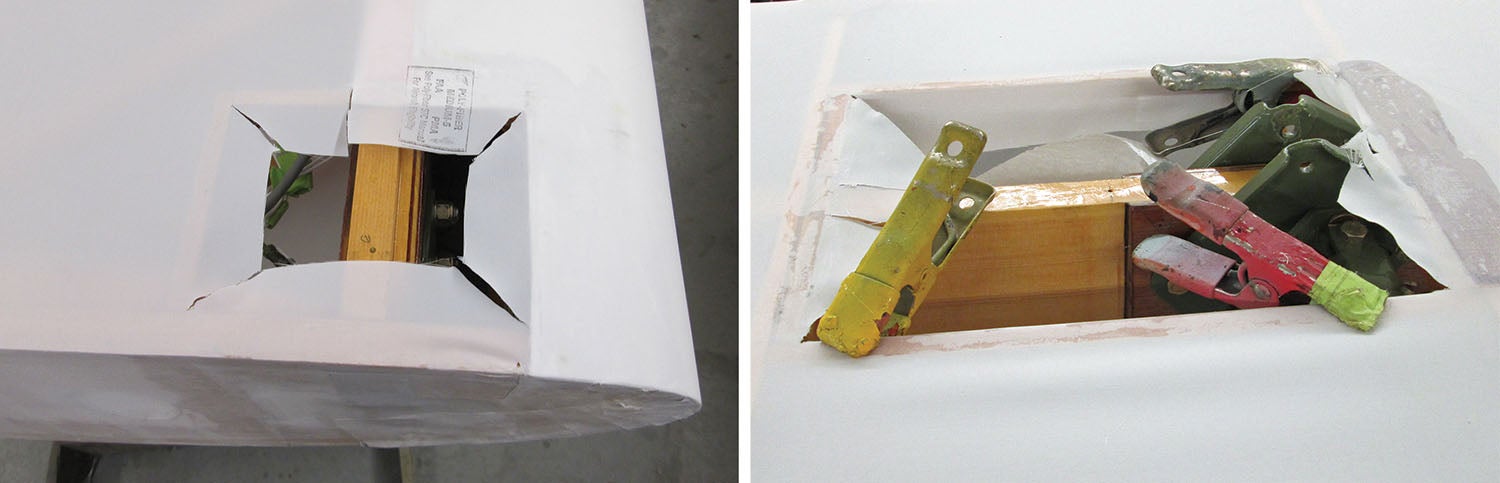
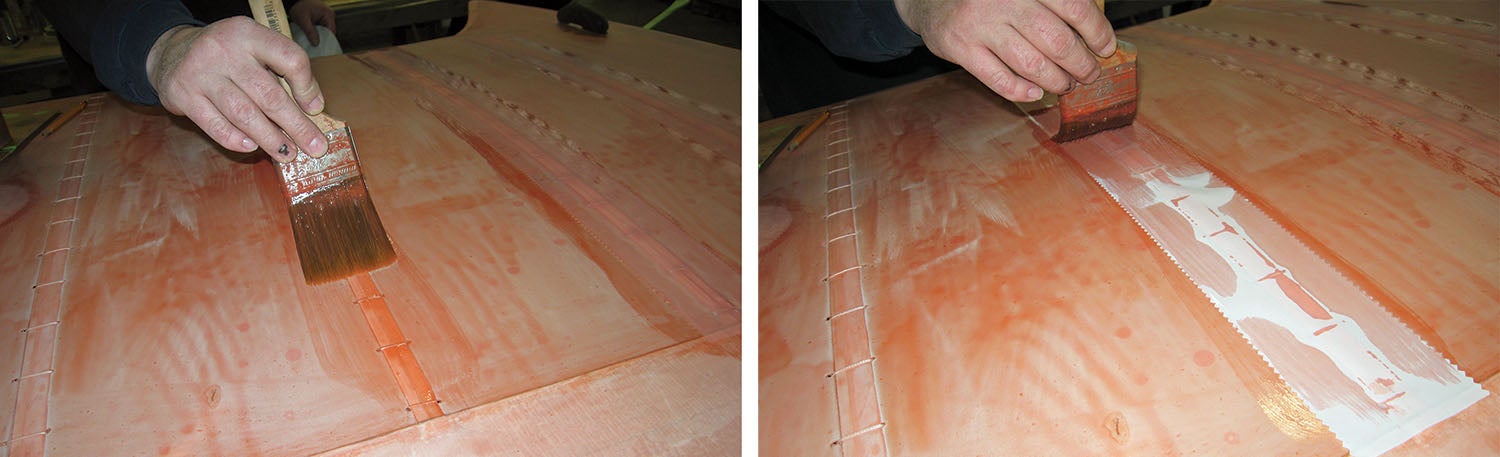
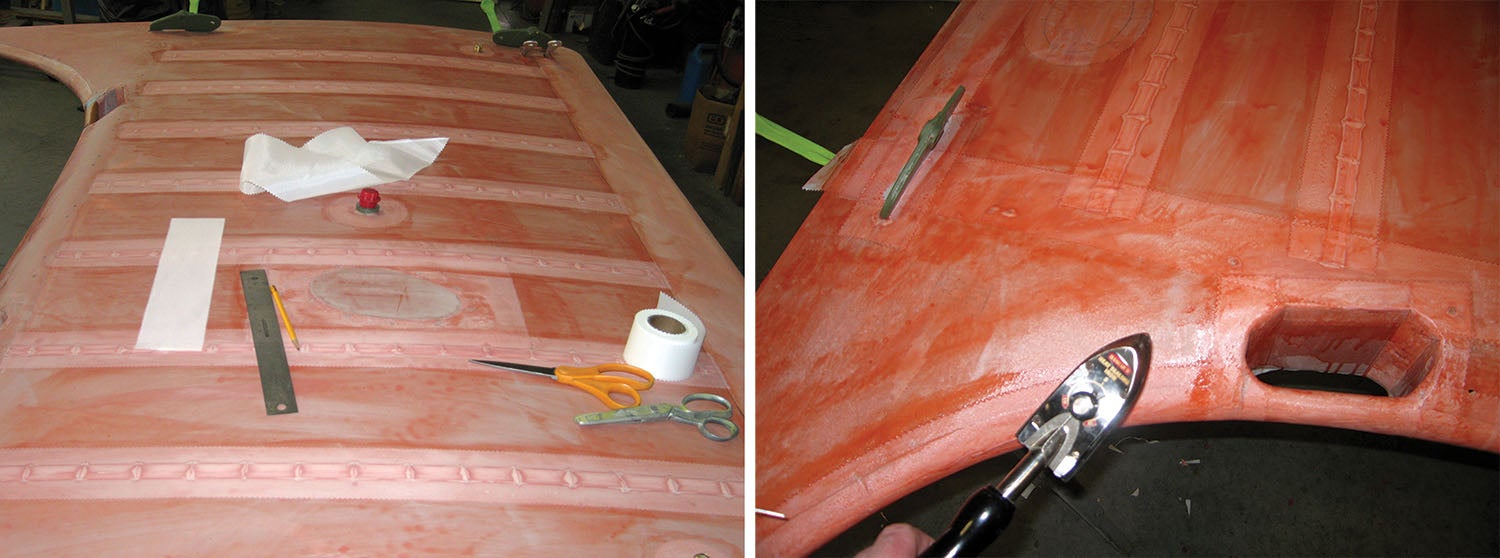
Before the tear off, take detailed photos of where the drain grommets are, where the inspection plates are, and where cable guides and other features are—and how they are handled as they come through the covering. You can even use the old fabric panels as a template if you tear it off in large sections.
Be sure to remove all of the fasteners and/or stitching before you start taking the fabric off. Take the time to find every single one. You can drill out rib rivets. Use a sharp utility knife to remove fabric, being careful not to damage the understructure. Take your time and take more pictures than you think you need. Keep a notebook with things you think of while you disassemble everything. Attach labels to parts. You’ll be glad you did later.
Once the fabric tear-off is complete, identify corrosion. Take pictures of the areas you’re going to repair for a before- and-after contrast to go in your eventual presentation notebook. Remember that one of the quality criteria the judges consider is, is the airplane equal to or better than a new aircraft? If the answer is yes, then you’ve got an excellent chance of getting attention. The way to do this is to assume you’re going to produce a cover job that looks even better than professionals in a factory could create.
If you’re building a homebuilt and the cover job is fresh and new, you won’t have to worry about the repair advice here, but you might need it later if you need to re-cover.

After repairs, get the structure as clean as you can and prime against corrosion. Epoxy primers are tough, long lasting and compatible with nearly all covering systems. Use the primer that is approved for the system you are using; most of them will also go nicely over existing epoxy and varnish. If you use the one-part spar varnish from the hardware store, the fabric cement will lift it…destroying all your hard work getting the frame ready.
Preparation is a great time to get intimately familiar with the instruction manual for your covering system. It is very specific on exactly what materials to use and how to use them. The reason that “preparation” is the number one mistake area is because people wing it. Don’t!
Now look for dents and imperfections. While these areas may not look bad now, once the covering is on, they will attract a critical eye as soon as you hang the “judge me” tag on the airplane. Use an epoxy-based filler—not Bondo—for imperfections. SuperFil works great.
If you’re conducting a restoration, consider replacing or rebuilding wings if the damage is extensive. While it indeed is a lot of work, the smooth lines and structure for a show plane finish will be there. It will also raise the resale value of the airplane.
2. We haven’t made the decision about what covering system to use, so we mix system components.
Before the job begins, determine what system you’re going to use. What is on the airplane now? You can look in the logbook, and you can often tell by looking inside the airplane at the fabric—find the Poly-Fiber or Ceconite stamp. The fabric itself is identical in both systems, but the chemicals you will use for the coatings is different.
My advice in this article is for the Poly-Fiber system because across antique, classic, and many Experimental aircraft it is the most popular. Some older airplanes use the Ceconite system. I personally don’t like Ceconite because it continues to shrink very slowly over its lifetime, and it is more flammable than the vinyl-based materials used in Poly-Fiber. There is no reason why you can’t substitute the Poly-Fiber system for the Ceconite system in the eyes of the judges. If you are showing a certified airplane, the judges will expect you to use a system with an STC. If you’re covering a homebuilt then you have the latitude to do what you wish, and there are a lot of choices. Air Tech, Superflite, Stewart and Oratex are a few.
The Details
Early in the manual for most of these systems you will see bold or highlighted wording that tells you the system instructions must be followed to the letter if you’re covering a certified aircraft. Why worry about it if you’re building an Experimental? Because the ground doesn’t know if your airplane is certified or Experimental; it can smack you either way. The reason we follow the system rules is to maintain airworthiness.
Get a copy of the manual—they are all available online. Make sure you have the latest edition. Then spend time reading it until you feel like you could instruct the class.
3. We decide to use a heat gun to save time.
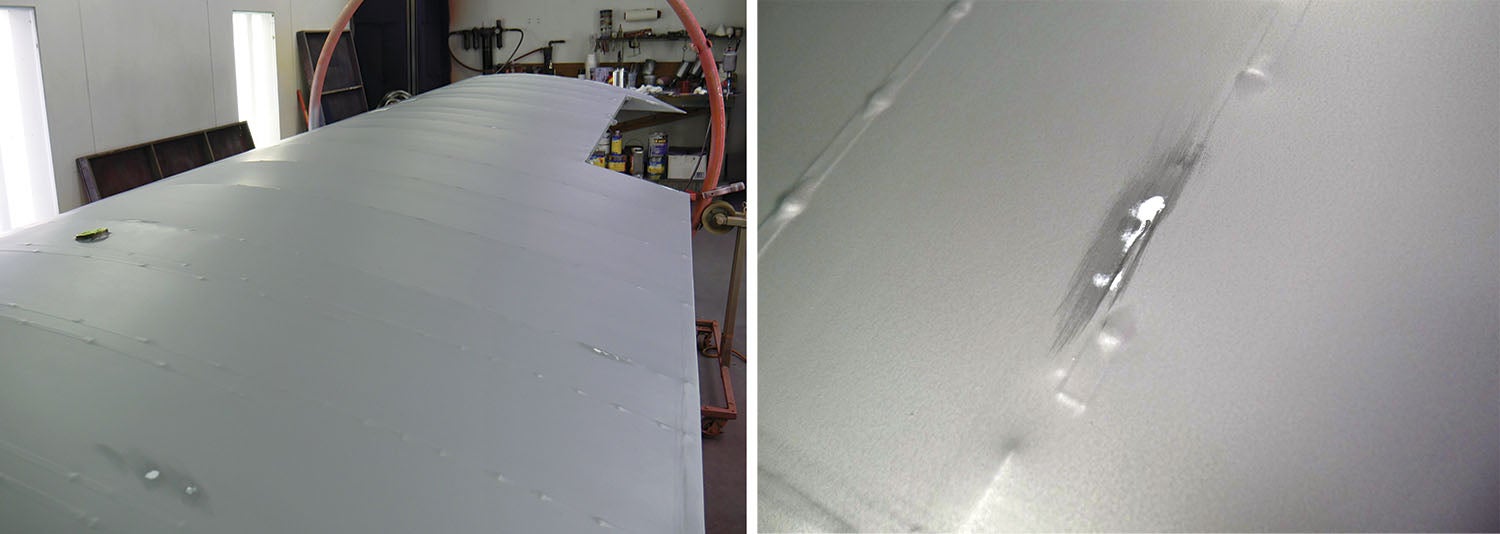
OK, I know you are laughing. Who would do this? When I made this list of mistakes, I thought about this one. All of the manuals and all of the instructions shout out not to use a heat gun to shrink fabric. But the shocking truth is that we see it. And we have seen it a lot. We have even seen it on beautiful antique and classic fabric aircraft. It shows up as panels that appear loose; panels that are overly tight, even deforming structure; tapes that have lifted up; and wavy patterns in the finish.
The chemistry and science of this is that you just can’t get a consistent fabric shrink with the right tension without a precise two-stage shrinkage process. Polyester fabric will shrink 5% at 250°F and 10% at 350°F. After 350°, fabric reverses direction and gets looser. Permanently and irrevocably looser.
The Details
Don’t borrow your mother’s iron. Go buy a good iron, without an automatic shutoff feature, with at least 1200 watts of power for consistency and a non-stick soleplate. Also buy a 165-watt “baby iron,” or mini craft iron. Use the calibration technique in the manual for the system you are using and double-check it. If the iron wanders from the set temperature more than 5° or is showing inconsistencies, get a better one. This might be the most important tool in your fabric covering kit.
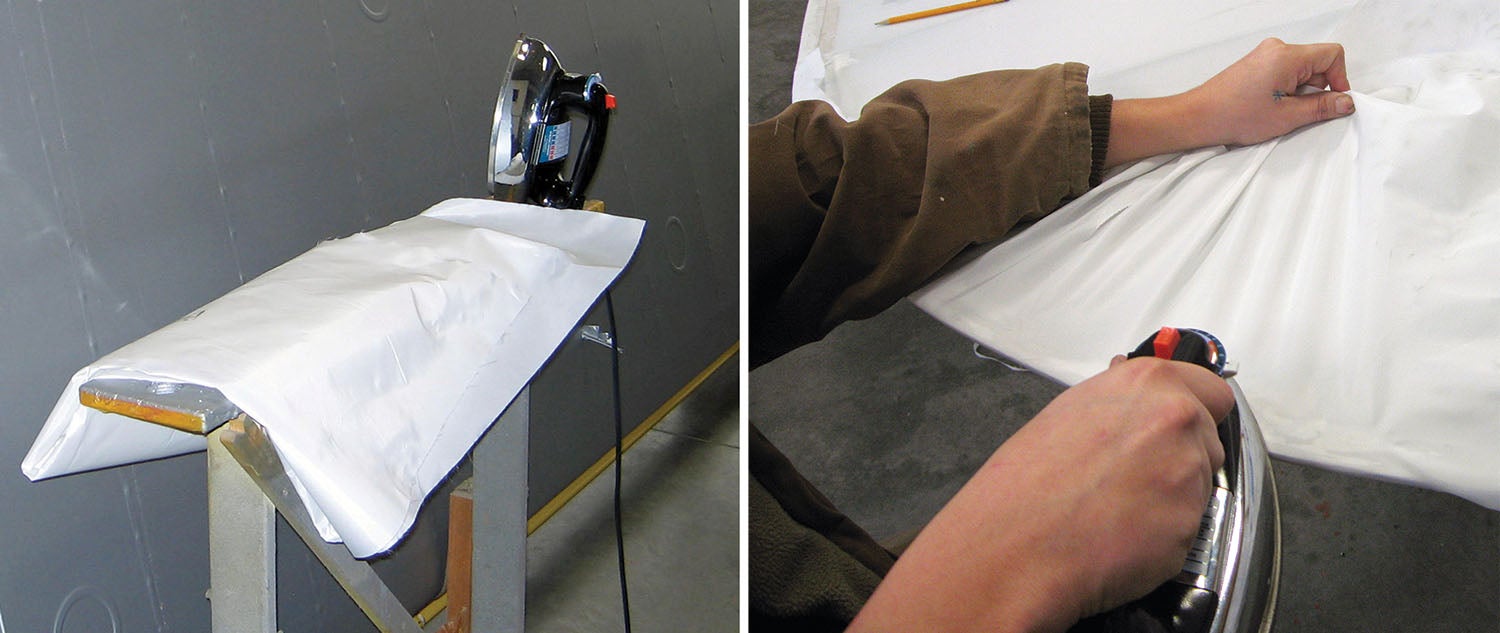
The idea is to be precise and careful at the same time. As you follow the directions in the manual, when you finish shrinking each bay, make a pencil check mark. As simple as this sounds, you are going to forget if you did it or not. The phone rings…you put the iron down…
Use the procedure in the manual and take a look at the fabric covering chapter in the Aviation Technician Handbook, which has outstanding color graphics for procedures. It is listed with resources at the end of this article.
Note: Not using a heat gun does not apply to Oratex. This is a system that arrives coated and colored, and they do specify use of a heat gun.

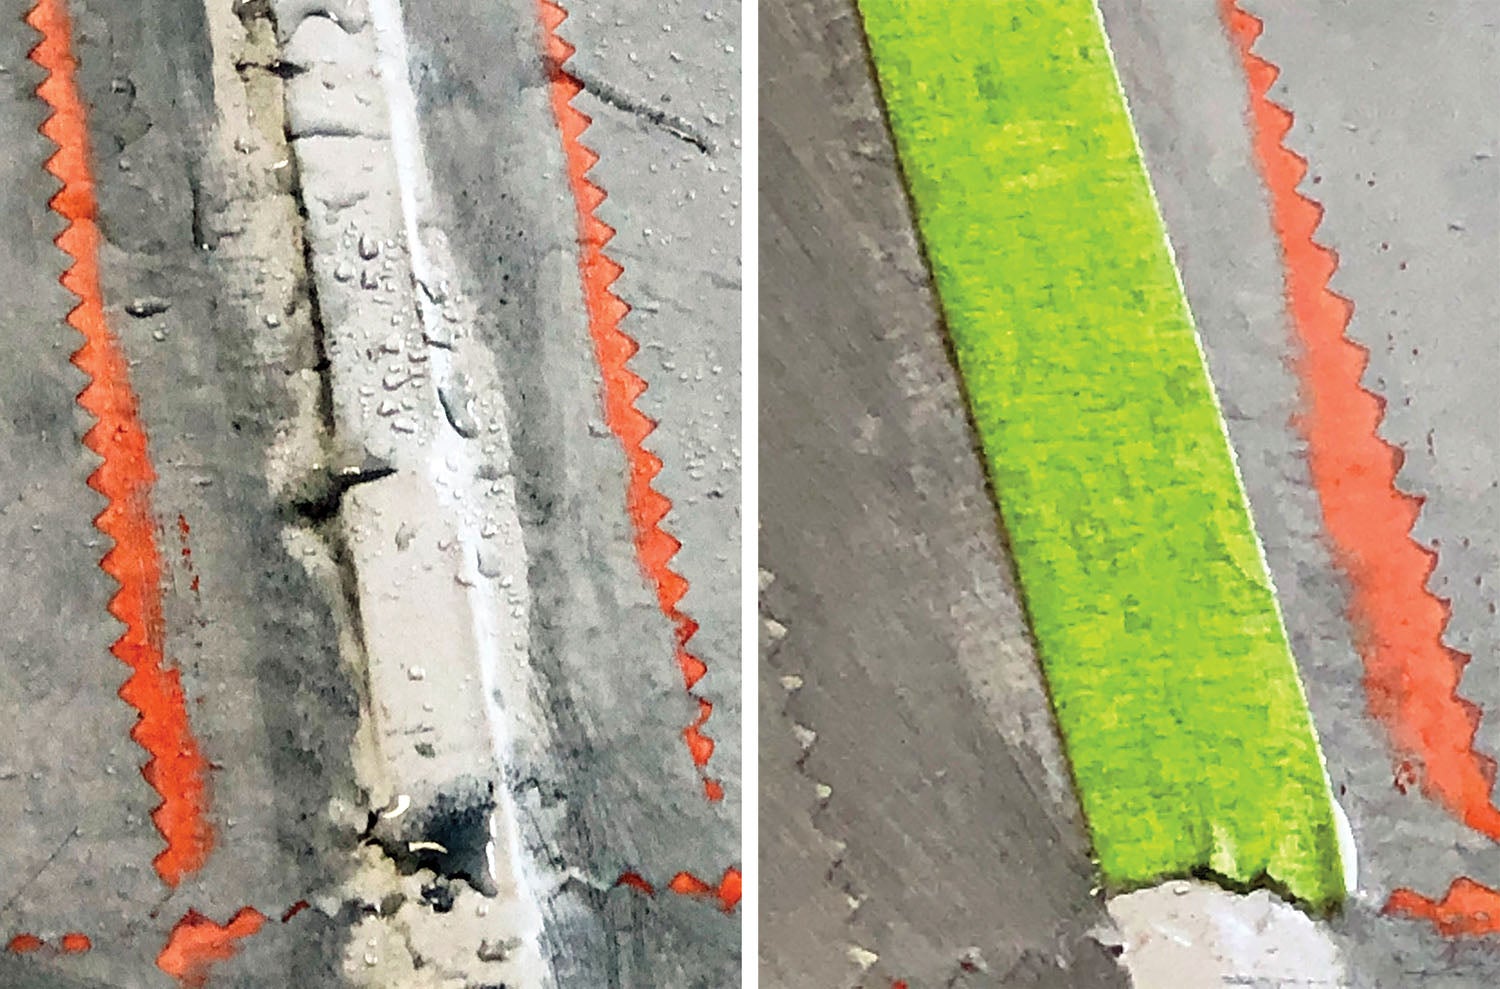
4. Reinforcing tapes missing, in the wrong places, or the wrong tapes used.
This happens when someone stops reading the directions and decides to guess. There’s a reason for reinforcing tapes. With fabric covering systems as light as we can make them, we also expect durability. The only way we’ll get this strength efficiency is with reinforcing tapes.
Reinforcing tape is an adhesive-backed polyester twill material that is stuck to the fabric over the rib caps before rib lacing or using other attachment methods. It reinforces the fabric so that rib laces, screws or rivets don’t rip through the fabric when attachments are installed and rib stitching is tightened.
The Details
Follow instructions exactly for where the tapes are supposed to go on your particular aircraft. We’ve seen people put the tapes over the rib stitching or rivets. This will take you out of the show category in an instant and register as a failure.
Don’t substitute materials, even if you think it will be stronger. Use the exact width that is specified.
Be as neat as you can when cutting the ends since they will be visible later.
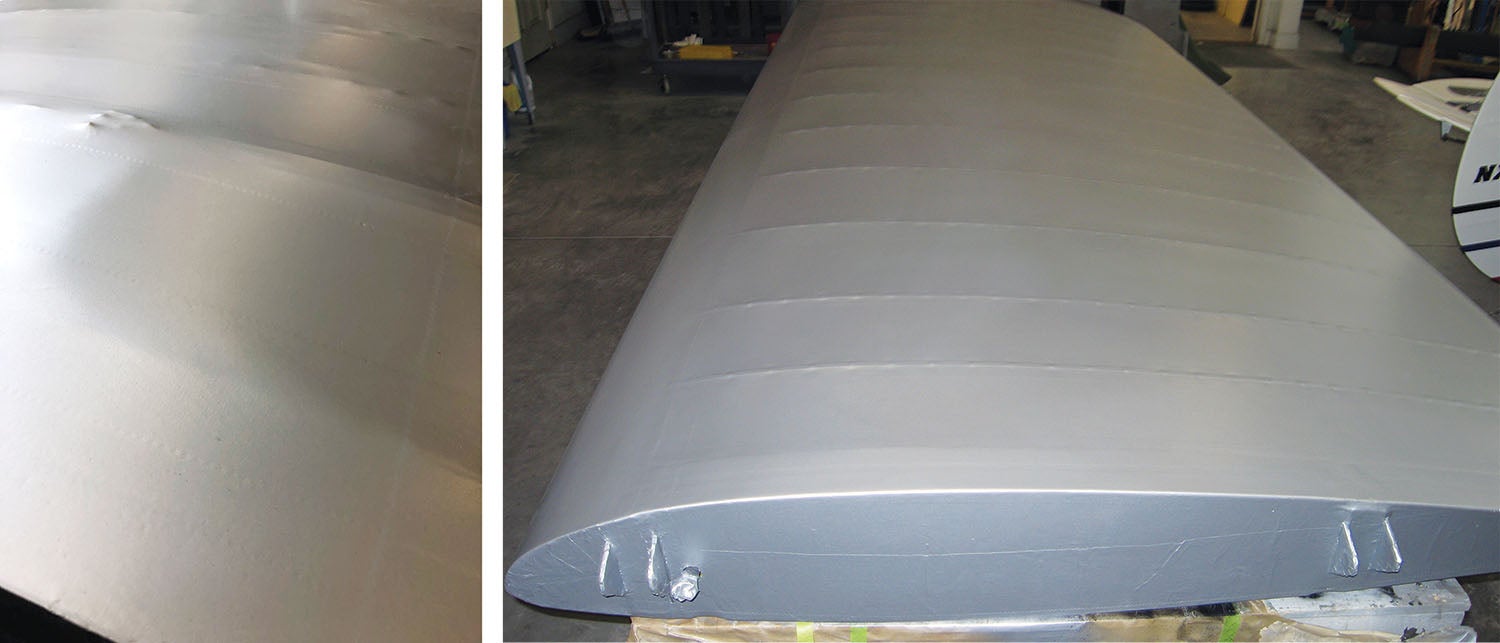
5. Inadequate sanding or overzealous sanding.
The first time I was taught how to sand the coats of Poly-Spray (silver coat), sanding paper and water hose in hand, I thought, “How hard could this be?” A little later, my building mentor came up to inspect my work and shook his head with a frown. He showed me the areas where I’d taken the finish completely off and made little fuzz balls of the fabric in numerous areas. In these tiny areas I had sanded through the delicate coatings of silver and right into the fabric without realizing it.
“I didn’t try to do that, you know,” I said sheepishly.
“No one ever does. It’s technique and attention. A lot of attention,” he replied. “That turns into practice, and practice turns into experience.”
Craftspeople who can sand just the right amount, hour after hour, are sought after and greatly admired. It is one tough job, this simple job of sanding. But even the most careful of us will end up sanding through to a section of the fabric. This will become apparent immediately as you feel resistance under your hand and you notice fuzz. Now what do you do?

The Details
First, prevent problems in the first place by taking extra care in your sanding technique. All will go well until you come to a bump, a rivet, a clip or any other hidden protrusion that causes the pressure from your hand over it to shoot up. You don’t have to be as wary on the flats, but keep a lookout for surprises.
Oops! Stop and look. After this round of sanding, let everything dry and then use some Poly-Spray (silver) over the bare spots. The silver coats have aluminum solids embedded in them and protect the fabric from ultraviolet light. UV light will age fabric in a hurry, so we want to make sure the silver coats are adequate.
A trick you can use is to place a high visibility, good-quality masking tape over protrusions. It will stop you from accidentally hitting the high spots.
One welcome feature of the Poly-Fiber system is that you can eliminate much of this sanding by using heat smoothing before the Poly-Spray coatings. In fact, the more heat smoothing you can do ahead of Poly-Spray, the less work you will have. Use the small iron set at 225° and gently run it over the edges of the pinked tapes, any drips and on bubbles. Over time you will develop the feel for exactly how much pressure to apply. When you run your hand over the pinked edges, you’ll be able to immediately tell when you’re done. This will reduce the chances of you sanding through to the tapes later, especially in these areas.
After the pinked-edge tapes have been applied and are dry, apply another coat of Poly-Brush on the tapes. When this coat is dry, use the small hobby iron to smooth the pinked edges. Two more coats of Poly-Brush are then sprayed on prior to silver.
If you are using a non-vinyl system, then you’ll be limited in how much you can smooth surfaces ahead of UV coatings. Sanding will be more critical and take longer on other systems. The key is following the instructions to the letter for the system you are using.
Be careful to calibrate your small iron; running it up over 225° for the blending will ruin your work as the edges will suddenly expand and curl from damage. There’s no going back on this one.
What if you’ve got the parts in the paint booth ready to go and discover a sand-through you missed? This isn’t in the manual, so only use it for tiny areas that you discover. Polyester based glazing putty—a tiny dab and smoothing—let dry and sand lightly—will cover the misdeed.
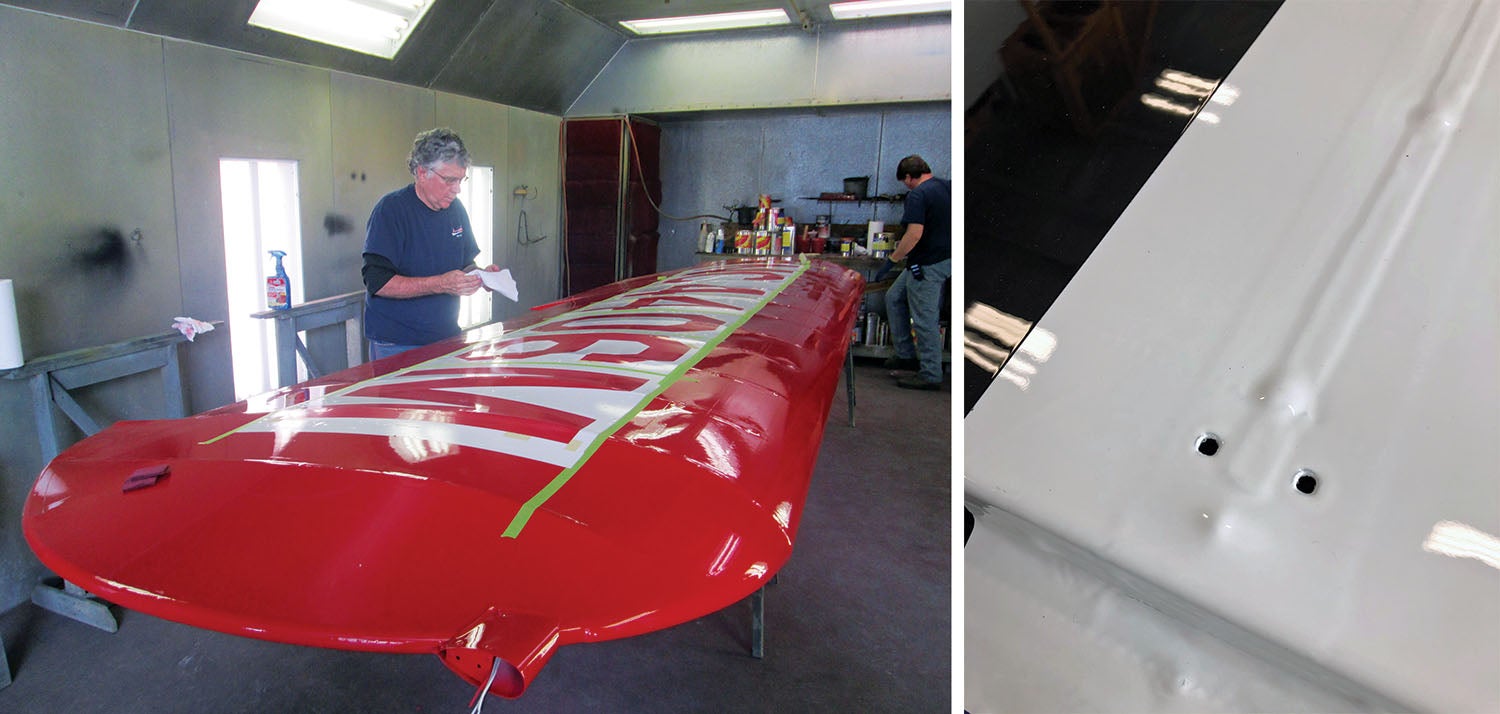
6. Protected finish painting.
That final coat of paint is what people will judge your airplane by, even though you could have made every possible shortcut in the assembly and the airplane not even be airworthy—if it looks fabulous everyone will think it is fabulous. Since in this article we’ve decided that you’re going to do everything right, with an extra eye for detail, then the paint is extra critical.
The Details
Give up that idea of painting the airplane in your driveway; you might even want to give up the idea of painting it inside your garage with plastic curtains. The best plan is to find a facility with a real painting booth. Why? Because you don’t want any contamination in the paint. Fresh paint is a magnet for dust and dirt. Judges will sight across the finish and see every imperfection. An enclosed booth with fans will maintain the heat and humidity you need to get the best finish. If you use your garage, you should plan on lots of protection from dust and a controlled environment for heat and humidity.
If this is your very first cover project, and you really want a top-notch paint job, consider paying a professional to do the final paint. This decision depends on how much you want to navigate a learning curve on painting. If you want an award-level paint finish, you’ll need to invest the time in learning from the pros or having a pro do the job. Even the master aircraft builder of many airplanes, Paul Dye, paid a pro to decorate his lovely Sonex jet.
Make sure you use a paint designed for fabric with a flexing agent in it. The manuals go into great detail on what paint products are best and what characteristics they will display. Automotive paints that you love should not be used on fabric because they are likely to crack. Make your choices using the guides. You’ll be able to find a color and surface gloss you love.
Good News
Back to Stan and Karen. It’s a good news story. They sold their Eagle and restored a 1973 Citabria 7KCAB. They found that they really enjoyed the restoration work every bit as much as the flying. They researched the judging standards and talked to their friend John, who spent 10 years as a judge. The year after the restoration, they attended their first fly-in with the airplane and won the top award.


Lisa – nice article, great detail! Note that Stewart Systems uses Superflite fabrics and their coatings are waterborne not water based, big difference. No nasty solvents to deal with. Fabric cement is heat set, can be used indoors without a respirator.
Thanks Lee! Good points.
Outstanding article. Love the way Lisa writes. Tight, to the point, humorous and organized.
This article resonates.
As young aerospace engineers Larry and I really wanted an airplane. In 1970, we found an out-of-license PA-22-108 (Colt) in a garage. In pieces.. Engine was past due for a major. Fabric had failed the punch test.. We loaded it all on a 20′ flat- bed trailer and relocated to my garage. We ‘farmed’ the engine out to Northrop Institute of Technology for a class project in major overhauls. In the meantime we self- taught the Stits Poly Fibre system.. We located a hangar at San Fernando ‘airport’ when it was time to attach the wings. As noted,, all painting was in the hangar. After 14 months of nights and weekends we had an airworthy ship which we nicknamed “The Cloth Moth’. N4659Z..
Comments are closed.