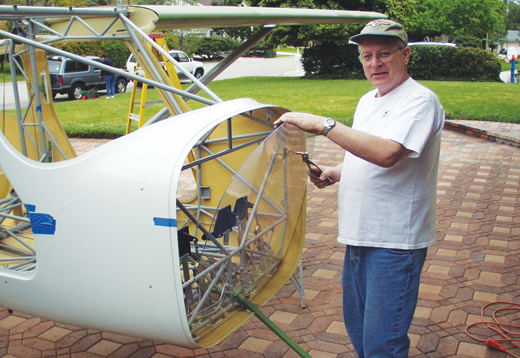
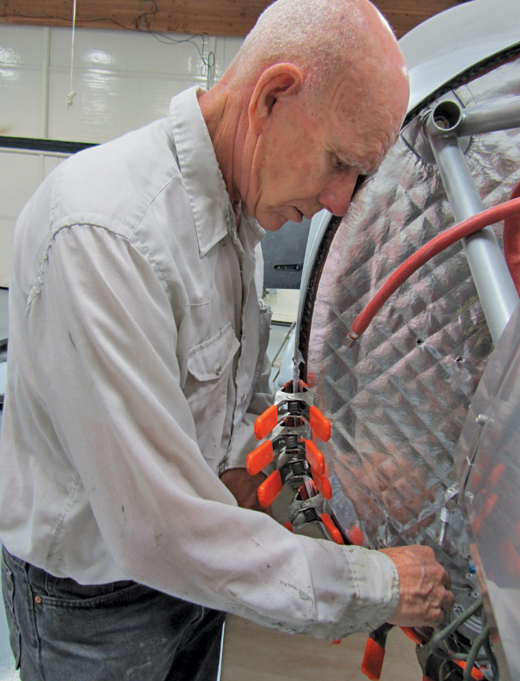
GlaStar builder Ed Zaleski installs an acrylic temporary firewall in preparation for determining the location of final firewall penetrations. Some builders find this technique helpful when their kit does not include firewall layout instructions.
Firewall-forward construction begins with a firewall. If you are working from a kit, the firewall may already be precut for you. At the very least, the material for the firewall is likely included, as is a plan or pattern to use to cut it out to size. Your kit may even include suggestions for laying out the various items that will pass through or attach to the firewall. If you are building from plans, there are a few more decisions you must make, such as how to lay it out, the material and thickness to be used and how to pass things through or secure them to the firewall. We’ll look at each of these in turn.
Firewall Materials
Most kits come with stainless-steel firewalls or material to make one, and plans builders will typically use the same material. The most popular stainless-steel alloy is 304, but 301 half-hard will also work. The 301 is about twice as strong as 304, and as a result is harder to cut, thus making 304 the preferred alloy. The minimum thickness for a stainless-steel firewall is 0.016 inches. Cutting and drilling stainless steel requires patience. Slow bit or blade speeds and higher pressures are the rule, as compared to ordinary steel or aluminum. Trying to push a drill bit or saw blade through stainless too quickly will just result in a burnt tool and little progress. Lubricating the cut with oil or cutting fluid also helps. Go half as fast, and you’ll get more done.
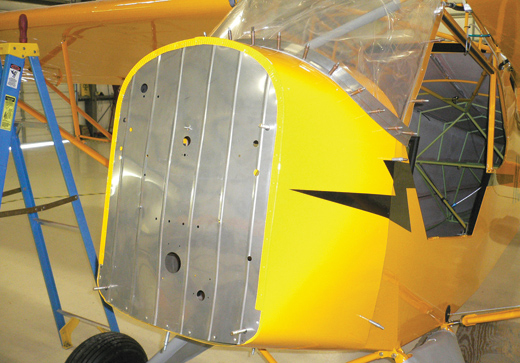
Ribs were rolled into this stainless-steel firewall to stiffen it up and prevent “oil canning.”
Riveting stainless-steel firewalls should be done with solid stainless steel, Monel rivets or stainless-steel CherryMAX blind rivets, with Monel being the most common choice. Small nut plates are often installed with 3/32-inch aluminum AN aircraft rivets, but aluminum rivets are unsuitable for securing major firewall components such as firewall flanges, seams or patches. The firewall must be able to contain a fire in the engine compartment, and the melting temperature of aluminum rivets is simply too low to fulfill that role. Hardware-store stainless-steel pop rivets are also a poor choice because the stems are not reliably secure and could fall out, leaving a hole through which hot gasses could pass.
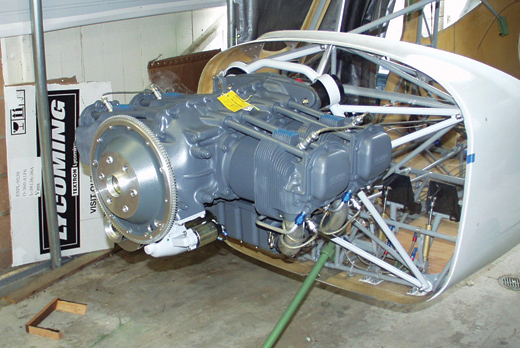
Here’s a GlaStar under construction with a transparent firewall in place, ready to begin the process of positioning items on the firewall.
Stainless steel is the most common material for firewalls, but there are other choices available. Mild, chrome-moly or galvanized steel can be used. These require a rust-preventative coating, but with galvanized steel that is included as part of the material. Mild or chrome-moly steel require painting on both sides. The minimum thickness for galvanized steel is 26 gauge. Plain (not galvanized) sheet steel of at least 26 gauge can also be used; it has a thickness of 0.018 inches.
When cutting sheet metal, be sure to wear gloves and deburr parts as you go. The sharp edges left after cutting are particularly nasty and hazardous to your hands. If you do not deburr parts after cutting them, you also create a potential future hazard.
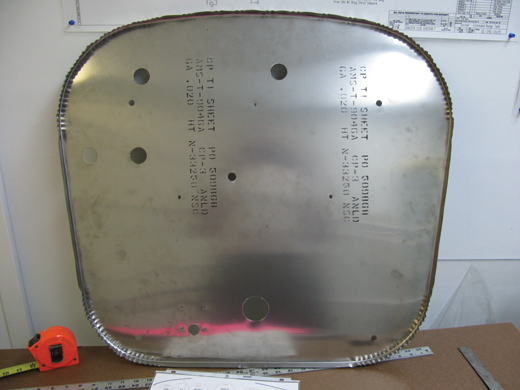
This Super Cub firewall by F. Atlee Dodge is made of commercial pure titanium and saves about 2 pounds compared to a stainless-steel firewall.
Exotic Lands
For builders who are obsessed with saving weight and have the room in their budget, titanium is an alternative worth considering. In a typical airplane project, a titanium firewall can save about 2 pounds compared to stainless. A scrap piece of titanium large enough to make a firewall will cost about $200 plus shipping. Commercial pure titanium is by far the best choice. It is much easier to cut and bend than any of the titanium alloys, such as 6AL-4V. However, it may not be as readily available as scrap. Look for a thickness of 0.016 to 0.020 inches.
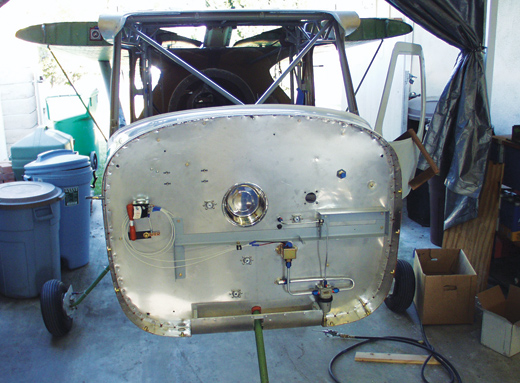
This GlaStar firewall shows eyeball fittings for cables, added support for an oil cooler and a “dog bowl” indentation to allow clearance for a prop governor.
Like stainless steel, titanium is more difficult to cut and fabricate, but not in exactly the same way. Titanium is prone to galling and sticking to tools, so it is important to use sharp tools and slow cutting speeds. It also dissipates heat poorly, so it is important to use sufficient cutting fluid to cool the part while drilling or cutting. If you can get titanium solid rivets, that would be best, but Monel rivets will work fine and are much easier to find. If you think that titanium is just too exotic to even consider, you might be interested to know that F. Atlee Dodge is currently selling pure titanium firewalls for Piper PA-18 Super Cubs (for an extra $220 over the stainless-steel price). See Table A (below) for a comparison of firewall materials.
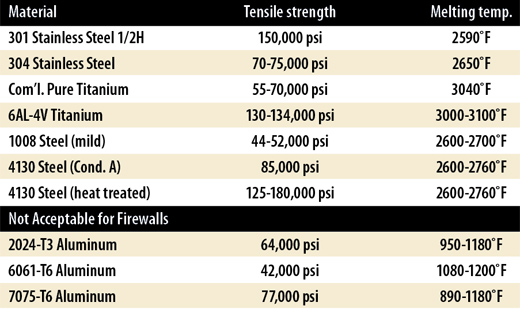
Table A.
Maintaining the Integrity of the Firewall
It doesn’t make much sense to fabricate a nice firewall and then punch a bunch of holes in it, but that is what you have to do to get wires, control cables and cabin heat from one side of the firewall to the other. There are, however, better and worse ways to go about penetrating the firewall while still maintaining its integrity.
Any airplane with a constant-speed prop will have at least three control cables penetrating the firewall: throttle, prop and mixture. If you have a carburetor, you can add a carburetor heat cable to that list. Some airplanes will run all of these cables together and push them through one hole with a rubber grommet, goop it up with red RTV and call it good. This may get you through your initial airworthiness inspection, but if a fire ever got going in the area of that penetration, you will have some pretty toasty feet in short order. That rubber grommet will last about 30 seconds when exposed to direct flames, as will the red RTV, which is only rated to 500° F for continuous exposure. Using a 2000° F fire-rated sealant will help, but there is an even better solution. An Eyeball Firewall Assembly, available from Aircraft Spruce & Specialty and other vendors, makes a tight seal around any cable penetration, even one at an angle of up to 50°. The steel ones will last as long as the rest of the firewall in a fire and make for a neat, professional installation. This is not the lowest-cost solution, but it is the safest.
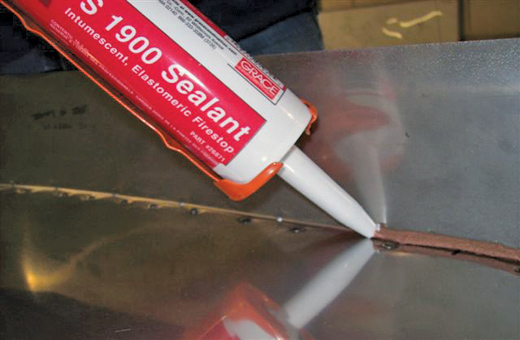
All firewall seams and gaps should be filled with a caulking material rated for 2000° F.
An alternative is the Firewall Penetration Kit from Plane Innovations which is similar to a system used by Glasair Aviation in its Two Weeks to Taxi program. In this system, a stainless-steel tube with a flange is riveted to the firewall. Run the wires or cables through the tube and wrap it in Aeroquip Firesleeve. Seal everything with Flamesafe sealant.
Wires run through holes with grommets need their own protection. Most aircraft supply retailers sell firewall grommet shields that minimize the exposure of the rubber grommets to any potential fire. These are recommended where rubber grommets have to be used.
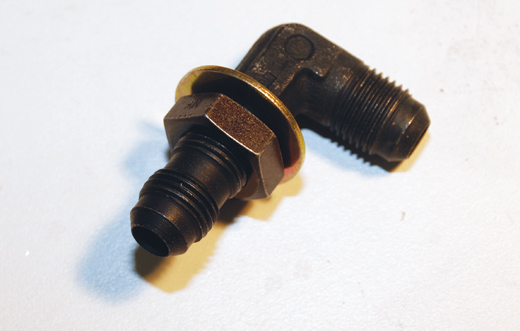
This is a steel AN833-6 bulkhead 90° fitting with an AN924-6 nut and an AN960-916 washer. These are well suited for running a fuel line through a firewall.
Cannon in D
Some people use cannon plugs to bring wires through the firewall, and they make for a clean-looking installation, but a large plastic cannon plug is almost as bad as having an open hole in your firewall. Any serious heat will quickly melt a plastic fitting. Realize that penetrations like this mean coming to some sort of compromise, and try to minimize the size and number of these holes. Metallic cannon plug bodies and housings are available, but they’re comparatively heavy and expensive. (Don’t forget that unfilled sockets in a cannon plug are like open holes; for best results, populate every socket in the connector, even if the pin is unused.)
Cabin-heat valves are the biggest offenders of firewall integrity on many airplanes. In most cases, an aluminum tube with a 2-inch diameter punches a big hole through the firewall, offering almost no protection from an engine fire. Luckily, Aircraft Spruce now has an all-stainless-steel cabin heat box that should go a long way toward solving this problem. This is something every kit manufacturer and airplane builder should carefully consider. It would be difficult to land an airplane with intense heat pouring through the hole where an aluminum cabin heat box used to be.
Fuel lines are particularly hazardous firewall penetrations. The risk they pose can be minimized by using steel bulkhead fittings, such as an AN832 straight bulkhead union or an AN833 bulkhead elbow. Either of these fittings can be secured with an AN924 nut, also in steel. All fuel lines on the engine side of the firewall should be protected with Aeroquip Firesleeve or a similar product. Running an aluminum fuel line through a rubber grommet in a hole in the firewall does not represent good practice and should be avoided, even though this has been done on some certified airplanes.
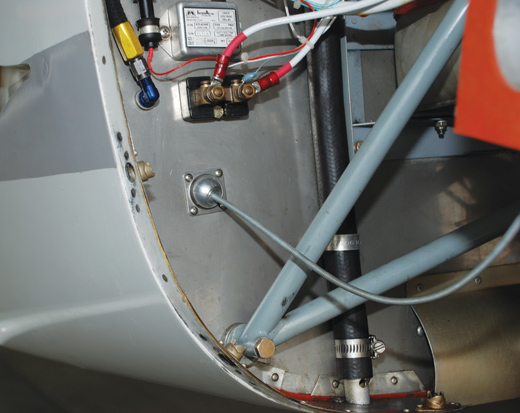
Eyeball firewall fittings provide maximum fire protection at cable penetrations and allow the cable to pass through at angles of up to 50°.
Laying Out Firewall Penetrations
Some kits will have detailed instructions for laying out firewall penetrations, while others may come with the required holes pre-punched in the firewall. Plansbuilt projects and some kits may not have any information about engine compartment layout and firewall penetrations. The original GlaStar kits came with an instruction for the engine installation that simply said, “Install everything forward of the firewall.” If you find yourself in a similar situation, you will need a strategy for deciding what to put where.
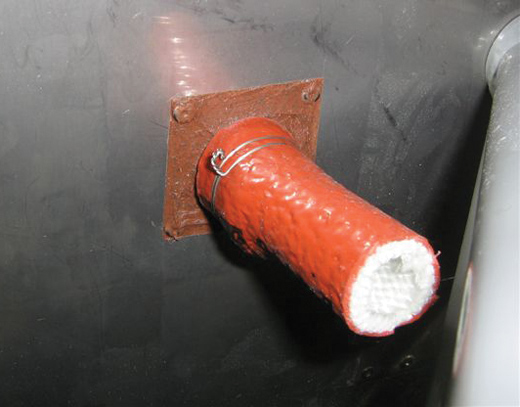
Glasair Aviation uses a stainless-steel sleeve with a piece of Aeroquip Firesleeve attached to route cables through the Sportsman firewall. After the cables or wires are run, the sleeve is filled with Flamesafe FS 1900 sealant.
The big problem with laying out a firewall is that you can’t see through the firewall to tell where structural supports are or where controls mount on the cabin end and attach to the engine on the other end. Still, there are possible solutions. One is that you can find someone with a similar airplane and engine installation and copy what they did (assuming they did it well). This is where builder support groups can come in handy. Or you can make a pattern of the structure hidden by the firewall and transfer it to the engine side, where it can more easily be seen. Another idea that works well is to make a temporary firewall out of eighth-inch acrylic sheet. You can punch holes in this until you are completely happy with the location of everything, and then use it as a pattern to make holes in the permanent firewall. The downside to this method is that you will have to remove the engine and mount from the airplane to take out the temporary firewall, but the trade-off may be worth it.
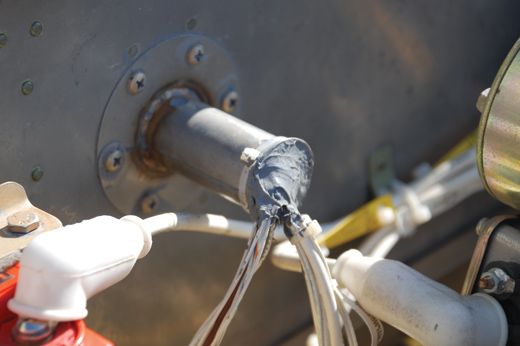
The Cessna factory uses a firewall tube filled with flame-resistant caulking for the wire penetration in the new 162 Skycatcher.
Most people will run wires high through the firewall. Oil coolers must be mounted where they have good support and where air can flow in and out of them easily. The battery is bulky, so it will usually go on the side opposite the oil cooler, where there is more room, or outside of the engine compartment, as dictated by weight-and-balance considerations. The gascolator will go low and typically on the left side, so that it is easy to drain during preflight. Control cables will usually come though the firewall low and in the center, because that is where they need to be to attach to the engine. The cabin-heat valve must be high enough to avoid interfering with the rudder pedals. It’s all logical when you think about it, but it can be frustrating to make everything fit where you can still get to it for maintenance later. That’s why a temporary firewall makes a lot of sense.
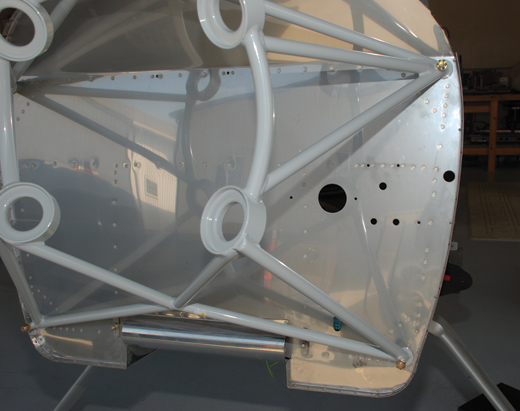
This RV-8 came with a prefabricated firewall with major holes already in place as part of the quickbuild option.
Attaching Items to the Firewall
A thin metal firewall can support lightweight items attached to it fairly well, especially if a doubler is used to give the firewall extra strength. Some items that can be supported by the firewall include voltage regulators, starter solenoids and gascolators. Items that can’t be supported by the firewall include such things as oil coolers and batteries. These larger items must be supported by structure behind the firewall and bolted to such supports to be adequately secured. If sufficiently sturdy elements are not conveniently located within the airplane’s structure, it may be necessary to span attachment points with a framework of aluminum angle to mount heavier items in places where they will work well with the other objects competing for space in the engine compartment. Such a framework can also be a convenient place to mount items such as oil- and fuel-pressure senders.
When attaching items to the firewall, you have the choice of using nuts and bolts or bolts and nut plates. Nut plates are more work to install initially, but they allow you to remove bolts without an assistant inside the cockpit in the future. While on the subject of nuts and bolts, all nuts used in the engine compartment or on the firewall on either side should be all-metal lock nuts (AN363 or MS21042), not those with nylon inserts (AN364 or AN365), because the heat of the engine could easily soften the nylon inserts in such nuts.
As you construct the firewall for your airplane, always keep in mind what it is intended to do—keep an engine fire out of the cockpit so that you can land the airplane. Keep holes to a minimum and protect them as well as you can. Where necessary, take the extra steps to protect any vulnerable structure behind the firewall, too. Your firewall may never be put to the test, but if it is, you will be glad you took the time to do a good job.
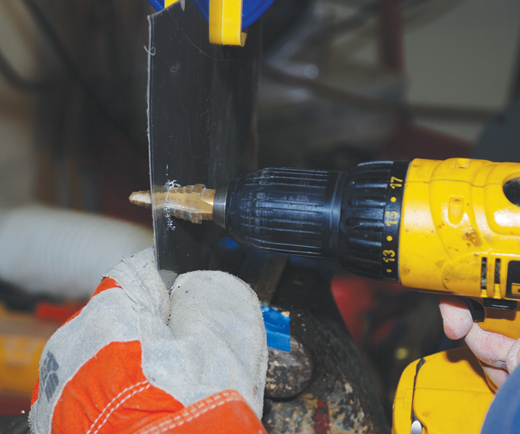
A step drill or Unibit makes easy work of drilling medium-size holes in sheet metal.
Making Holes
Making holes in firewalls is not difficult if the holes are less than 1 inch. Drill a starter hole using a #30 drill and then enlarge it to a quarter-inch or so with a larger drill bit. For larger holes up to an inch, a step bit or Unibit works best. This is much safer and easier than trying to use a conventional drill bit to make a large hole in thin metal. For the cabin heat valve, where a 1-1/2- or 2-inch hole will be required, a chassis punch makes an especially nice hole. Hole saws also work for larger holes, but they do not make as clean a hole, and cheaper ones may not cut through harder alloys well. However, a good hole saw can be used if you are careful and patient. Whenever you drill into sheet metal, be sure to secure the piece being drilled. It is easy for drills to catch on the metal as they try to break through.
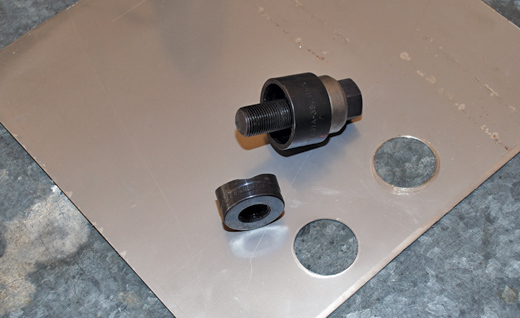
A chassis punch makes a much cleaner hole than a hole saw. Here are the two types of holes side by side, with the chassis punch hole being the lower one. Unfortunately, chassis punches cost considerably more than hole saws.
Firewalls for Composite or Wood Airplanes
A metal firewall from stainless-steel sheet 0.016 inch thick will stop a fire from entering the cockpit, but it will not stop heat from coming through the firewall. So if the firewall is attached to flammable materials such as wood or fiberglass, you need to add another layer of protection to stop the heat from transferring through the firewall and igniting, or at least charring, the rest of the airplane. Wood such as spruce or fir will catch on fire at less than 500° F. Fiberglass material will ignite at 700° to 800° F, depending on the resin used. The backside of a metal firewall can easily reach that temperature in a few minutes during an engine fire.
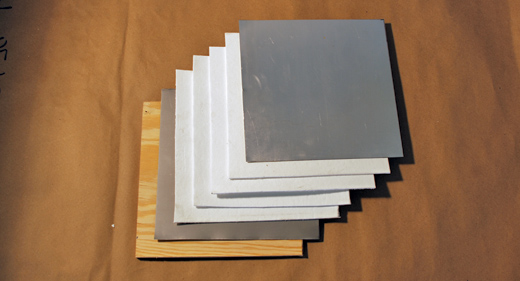
Here is a sample of the buildup of materials needed for the firewall of a wood airplane. The layers: plywood, stainless steel (0.016 inch), four layers of eighth-inch Fiberfrax and an aluminum protective sheet (0.020 inch).
The FAA says that a firewall must withstand 2000° F for 15 minutes. Testing performed by Stoddard Hamilton (the predecessor of Glasair Aviation) revealed that the backside temperature of a stainless-steel firewall reached about 1600° F after 8 minutes, sufficient to ignite the fiberglass airplane structures. Further testing showed that a half-inch layer of Fiberfrax insulation would reduce the backside firewall temperatures to about 130° F, well within safe limits for the fiberglass supporting it. The Fiberfrax material is delicate and will absorb engine oils, so it needs to be protected with a 0.020-inch layer of aluminum on the forward side. In the event of a fire, the protective aluminum would quickly melt away, but the Fiberfrax will do its job of insulating. Some long aluminum pull rivets or #6 screws can hold the Fiberfrax and aluminum sheet in place against the composite structure. The control and wire penetrations should all be protected with fire-rated caulking. These recommendations related to fiberglass structures apply equally to wood.
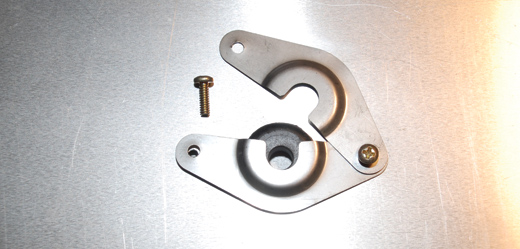
A firewall grommet shield is opened up to show the grommet. Wires with factory-applied connectors often need oversized holes in firewalls. The shield protects the grommet filling in the hole.
Some manufacturers of composite airplane kits now provide pre-made, fire-resistant firewall protection for their customers. Lancair, for example, includes such firewall protection in its kits. If such protection is provided, it is vital that you install it per the manufacturer’s instructions. If it is not provided, you will need to fabricate it yourself.
Wendell Solesbee works on the engine installation in his Lancair Evolution. Note the factory-furnished firewall blanket made to protect the composite structure of the airplane.
The builders of all-metal airplanes can also benefit from a Fiberfrax firewall blanket to prevent excessive heat from entering the cockpit during an engine fire. A thinner quarter-inch layer may provide welcome extra protection for pilot and passengers of metal planes such as RVs, and perhaps help reduce sound levels a bit, too. In an all-metal airplane, the Fiberfrax can be attached to the cabin side of the firewall.
Sound Insulation
Many builders like to add sound insulation to the cabin side of their firewall. This is fine, but it is vitally important that any insulation material used is flame resistant and aircraft quality. Remember that the firewall can get extremely hot in an engine fire, and it could possibly ignite unapproved materials or cause them to emit noxious fumes that could disable the pilot.
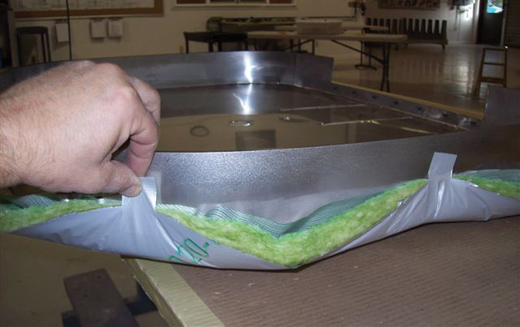
Non-flammable sound-blanket material is attached to the cabin side of the firewall before it is pushed into place at the Glasair Customer Assembly Center.
A well-constructed firewall is an important safety feature in any airplane. Take the time to think yours out and build it carefully. You will probably never need the protection it is designed to provide, but if you do, you will be glad you took the time to build it well. Next time we will look at engine mounts. This will be one of the smaller topics we will explore, but it is still an important one.








This is very great even for the next younger generation those who will be interested in aerospace engineering I think they will be attached to this very great work for the firewall. I get all the information I need on my assignment in Aerospace structures and materials. Thanks for the great work.