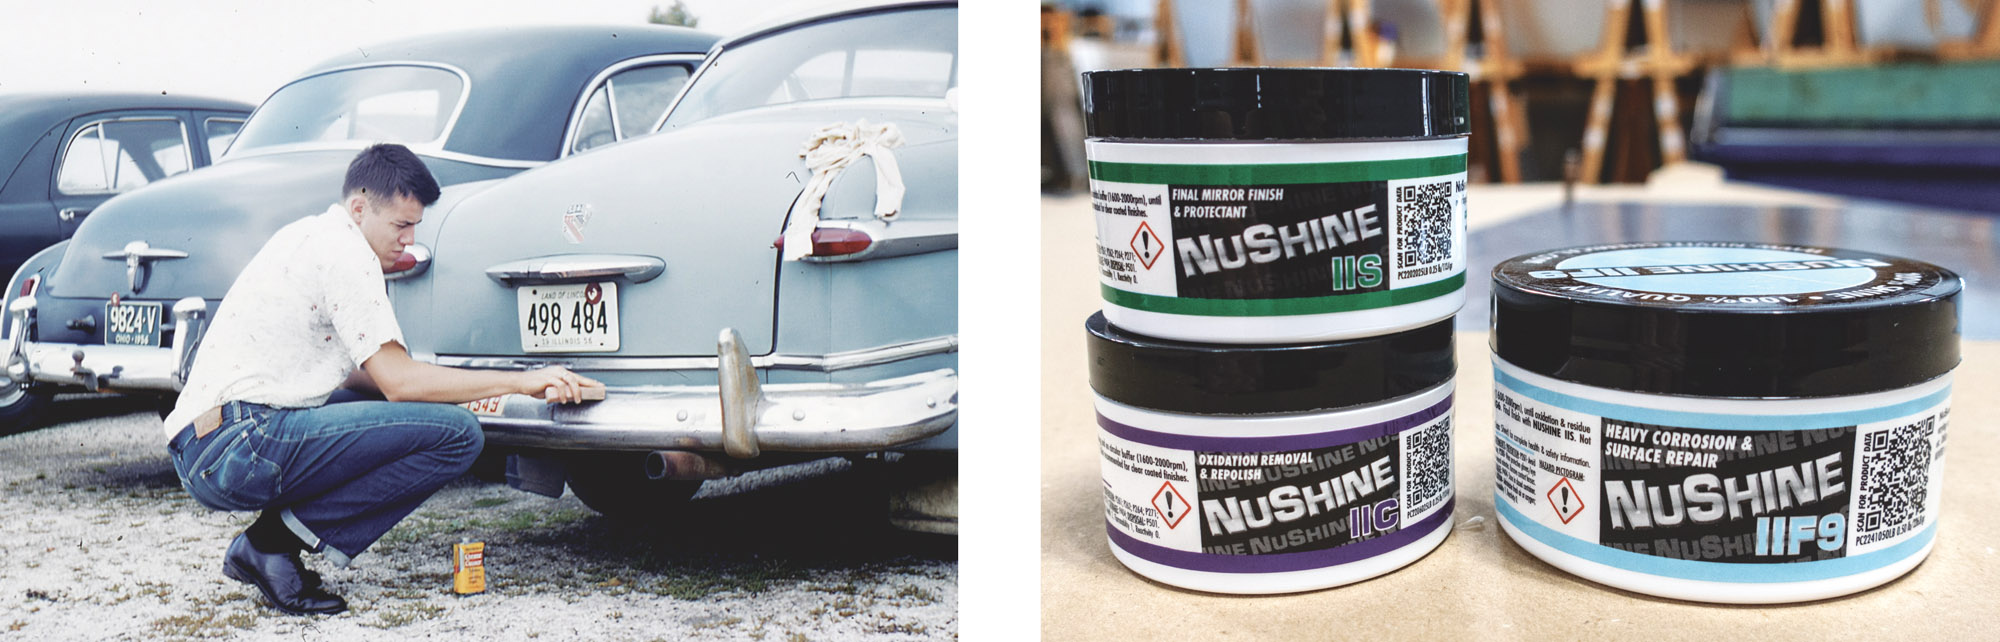
 Reflect on this: To turn a matte-gray sheet of 6061-T6, which absorbs as much light as it reflects, into a mirrored surface that cloaks itself with its surroundings, focuses the sun like a solar oven, and attracts fingers like unsupervised candy at daycare, everything must first turn black: hands, clothes, shoes, rags, the floor, tools, and the tub of your washing machine if you’re foolish enough to machine-wash the buffing pads and rags. On the other hand, there’s nothing like a mirror-like polish to make your airplane simultaneously invisible and glaringly obvious on a flight line.


Something about a reflective surface is universally appealing, classic, timeless—even visceral. (I can imagine a caveman staring at a cloud-dappled sky reflecting off the silver surface of a puddle thinking, “Someday I’m going to have a polished airplane.” But then I can imagine a lot of things.) Beyond appearance, there are tangible benefits to polishing. All of them spring to mind at once so I present them in no particular order.
- It reflects the sun, reducing heat buildup on and in the airframe.
- It sheds water like a seal. On dewy mornings my polished airframe was dry while painted aircraft were not.
- It adds no weight, therefore it doesn’t subtract from performance or useful load.
- It is inexpensive, it requires no special prep, equipment or skills, and the task can be spread out over time. That’s five benefits in one bullet point. But wait, there’s more…
- A polished surface improves with each polishing session. As a fellow polisher said, “A painted airplane never looks better than the day it leaves the paint shop. A polished airplane gets better each time you polish.”
- If attention is your thing, plenty will fall on your polished airplane.
- When polished during construction, the task of polishing is broken up over time.
That brings me to a list of polishing cons, also in no particular order:
- Polish doesn’t hide imperfections.
- Initial polishing is time-consuming.
- Initial polishing is messy.
- Polish can hide the entire airplane.
- You’re not done polishing until you sell the airplane.
- If attention isn’t your thing, plenty will still fall on your polished airplane.
Pulling the (Buffer’s) Trigger: The Decision To Polish
In terms of dollars, polishing is (probably) the least expensive finish you can apply to your airplane. In terms of labor, well, there are few shortcuts. I’ve heard people say, “I’m going to polish my airplane this weekend,” by which they thought they were going to start from the mill-finish and polish their entire airplane in one weekend. I’d bite my tongue and think, “What a cute thought.” I’ve known people who’ve started polishing and given up, their airplane resembling their abandoned effort. And that is why I’m staking claim to pages in three consecutive issues of KITPLANES to share the knowledge I’ve gained from polishing two airframes (and numerous propellers). Beyond the how-tos I share to speed you through the learning curve, I quantify—as much as anyone can— both the dollar and time cost of polishing so you can estimate both for your project.
Polishing can begin anytime. The best time to start, however, is before a skin is attached to its underlying structure. There are two reasons for this: You’ll probably handle the skins with more care from the start when you know you’ll be polishing them, and the skins are easier to polish flat and fully supported on a workbench. When I began building my Sonex I didn’t know I’d be polishing it and naming it Metal Illness. (One sprang from the other. I’m not sure which came first, so they live as equals in my mind.) By the time I set my mind to polishing, a great deal of my airplane had been built. The wings and tail were done, though not installed. The fuselage was on its gear. This wasn’t ideal for polishing, but it was better than having the airframe fully assembled.
Polishing completed assemblies has three disadvantages worth noting. The first is poor ergonomics: lying on the floor, squatting to get the low spots, reaching for distant areas while supporting the weight of a buffer. The second disadvantage is that the areas of skin supported by underlying structure polish more quickly than unsupported areas. It takes time to equalize the shine. The third is each rivet, screw, or bolt head and panel intersection will collect polish, which is tedious, and necessary, to remove. When I began building my Onex I had no doubt I was going to polish and no question I was going to polish at the component level.

Why Nuvite NuShine II?
When I committed to polishing Metal Illness in 2001-ish, I chose Nuvite NuShine because I saw the result it could produce. I say “could produce” because, like any product that requires the addition of someone’s labor, poor labor can hinder the product’s performance. I continue to use it because of the results I achieved. Nuvite NuShine II is a multi-grade, multi-step process (approved by many airlines and OEM manufacturers) with six grades of polish. The three grades I use for (non-alclad) 6061-T6 are NuShine IIF9 (for the initial cut and polish), NuShine IIC (to reduce swirls and deepen the reflection), and NuShine IIS (for the final, swirl-free finish and ongoing maintenance). Progressing through the grades is like sanding wood with ever-finer sandpaper, though no material is actually removed. While NuShine IIF9 cannot produce the swirl-free finish NuShine IIS can, grade S cannot remove the imperfections grade F9 does. The bulk of the polishing results—as well as the bulk of the effort—comes from grade F9. Moving to a finer grade too soon will not speed the polishing process. Staying with a coarse grade longer than necessary does no harm. Polishing does not remove material, it burnishes the surface, rounding the microscopic peaks and valleys into a smooth surface the same way erosion turns rugged mountains and sharp valleys into rolling hills and, eventually, a flat plain.
Dealing With Defects
Let me state the obvious: If you are going to polish, take every precaution to avoid scratches and dents. Don’t slide the parts across each other or your workbench, don’t lay them on a surface that isn’t clean, and don’t lean them against a 2015 Chrysler Town & Country “real quick” while you look for your keys. Dropping a tool on a skin or banging a skin into the corner of a workbench will preserve that moment in memory with a souvenir dent.
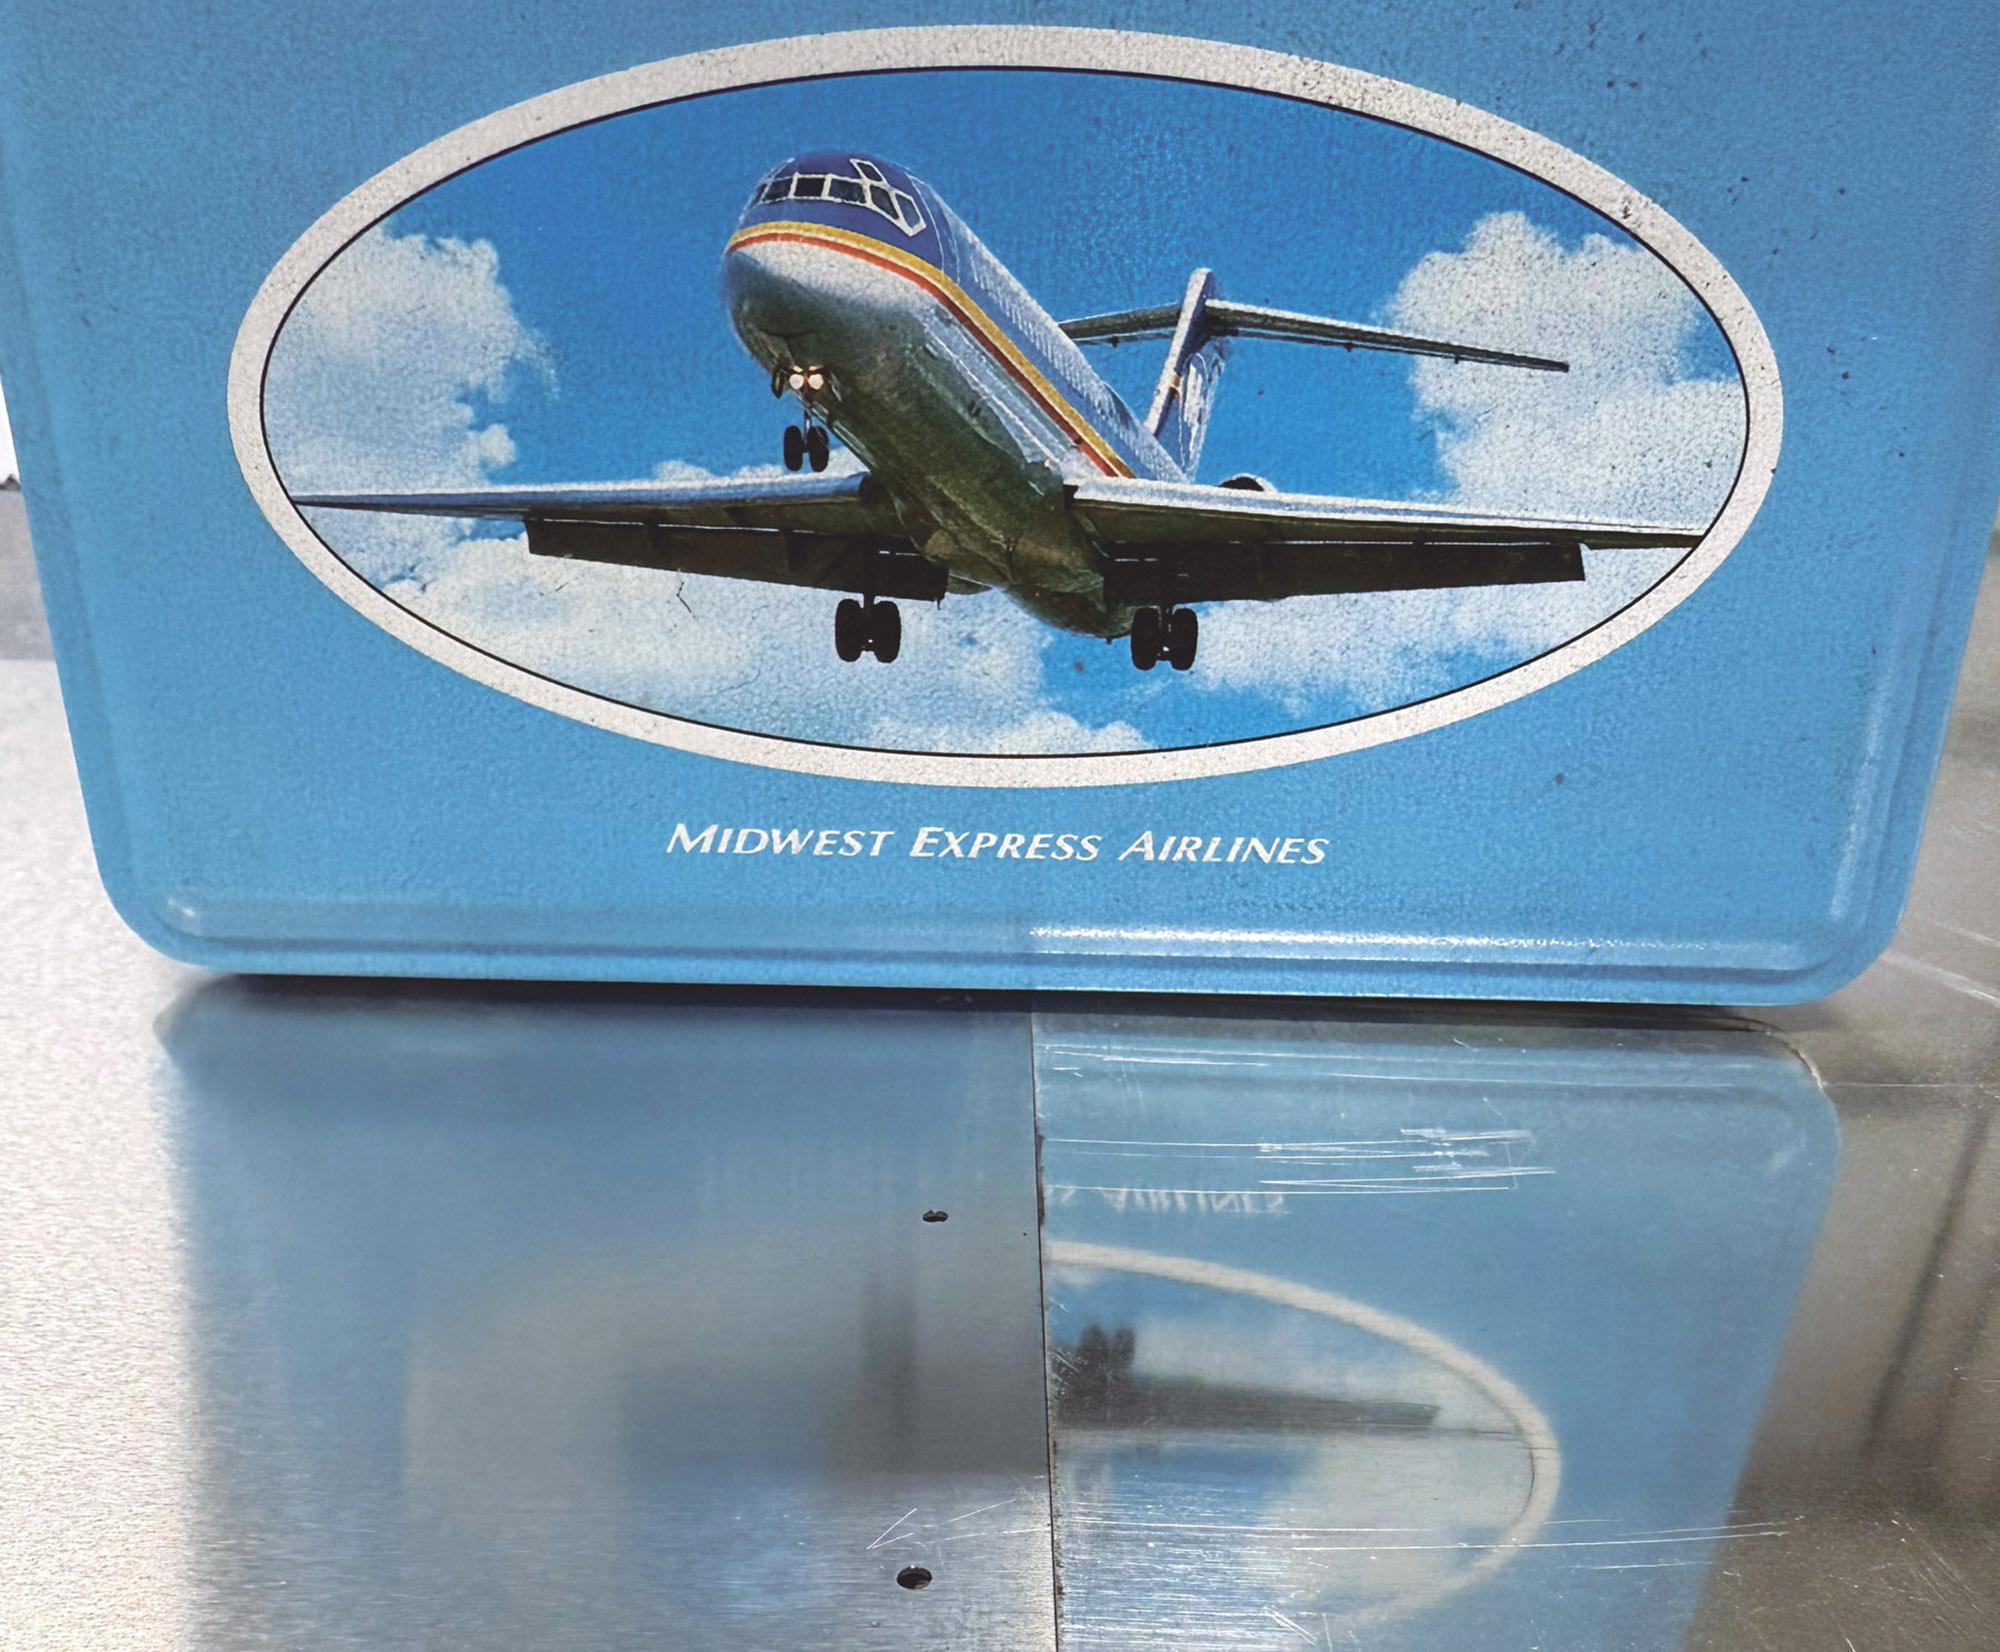
When (not if) mishaps happen they can usually be dealt with. (Your parts may even arrive pre-scratched. The material I used to plans-build Metal Illness arrived well-damaged from its 2000-plus mile journey across the country. Maybe that’s why it’s called scratch building?) Small, incidental scratches can often be worked out with NuShine IIF9. Deeper scratches can be sanded out before polishing. Many scratches can hide in plain sight on a polished surface, camouflaged by the reflected surroundings. Unfortunately for me, I’m compelled to remove any scratch I can see. Fortunately, I can enjoy a highly polished airplane while removing the smaller scratches over time. Unfortunately, a polished airframe will collect scratches and dents just as painted aircraft do. Fortunately, I can enjoy a highly polished airplane while removing the new scratches over time. (Have you detected an unending pattern?)
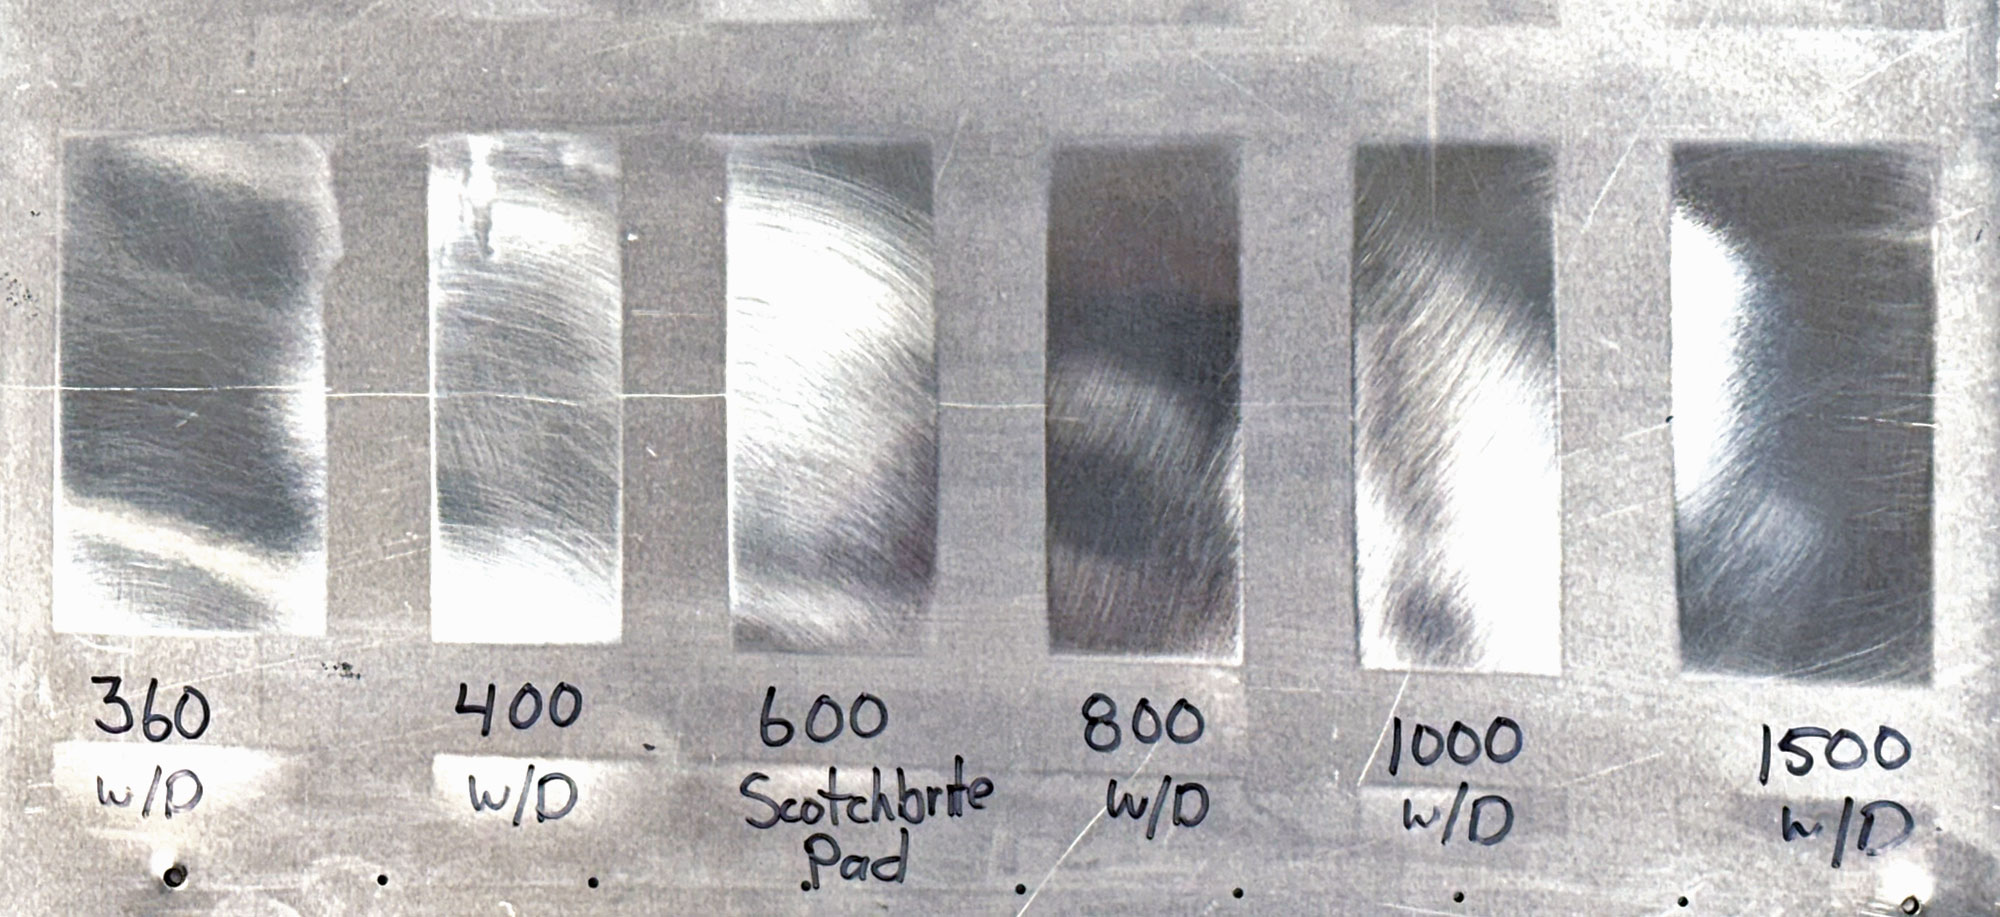
If polishing is begun on a scratched surface it can seem to take as long as the aforementioned mountain erosion. I remove the worst scratches with sandpaper no coarser than 360-grit, keeping the sanded area to a minimum. It’s better to start with sandpaper that’s too fine than too coarse. Starting too coarse removes more material than necessary, thereby increasing the effort needed to ready the area for polishing. I finish with minimum 600-grit, blending the sanded area into the surrounding surface. I caution against sanding with power tools that spin. They can quickly heat the aluminum and distort it or give the surface the appearance of orange peel. On flat surfaces I use my fingers to back the sandpaper. On curved surfaces I use my fingers or a sanding block.

When the surface is deeply scratched (gouged) the displaced material may or may not remain attached to the skin’s surface. If the gouge hasn’t rendered the skin unairworthy (a deep gouge on a fairing is one thing, a gouge on the wing’s leading edge is quite another), the gouge may be cosmetically minimized by using the convex side of a spoon to burnish the displaced material back into place. While that doesn’t restore the skin’s strength, it does help restore its appearance and minimizes sanding, which removes even more material but eases the stress riser.

Dents can be dollied out with a ball peen hammer and bucking bars. Keep this work to a minimum as hammering distorts (stretches) the material. After a dent is dollied out the surface can be sanded to blend its imperfections into a contiguous smooth surface before polishing. Metal Illness suffered two serious dents after it was completed; one was a dented turtledeck (the result of hangar rash) and the other, a dented horizontal tail skin, was caused by The Great Buffer Accident of 2006. (More on that next month.) The turtledeck dent was dollied out, sanded, polished, and made to disappear. I used a palm sander to blend the dolly marks with the surrounding surface as I was dealing with an area approximately 4 inches square. The electric palm sander was incapable of overheating the aluminum. Metal Illness was awarded Plans Built Champion at AirVenture 2006 with the dented tail skin. (I’m not sure all the judges saw it. It was a fresh maintenance wound, which I pointed out to the judges I interacted with. They were understanding that bad things happen to good airplanes at inopportune times.)
Protecting Yourself, Your Work, Your Work Area, and Your Marriage
Two by-products of polishing are airborne polish residue (which flies like pollen, settles everywhere, and smears like charcoal) and loose wool fibers. Both become dispersed about your person and work area and are transported everywhere you and your clothes travel. It can permeate your shoes and socks and will get captured in your hair. That’s how it fulfills its destiny to be tracked across your floor and appear as dark smudges in your bathtub. If you’re foolish enough to put the clothes and rags straight into the washing machine…you’ll wish you had painted. Protect your health with safety glasses and a mask. Protect your home and keep the mess contained to your workshop by wearing clothes and shoes you can leave in the shop. Protect the floor and other items in your shop by covering them with plastic, old bedsheets, or cardboard. You don’t want your kids sitting on bike seats coated with polish residue. Pre-wash work clothes and polishing rags in a bucket before putting them in the washing machine. Better still, don’t put them in the washing machine.
In addition to protecting yourself and your work area from the dust and debris of polishing, it’s vital to protect the surfaces to be polished from any debris that can scratch it. Buffing pads and rags, in particular, need to be protected from contamination. A buffer pad or rag that picks up a metal chip can ruin a square foot of aluminum in seconds. During brief breaks in work sessions I set the buffer down with the pad facing up. When a work session is done I place the pads and rags in sealed plastic bags.
To prevent metal chip contamination I never polish a skin until it has been up-drilled for all fasteners and all the holes and edges have been deburred. There are two reasons for this. Fitting, up-drilling, removing, and deburring skins prior to polishing reduces post-polishing handling and the risk of marring the polished finish. Deburring before polishing is critical to remove metal chips that will surely get caught in the buffing pads and carried across the skin’s surface with devastating effect. If that happens, throw the pad away; it can never be trusted again.
Another form of contamination is the mixing of grades of polish on a single buffing pad, wheel, or rag. A coarse grade of polish on a pad used for a fine finish will thwart your polishing efforts. Think of it as having some 220-grit sand on your 400-grit sandpaper—the coarse grade will hamper the effectiveness of the fine grade. Dedicate each rag, buffing wheel, and pad to a specific grade, label them, and segregate them from each other.
I buff flat skins on a hollow core door or a sheet of plywood. To avoid picking up bits of wood when I polish near an edge of a part I cover the work surface with Kraft paper. When I switch to a different grade of polish, I also lay down new Kraft paper. All of these precautions are easy and well worth the effort.
During my career in the kit aircraft industry I was frequently asked, “Would you do it again?” I can unequivocally state I should have pursued a career in architecture more aggressively, but there is very little I’d change about the Sonex I built. Polishing, clearly, is something I’d do again because I am doing it again, on my Onex. It took me a while to crack the polishing code on Metal Illness. Now I can polish with great efficiency, though it’s still a task with few shortcuts. I would never lead anyone to believe polishing 6061-T6 to a mirror finish is fast, but it isn’t hard. For me, polishing is an illness, a Metal Illness. Next month we’ll make parts shiny.
Photos: Kerry Fores, RAy Fores, Mark Schaible


Hi Kerry,
Once the polished skins are attached to the structure, how do you deal with the rows of unpolished rivet heads? Do you go back later and polish those to match the skins, or is this a non-issue and you just leave the rivet heads unpolished? Thanks!
Hi Keith,
The rivets will become polished when you finish polish the aircraft. Stainless steel pulled rivets, as used on the Sonex and others, are already polished. Solid rivets will polish up very quickly. In short, no particular attention is given to, nor needed by, the rivets.
Thank you for reading!
Comments are closed.