 Let’s cut to the chase here. We’ve been teasing this product since we first had it appear on our collective screens. Garmin’s GI 275 is more than a small-scale EFIS, more than just an instrument set for certified aircraft. It’s a tantalizing new touchscreen instrument family originally designed for the certified world, but that still has some valuable applications among Experimentals. In truth, we probably got our hands on an early production set of GI 275 displays because we can more easily install and test in a homebuilt than wait for a customer Cessna to get built and then go flying.
So let’s dive in. Garmin has one physical configuration of the instrument itself, with variations based on what is in the box and which bits of software are enabled. It breaks down to an attitude indicator (ADI) starting at $3995; this is known as the GI 275 ADAHRS. A somewhat de-contented version of that same box can be used as a course deviation indicator (CDI) or multifunction display (MFD); it’s called the GI 275 Base and sells for $3195. A third version is the GI 275 ADAHRS+AP, selling for $4495, which has all the functions of the ADAHRS unit as well as a supplementary circuit board to provide both digital and analog outputs to drive certified autopilots. Oh, and there’s actually a fourth version, which combines the GI 275 Basic display/processor head with a remote box (either the GEA 24 or GEA 110) for integrating with engine and airframe probes. Garmin’s goal was that some combination of these instruments would produce a whole-airplane solution in 31/8-inch instruments. Where this meets the needs of Experimentals better aligns with those looking to update older aircraft without having to gut the panel and start over.

Architecture
Within the GI 275 family, there are commonalities across the variations. For example, every iteration of the GI 275 has an internal, VFR-rated GPS, though there’s no internal antenna as you’d find in the Garmin G5. (For the certified installations, which are predicated on an STC approval, only certain antennas are approved, but for Experimentals you can use any number of the common Garmin antennas in addition to the puck-style antenna Garmin sells for the 275.) For the most part, Garmin expects there to be an IFR GPS on board and that’ll provide position and navigation data to the displays, but the VFR GPS can be used as a backup in case the primary fails. The map displays will all function on the internal GPS.
All iterations have the same touchscreen display. It’s true that if you compare raw square inches against the G5 or, heaven forfend, a G3X Touch, the 275 seems to come up short. But the display is bright and has much higher resolution than the G5’s. Although the data layout can seem a little crowded—definitely no social distancing here—the screens are always easily legible and remarkably capable of fending off glare. You remember when you got your very first high-resolution computer or smartphone and how dazzled you were by the resolution? Same deal here.
Skeptics among us figured a touchscreen on such a small instrument was almost a gimmick. I can tell you from hours of setup and flying with the 275, that’s not the case. I assumed that I would do most of the work with the concentric knobs. They do repeat much of what can be done via touch. For example, pushing and holding the center button brings up a sub menu—it’s different depending on the instrument configuration—that you can scroll through either by twisting the inner knob or by touching the up and down arrows. But where the touchscreen really comes into its own is on the PFD or primary flight display when you’re actually flying. More on that in a minute.

When It Comes to Wiring
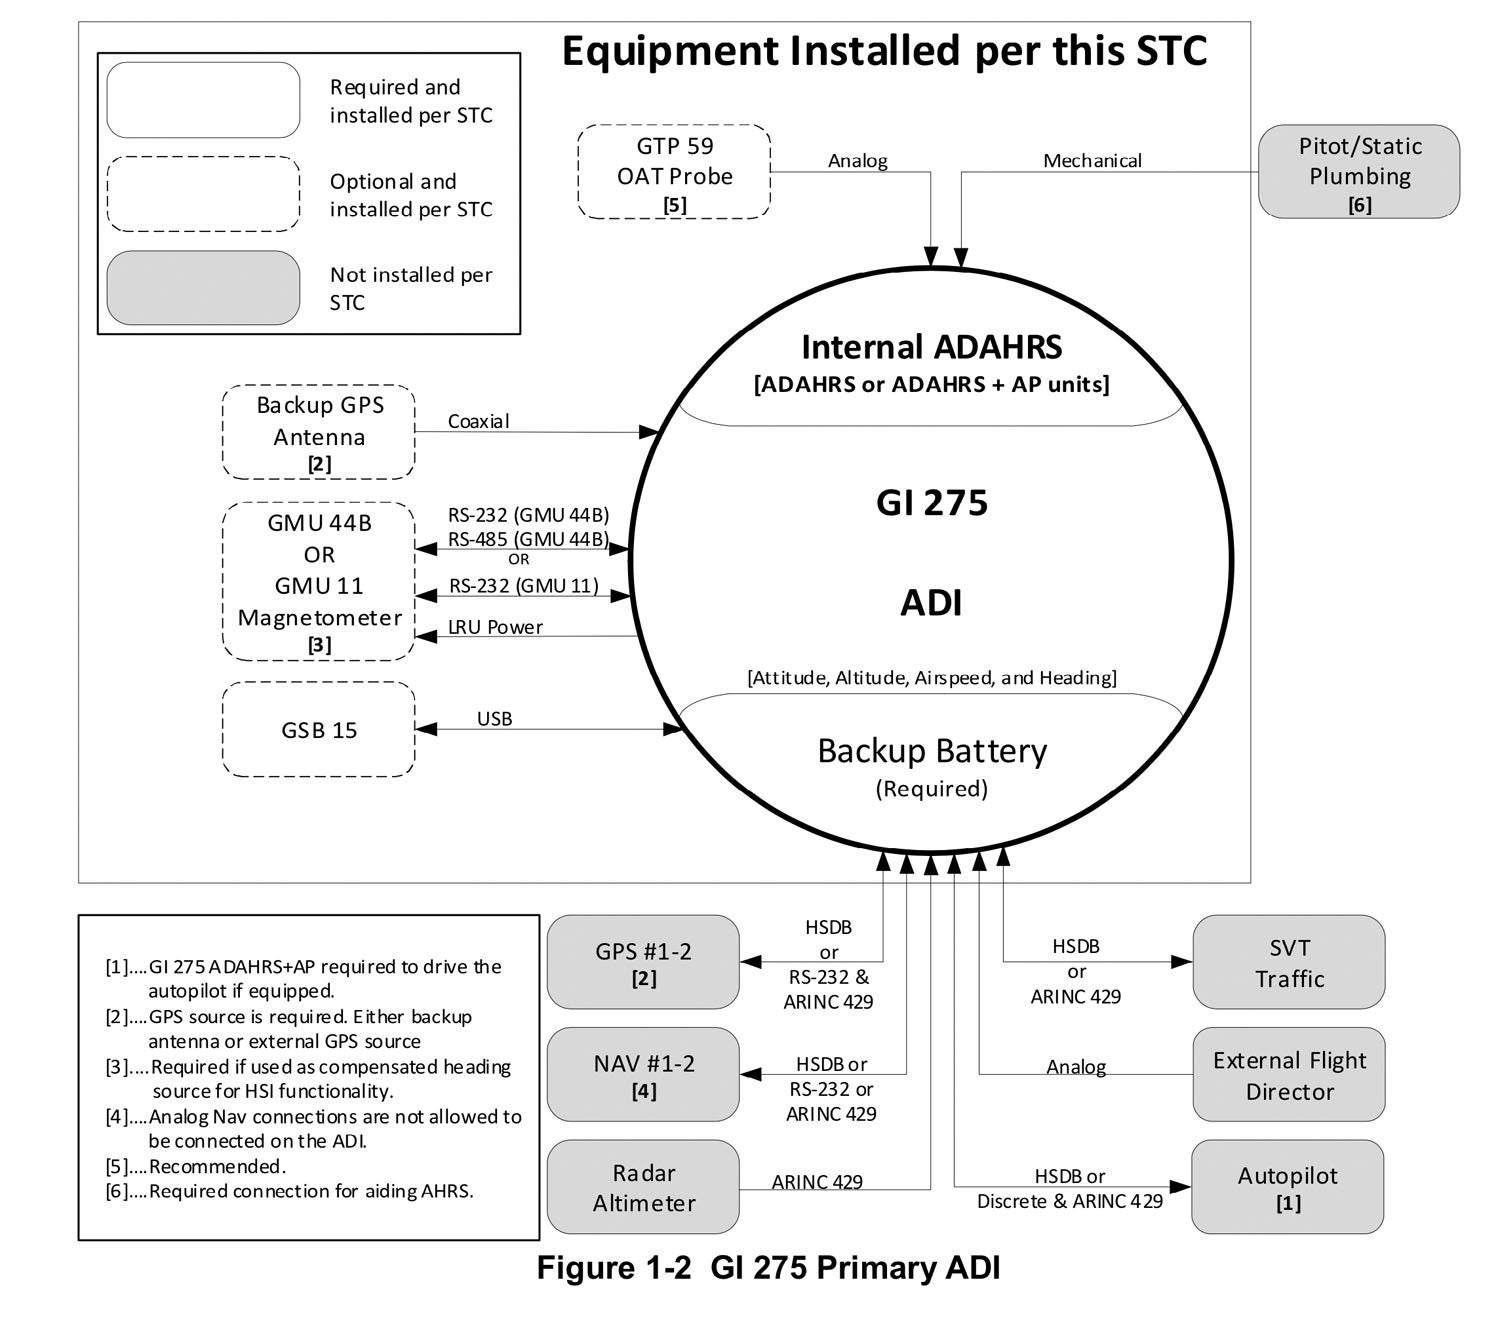
Nowhere is it more clear that the GI 275 is aimed at a very, very broad audience than with the interface choices. By and large, radios and instruments aimed at the Experimental category depend on a simplified CAN bus data architecture. For example, the G5 sends all the data across CAN—from the magnetometer and OAT probes to the autopilot servos and the data-combiner box that enables an ARINC 429 connection to external navigators. Multiple G5s are also connected on the CAN and share virtually all data.
Each GI 275, on the other hand, has internal ARINC 429 connections—two channels out, four coming in—meaning that one instrument can be connected directly to multiple nav-data sources. But that’s not how multiple GI 275s talk to each other. Instead, they’re daisy-chained with the HSDB (high-speed data bus), which is also referred to as an Ethernet connection in the manual. Each 275 has two sets of HSDB in and out connections. Moreover, modern GPSes can communicate with the 275 via HSDB; in the case of the GNX 375, which I have, the HSDB carries navigational data from the GPS to the 275, and air data back to the 375 for the internal transponder. For Garmin’s newer navigators—the GTN 600/700-series, GNX 375, GPS 175 and GNC 355—data is shared over Ethernet/HSDB. For older navs like the 400/500-series and GNS 480, it’s done over a combination of ARINC 429 and RS-232. Phew!
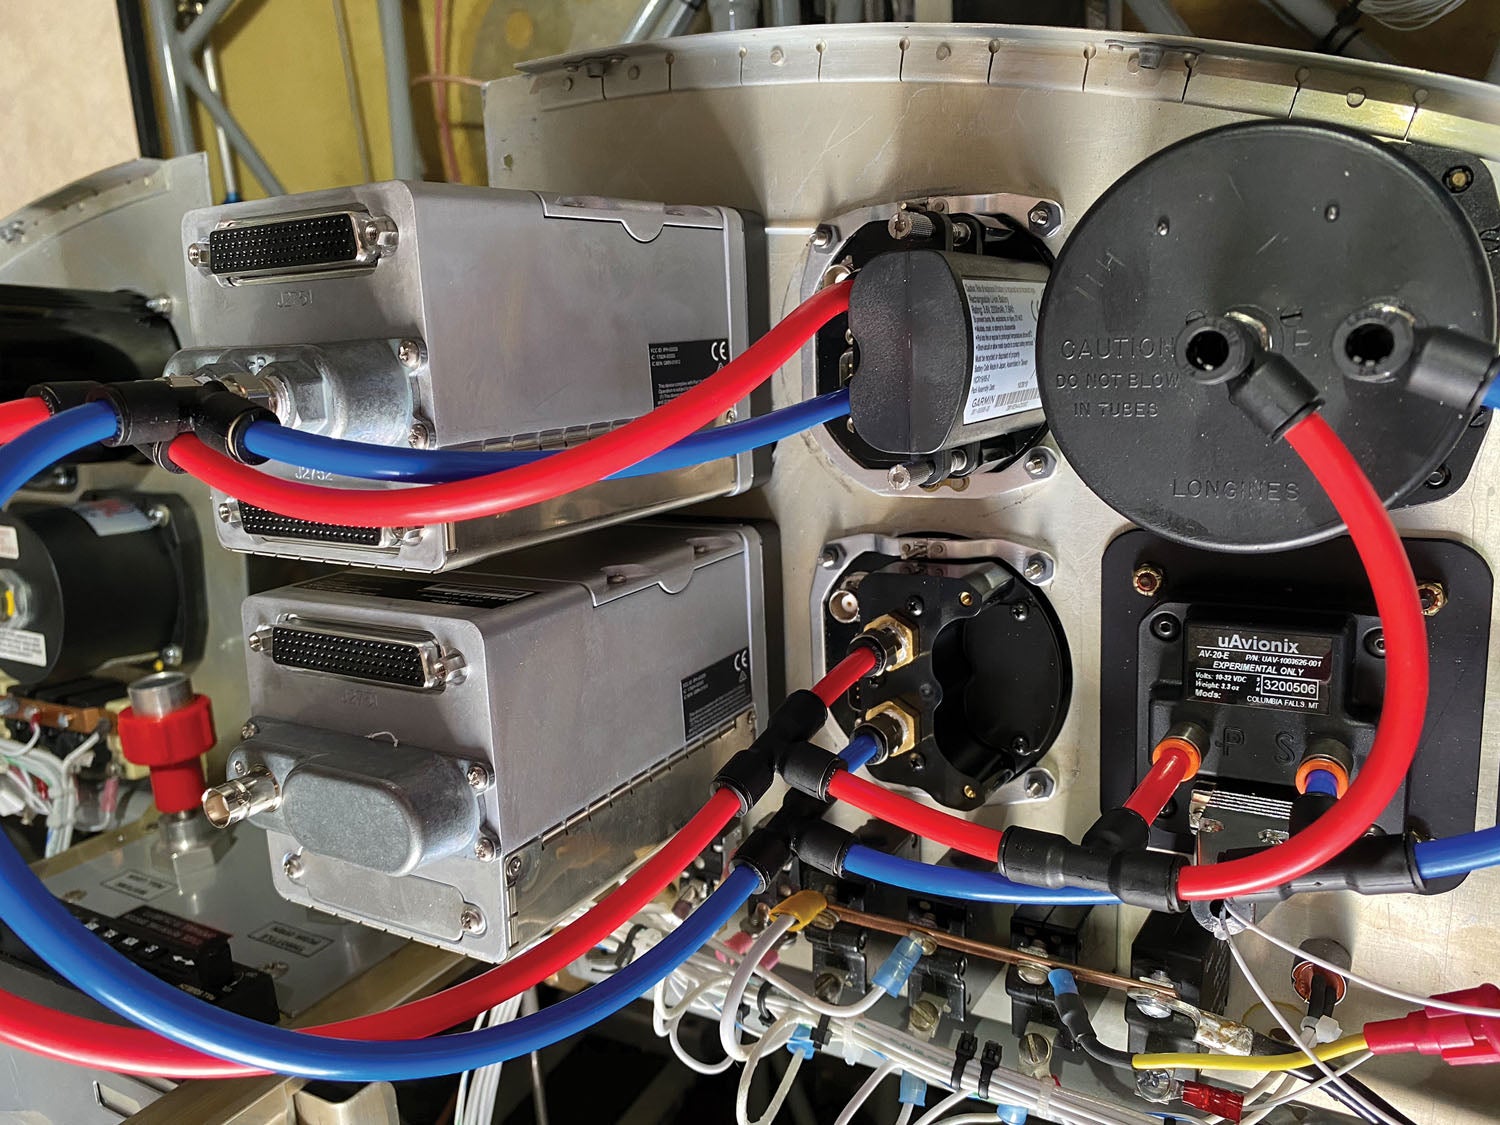
In the case of two 275s in the airplane, one is talking to the GPS via HSDB, and they’re all connected via HSDB. This architecture allows all units in the network to see all the data and afford multiple variations for display reversion.
What if you have an older nav/com in the airplane, something that sends analog signals to an HSI or CDI? The GI 275 has that handled. You can connect older nav/coms directly to the 275, though the number of wires to make that happen will either make you a temporary expert in populating 78-pin, high-density connectors or reaching for the phone to call your favorite avionics shop. (In fact, unless you work with these high-density products often, I recommend having a harness professionally made. You’ll thank me later.) Each GI 275 also has two RS-232 data circuits and one RS-485 channel. That’s a lot going on in big connectors hanging from the back of a 3-1/8-inch instrument, with most of them being shielded, multi-conductor cables. Every GI 275 has built-in Bluetooth and WiFi transceivers, enabling a connection to tablets and computers for wireless data transfer and database updates. You can also wire a USB dongle or use Garmin’s GSB 15 USB port/charger. It’s also worth noting that the 275 accepts not only nav data from external sources but can show traffic and weather from ADS-B sources, though there’s no option to connect portables like the GDL 50. You need the GNX 375, a suitable ADS-B-equipped transponder or the GDL 69 or 69A.
Finally, Let’s Fly
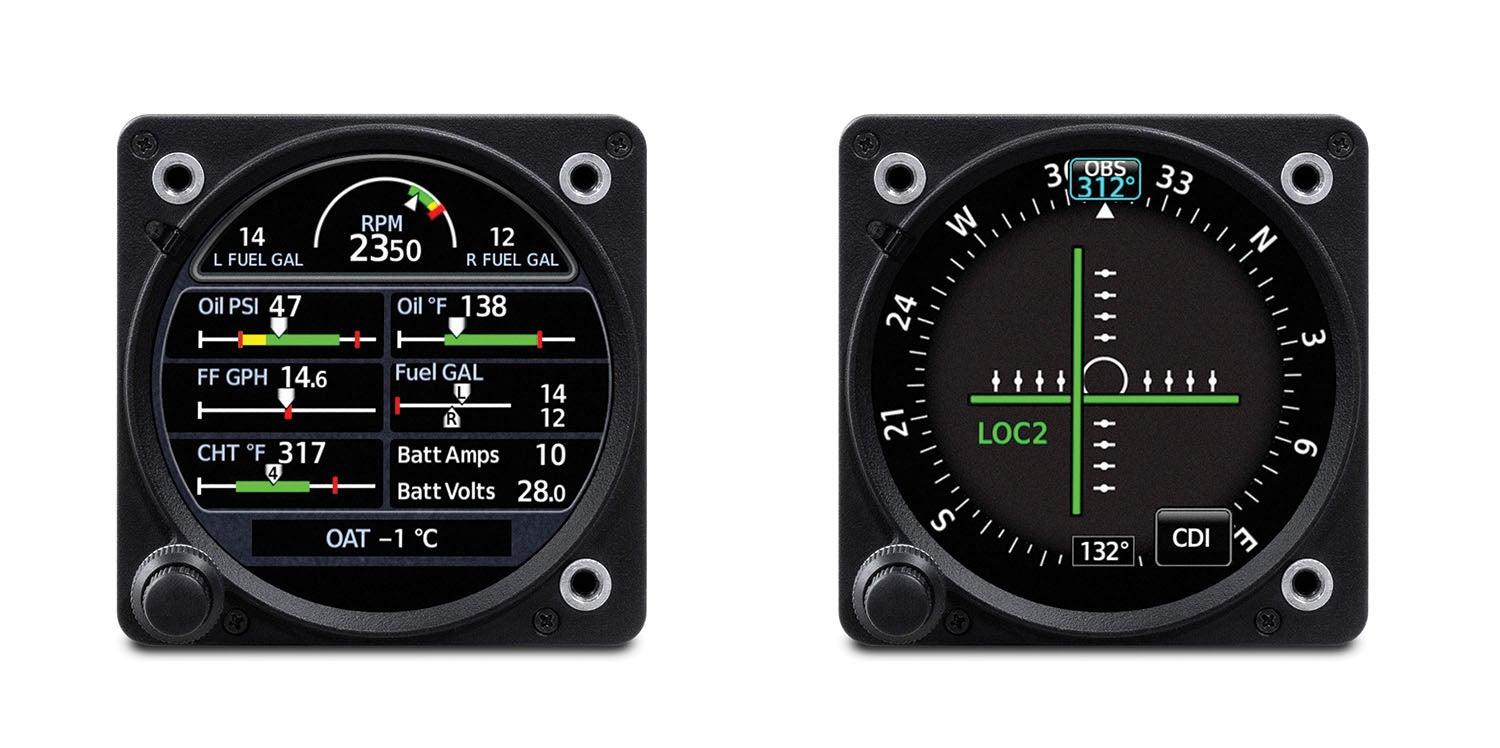
Installation complete and the setup finished—itself a detailed task given the wide array of options and interfaces available—the GI 275 impresses. Let’s start with the ADI, which manages to stuff a ton of information into one place. It has the normal tape displays for airspeed and altitude, a horizontal tape along the bottom for magnetic heading (when connected to a magnetometer) or GPS track (when not). There is a graphical vertical-speed indicator but it’s very small; it is, however, backstopped by a small digital presentation nestled into the altitude box that proves to be easily understandable after an hour or so.
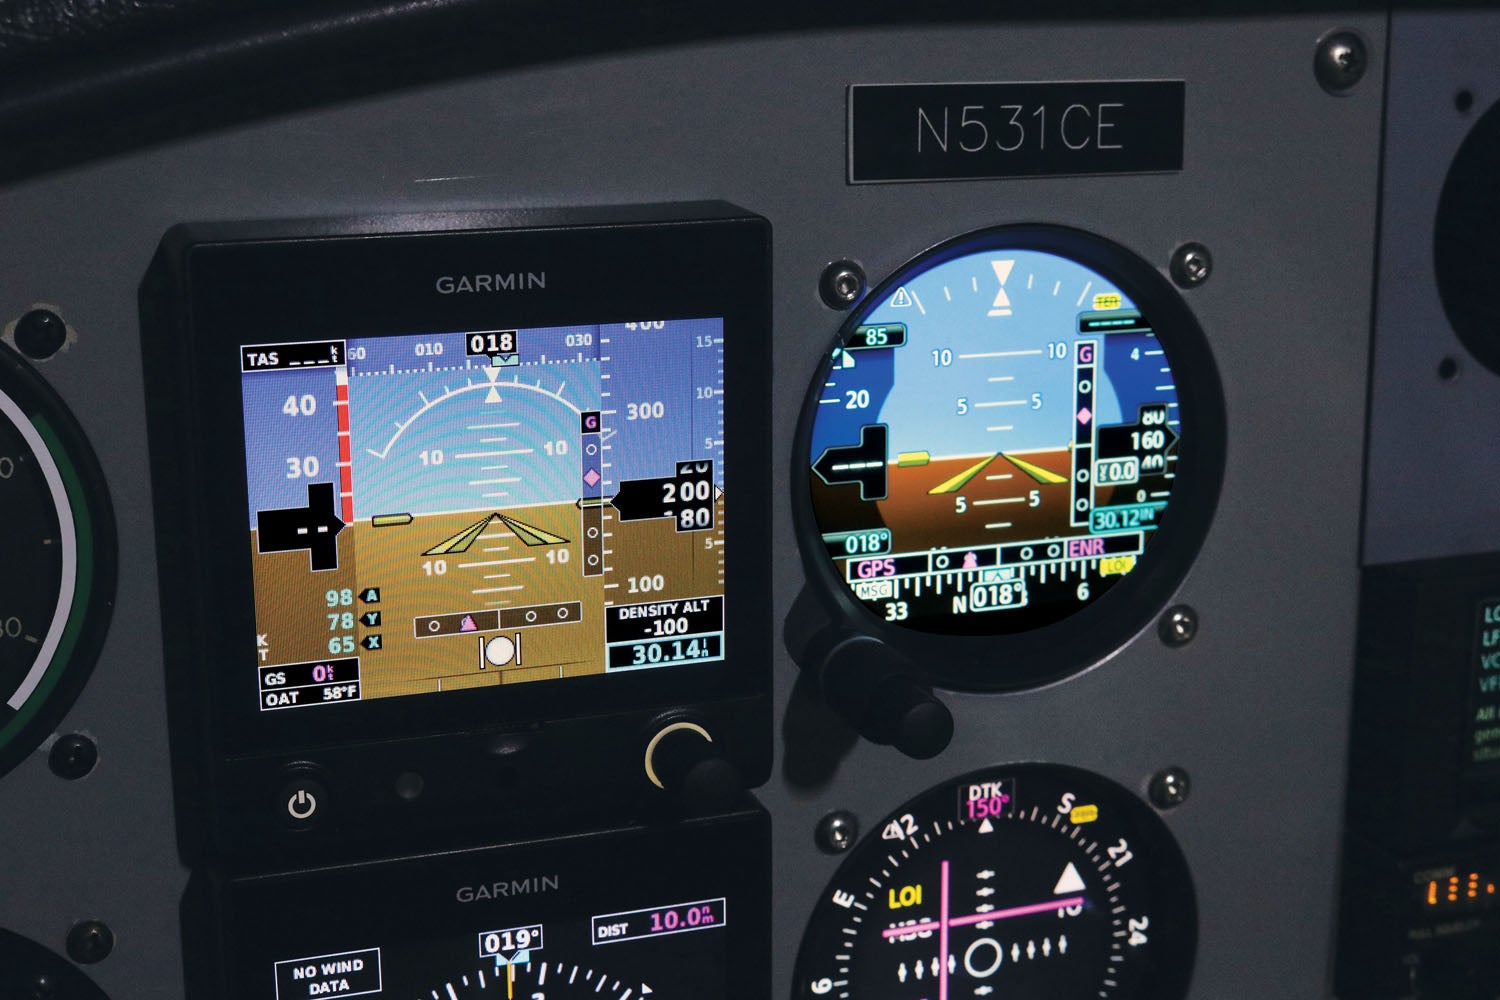
Around the four “corners” of the display, you’ll find boxes that show the baro setting (lower right), altitude bug (upper right), airspeed bug (upper left) and heading bug (lower left). Touching any of these boxes will make them live and then the smaller concentric knob will change the value; baro is always the default. I never had trouble jabbing the display and getting the intended field; even though the data boxes appear small, they respond to a semi-accurately placed finger. Understand that Garmin uses a variable-rate scheme here: The faster you spin the knob, the quicker the value changes. It takes practice to keep from overshooting your desired settings. I found myself overreaching at first because the G5 has a much less aggressive scheme—what I’m used to—and this means making large-scale bug changes requires a lot of twisting. Incidentally, if you have two displays and one is configured as an HSI or MFD, changing the heading on the second unit will reflect on the ADI since the heading bug syncs between displays.
If that isn’t enough, Garmin has enabled synthetic vision on the ADI and it’s amazingly effective given the screen size. It helps that the pitch scale is somewhat expanded and that the slip/skid ball is incorporated into the attitude pointer for compactness. (In this way, it’s more like the G3X Touch and G1000 than the G5.) And if it’s all too much, you can choose to declutter the display down to a very basic attitude indicator, though after spending on this instrument I’m not sure why you would.
Let’s dive into the ergonomics rolled out with the GI 275. For the right-handers in the group, it would seem more logical to put the knobs on the lower-right corner—that keeps us from having to reach “across” the screen for data entry. But this is intentional on Garmin’s part because most production aircraft have instruments with some kind of knockout on the lower-left corner, like an altimeter or VSI. Even the airspeed indicator in a lot of certified aircraft have a true-airspeed knob in that spot. Garmin decided it wanted to ease the installation process as much as possible, hence the layout and, for that matter, the choice to go with 3-1/8-inch screens that mount from the rear. Indeed, the key advantage the G5 has over the 275 is that the front mounting leaves room for a larger display. In practice, you quickly become accustomed to the knob position.
Multifunction, Indeed
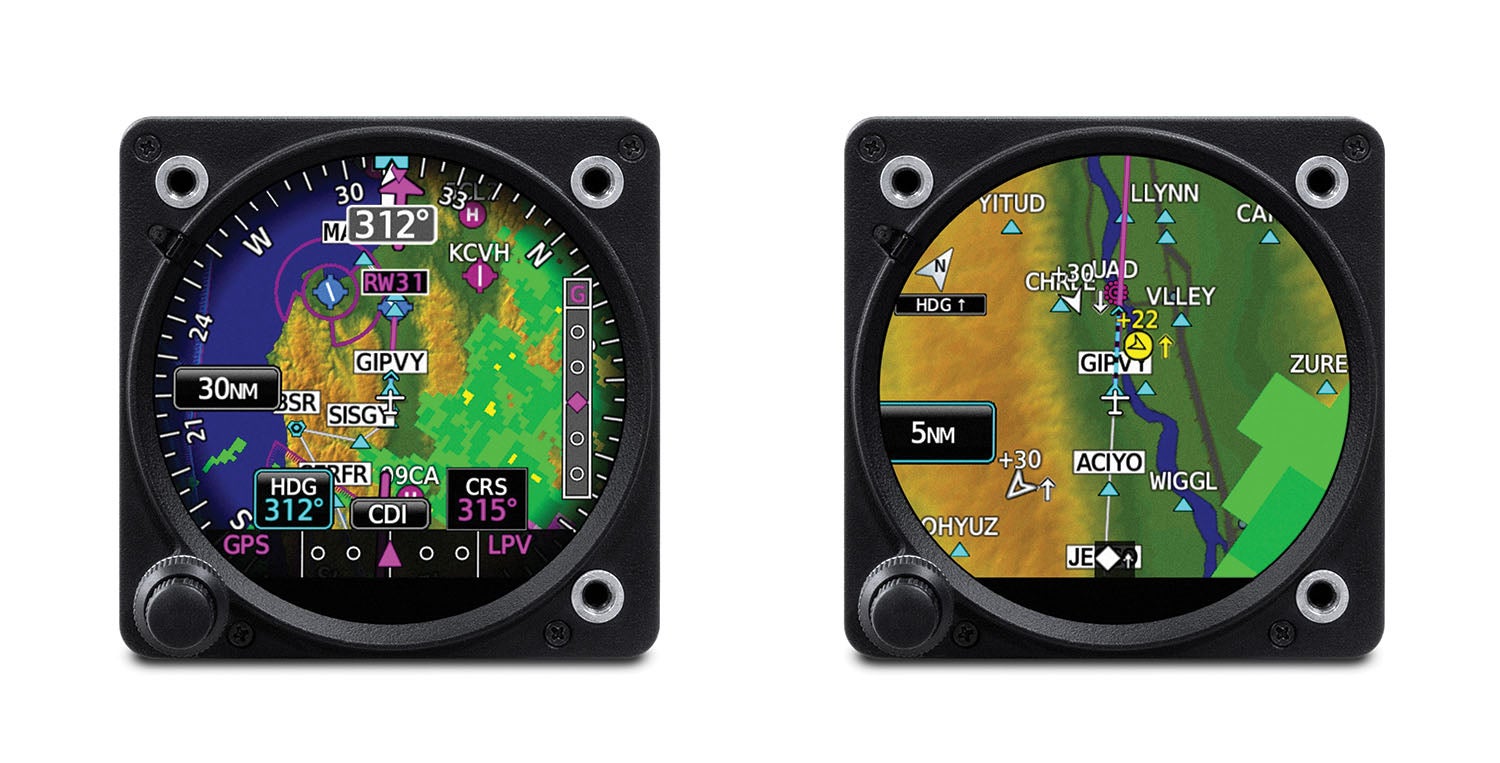
The GI 275, even in Base form, does a lot. It can be configured as a conventional HSI or CDI, but also can be an EHSI, for enhanced. A moving-map underlay provides situational awareness as well as the conventional compass rose and deviation indicators. That map can show airspace, terrain, weather and traffic simultaneously with the course data. Of course, there are also dedicated screens with just weather and traffic, and simplified versions of navigation displays.
How does this work in practice? I used the second GI 275 to repeat ADS-B weather and traffic from the GNX 375. And while the presentation isn’t quite as facile as you’d find with, say, a good-sized tablet, it’s perfectly functional and a nice way to mirror important data from the navigator to a location more in your line of sight. I found myself switching over to the most important screen as needed—radar when navigating through weather, traffic when there was a potential conflict. And that’s done easily because the larger of the concentric knobs quickly moves among the enabled pages.
Autopilots and Engine Monitors
The GI 275 is capable of driving just about every form of conventional autopilot out there, all the way back to Cessna wing levelers. It cannot, at this time, drive any autopilot servos directly. Of course, the G5 can, though it does require a control panel to make that feature functional. What does this mean for you? If you have an older installation with, say, an S-TEC autopilot in place, the GI 275 makes some sense. You can remove an older electro-mechanical HSI and not lose autopilot capabilities. This may be a good path assuming the rest of your older autopilot is still in good health. For some owners, it’s cheaper to remove all the old stuff and start fresh with Experimental-class components. But then you have a much bigger job on your hands.
As for the engine monitor, that’s beyond the scope of this review. But having looked over the documentation, there’s no reason to believe that the EIS version lacks capability. It is more expensive than a standalone engine-monitor upgrade would be, however.
Bottom Line It, Then
There’s no doubt the GI 275 is a rugged instrument system and its capabilities far outstrip the G5, coming relatively close to what a G3X Touch can do. But cost is an issue. Let’s look at one example. Updating from vacuum instruments to a pair of G5s is close in cost to adding just one GI 275 with a magnetic heading reference. But the G5 provides basic attitude information and a simplified HSI as your second instrument; you do, however, have complete ADI redundancy. You do not get the crisp, clear moving map, or traffic and weather displays.
Capability and flexibility are expensive. Garmin has thrown the proverbial kitchen sink at the GI 275, giving it capabilities that few installations will ever fully leverage. And most of those are biased toward the certified market, aimed at easing the work of avionics shops having to integrate systems from Cessna 172s to King Airs. Overkill for your average homebuilt? Definitely. A blueprint for future product better suited to our needs? Let’s hope!
Photos: Marc Cook and courtesy of the manufacturer.
![[Credit: JetStream Rider]](https://www.kitplanes.com/wp-content/uploads/2026/04/AdobeStock_345999332.jpg?w=218&h=150&crop=1 "2026 Avionics and Lights Buyer’s Guide")
![[Credit: Dynon]](https://www.kitplanes.com/wp-content/uploads/2026/04/EMS-stand-alone_HDX.png?w=218&h=150&crop=1 "Dynon Unveils Scalable Engine Monitoring for Kitbuilders")


