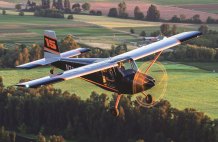
I know some will raise their eyebrows when I declare that KK-1 is completely scratch-built. Traditionalists will protest that real scratch builders cut their parts out on dank hangar floors in dim light with hand shears. Flanges should be bent on rusty brakes or pounded over the edge of work tables. Real scratch builders have neither space-age, computer-controlled punch presses, nor press brakes with digital controls or megaton hydroforming presses.
To which I say, phooey. Real scratch builders use the best tools at their disposal, and we are no different. We made almost every part of this airplane from raw stock, shaped every form block and set up every tool. We’ve bent every bend and set every rivet…I call that scratch-built. Surprisingly, every method we’ve used is available to other designers and builders. It might not be as convenient as it was for us, but it is certainly possible.
Instead of a pencil and vellum, my partner in crime, Ken Krueger, used a computer running AutoCad 13 and Mechanical Desktop to produce a virtual three-dimensional model of the airplane. Each part was designed in the computer and took its place in the ever-expanding model. Skins, ribs, spars and everything else were drawn, fitted and joined in electrons before metal was cut. With these powerful tools, the part could be designed right down to an accurate location of every rivet hole.
Still, You Have to Build It
Once the file is drawn, it must be created in metal. If you’ve followed metal aircraft kits, particularly RVs, you will have noticed that kits produced in the last several years advertise matched-hole construction. With the advent of computer-controlled tooling, it became possible to put all the holes in the parts as they were manufactured, and do it so accurately that they all align as the parts are assembled. Such parts are essentially self-jigging; when all the holes line up, there is only one possible alignment. It is an effective way of cutting building time by a large percentage, but it requires that the parts and holes be accurate to within a few thousandths of an inch-in three dimensions.
Achieving this kind of accuracy requires that the digital files be fed directly into a computer-controlled cutter-outer. Vans Aircraft owns three Trumpf TruMatic punch presses that fit the bill nicely, and we were able to rent time on them quite reasonably. (By that I mean that Van never asked for any money, completely destroying his carefully cultivated cheap Dutchman image.) But you don’t have to work for an aircraft company to get access to tools like these. Any medium-size city has machine shops with similar equipment that can cut parts from .dxf files. It doesn’t take a lot of time once the punch press is loaded with the proper tools. Large wingskins, complete with all rivet holes, openings for inspection plates, nutplate patterns, etc., may be cut within a couple of minutes. Wingrib blanks, with all of the rivet holes and lightening holes punched, take about 50 to 60 seconds. The same shop probably has a brake that can make bends over 3 feet long. Shorter than that, there are several moderately priced sheet-metal brakes on the market.
Making the Cut
The old hands in Vans shop chuckled when they saw a couple of office guys heading for the press brakes, but they pitched in to show us quicker and easier ways to set up the tools accurately. After two evenings on the punch press and another two or three on the bending and pressing tools, we had all the parts we needed for KK-1s new empennage. Three empennages, actually. We made three of everything: one to fly, one to test, one in case we messed up a part.
Parts such as ribs, with curved bends, are traditionally made by pounding the flanges of an aluminum blank down around a form block. We made all of our own form blocks. The punch press made templates from 1⁄8-inch-thick aluminum plate. These templates were screwed to pieces of high-density particle board. We built a simple router table and plugged a roller-bearing guided bit into a garden-variety woodworking router. With the roller following the aluminum template and trimming the edge of the particle board, we could produce accurate form blocks in a few minutes each. Kruegers design features a rectangular horizontal stabilizer and a constant-chord wing, and there is one size and shape of rib for each, so we had to make only one form block. Thatll help.
This was my first experience with matched-hole construction, and I was mightily impressed when we assembled a complete 8-foot-long horizontal stabilizer with Clecoes and never touched a drill. It was straight almost to the limits of our measuring tools, certainly less than 1⁄16 inch. I was even more impressed a few nights later when we riveted it together and threw it on the postal scale in the shipping department. Kruegers computerized estimate was 10.25 pounds, which I thought was optimistic. The actual weight: 10.12 pounds!
I worked on the usual repetitive metal airplane building tasks for the next week or so, dimpling skins and ribs for the rest of the empennage, while Krueger worked on the computer, calculating loads for a static test of the horizontal stab. He considered all of the loads that the stabilizer would see, including gust loads, and developed a grid pattern. We bolted the first stabilizer to a wood truss, covered it with thin plywood, drew the grid and began applying loads by piling on bags of lead shot. Lucky for us, Vans does exactly this sort of thing when developing a new airplane and the company has invested in several tons of shot, all in accurately weighed and labeled bags.
Krueger had designed the stab to stand up to 6 G, with a 1.5 margin of safety. In other words, it would permanently distort at 6 G, but it would not fail at less than 9. As the shot bags piled up, the stab creaked and groaned, and the skins on the lower surface began to wave and ripple. The ripple patterns were interesting in themselves; theyd crease the skins at about a 45 angle to the spars until they hit the spanwise stiffener wed put between the front and rear spars. Then theyd stop and a new wrinkle would form in the next bay. Without that stiffener, which weighed just a few ounces, the wrinkle would have been continuous from spar to spar and the stab would have failed much sooner.
Volkswagen engine guru Mel Ellis and I sorted shot bags and loaded them according to the diagram, while Krueger directed the show. Somewhere around ultimate load, engineers begin demonstrating some strange body English and holding their lips all funny. But in this case, there was no need to be nervous. We piled on the last bag in Kruegers worst-case scenario and jumped back. Nothing happened. At 9 G the stab was bent and wrinkled, but it didn’t fail. There was no point in going further. If the stabilizer was strong enough to support nine times the load it would see in unaccelerated flight, it was plenty strong enough. We removed the shot and measured the permanent deformation. To my amazement, it was just over 1⁄16 of an inch. Any doubts Id had about this lightweight construction being strong enough disappeared.
We went ahead and built another horizontal stabilizer and completed the rest of the tail as well. Weighing the completed rudder, vertical stabilizer, elevators and new stab gave us the total weight of the entire empennage: 25 pounds.
The Wing’s the Thing
With the empennage in hand, we began work on the wing. Our first effort was to be a test article, a wing that we could test to destruction. As it turned out, this was well worth the effort just as a trial run. Even with previous experience and all the computer modeling, there were still a few hole patterns that werent in the right place, and we had nobody to blame but ourselves. The punch press put the holes exactly where we told it to. We also found that a 22-foot, one-piece wing built of such thin metal is, at least in the pre-skinning stages, a wavery, floppy beast. Ellis attended several of our wing-building sessions, and we were glad to have a third person to help move the wing around.
Almost immediately we found that building the trailing edge of the flapless wing was going to be a challenge. It requires little ribs aft of the rear spar and a lot of riveting in progressively tighter spaces. It turned out that it would actually be easier to build flaps and bolt them onto the wing, so thats what we did. Krueger returned to the computer and designed a slotted flap, much like the one found on the RV-9. The punch press soon handed us the parts, and we were off and running.
Well, jogging might be more like it. One or two evening work sessions a week really isn’t enough to make fast progress. Kruegers days were becoming increasingly filled as the RV-10 neared product release. Factor in a few weekend fly-in commitments, kids soccer games, vacations and concerts, and it was six months before we completed the wing and simulated fuselage center section.
The mainspar is built in the time-honored Mustang, RV and many others fashion. We bent two C-channels from 0.063-inch aluminum. The punch presses had cut them out for us complete with all the holes for attaching ribs, skins and landing-gear supports. Vertical stiffeners, as well as some of the spar cap material were supplied by a single piece of 1⁄8-inch aluminum with large lightening holes punched out. We called them waffles, and of course they had rivet holes punched to match the channels. The rest of spar cap was made from 3⁄16 x 1 inch aluminum bar stock that we bent in the middle to match the dihederal of the wing. The punch presses couldn’t handle material this thick, so the bars had to be stacked, clamped and drilled by hand, using the waffle as a guide. This took several happy hours at a drill press, most of it spent dreaming about bigger punch presses.
Leading the Way
Once the spar was done, we Clecoed on the main ribs and turned our attention to the leading edge. This was built as a separate D section, but because our shop doesn’t contain a press brake long enough to bend the leading edge as one continuous piece, we made it in two pieces and spliced them together-which bought us trouble. Our first attempt on the left wing resulted in an ugly joint with a big dish in the skin. Our second try, where we set the joint rivets with the two pieces Clecoed to the mainspar, came out much better. But that first splice had disturbed the alignment of the whole left wing, and we fought it the rest of the way. The result was some wrinkled skins and truly ugly rivet lines. We consoled each other with the phrase test wing whenever something went wrong. Education is never free, and we were buying knowledge here. Besides, if this ugly thing went to design spec, then a good one would be even better.
Finishing out the ends of the wings really convinced me that Krueger has a better grasp on mechanical design than the average bear. The simple thing would have been to end the wing with a reversed rib, just squaring it off like an old Mooney. Of course, we could also make a fiberglass tip to join to the overhanging skin. The first is draggy, and the second involves fiberglass. Thats an ugly choice, so Krueger came up with a sheared-tip design. The top skin is longer than the bottom, and a huge piece of aluminum shaped like a giant tadpole joins the two. You have to bend a flange all the way around it, some of it one way and some of it the other. I made the form blocks and bent the flanges by simply following directions, but I still hadn’t quite grasped the concept. Then we put it on the end of the wing and the light bulb came on. Every single hole lined up, too. Hed even remembered to put in a removable access plate so we could insert the aileron pushrods later!
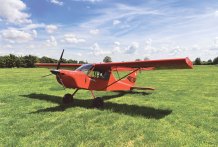
When we finished the wing, it weighed about 108 pounds, including the steel landing-gear supports, but not counting the flaps and ailerons or their controls. Including those components, we estimated the wing at 125 pounds. Combined with our 25-pound tail and 165-pound firewall-forward engine installation, we were now up to 315 pounds, leaving 110 pounds for the fuselage, landing gear, canopy, fuel tank, etc. Thats a pretty tall order, so I began to think our 450-pound empty weight might be a bit optimistic.
The Lead Lackeys in Another Test
We fabricated a center section of fuselage, bolted it to the wing, and then turned the whole assembly over and bolted that to a wood forklift pallet with 16 sturdy lag screws. Krueger had served as a mentor for several Oregon State engineering students, some of whom expressed an interest in witnessing an actual load test.
Ah, the naïveté of the young! We welcomed them enthusiastically as they showed up on the appointed morning, some even bearing drinks and doughnuts. Little did they realize that load tests consist mostly of…loading. They became lead lackeys, and were put in charge of loading thousands of pounds of lead shot in 25-, 10-, 5-, 2- and 1-pound bags onto the bottom of the wing, following the charts Krueger had worked up. He directed the loading, I appointed myself head photo taker and keeper of the wingtip props, and we watched as the bags piled up.
We were testing to three different load conditions. Roughly speaking, they were 6 G, 7.5 G and 9 G. The load distributions changed with the case to simulate Kruegers worst-case scenarios: full aileron deflection, sudden pull-ups when already heavily loaded, etc. To meet the standards of the Aerobatic Category (the most stringent FAA category for production aircraft) we would have to demonstrate that the wing could support 6 G without permanent deformation, and 9 G for 3 seconds without failure. Our airplane was going to be registered Experimental, so we were under no obligation to meet these standards, but they seemed a good target. Strictly speaking, we could have used different wings for the different tests to avoid cumulative stress. We didn’t want to build yet another wing, so we went with some conservative assumptions (aerobatic gross weight 800 pounds, same test article for all tests) and figured that if the wing didn’t meet the Aerobatic category requirements, wed just placard it as a non-aerobatic airplane.
Once the lead lackeys had done their work and the wingtip supports had been removed, the wing held 6 G without drama. There was some ominous popping and definite wrinkles at 7.5 G, but nothing broke. At almost 9 G, something finally did break-the forklift pallet that the wing was mounted on! We quickly stuck a solid block under the failing plank, removed the wingtip supports and held our breath. The wing held for 3 seconds, then 10 seconds, then a minute. Nothing happened. It just sat there. A 108-pound, 22-foot wing that held 9 G, seemingly indefinitely. Ill fly that!
When we stopped holding our breath and looked up, our lead lackeys had suddenly found pressing appointments elsewhere. So with help from Kruegers wife, Susan, and his daughter Amy, we unloaded and stored all the lead bags. Its lighter work when you know your design is a good one.
Next month: The real airplane, not just the test articles, comes together with engine, prop, avionics-and begins, finally, to appear like something worthy of flight.


![[Credit: AdobeStock]](https://www.kitplanes.com/wp-content/uploads/2026/07/AdobeStock_125628775.jpg?w=324&h=160&crop=1 "Roll Recovery, Part 2")
How much would you charge for the plans
Comments are closed.