Many builders come to their projects with mechanical experience and tools from previous efforts, so it’s easy to assume that everyone knows all about the proper selection and handling of tools. On the other hand, many first-time builders have never had a lot of training in this regard. With that in mind, let’s drop back and look at the proper use of hand tools as the beginning of best practices.
Safety
Aircraft building often involves lots of drilling, grinding, cutting, and shaping of metal and composite materials. In addition, there is always plenty of lifting and use of potentially hazardous chemicals, from avgas to acetone and many others in between, not to mention many different paint products, some of which can really do some major damage to your health and life. That means safety gets top billing when we start to talk about tools.
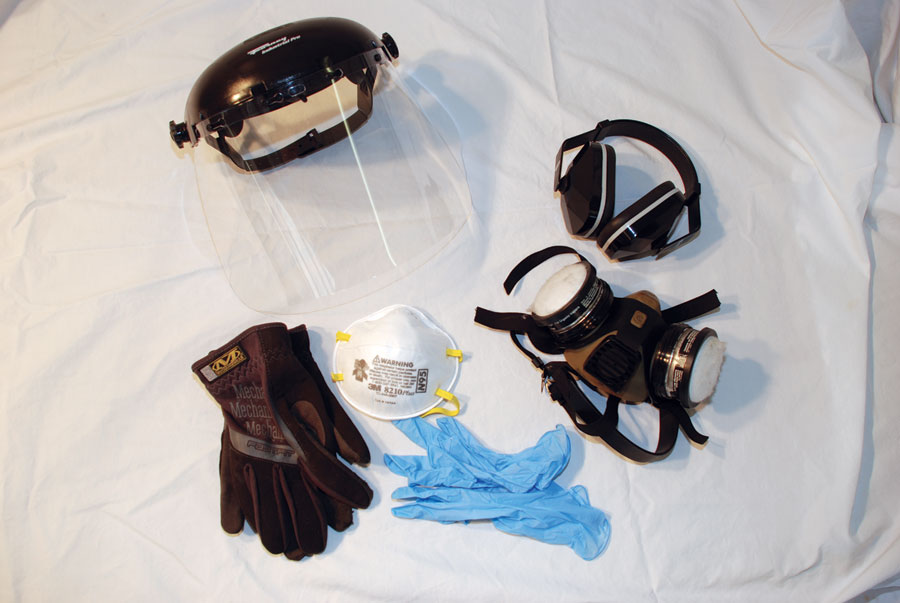
Personal protective equipment should always be available and used in your shop to prevent injuries. A face shield or safety goggles protect from flying metal during pounding, grinding, or drilling. A simple dust mask is fine when particles are benign, but a respirator should be used whenever fumes or toxic dust are present. Ear muffs are a must for noisy operations such as riveting. Nitrile gloves are good to protect hands from grease, chemicals, or resins. Work gloves protect hands when sharp metal edges are present.
Most accidents can be prevented by using a few simple pieces of protective equipment, namely safety glasses, gloves, and hearing protection. Throw in a respirator to protect from chemicals, paints, and dust from sanding or grinding composites, and you have covered most potential hazards. Of course, most does not mean all, so be sure to check the manufacturer’s literature including MSDS whenever you introduce a new chemical of any kind to your shop. Some things are surprisingly toxic, especially some paint products.
After buying these basic safety items, the next most important step is to use them. It is very easy to get lazy about putting on safety glasses or a respirator, but just train yourself to never skip this important step. Make it an automatic activity like fastening your seat belt.
Hammers
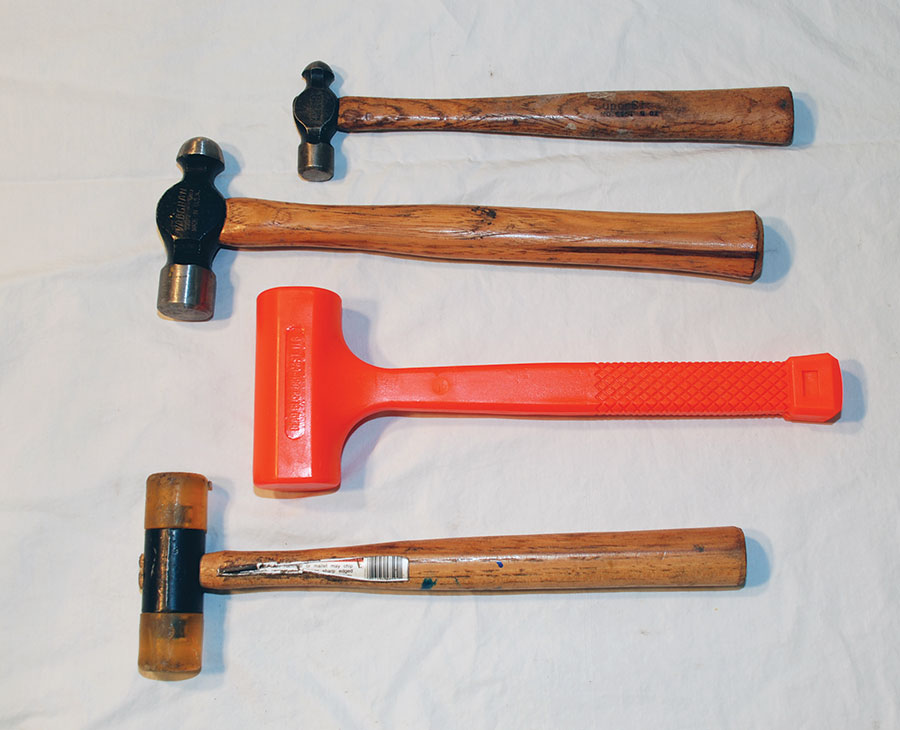
Everyone has heard the usually humorous and almost always not helpful comment, “Just use a bigger hammer.” I can say that, with only the rarest exception, this is not the solution to any airplane building or maintenance problem. Three types of hammers are useful to an airplane builder: a ball-peen hammer, a soft-faced or plastic hammer, and a dead blow hammer. The ball-peen hammer is used to drive chisels and punches or a tight-fit bolt such as you may encounter attaching a wingspar to the main structure. Other than that, it is hard to think of an appropriate use of this tool. It should never be used directly on aluminum or on any hardware with a normal fit. If you just feel the need to hit something with a hammer, try to find something that is not going to be used on your airplane.
Hammers have their place. The ball-peen hammer is good for driving punches. Use a size that is appropriate to the task. The dead blow hammer is something of a specialty tool, but it is handy for use with a rivet frame. The plastic hammer should get most of the hammering duties around an airplane project.
Except as noted above, anything you actually care about should be struck with a soft-faced (usually plastic) hammer. Bolts that need a little help going in or coming out should only be struck with a plastic hammer, as should aluminum engine or airframe parts. At least in theory, a hammer should be among your least-used tools. If you think you need a hammer, first try to find a way to solve the problem some other way.
A dead blow hammer is a special tool used for driving the striker of a rivet frame, or it can be used to bend metal held in a vise that is too thick to bend with a hand seamer. Its plastic face will not mar aluminum parts or send metal chips flying towards your eyes.
Be sure to use eye protection when using a hammer, especially a ball-peen hammer as it strikes steel.
Screwdrivers
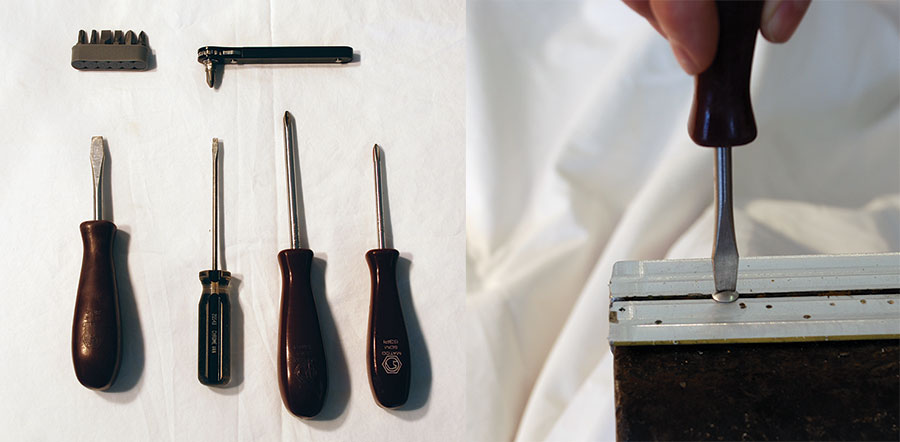
Like hammers, screwdrivers are pretty familiar, but there are a few important points to make. One, be sure to use the right size and type of screwdriver to match the screw. A straight-blade or common screwdriver needs to fill the slot in the screw and have a blade that is at least 75% as wide as the slot. A blade that is too thin or too narrow can damage the screw and slip out of the slot, possibly causing injury. Once a slot is damaged even the right screwdriver may not be able to turn the screw. Phillips-head screwdrivers also come in sizes. The most common size is the #2, but smaller sizes are common on electrical components. The same admonition applies: Use the correct size to avoid damage to the screw.
(Left) Screwdrivers come in different sizes and shapes. Use the one that best fits your screw. From left to right: common screwdriver; small common screwdriver; #2 Phillips screwdriver, the most common type used on airplanes; #1 Phillips for smaller screws. Above is an offset screwdriver with interchangeable bits. (Right) Be sure to use the correct-sized screwdriver for the job. The blade should be at least 75% of the width of the slot.
A screwdriver needs to be aligned as closely as possible to the length of the screw. Slight misalignment can usually be tolerated, but if clearance is a problem, use an offset screwdriver rather than risk damaging the screw.
Power screwdrivers or cordless drills are handy for taking things apart, but great care should be used when assembling things with a power tool. Set the torque to a low value and do the final turning by hand to be safe, at least until you are very confident in the amount of torque your tool applies at any particular setting. Aircraft screws should go in fairly easily, so any unexpected resistance to turning a screw is reason to back off and check for damaged threads or cross threading. If excessive force is required something is wrong. Take a breath and start over.
Pliers
Pliers definitely have their uses around airplanes, but not as a substitute for a wrench. Slip joint and water pump pliers are great for gripping round stock or steel pipe, or for bending small pieces of metal if the jaws are well protected with tape. Needle-nose pliers are very useful for working with cotter pins and many electrical tasks. Diagonal-cutting pliers (dikes) are great for shortening cotter pins and cutting electrical wire and zip ties. Vise-Grip pliers can work well as a small vise or to remove broken studs. And finally safety wire pliers are indispensable for working with safety wire. The one thing they all have in common is that they should never be used to tighten or loosen a nut or bolt except in the case of a true emergency. That is because they will make hash out of a nut or bolt in short order.
Different pliers are made for different jobs. From left to right: water pump pliers, safety wire pliers, needle-nose pliers, dikes or side-cutting pliers, and Vise-Grips. Don’t use pliers if a wrench will do the job better.
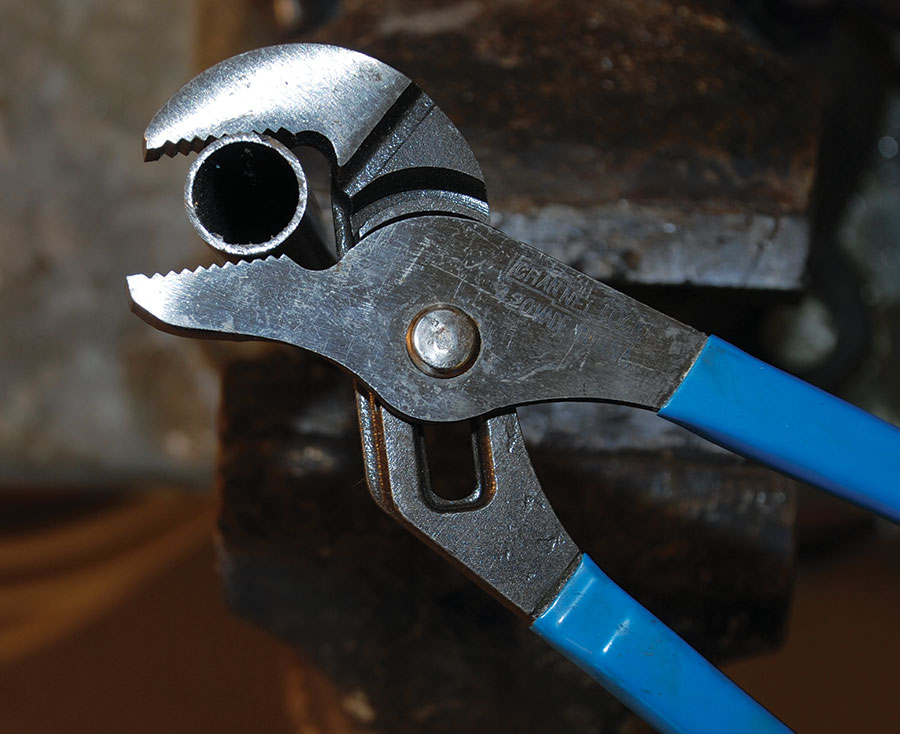
By the way, when using water pump pliers or Vise-Grip pliers to turn round stock or remove a broken stud, there is a right way to orient them, which is to have the handle extending right to tighten or left to loosen, with the heavier jaw on top. This will work to tighten the grip around the part. These tools are rarely used around airplanes.
Water pump pliers can be adjusted for different diameter material. These pliers are well positioned to turn this pipe clockwise.
Punches and Chisels
Center punches, both standard and automatic, are well suited for marking hole locations in metal parts prior to drilling. In fact, you should never just try to start drilling a hole in metal before center-punching the starting point. This keeps the drill from drifting off the mark as you start the hole. The standard center punch should be struck with a ball-peen hammer of a size appropriate to the thickness of the metal being marked. In other words, use a small hammer on thin sheet metal. Use a larger hammer on a casting or other more substantial piece of metal. Always use safety goggles when striking a punch with a hammer.
Drift or pin punches are used to drive out bolts, bearings, and other items. Never use a steel drift punch on aluminum. A steel punch can be used against steel parts if they are hardened and unlikely to be marred by the softer steel punch, but a brass punch usually offers a better solution. Take care when using a punch to avoid damaging parts.
A cold chisel is rarely used around an airplane, but if one is required be sure that it is sharp and the head is not mushroomed. Dress dull or damaged punches with a bench grinder, again, with safety glasses in place.
Wrenches
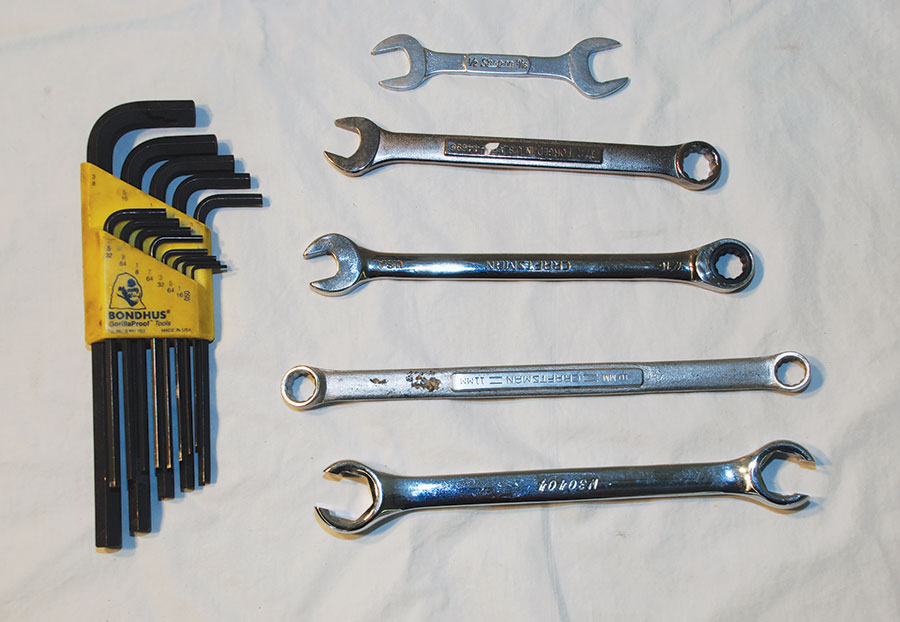
A good set of combination wrenches is a must for any airplane builder. The combination wrench has both an open end and a box wrench of the same size on each tool, making it the best choice for the largest number of situations. A set of box wrenches or open-end wrenches can be a good choice for a second set to cover times when two wrenches of the same size are required.
Allen wrenches are shown on the left. From top to bottom: Open-end wrench; combination wrench, your first choice in most situations; combination wrench with ratcheting box end; box wrench; and a flare nut wrench.
Whenever possible use the box end of the wrench to gain the most secure grip on the nut or bolt. When using an open-end wrench, orient the wrench if possible with the handle extending to the right to tighten and the left to loosen with the heavier jaw on top. The wrench is stronger this way and less likely to deflect under a heavy load.
Always resist the urge to just grab an adjustable wrench. Those wrenches are for emergency use or when you can’t afford to carry the weight of a full set of wrenches in your plane. They are much less capable of fitting into tight places and tend to deflect much more under load. Everyone has some of these wrenches, but for the most part they should be left in the toolbox. Train yourself to recognize the size of wrench needed for different nuts and bolts and grab the correct combination wrench as your first choice.
Another type of wrench that is nice to have is the flare nut wrench in sizes to fit the fuel, brake, and vent lines in your airplane. They do a much better job of gripping the flare nuts than open-end wrenches. If you are so inclined, you can add some aluminum hose wrenches to your toolbox. These come in sizes to fit the ends of Aeroquip and other similar hoses. Their benefits are they are less likely to mar the hose ends, and their short length makes it less likely that you will over-torque your hose fittings.
Lastly, a set of Allen wrenches will come in handy. Be sure to get good quality tools that won’t fail or damage parts.
Ratchets and Sockets
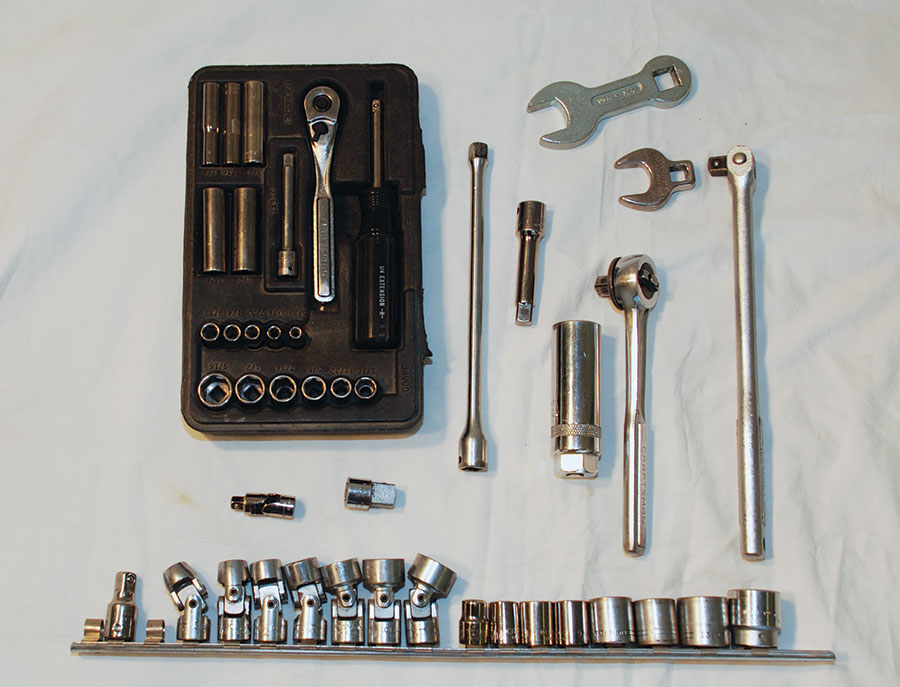
A good socket set is an essential part of any airplane builder’s toolbox. Most airplane work can be done with a 1/4-inch drive set containing both standard and deep sockets, but some larger items such as prop bolts, engine mount bolts, and spark plugs will require a 3/8-inch drive setup. Add various extensions, a universal joint, and a special spark plug socket, and most needs are met.
Various sockets, ratchets, and related accessories are must-have tools for building airplanes. Buy good tools, but don’t go crazy. You can spend a fortune on tools if you aren’t careful. Note the crow’s foot and propeller wrench at the upper right. These may be needed to install your propeller.
Always use the right size socket and never try to force metric sockets onto American nuts and bolts or vice versa. Do not use a pipe to extend the handle of a ratchet. This is a good way to break your tools. If you need to apply more torque, get a tool designed to deliver it such as a breaker bar or a ratchet and socket with a larger drive such as 1/2-inch. Also do not use standard sockets on impact wrenches. This will quickly split out the sides of a standard socket. There are special sockets made for impact wrenches; use those.
Torque Wrenches
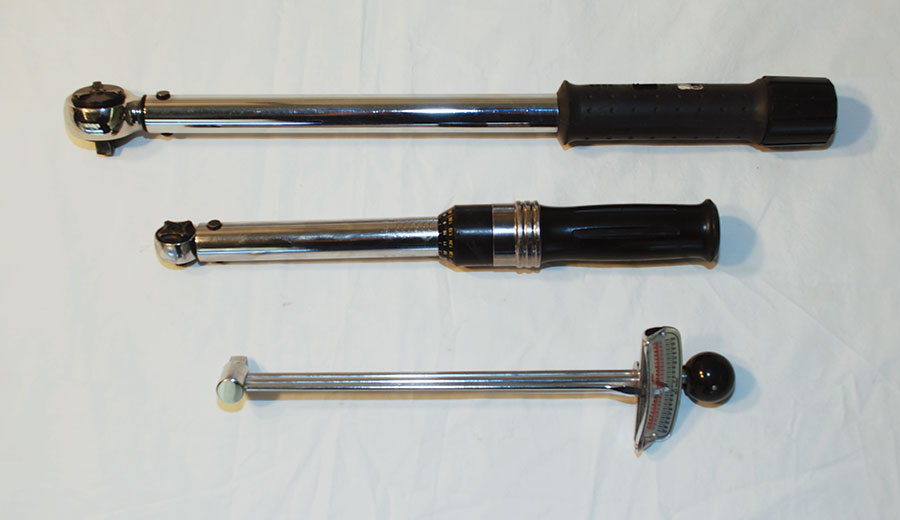
Every airplane builder will need a torque wrench at some point, actually at many points. Many things are tightened by feel, but if you don’t have a lot of experience, your “feel” may not be too accurate. This is especially true if your mechanical experience has been working on cars or something larger. It is easy to over-tighten the small nuts and bolts used on airplanes, so take the time to torque things until you develop a sense of the correct tightness for different size fasteners. Even after much experience, you will want to actually torque critical items—things that keep your engine running or keep your airplane’s critical parts where they belong.
Torque wrenches are needed for critical nuts and bolts to be sure they are properly tightened. From top is a 3/8-inch drive wrench, -inch drive wrench, and a beam-type -inch drive wrench. The beam wrench is the least expensive and is particularly handy for setting alternator belt tension.
If you can only afford one torque wrench, get one in 3/8-inch drive that will do small fasteners plus prop bolts and spark plugs. A 1/4-inch drive wrench is nice for smaller nuts and bolts but won’t work for larger items. By the way, torque wrenches need to be calibrated annually or after they have been dropped on a hard surface.
Metal Cutting and Shaping Tools
Just about every airplane builder will need a few metal cutting tools such as sheet metal shears and a hacksaw. Aviation shears come in right, left, and straight (green, red, and yellow) to optimize their cutting for different jobs. For example, right hand shears work best for cutting a small amount of metal off the right side of a larger piece or for cuts that require curving to the right. It is nice to have a full set to be prepared to make whatever cuts may be required.
Metal cutting and bending tools: Hacksaw on left, a hand seamer at top, then right, left, and straight shears below.
The hacksaw is a versatile metal cutting tool, but to get the best results, a number of blades with different numbers of teeth per inch (pitch) are needed. The important thing is to have at least two teeth of the blade in contact with the part being cut at all times. Thus thin wall tubing or sheet metal cuts best with 32 teeth per inch, but a larger piece of solid stock will cut more quickly with a blade having 14 to 18 teeth per inch. Hacksaws cut on the forward stroke, so be sure to install the blade with the teeth pointing forward (away from you).
Files are simple and useful, but a little practice is needed to get good at using them well. From top to bottom: triangle file, flat file, panzer file, rat-tail file, half-round file, and a file card (used for cleaning).
Various files and deburring tools are must-have items for any airplane builder. A panzer file is great for shaping or straightening the cut edges of aluminum. Its large, widely-spaced teeth are ideal for soft material, but are not well-suited for steel. The flat file, with parallel edges and sides; the half-round file, with one side flat and the other rounded; and the triangle file are all useful for different tasks. The flat file is ideal for deburring metal edges and smoothing cut surfaces. It is also good for dressing up warped exhaust pipe flanges. Practice holding it flat as you push it forward to cut. The flat face of the half-round file can serve many of the same needs met by the flat file. The rounded face is good for dressing out nicks in metal propeller blades or deburring rounded edges. The triangle file can be used to clean up minor damage to threads or smooth out smaller cut parts. It takes some practice to become skilled with these tools.
Measuring and Layout Tools
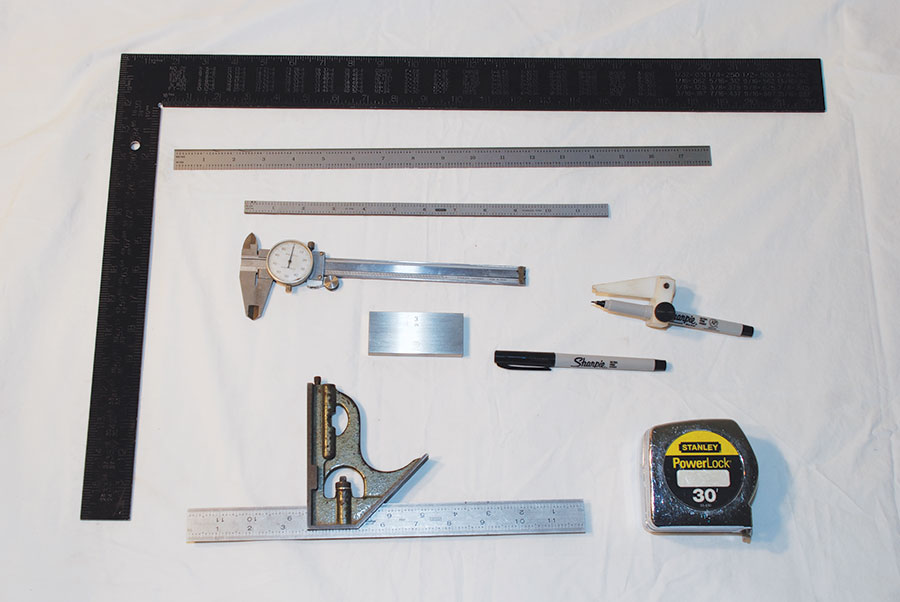
It is pretty hard to build a good airplane without the ability to take accurate measurements, but you don’t have to spend a great deal of money to cover the vast majority of measuring needs unless you are doing serious engine work. A set of 6-inch calipers calibrated to .001 inch will serve almost all your precision measuring needs. Get a gauge block to check its accuracy from time to time, and be careful to protect your calipers from damage or dirt.
Various squares, rulers, and calipers will be needed to lay out the work as you build your airplane. Buy a gauge block, shown below calipers, to check the caliper’s accuracy from time to time.
Steel rulers are very useful for accurate measuring and layout. A 6-inch ruler and an 18-inch one will cover most of your needs. For larger items a good quality tape measure will do the job. Micrometers and bore gauges are needed for internal engine work, but typically nothing else on most airplane projects.
For large items, a framing square can come in handy, but the smaller combination square is much more useful for small parts. Marking parts is best done with something like a Sharpie pen with a fine point. Pencil should not be used on aluminum, nor is it advisable to use a scribe in most cases.
Use the Proper Tool
The best quality work comes from using the correct tool for the job at hand, not from improvising with whatever is convenient. Buy good tools and keep them in good shape. It will make doing good work so much easier.

