Good power tools help the airplane builder work faster and better. And in some cases, without power tools some jobs would simply not be possible to do. In each case the amateur airplane builder should acquire good quality tools for jobs that will be repeated many times, save money on tools that will be seldom used if possible, and not be afraid to share tools that may only be used once or twice during the construction of your project. The key to doing good work, in other words best practices, is to get tools that are well-suited to the task at hand. Sometimes that is a $250 drill by Sioux, but other times it is a $25 die grinder on sale at Harbor Freight.
Let’s look at the most common power tools you will need to do a good job building your airplane. These will include drilling tools—air drills, cordless drills, and drill presses; band saws of various types; bench grinders and sanders; air compressors and air tools; and lifting equipment—jacks, hoists, and winches.
Drills and the Drill Presses
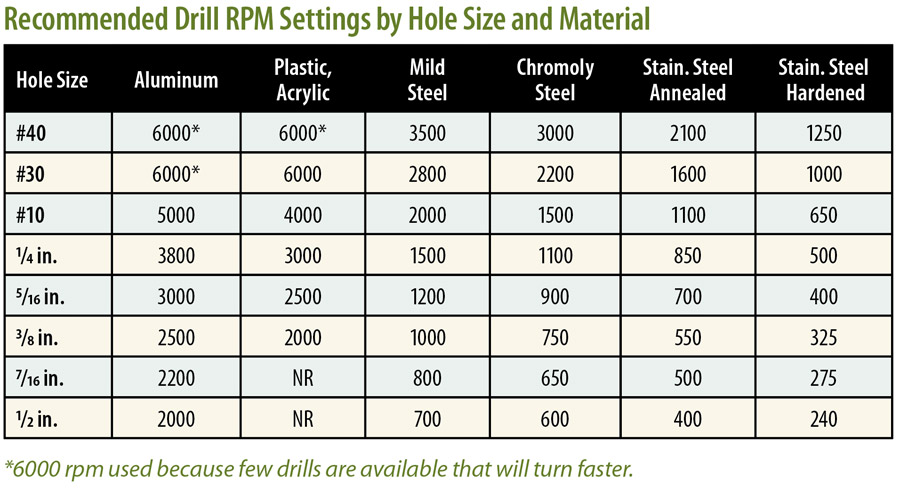
If you are building a metal airplane such as any of the RV-series, you will need a good air drill that will turn 5000-6000 rpm to do a good job drilling holes for rivets. Most inexpensive air drills will only turn about half that speed, and they will work, but a good high-speed drill by Sioux or a similar quality manufacturer will do a much better job, producing a rounder, cleaner hole. You have a lot of holes to drill, so this is probably somewhere where you should spend a little money and get a really good drill. As you can see from the table you will also need a drill that will turn considerably slower for steel and larger-diameter holes in aluminum. A second air drill is nice to have, but a cordless drill with a 1/2-inch chuck, which you will need anyway, will cover a broad spectrum of needs and let you save the cost of a second air drill.
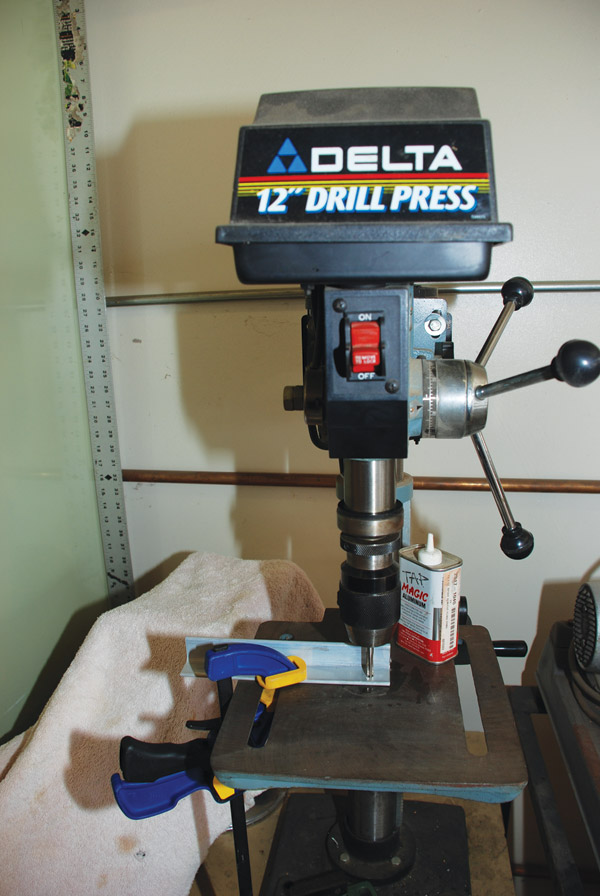
A drill press will often come in handy while building a plane. The ability to work at varying rpms and get holes perfectly straight contribute greatly to producing good work. A drill press can also be very helpful to start a tap into a hole by keeping it perfectly perpendicular to the work. Turn the chuck by hand to start, and only use power if you have practiced and then only if you can set your drill press to a very slow rpm. Powering a tap is really best done with a milling machine. A small drill press will do for most drilling jobs you will encounter, so there is no need to spend a great deal of money on this tool. Remember to secure your work whenever you use a drill press. You do not want the work to start spinning or flying across the room. Be sure to wear eye protection whenever using a drill or drill press.
Keyless chucks do not make drills work better, but they surely come in handy when changing drill bits. Chuck keys have a bad habit of disappearing just when you need them, so why not just do away with them altogether?
Be sure to always use sharp bits when drilling. Buy several of each common size and sharpen or replace them often. Dull bits do a poor job of drilling clean holes. For holes over 3/8 inch in sheet metal, use a step drill to enlarge the hole to its final size. This is safer and makes a better hole.
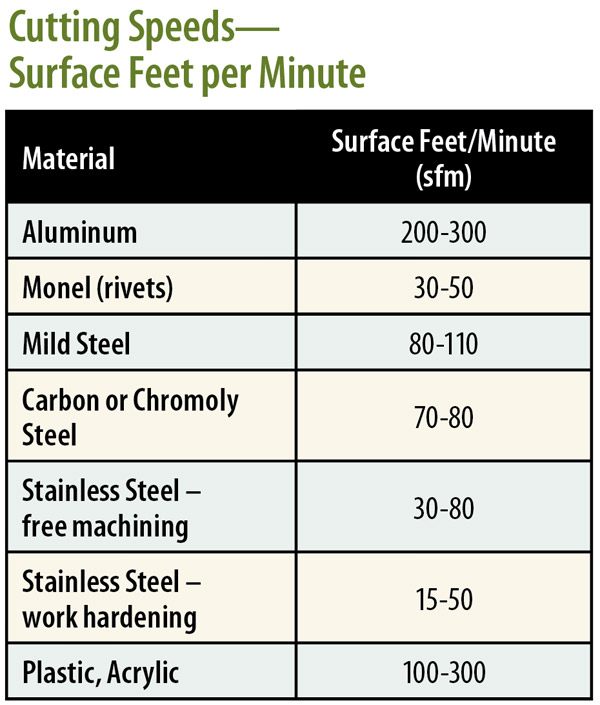
Drill speed is based on surface feet per minute (sfm). Here is the formula, if you would rather not use the table. This sfm number will appear again when we look at band saws.
Formula: rpm = (sfm x 3.82)/drill diameter in inches
Threaded and Through-Hole Sizes
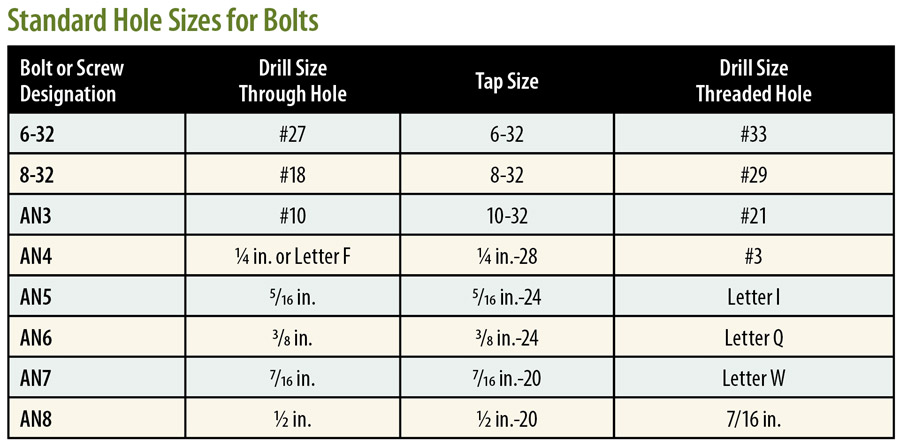
When drilling holes for various bolts and screws, be sure to make the hole the correct size. The table shows the correct size hole for the common bolt and screw sizes you are likely to encounter. The tap size is the size you would need to buy to make a threaded hole for the bolt or screw on the table. The “through-hole” drill size is for a bolt that simply passes through the material without threading into it. This is by far the most common type of hole you will need to drill. The drill size for a threaded hole is the undersized hole that should be drilled before tapping a thread into it.
Note that for close-tolerance NAS bolts you will want to drill the hole undersized and ream it to the exact dimension required, typically .001 inch undersized. For example, a NAS6606 bolt should be placed in a hole with a finished dimension of 0.374 inch. First drill the hole to 23/64 inch and then ream it to .374 inch. These reams are available from any vendor that caters to machinists.
Band Saws
A metal-cutting band saw, at least one that will cut slowly enough for aluminum sheet, comes in very handy. The problem with most common band saws is that they are geared to cut wood at speeds that are way too high for metal, way faster than the more desirable cutting speed of 300 sfm we would like for aluminum. There are vertical band saws that will gear down to the speeds needed for cutting aluminum and steel, but they will cost $1000 or more. Horizontal band saws start out at much lower prices, but they are less versatile. Still, a good vertical band saw is worth considering if your budget will stand it. It is a lifetime tool if you get a good one. The budget-minded builder can gear a wood-cutting band saw down to the proper rpm range with some extra pulleys and belts.
A band saw geared down to cut metal is very useful but admittedly a bit expensive. Here a builder cuts off a piece of aluminum angle using a cutting guide.
The same comments made about hacksaw blades apply to band saw blades. Get a blade with a fine pitch for tubing and thin metal. Use a blade with a coarser pitch for thicker material or solid pieces. Cutting fluid will make sawing easier, especially with larger and harder pieces of material.
An alternative to a band saw is a handheld jig saw. They are inexpensive and work especially well for holes where there is no access for a band saw blade. Be sure to wear eye and ear protection when using these tools. Gloves are a good idea, too, to protect you from sharp edges produced by cutting.
Bench Grinders and Sanders
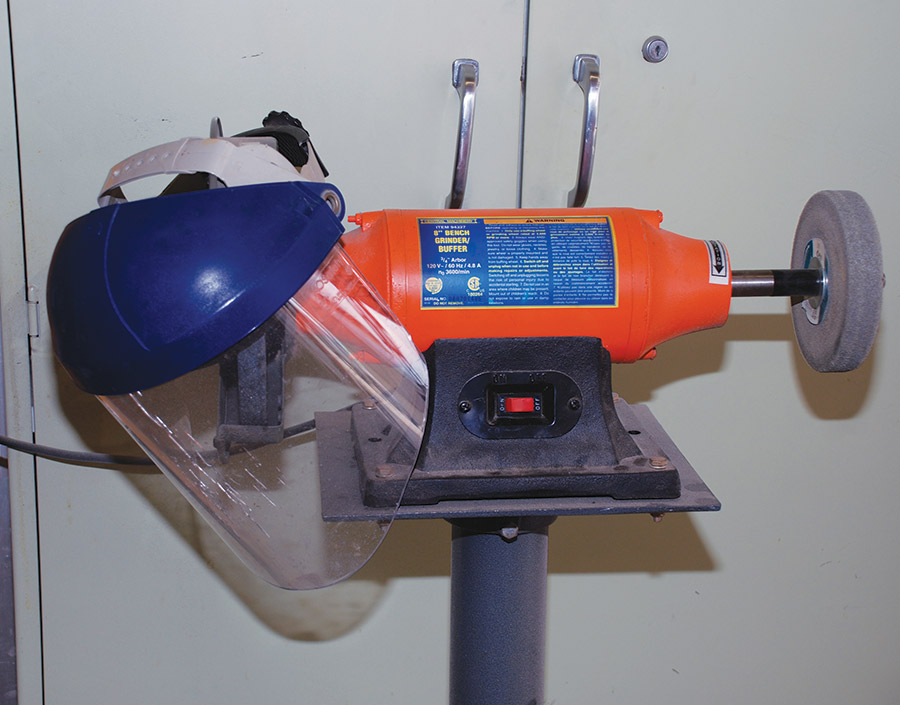
Bench grinders are handy and not too expensive. You will need one to sharpen drill bits and dress up punches, chisels, and screwdrivers. Consider setting yours up with an abrasive wheel on one side and a Scotch-Brite wheel on the other. The Scotch-Brite wheel is great for deburring. Always use eye protection when grinding or power deburring. It is a good practice to just hang a face shield on the grinder when it isn’t in use to remind you of how important it is.
A bench grinder, with one side set up with a Scotch-Brite wheel, works well for general sharpening and grinding on one side and polishing and deburring on the other. Keep a face mask hanging on the grinder to remind you to always use it.
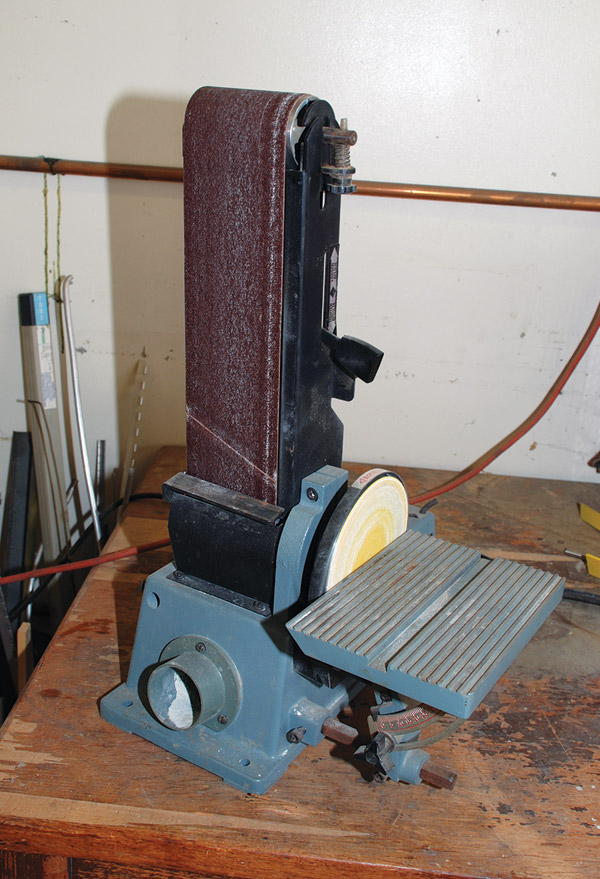
A bench mounted combination belt and disc sander is another power tool that often comes in handy. It works well for deburring and shaping parts that have been rough cut. A neat little trick for fabricating a bushing to a precise dimension is to cut it off a little long, then chuck it up in a drill and use the belt sander to finish it off to the exact length you need. With some care you can make bushings that are within a few thousandths of an inch of the desired dimension.
Air Compressors and Air Tools
The air tools you will need will depend on the type of construction of your plane. These tools will start with an air compressor. The size and accessories you will need will depend on what type of project you have and whether or not you plan to paint it yourself. Here are some rough guidelines: air drill—12 cfm @ 90 psi, rivet gun 3X—3 cfm @ 90 psi, paint gun—10-12 cfm at 40 psi. For more detailed requirements look at the specifications of the tools you intend to use. You can see that the air drill is the big consumer of air, but you can undersize your compressor a bit if you get a larger tank or don’t mind waiting for the compressor to catch up with you every now and then. Good advice is to get the biggest compressor you can afford and run with the power you have available. In most cases you will need a dedicated electrical circuit for the compressor. If you plan to paint your plane, you will also need a very good drying system for the air supply.
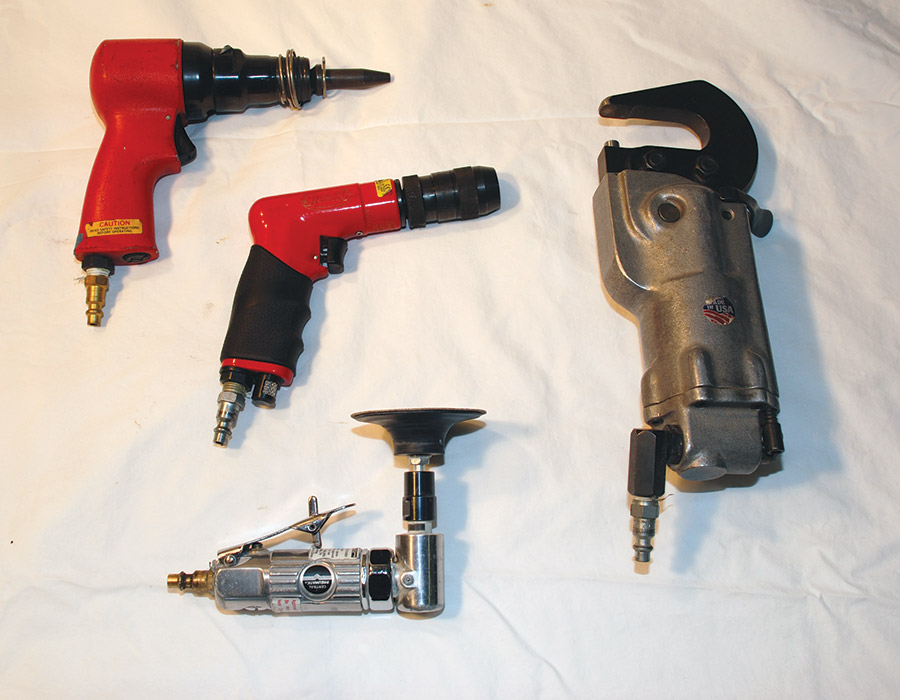
A selection of air tools that most metal airplane builders will need, including an air drill, a rivet gun, an angle grinder with sanding attachment, and a rivet squeezer. The angle grinder is a Harbor Freight unit used for working on the cowl and fairings.
Rivet guns are sized for the rivets they will be driving. A 2X gun is perfect for 3/32-inch rivets and handles 1/8-inch rivets pretty well. A 3X gun is what most RV builders use and will do a fine job on 3/32- inch or 1/8-inch rivets and a marginal job on 5/32-inch rivets, but a 4X gun is much better for rivets larger than 1/8 inch. They make even larger rivet guns, but it is hard to imagine why you would need one for your project. The best results will come from using the proper sized rivet gun.
If your project has a lot of pull rivets (sometimes called pop rivets), you will likely want to consider buying a pneumatic rivet puller. A hand puller will work fine for a few rivets, but if you have several hundred or more, a pneumatic puller starts to look like a pretty good idea and will certainly do a more consistent job of pulling rivets for you. Good ones run $350-400 or more, but inexpensive ones can be found for around $80-100. Check with your fellow builders on the forum for your type of project or VansAirForce.net to get specific recommendations on this. A strategy for the budget-minded is to get the Harbor Freight puller for $80 and add the extended warranty. Then if it dies, just go get another one.
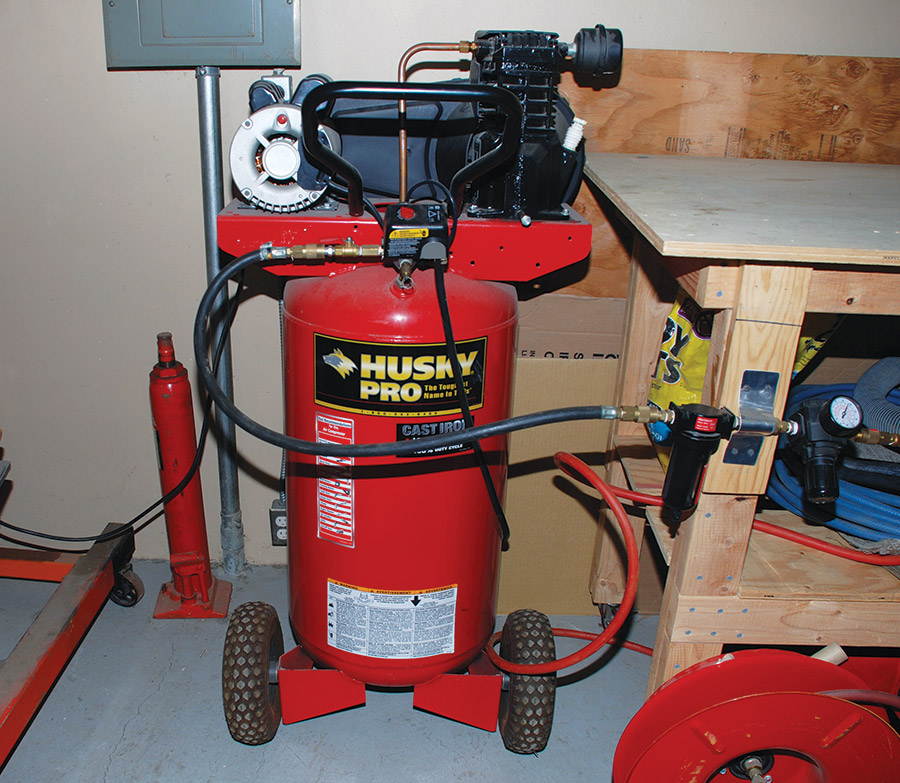
This 120-volt air compressor from Home Depot provides plenty of air for airplane building. This unit draws 15 amps, so it will need its own electrical circuit. This RV-8 builder will need to install a good air dryer when it comes time to paint his plane.
Composite builders will have many needs for air sanders and die grinders. Since it is important to run these tools without oil when working with composites, this is one time where Harbor Freight Tools is the first choice. Get cheap tools and let the fiberglass and dry running eat them up. Throw them away and get new ones. Don’t spend $250 on a good die grinder and watch it get destroyed. There is no need for such waste. You should also have an inexpensive air drill set aside for composite work, one that never gets oiled.
When working with composites it is vitally important to eliminate possible sources of contamination to the material to ensure the best possible bond. Air tool exhaust will contain oil spray if the tool has ever been oiled. Since your life may depend on good bonds in your plane, you should never use air tools that have been oiled when working on your composite airplane. Of course, working on metal airplanes is another matter. Tools used on metal airplanes should be oiled from time to time to keep them working well. However, once a tool has been oiled, it is no longer fit for use on any composite structure.
Winches, Hoists, and Jacks
Every builder will need an engine hoist at some point. You can rent one or buy one at Harbor Freight. They are pretty reasonable, especially if you wait and get one on sale. Of course, there are other ways to hoist your engine into the plane, but most of them are much less convenient. A come-along or winch attached to a beam in your shop or garage will work, but you must be very careful to check the supporting beam to be sure it will carry the weight of your engine. You must also move your airplane into position under the engine instead of being able to move your engine to the airplane. In all cases be sure that your lifting device has sufficient capacity to do the job and do not leave your engine hanging unattended, especially from a hydraulic engine hoist. Lower the engine to a solid support if it is not going to be immediately attached to the airplane.
A second thing to consider is the stability of the airplane itself. A taildragger will suddenly become very light on its tail once the engine is installed, especially if the wings have not yet been attached. On the other hand, a tricycle-geared airplane will fall back on its tail if you remove the engine without providing support at the back of the plane. Be prepared to deal with these situations before you begin work.
Conclusion
Best practices are always safe practices first. Use the recommended personal protective gear when working with power tools, or any other tools for that matter. Be sure that your work is secure and your tool is properly positioned before applying power to it. A poorly positioned drill or rivet gun can do a lot of damage very quickly if you aren’t careful. Every builder will end up with a few ruined parts before his or her plane is finished, but there is no need to add to that because of poor work practices. Use the correct tool for the job and take a class or get some experienced help if you are not sure how to use it properly.

