 As a new builder (of a Panther), I came quickly to the step of needing to mark rib centerlines to align the ribs with the predrilled holes in the skin. Reading ahead in my manual, I saw that I would also need to mark some flanges at a specific distance from their edges (not on center). I wanted to come up with a marking method that was adjustable and that led to the simple DIY marker holder shown here.
![]() As a quick side, I know there are commercially available tools that do a similar task, but I like mine because it rests flat on the work table, so it’s very secure. I made this to fit Sharpie Ultra Fine Point markers, which seem to be the most popular, but you can change the holder dimensions to fit your preferred marker.
As a quick side, I know there are commercially available tools that do a similar task, but I like mine because it rests flat on the work table, so it’s very secure. I made this to fit Sharpie Ultra Fine Point markers, which seem to be the most popular, but you can change the holder dimensions to fit your preferred marker.
Marker Holder
Cut the aluminum rod to length and deburr/finish the ends as needed. Drill the 0.422-inch (27/64) hole through the rod as shown. Then drill the 0.437-inch (7/16) only partway through (about three-fourths of the way). This stepped hole will give a nice repeatable “stop” for the marker. Drill a 0.106 (#29) hole through the center of the rod, into the larger hole, and tap this hole for a #6-32 screw.
Clamping Block
Cut the acetyl plate to 1.5×1.0 inches. Deburr and finish surfaces as desired. Drill the 3/4-inch hole though the face of the block. Then drill the hole for the locking screw as shown: First drill 0.136 (#29) through, then drill the screw clearance hole (0.166, #19) halfway through the block. Tap the hole #8-32. Note that this hole is drilled before cutting the slot, which keeps the block stable for drilling and tapping. Now cut the slot (hacksaw or bandsaw) at the midpoint of the block as shown.
Press the rod into the hole in the block. (If the fit is too tight, install the #8-32 screw and tighten just enough to close the saw gap slightly, then redrill the 3/4-inch hole.) Insert the marker “tail-first” into the larger hole in the rod. Lock it in place with the #6-32 screw. Be careful not to overtighten as this could crack the marker.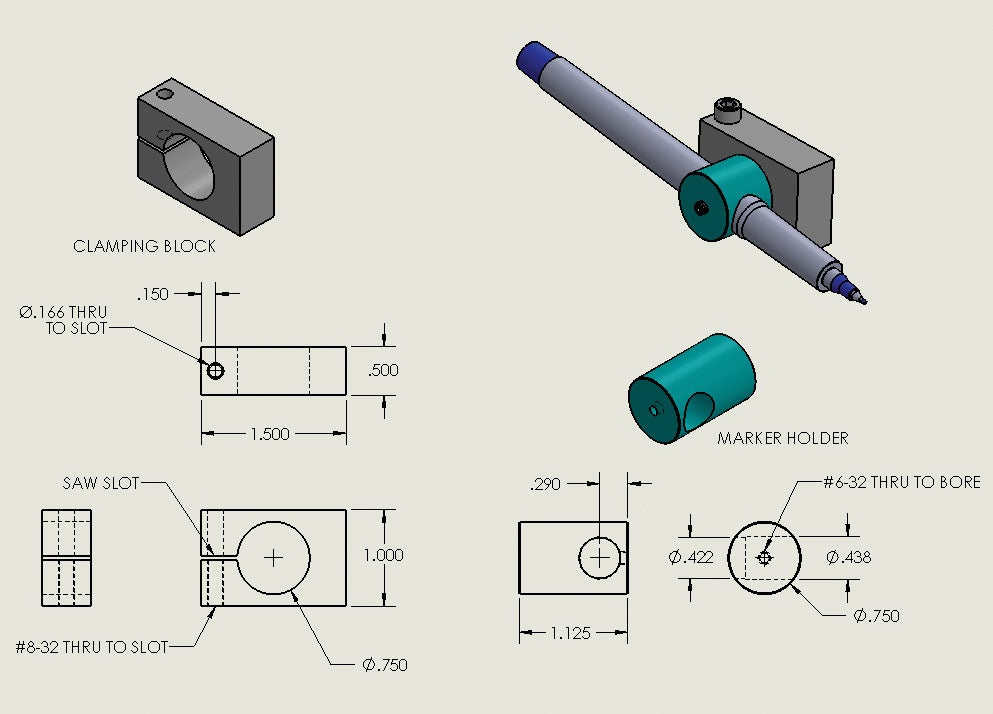
In Use
Use a ruler or machinist’s square to set the tip of the marker to the correct height by rotating the rod. Once set, tighten the #8-32 screw to lock the position. To get a little fancier, press a thumbscrew cap on the head of the clamp screw.
To use, you can either keep the holder stationary on a flat surface and drag the rib along the tip of the pen, or, hold the rib stationary on the flat surface and drag the pen around the rib. Note that you can leave the marker in the holder and still put the cap back on, so it doesn’t dry out. Besides the advantage of adjustability, this technique also eliminates having to compensate for the pen-tip width that would be needed using a straightedge.


