 While building my RV, a non-aviation friend stopped by to look at the nearly completed plane and commented, “I can’t imagine the number of decisions you have made.”
He was right, building does require a lot of decisions. I guess the second one I needed to make was selecting what aircraft to build. (The first decision I made was to build a plane.)
A year after completing my RV-9, I ordered the plans for a Pitts S1-C. There, decision made, or so I thought. The very day the Pitts plans arrived, my wife told me she was pregnant. To this day, those plans have only been out of the drawing tube twice: the day they arrived and two years ago when my now 12-year-old son wanted to look at them.
Fast-forward and the bug to scratch build is still with me. While my son really wants a Pitts, that is not a good family hauler. Not to mention it will be a little difficult for him to get flying lessons in a single-seater.
What to build? I have read just about every article on selecting kits: needs versus wants, average trip length, average passenger load, etc. Everything points toward a family hauler like the RV-10. Although I really like the big RV, my heart isn’t in it. I took a long look at the Bearhawk: four seats, taildragger, good short-field capability, etc. The problem for me, a man of simple means, is that I choke over the cost of the (I)O-540 engine and constant-speed prop for both of those projects. (I know, the Bearhawk can be built with a 180-hp O-360.) With that in mind, I bought the plans for a Bearhawk LSA, thinking my son could learn to fly in it and we could take it camping. Then my wife mentioned she likes to go camping too, so I ordered the plans for the WagAero Sportsman 2+2, which is a homebuilt version of a Piper PA-14 Family Cruiser, essentially a four-place Super Cub. The original PA-14 was powered by an O-235, and most Sportsman 2+2s are powered by an O-320 or O-360.
Now We’re Getting Somewhere
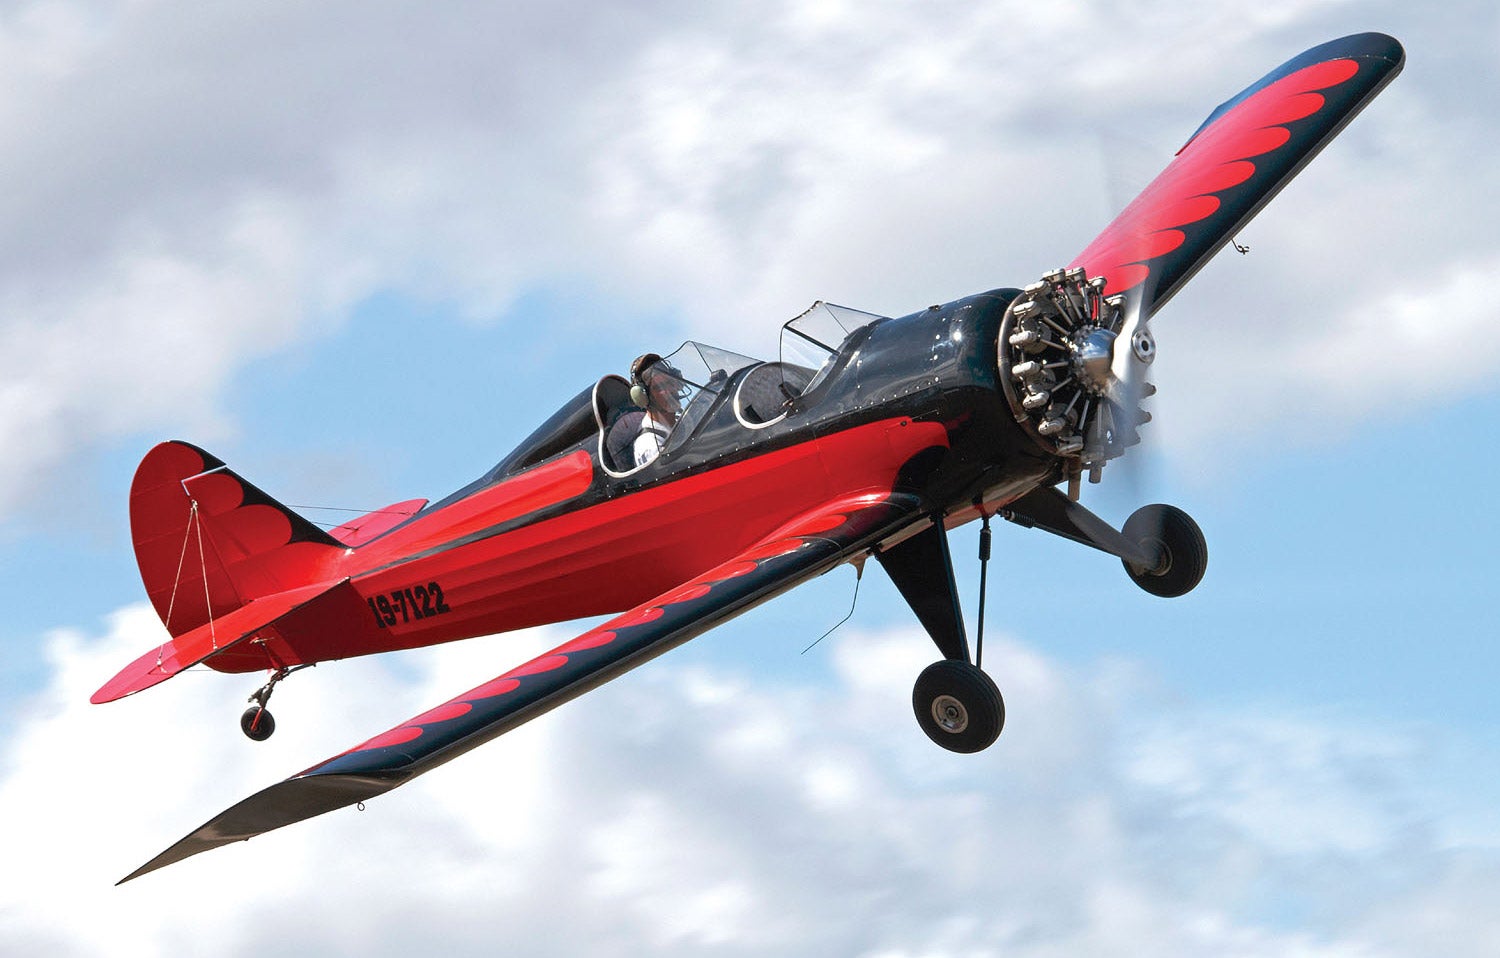
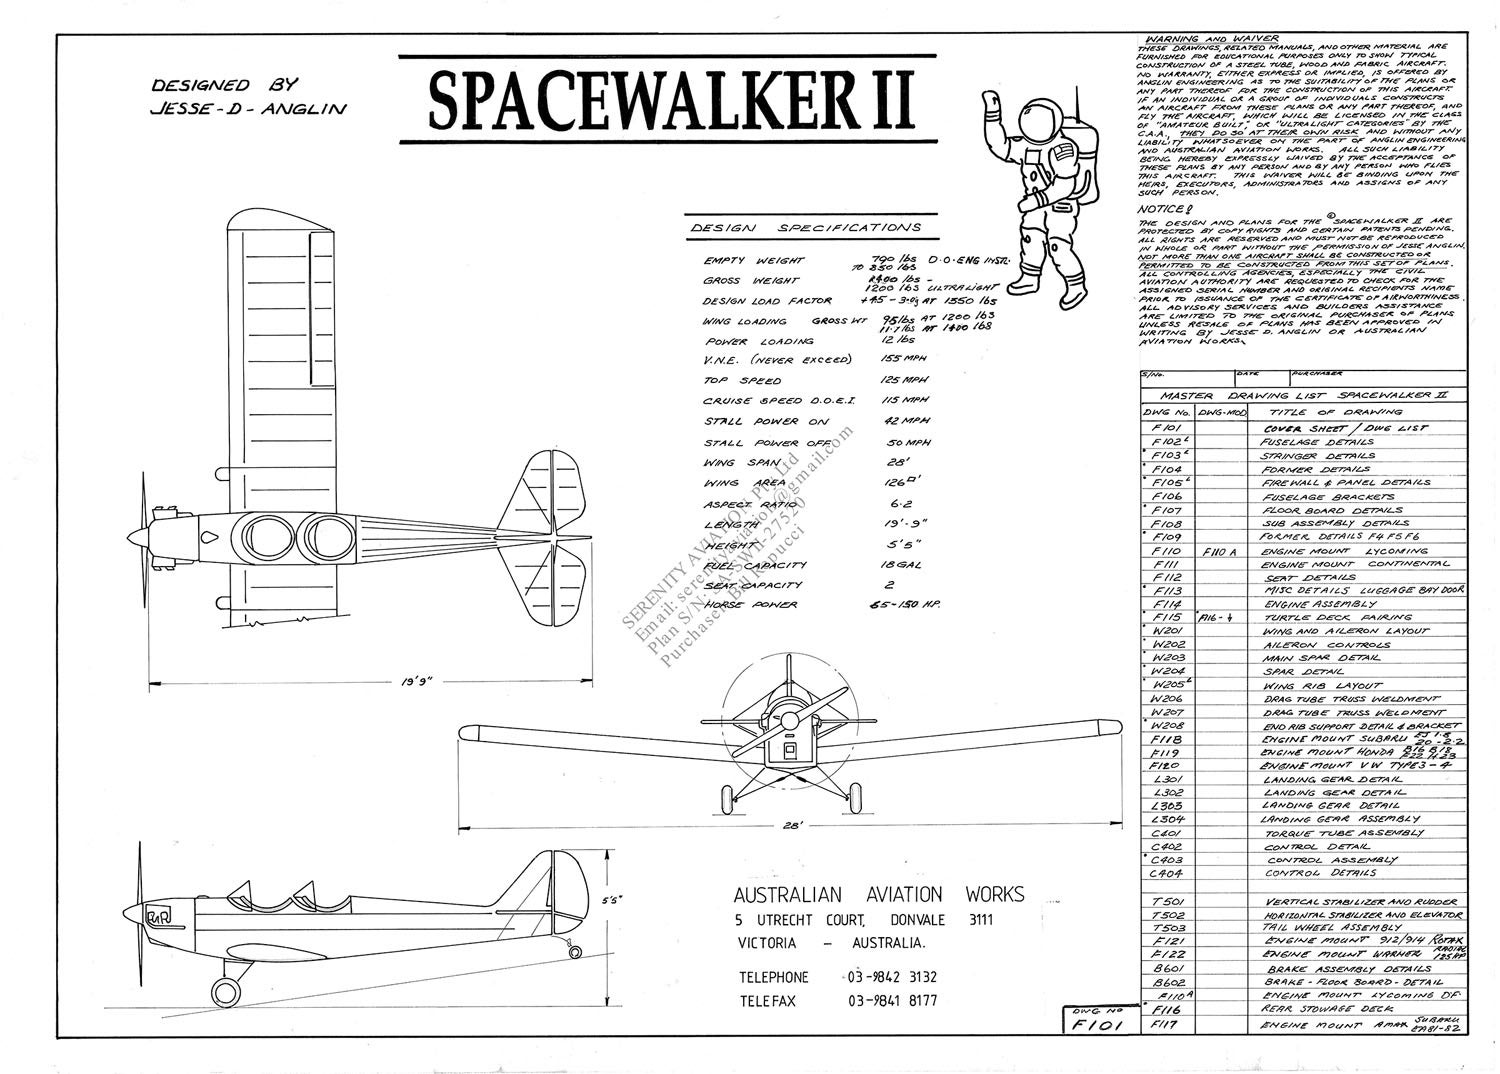
Then, out of nowhere, I stumbled across a picture of a plane that has always made my heart flutter. So, out goes all the logic, my stack of aircraft plans was tossed into the closet, and I ordered yet another set of plans. The new plans are for a plane that will only carry two, is open cockpit and is constructed of tube, fabric and wood. It did take some research to locate the plans, but after a quick electronic banking transaction, I received the PDF version of the Spacewalker II plans. (The full-size drawings should arrive before you read this article.)
Starting as a single-place, open-cockpit monoplane, the Spacewalker begat the Spacewalker II, a two-place version. The designs were sold and renamed the Warner Revolution I and II. From there, the family tree grew a few branches; one was the Sportster, which visually is similar but not a Spacewalker. The other branch of the family tree hangs a Rotec radial engine on the front and alters the structure to handle the new engine, lengthens and strengthens the main landing gear, and makes some other minor changes (see “Radial Revolution” sidebar below).
The PDF drawings are very well done and appear to include everything a scratch builder needs except instructions. The lack of instructions (no line-by-line, hand-holding instruction book telling you to build part “Y” after you finish part “X”), support, prefabricated parts, etc. is a common trait shared with most scratch-built planes.
While scratch builders generally start with the wings, I elected to begin with the steel bits first. After looking over the plans and making a list of all the .080-inch thick parts, I ordered an 18x18x.080-inch sheet of 4130 chromoly steel plate. A little over a week from when I first ordered the plans, I was cutting steel.
My process is to look up a part I want to make, use the snipping tool that is included in Microsoft Windows, clip the part I want to fabricate from the PDF and print the snipped image. Knowing the drawing will not be to exact size (desktop laser printers tend to distort whatever they are printing), I then draw the part right on the steel plate and proceed to cut it out.
The four heel brake tabs/pedals were the first parts I made. I elected to add lightness by drilling a lightening hole on the tab of each. The other minor change I made was to press in oil-embedded bronze sleeve bearings wherever a hole will be a pivot point. My thinking is that by adding the oil-embedded bronze bushings, I will not have to lubricate them, and should the holes get wallowed out with use, I can press the bushings out and replace them. As a builder, you must be sure to read and understand the drawings; in the case of the heel brakes, left and right brake levers are required.

Thoughts on Scratch Building
I believe Van’s Aircraft has to be given credit for growing the scratch-built aircraft industry/hobby/culture/whatever you want to call it. Many of today’s scratch builders started with an RV and with that experience under their belt, move on to other projects, as I am doing.
With just a few hours and parts into a 100% scratch-built project, I find it relaxing in a way the RV project wasn’t. Yes, the fear of messing up a part is still there, but I have control over my own destiny in that if I mess a part up, I just grab the raw stock and carve out another piece. I have also found contentment in completing a good part, not just an assembly of parts as was the case with the RV build. Call it “Zen and the Art of Aircraft Building,” if you will.
This Could Take Years
Well, yes and no. It took 2400 hours spread over four years and four months to complete my “slow build” RV-9. In looking at the Spacewalker II plans, it is a much simpler build than the RV, even if I have to shape every part.
I have a theory that the average builder only has about 2400 to 2500 hours of building patience in their system. When building a kit aircraft, many of those hours go into adding fancy interiors and complex panels with their associated systems, accessories, intricate electrical systems, etc. With scratch building, I think the same hour limit is there, you just end up with a much simpler plane. (I also believe that when building a kit, the price of the kit is roughly one third the cost of the finished plane. I am really curious if there is a similar rule of thumb that can be applied to scratch building.)
Putting the “Mental” in Experimental
Scratch building a plane is different than building from a kit in a couple of ways. First, you will need to learn how to fabricate components that come pre-done with most modern kits. Then there is welding, covering, and a few other skills that have to be mastered.
In my case, since my goal is to set the state of aviation back about 80 years with the selection of this design, I realized I would have to learn to weld. Being a glutton for punishment, my Santa was kind enough to give me an oxy-acetylene welding rig a few years ago for Christmas. I played with it when it first arrived and finally got serious about learning the art of gas welding last year. After all, what else was I supposed to do in 2020? I am finally at the point where my welds are strong, with good penetration, no holes burned through and fairly even beads. No, my welds will never look like what you see on a 1946 Cub or T-craft, but then again, I haven’t been welding 40 hours a week for years.
To quote Dirty Harry Callahan, “A man has to know his limitations.” In my case, I am trying to expand those limitations by adding welding, painting and possibly machining to my list of skills. (I have a line on a used mill that may find its way into my shop/hangar/man cave.)
I have yet to pull out my paint gun but jump at every chance I can find to use my welding torch. In a future article, I will highlight some of the simple jigs I have created to produce near-identical parts.
The Tally
In the last six months, I have worked on the Spacewalker II for approximately 60 hours and have spent $350 on the plans and materials. In early 2021, I plan to order the steel tubing for the fuselage, tail group and wing fittings. My initial estimate for that is around $2500, without shipping.
I have not set a budget or schedule for this project and refuse to do so. It will be competed when it is done—no hurry. Besides, I still have the RV-9 to fly when the weather is nice. Unfortunately, it is not an open cockpit.
Plans and Support
For plans contact Neale Dunstan at serenityaviation@gmail.com. As of May 2020 the plans, which include both PDF and full-size drawings, cost $255. Neale does maintain a presence on Facebook and is in the process of putting the finishing touches on his website, which when ready will be at www.serenityaviation.com.
As mentioned above, some scratch-built airplanes have limited support available, online or otherwise, and other models may have no support available of any kind. With that in in mind, I have created a public group on Facebook for builders and fliers of the mark.
Photos: Martin Hone and Bill Repucci.


")


Dick VG started out with scratchbuilt: offering plans for the RV-3, then the RV-4. They sold, but not like hotcakes, despite having the NASAD seal of approval. The the plastic kits, like Lancair and Glassair, came out and Dick thought, we could make kits, and sell them for about half the price of the plastic kits. That is what propelled the RV series of aircraft into what it is today: affordable kits made with conventional materials. That’s the irony of your story that I appreciate most.
Too bad this whole thing has gone blackout. Lovely aircraft. Neale was very responsive when I bought plans…right up to the moment he no longer answered any attempts at communications.
I wish them well…the plane deserves at least that.
Comments are closed.