Integral fuel tanks, like those on RVs, are generally riveted together and made leak-proof using a polysulfide sealer. (Commonly Pro-Seal.) This two-part chemical sealer is bad-smelling and known for getting everywhere, but does a good job of keeping fuel inside—most of the time. The problem comes with rivets—all of those little holes in the tank just waiting for a tiny spot that wasn’t sealed well to give way.
While big leaks around fuel senders and access panels make up the majority of fuel tank problems, it is not uncommon for tanks to develop leaks at rivets that are so small they don’t drip—they just tend to seep (or weep) fuel at a rate equivalent to its evaporation. The process of evaporation usually leaves rings of color (the blue dye in 100LL, for example) around the offending rivet. If the weeping is bad enough and the rivet is on the bottom, the fuel might actually run down the tank and leave streaks back to the spar.
Weeping rivets are not really an issue in terms of losing substantial amounts of avgas. But no one likes a fuel leak, even if its only downside is a stain. Most owners see these things develop slowly over time, usually well after the airplane is painted and often years into the life of the machine. The first response is denial, followed by occasional cleaning—and finally acceptance that, yes, you have a weeping rivet. Even with acceptance, most owners continue the cleaning ritual (acetone works well) for a while before deciding to address the problem.
There are really only a few ways to deal with such a weeper. The most difficult method is probably the surest—remove the tank, cut an access hole, blob the rivet with Pro-Seal, then seal up the access hole and re-install the tank. This process is highly invasive and adds an access hole that needs to be sealed properly—or you have introduced a much larger leak than you started with.
Well, This Sucks
A simpler but far less reliable fix is to empty the tank of fuel and pull a vacuum on it, then wick some green Loctite into the rivet, allowing it to be pulled in by the vacuum and seal the microscopic leak. (Loctite 290 is the common “green” version, made for wicking into threads by capillary action.) While this method sounds elegantly simple, it also does not reliably work—especially in the long run. Try it if you wish but eventually the weep will come back, especially on a bottom rivet.
A compromise method that works almost all of the time and solves the problem for good is to remove the bad rivet and insert a new, sealed pulled rivet using Pro-Seal gooped on the end to seal the hole. This method is marginally invasive and can be scary until you have done it once. But it is far simpler than removing the tank and overall much more reliable than Loctite.
Case Study
In the case demonstrated here, the weeping rivet was on the bottom of an RV-8 tank and had been seeping fuel for about a year. It was time to fix it before the blue stain permanently discolored the white wing paint. The bad rivet was in a rib/skin hole and was a 3/32-inch countersunk solid rivet. Unfortunately, research of the usual (and more unusual) vendor sites showed no sealed pulled rivets available in that diameter. (A sealed pulled rivet is actually enclosed on the back side so that nothing can leak through the stem hole after the rivet is set.) There are, however, quite a few sealed 1/8-inch pulled rivets available, so that is the direction we had to go.
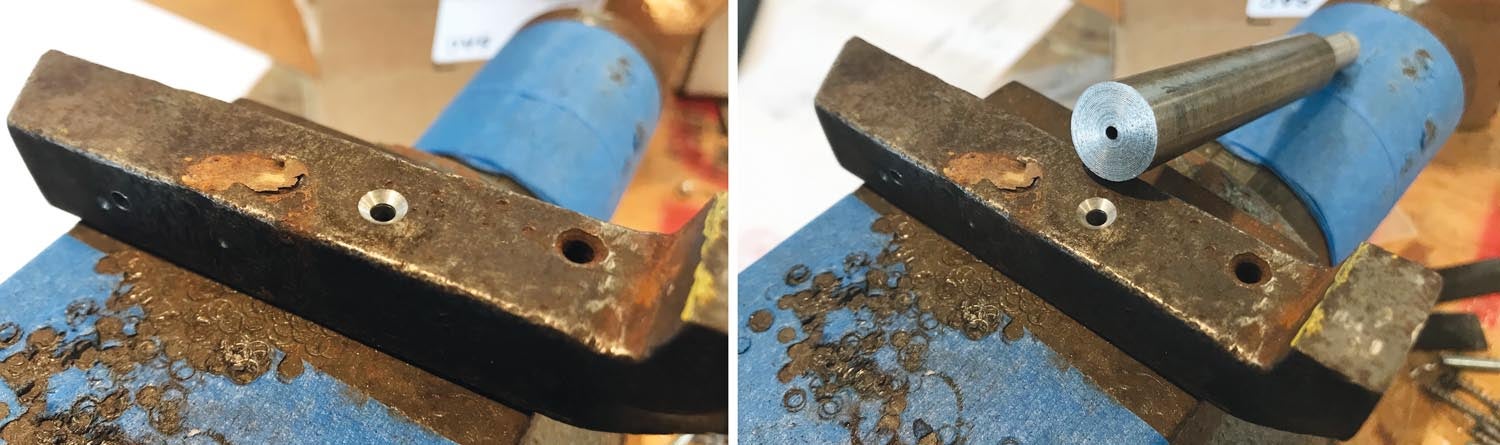
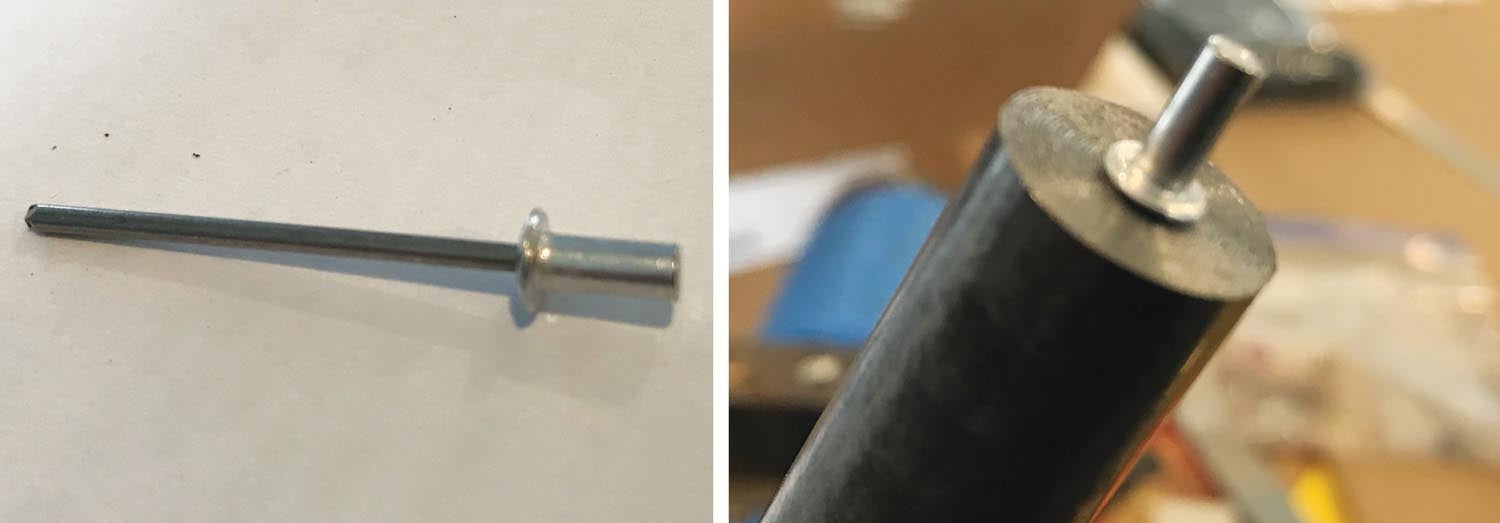
You can buy sealed rivets from various suppliers—the easiest to find from an aviation source being the AD42H, available from Aircraft Spruce. Unfortunately, this is a dome-head rivet, not a countersunk one. Since the rivet being replaced was a flush head, this means the hole is already dimpled, making a dome-head rivet impractical. However, this is where a little shop miracle can be applied, because the AD42H is an aluminum rivet—and therefore soft. You can reform the head!
This is actually a much simpler process than it might sound. Find a small steel block—an old steel bucking bar will work. It’s what I used because it was the first thing I saw while looking around the shop. Drill a 1/8-inch hole perpendicular to a face, as deep as the unpulled rivet. Drill a little deeper, because you’re going to countersink the hole. Now pull out an aviation countersink tool and countersink the mouth of the hole until a -4 flush rivet sits flush. This is now your female mold. Next, take another piece of steel—I used a 3/4-inch diameter piece of 4130 rod I had in the drawer, about 6 inches long—and cut the face square. Drill a hole in the face that is deep enough to take the entire unpulled rivet shank, plus a little more. I did this with my lathe, but you can do it by hand just as well if you’re careful.
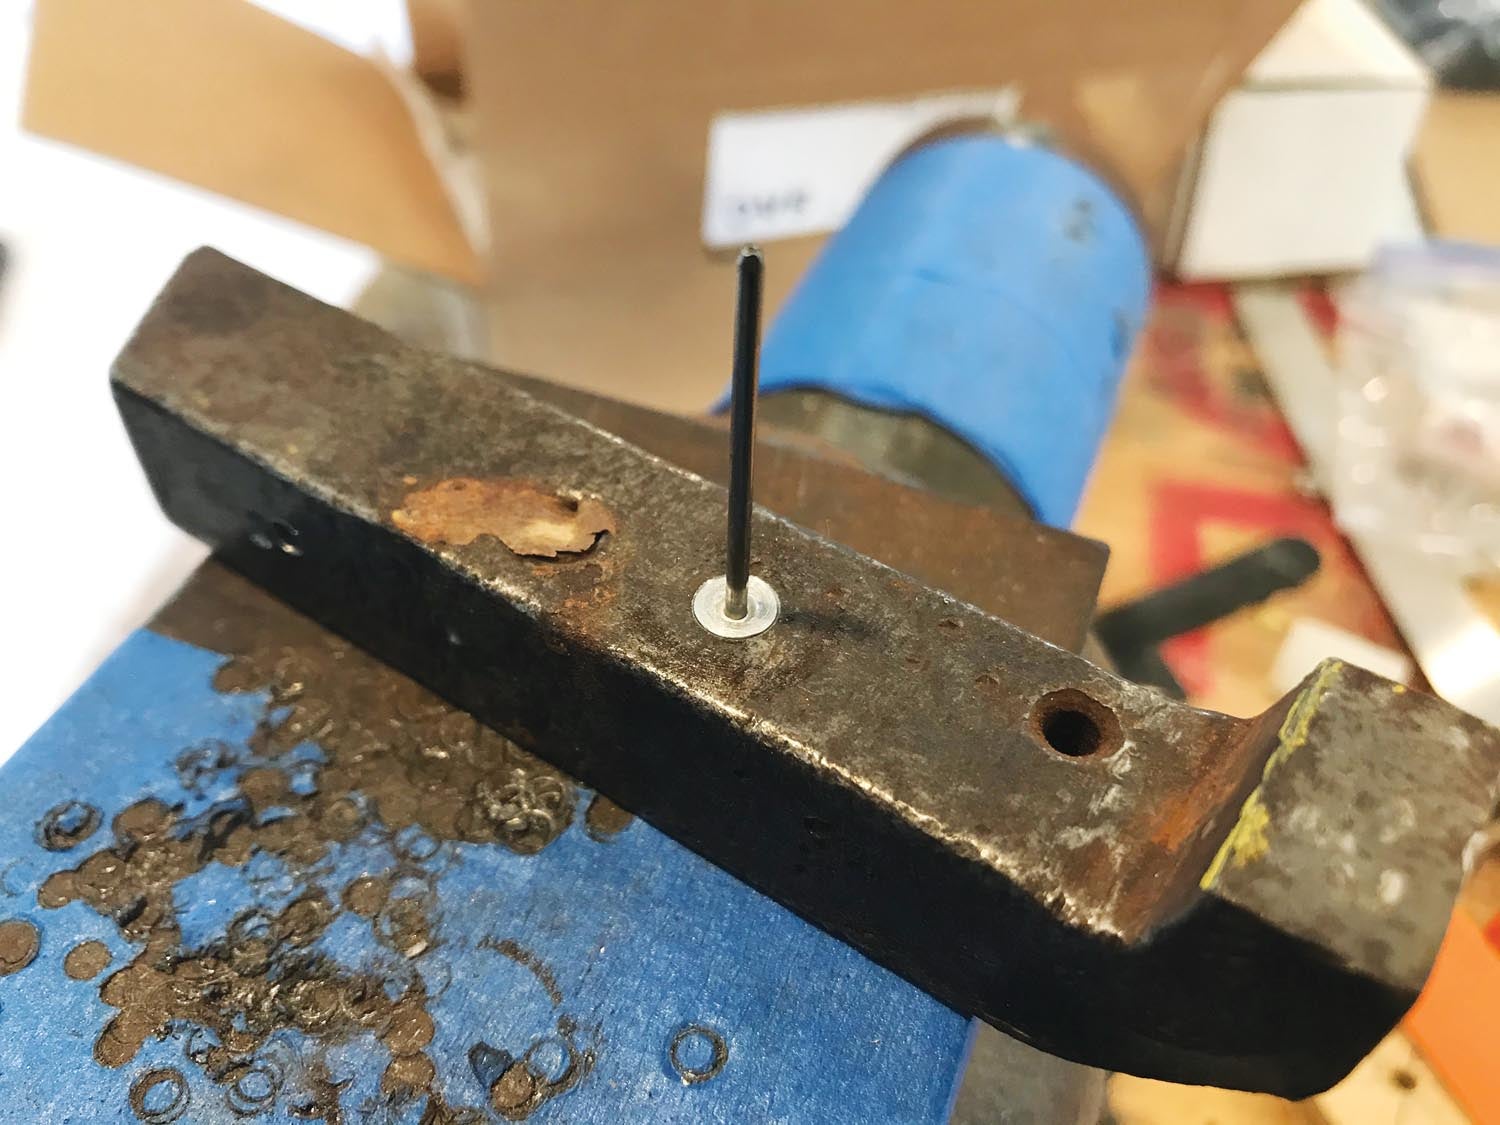
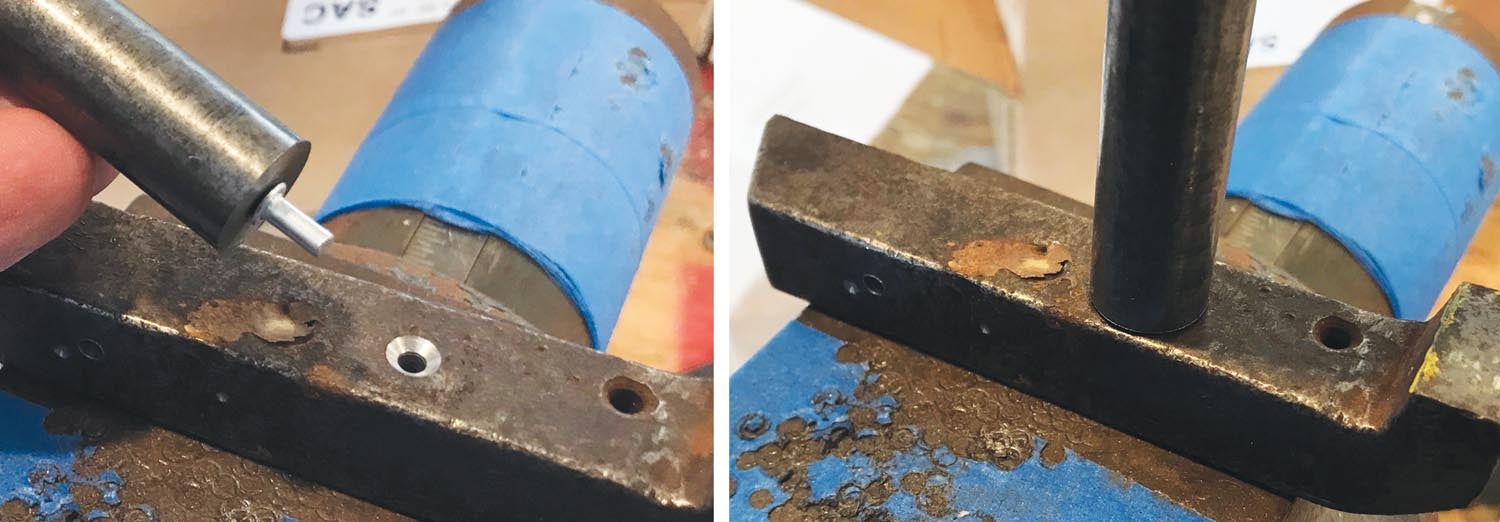
With these two pieces of steel, your little tool is complete. Place the female block on something firm, like your bench vice. Insert the dome-head rivet in the block. Place the other piece over the shank. You’ll notice that there is a little space (the height of the dome head) between the two pieces of steel. Now whack the thing with a hammer—the gap should be gone! Remove the rivet and look at the perfect 100° countersunk sealed, pull rivet you have made! Make a few of them, just for fun—it really is easy.
Wrapping It Up
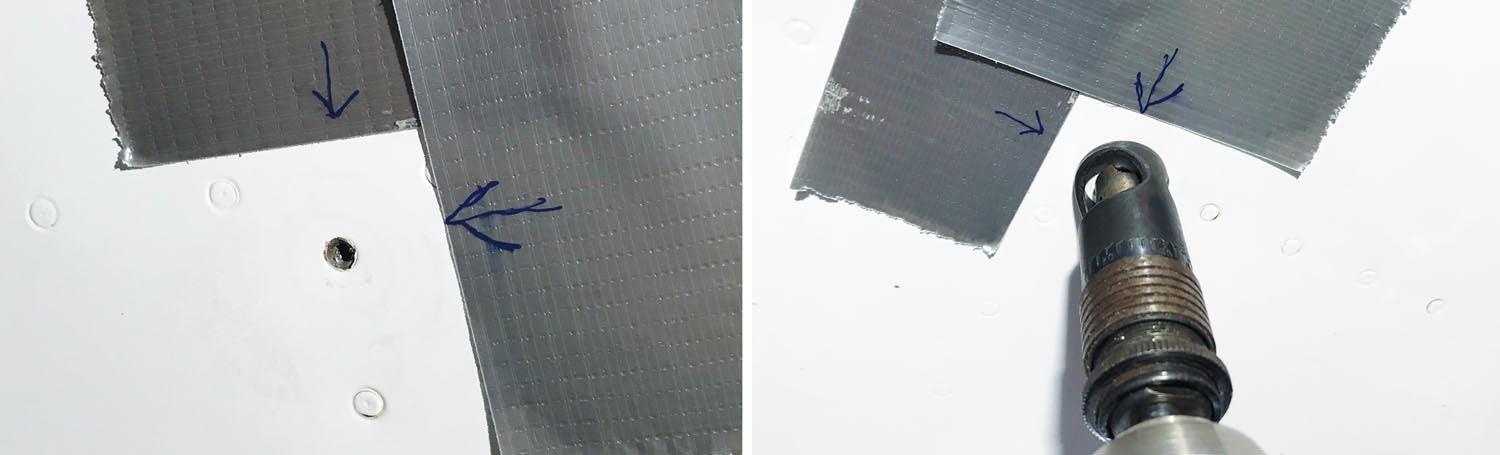
With your new rivets all set, you can now go to the airplane. Drain the fuel tank completely and let it air out until you don’t smell fuel. Drill out the offending rivet with a #40 drill. Now upsize the hole to #30. You’re still left with a dimple that is sized for a 3/32-inch rivet, but in the case of an RV tank, the skin is 0.032 inches thick, allowing for a little bit of aluminum removal. Carefully take a #30 countersink in a cage and countersink the hole a little at a time; check with one of your rivets to see when you’ve gone deep enough. Remember, you’re not doing a line of these rivets. So while you’ll reduce the strength of the joint a little, it won’t be a big deal in the great scheme of things.
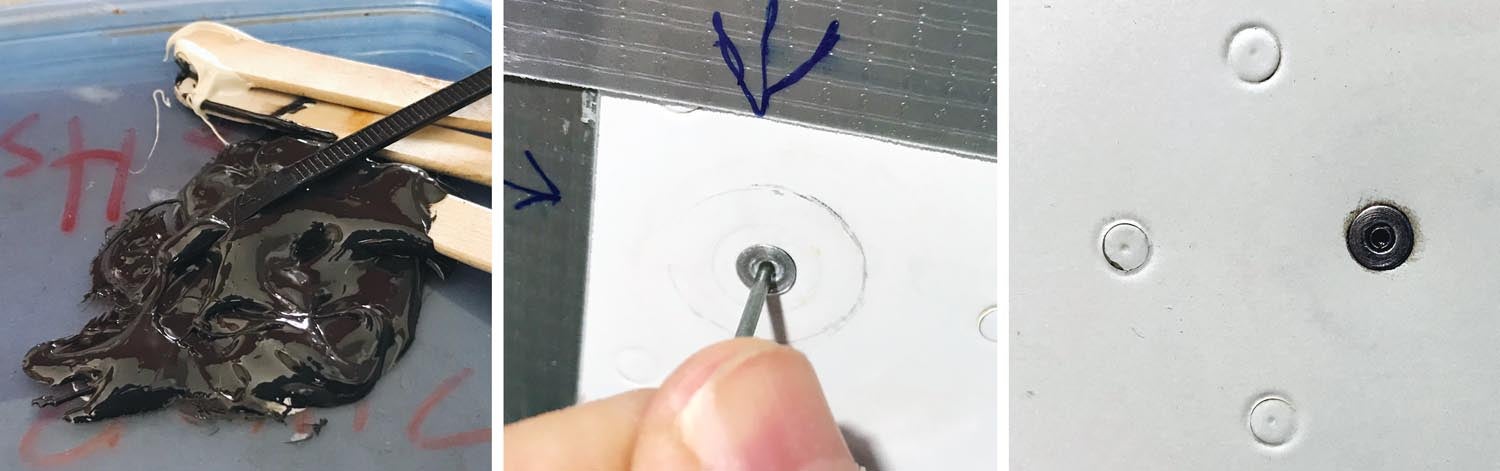
Once you have the rivet sitting flush, pull out your Pro-Seal and mix up a little bit of the nasty stuff. Force a little into the hole and then dip the head of the rivet in more, insert the rivet and pull it normally. Pro-Seal will squish out. Wipe it off flush, clean any remaining Pro-Seal off the surrounding area with acetone while it is still soft and walk away for a few days until the unused Pro-Seal on your mixing pad has cured. Refill the tank and you’re back in business!
Is this a long-term fix? Well in my case, it took about 1800 hours and a dozen years for the rivet to start weeping in the first place, so I don’t think I can give you a definitive answer for a decade or so. But I have heard positive reports from other experienced builders that this is the most certain way to fix a weeping rivet. And you might want to save your tools, or just make up a batch of the countersunk AD42Hs in case someone else needs one in the future. After all, you’re now a specialist in weeping rivet repair.
Photos: Paul Dye; illustration courtesy of Van’s Aircraft.
![[Credit: Lisa Turner]](https://www.kitplanes.com/wp-content/uploads/2026/02/Fuel-Selector.jpg?w=218&h=150&crop=1 "Fuel Follies")


![The author flying his Sinson 108-2 Voyager in the skies above British Columbia, Canada. [Credit: Mike Davenport]](https://www.kitplanes.com/wp-content/uploads/2026/03/CF-EZB-over-water-D.-Cardy-photo.jpg?w=324&h=160&crop=1 "A 30-Year Love Affair With My Stinson")


Brilliant.
A friend of mine who is building an RV-7A had one leaking rivet when he performed the manometer test on his newly-built fuel tanks. He thinned some ProSeal with a little toluene (supposedly up to 15% by weight is OK), and applied it to the manufactured head of the rivet, and pulled a light vacuum on the tank (maybe 15″ of water). The thinned ProSeal got sucked in. He let it cure for a few days, and re-tested. No more leak.
Of course, the test of time is yet to come.
Nice!
How does one successfully recover the shop head part of the drilled rivet now loose inside the tank?
Good question! It is most likely still captured by the proseal bead that was sealing it in the first place. If not, you should have finger screens on the fuel pickups in the tanks to prevent it from getting in the fuel lines.
Ben… Buy some of the rivets Paul suggested… Nothing is left inside the tank.
Paul thanks for the info.
You can use the AK42H. Countersunk sealed pull rivet. I used one on my RV-7 tanks.
https://www.aircraftspruce.com/catalog/hapages/blindcloseendomehdrivets3.php
Well if a countersunk rivet is needed in the closed end variety, why not use the AK43H version? It’s the same thing in countersunk style, so no modification is needed.
Paul,
I just subscribed an hour ago.
Just before i was about to toddle off to grip the perch I read this article. (It’s way past lights out in West Australia).
Mate I’ve got more than the value of a years subscription in this article already. Brilliant!
Comments are closed.