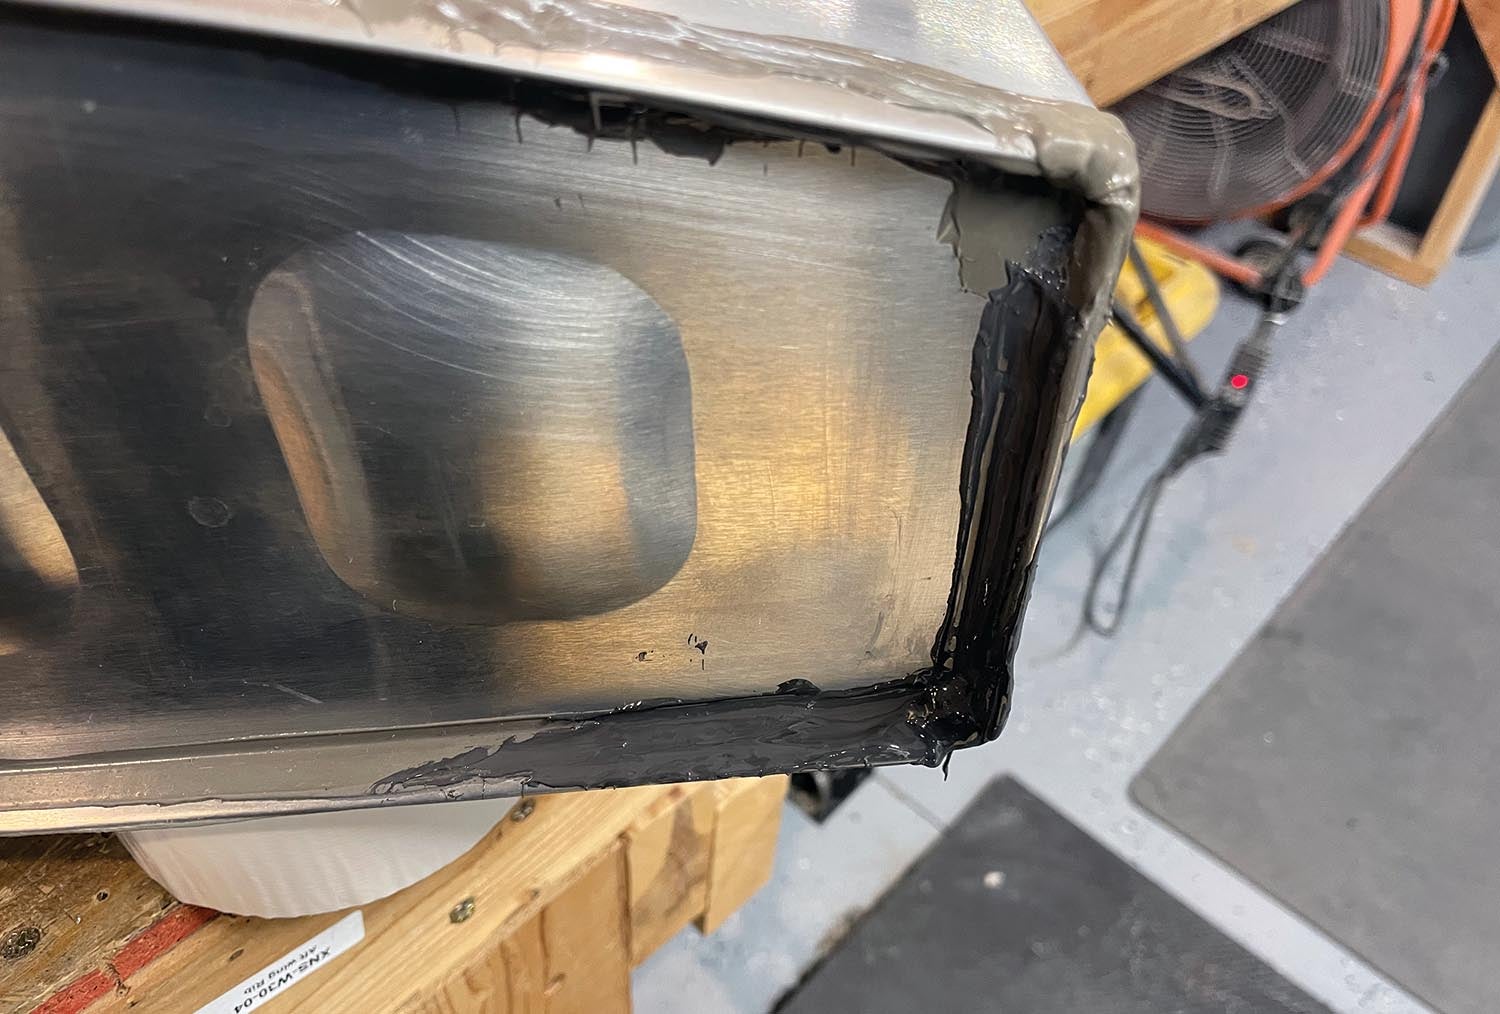
 I won’t say that I hate Pro-Seal. But I will say that I am not that fond of working with it. Pro-Seal (a brand name for polysulfide sealant that has trade names like FlameMaster and ChemSeal) is most commonly used as a fuel tank sealant. But it’s also used where you want to provide a semisoft fillet or plug for a hole. It’s sometimes used to seal leaks in the firewall, though it is not really a good fire barrier. It is, however, a good gas and liquid barrier, and does a reasonably good job at many things.
The downside? Using it makes a mess. A huge, ugly mess. No matter how many precautions you take, you end up getting it on your gloves, then the back of your gloves, then onto anything else in the shop. I have managed to do mess-free jobs, but only small ones and under the strictest procedures that would make a hazardous materials lab proud. As soon as the job gets large, all bets are off.
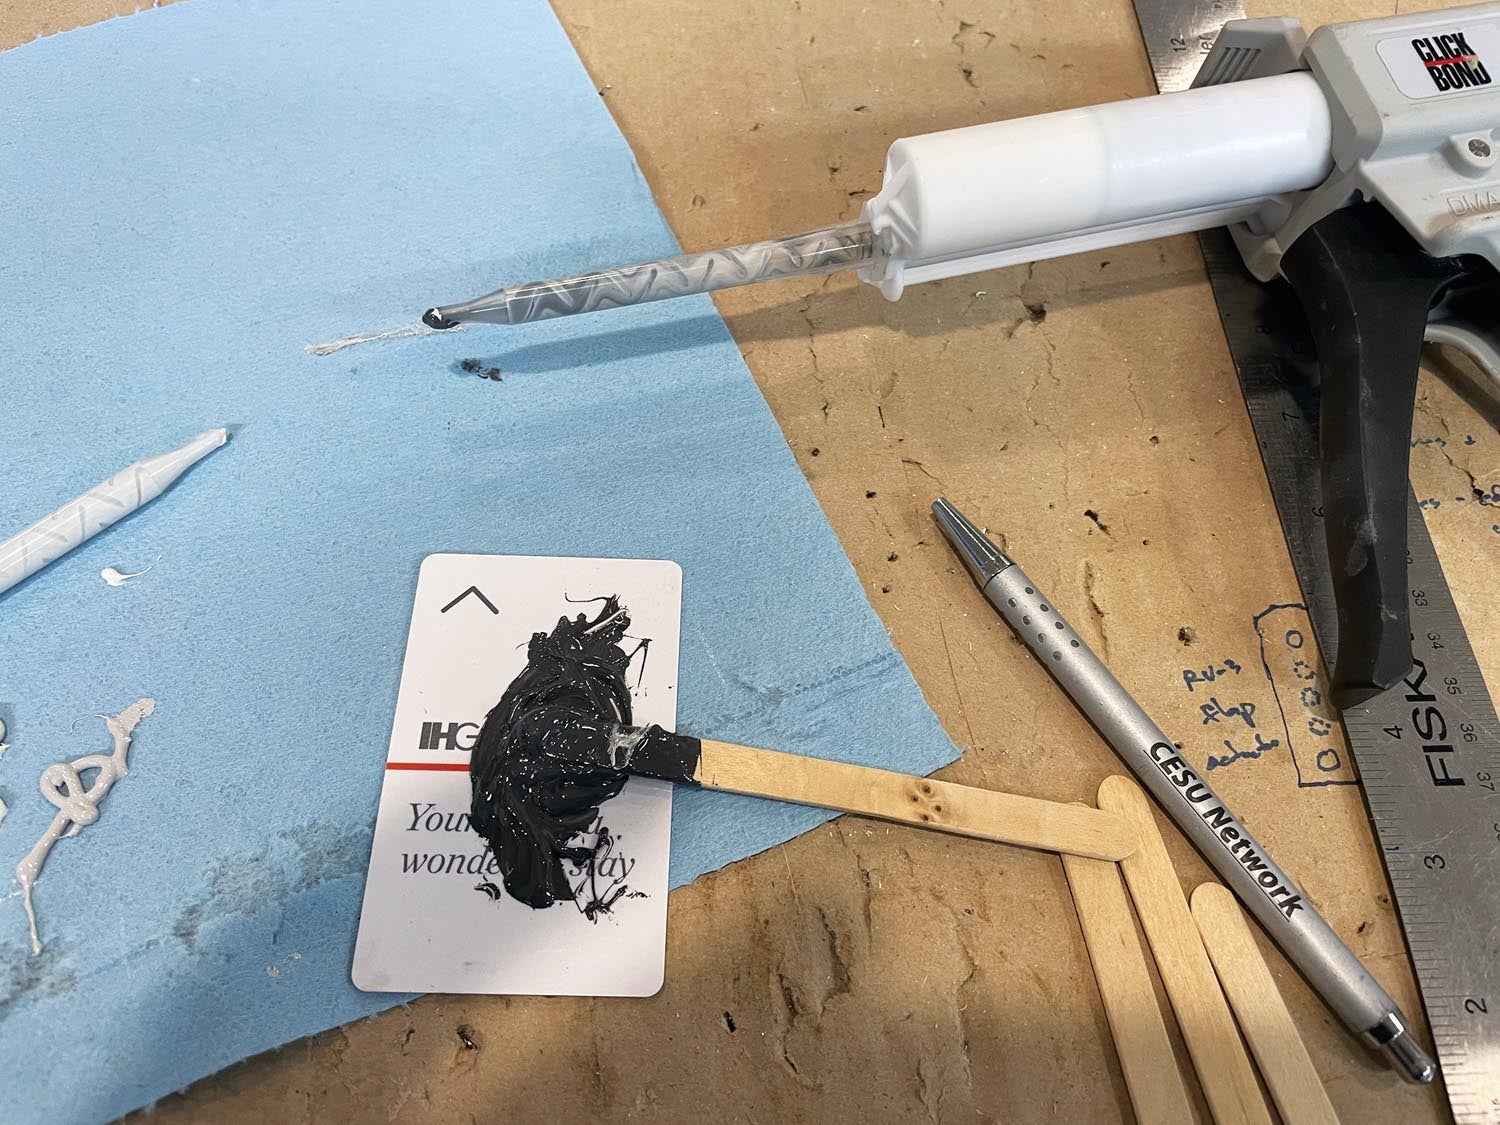
Pro-Seal comes in different types of packaging. The most common are cans and cartridges. The cans allow you to spatula out small quantities, mix them on a palette—I usually use a scrap piece of aluminum, a piece of cardboard or, for small quantities, a hotel key card—and apply it with a popsicle stick. An alternative to this “bulk” packaging is cartridges—prepackaged single-use cylinders that you mix with an integrated plunger then place in an applicator gun and squeeze into place. The cartridge system is ideal for large jobs and getting the material exactly where you need it—but you still end up using a popsicle stick or other applicator to shape the fillet. And these types of cartridges, once mixed, shoot the entire quantity of material—it is mixed and it is all going to cure. If you just need a little dab, it is incredibly wasteful.
After working with the gooey stuff for decades, I am always on the lookout for easier options. What I want is a gun that gives me the ability to mix and apply small quantities of Pro-Seal with no significant waste and spot-on application. (I don’t want much!) We do that with epoxy all the time, so why not with Pro-Seal? And so, the experiment begins…
The Dual-Cartridge System
Two-part adhesives have been available in dual-cartridge packaging for many years. The applicators and guns are readily available, if not ubiquitous. Big box stores even carry dual-syringe packages of epoxy adhesive—two syringes molded in a single unit with a cap on the end that allows you to use a little then cap it off for later. I have a couple of these in my toolbox and they last for years—and are so much easier than the old-style tiny toothpaste-tube packaging that had you try and squeeze out equal portions onto a card, mix and apply. Getting equal portions was always a little tricky that way. But with the dual syringe, it is almost automatic.
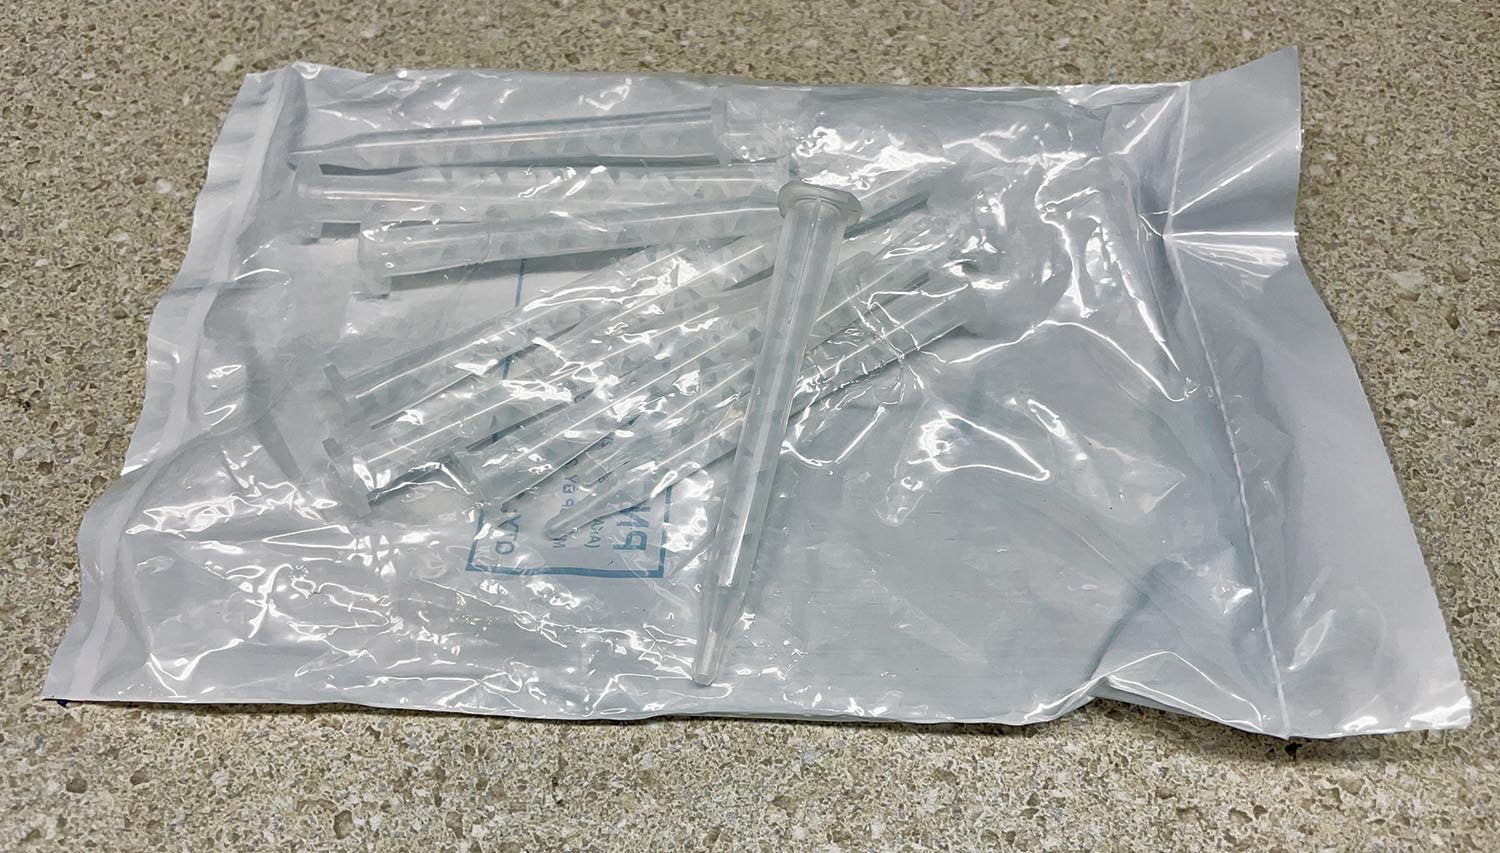
The cartridge/gun systems take this a step further, allowing you to have a nice pistol-grip applicator that gives you precise control, with mixing done inside a disposable nozzle that fits on the front of the cartridge. You put the cartridge in the gun, install a disposable tip, squeeze out just what you need, where you need it, then dispose of the nozzle. Cap off the cartridge and it’s ready for another time. Of course, if you have different types of adhesives or sealants, you only need one gun, making this a nice, reusable, interchangeable system.
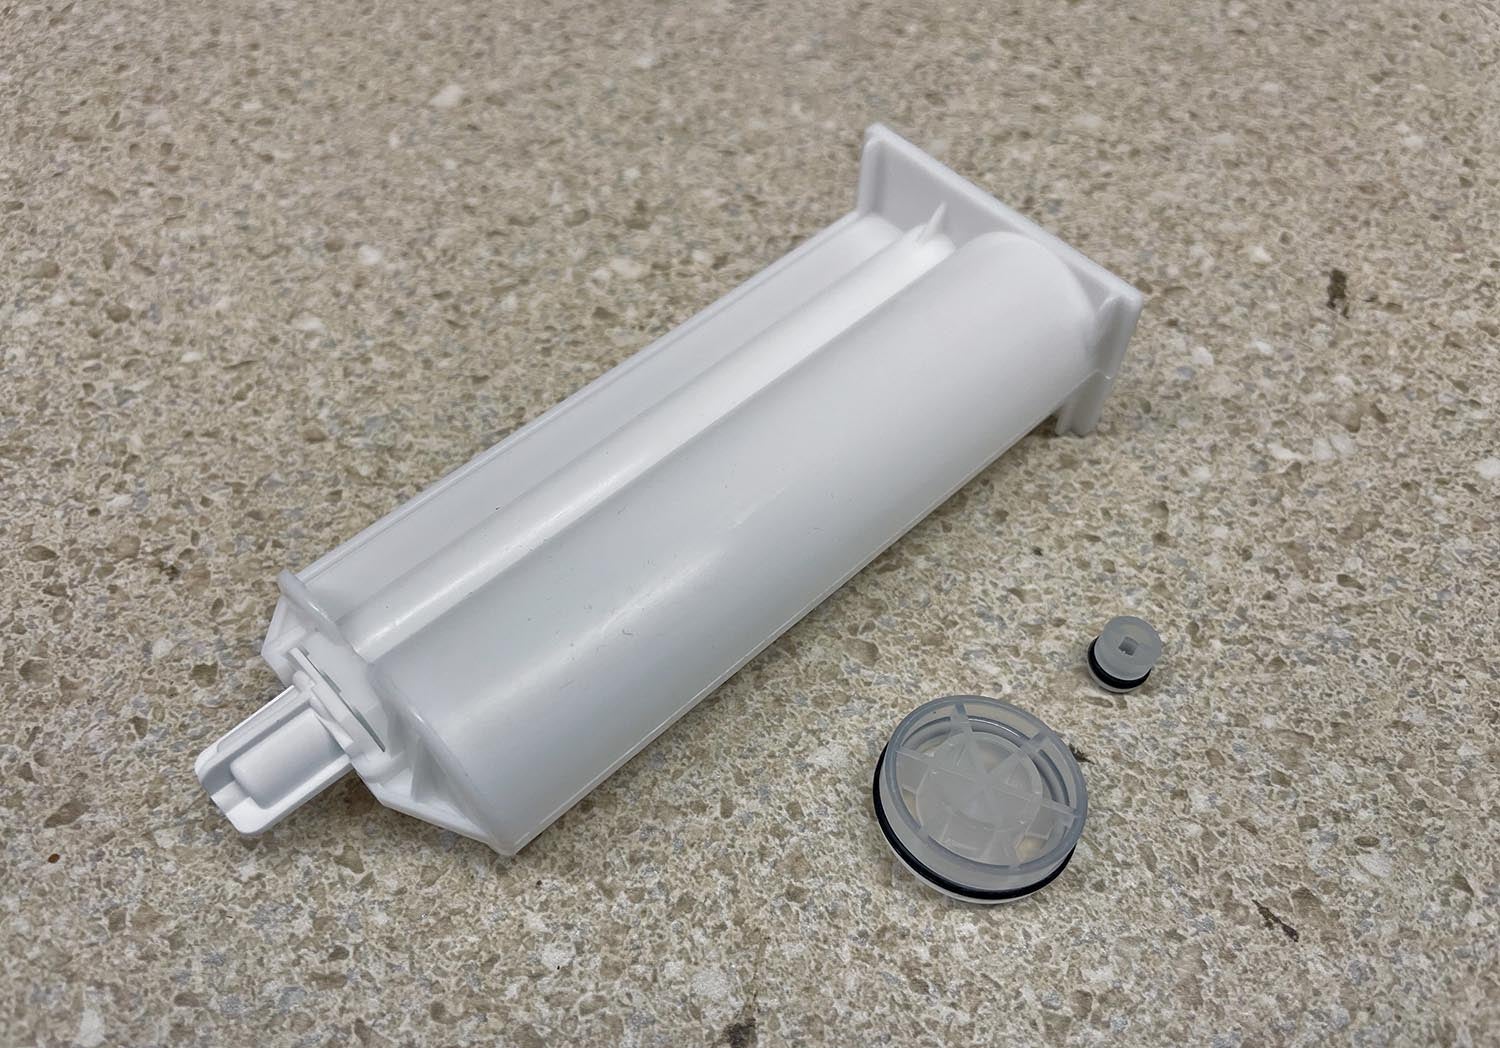
Unfortunately, while a wide variety of epoxy adhesives is available in a cartridge, I have yet to find a supplier of cartridges preloaded with polysulfide sealant. As mentioned above, you can buy it in a single-use cartridge but not in the dual-cartridge configuration. So if you want the ability to mix small portions at a time in a gun, you have to take some initiative and roll your own. You see, you can buy empty cartridges, pistons, nozzles and guns on the internet—all you need to do is fill them up. And that is what our little experiment was about.
Finding the Supplies
The first problem to overcome when finding a supplier of components was figuring out what to call them. Looking through literature for various prefilled epoxy cartridges, I found that “dual adhesive cartridges” seemed to be a common name—so I eventually searched for those and found empty ones available at McMaster-Carr. Undoubtedly, they are available elsewhere, but we found McMaster quick and easy, so we stopped looking. They carry cartridges, nozzles and guns—everything you need except the Pro-Seal.
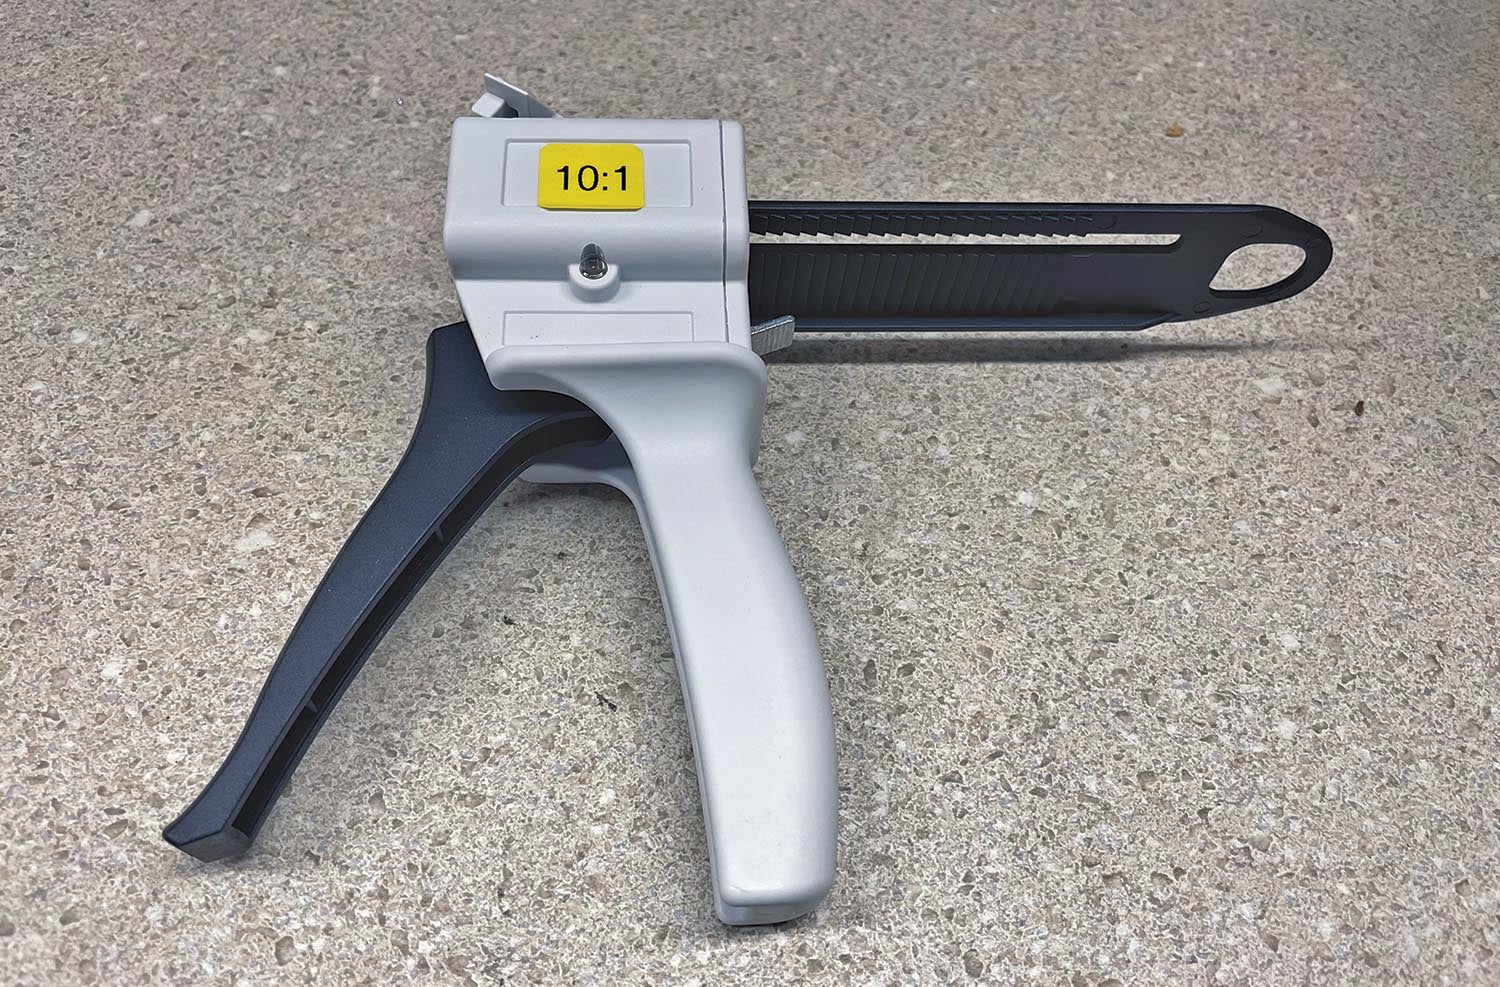
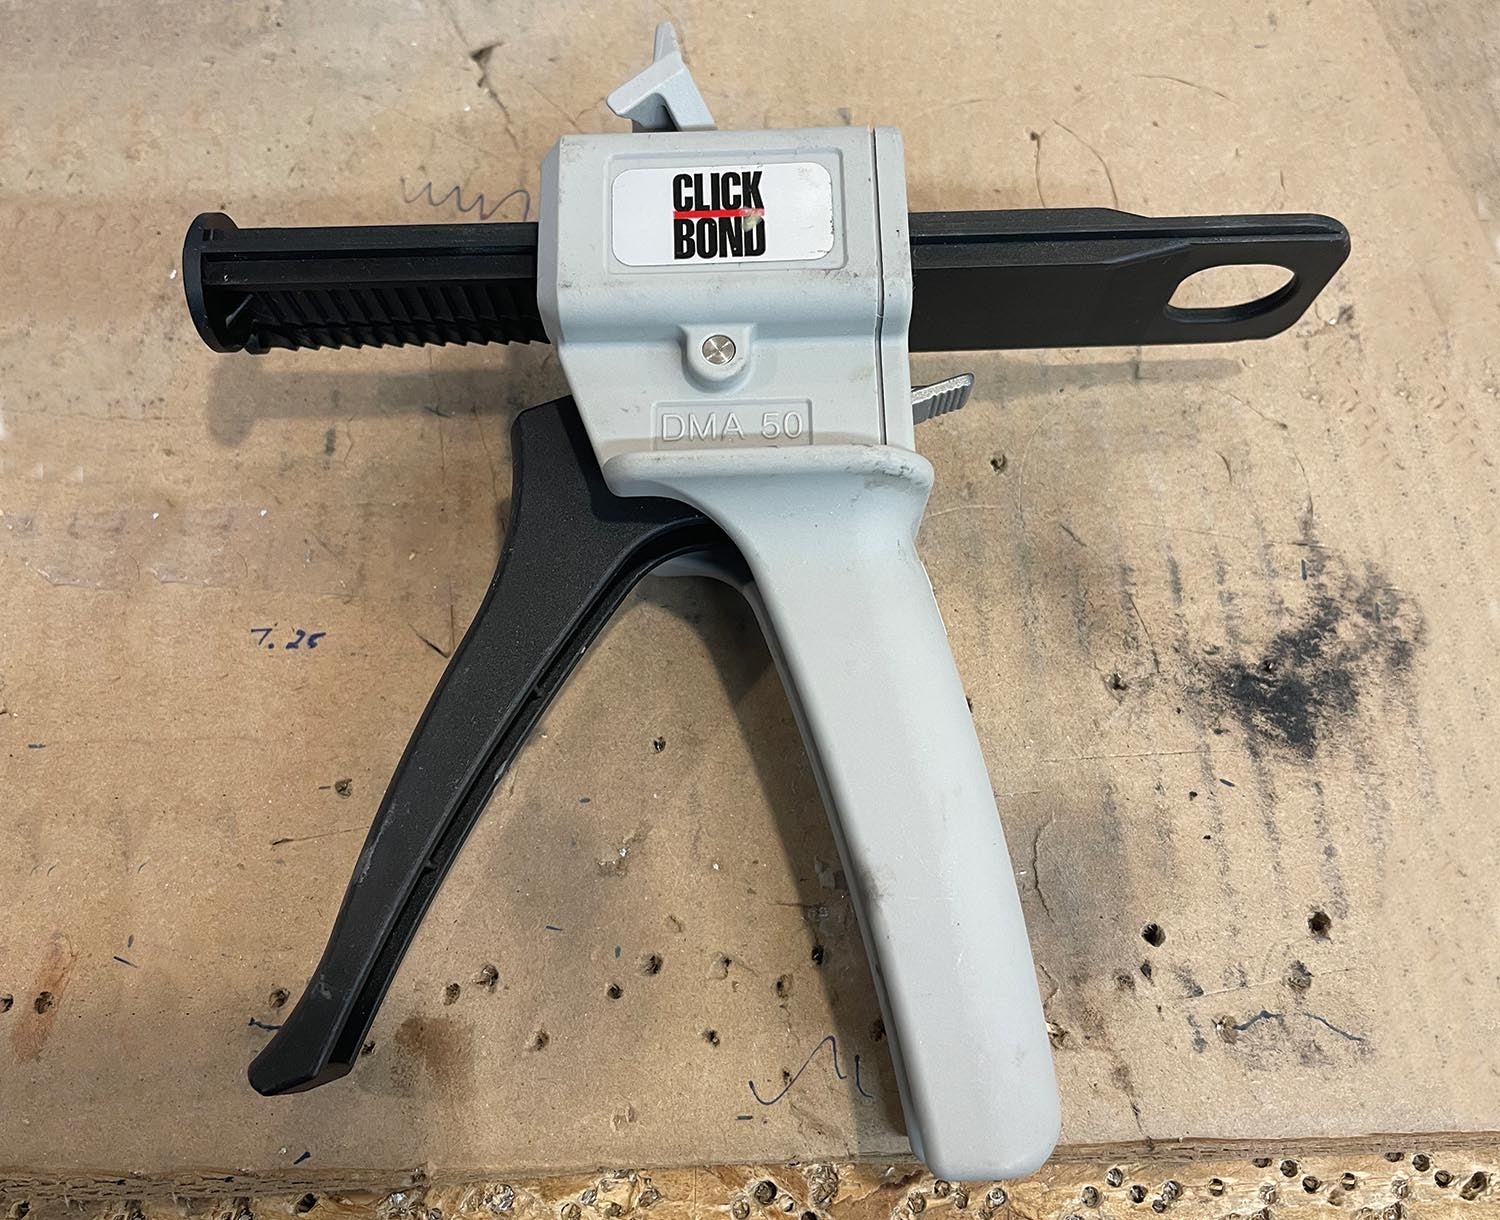
Compatibility is tricky, as is mixture ratio. The Pro-Seal we generally use mixes in a ratio of 10:1—so that is the type of cartridge you need. And along with that cartridge, you need a gun with a 10:1 slider as well as nozzles that will fit a 10:1 cartridge with a bayonet fitting. But not all guns have the same spacing between the centers of the two cylindrical chambers in the cartridge! Ordering a random gun on Amazon might well get you a $20 paperweight because it doesn’t fit your cartridge—so best to buy guns and cartridges from the same place—or figure out the same “standard.”
For our experiment, we used a gun from Click Bond (they actually prefer that we call it an “applicator”) that we have in our shop for using Click Bond products. It is manufactured by MIXPAC and is labeled a DMA50. But be careful—these come in different mixing ratios, so don’t buy one for 1:1 or 2:1 when you need a 10:1 for polysulfide! The cartridges also have to be the right size—we went with the 1.69-ounce units because that was what the Click Bond (MIXPAC DMA50) applicator was designed to use.
When buying sealant, we like to go to Aircraft Spruce because they generally have enough turnover that their stock is fresh. Polysulfide has a shelf life of about nine months, though many extend that by keeping it in the refrigerator. How long does that extend life? No one knows for sure! I can tell you that I have had good luck with sealant that is out of date by a few months but if it is dated more than a couple of years ago, it doesn’t want to cure. If you’re sealing fuel tanks, just go with a can that is within its official expiration date—you don’t want to do that job again! Buy a pint or quart kit, depending on how many cartridges you want to fill. We bought five cartridges, and a pint kit did those with lots left over to keep in the fridge for another time.
Our Process
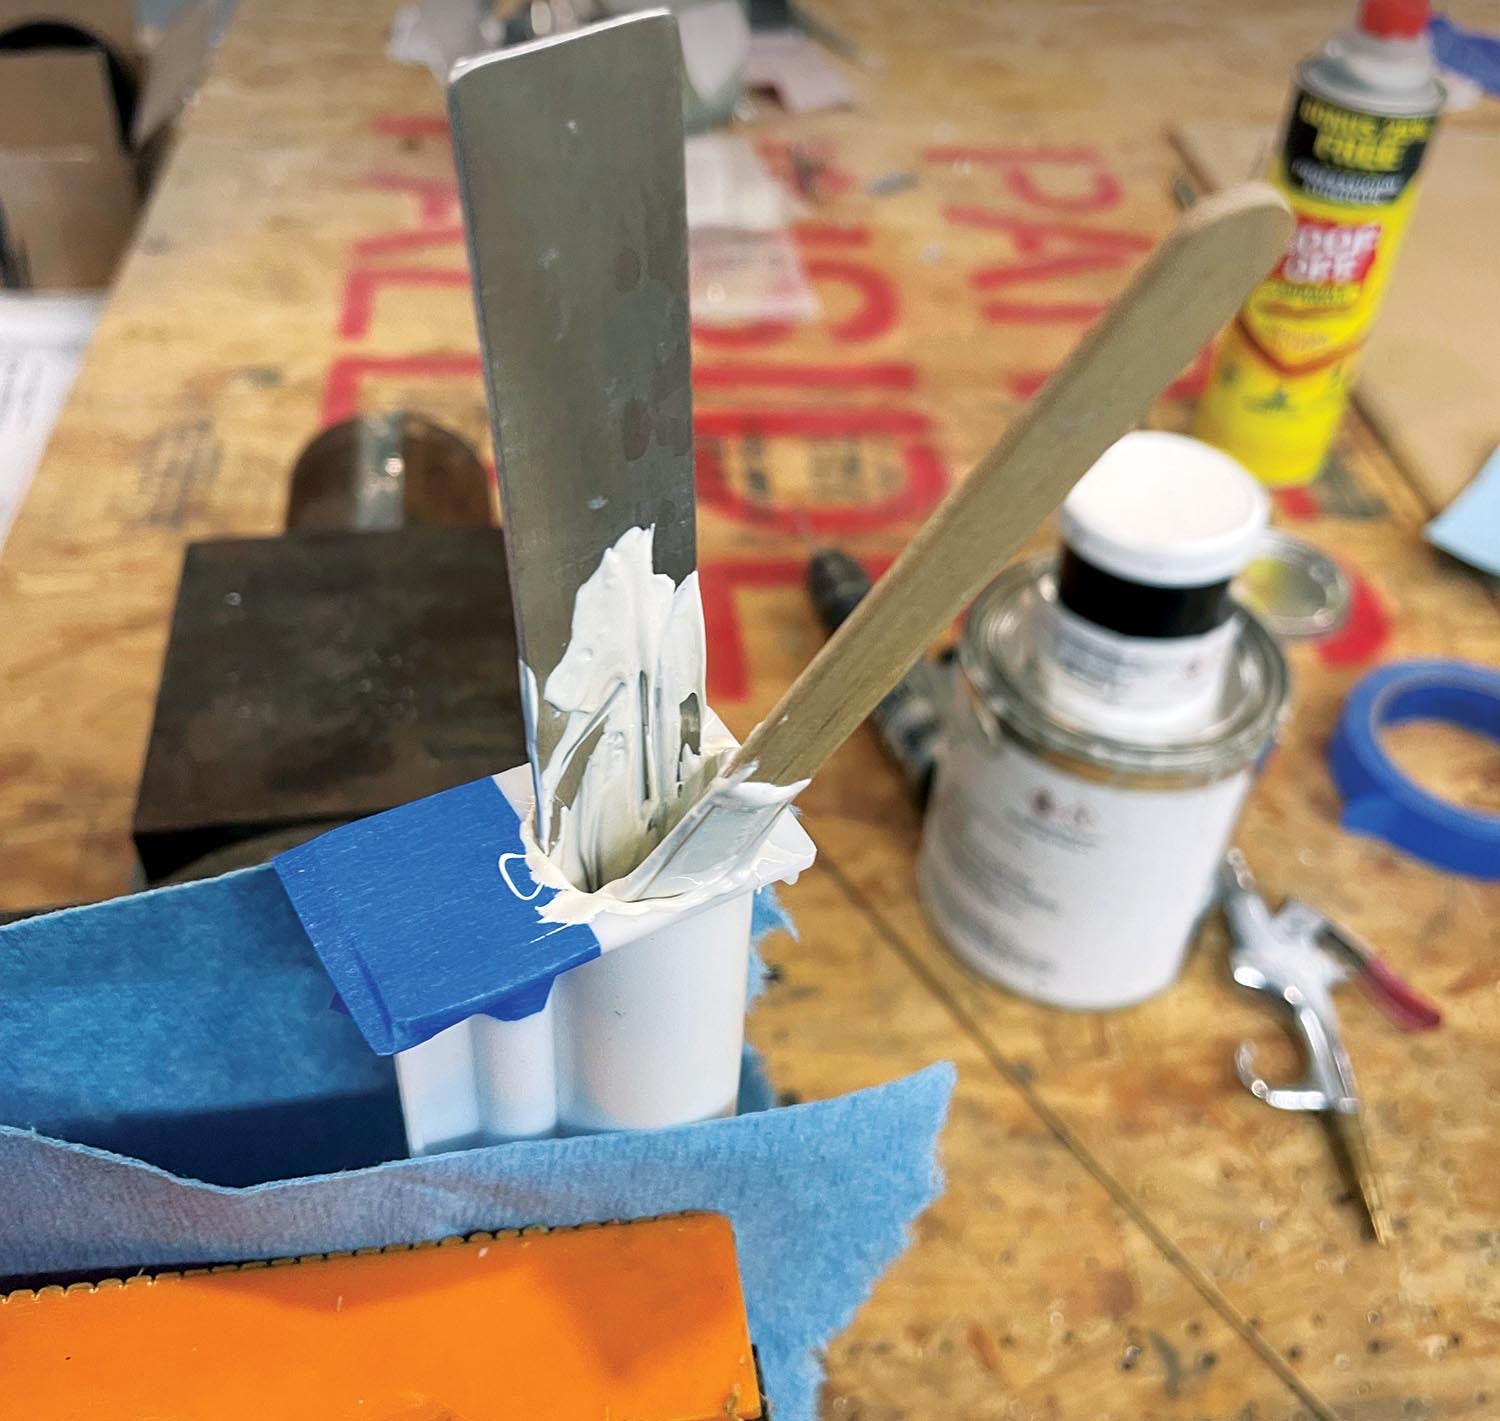
Remember, the goal of this experiment was to try and minimize the mess and waste of using Pro-Seal. As such, we wanted to avoid mixing any Part A and Part B while filling and to keep as much of the gooey stuff off our workbench, our tools and us as possible. To do this, you’re going to need lots of latex gloves, paper towels, popsicle sticks and acetone. Also, grab some scrap aluminum and make a couple of aluminum popsicle sticks narrow enough to fit down inside the tiny diameter chamber for the polysulfide catalyst—something a little less than 1/4 inch with a rounded-off end will work.
I also found I needed a solid “needle” to vent air out during filling—a piece of piano hinge wire with a point sharpened on the end worked fine, along with some straightened pieces of safety wire. These could be poked down in the chambers to get rid of trapped air.
Wear your gloves and have some paper towels handy. Keep the acetone can open so that it is easy to put a little on a paper towel and wipe up a mess. Always wear gloves! If you notice a spilled bit of polysulfide, immediately wipe it up with acetone—if the can isn’t open already and you have the sealant on your gloves, then you’ll transfer it to the cap and then set the cap down, making a mess on the bench and so on and so forth. In other words, plan ahead!
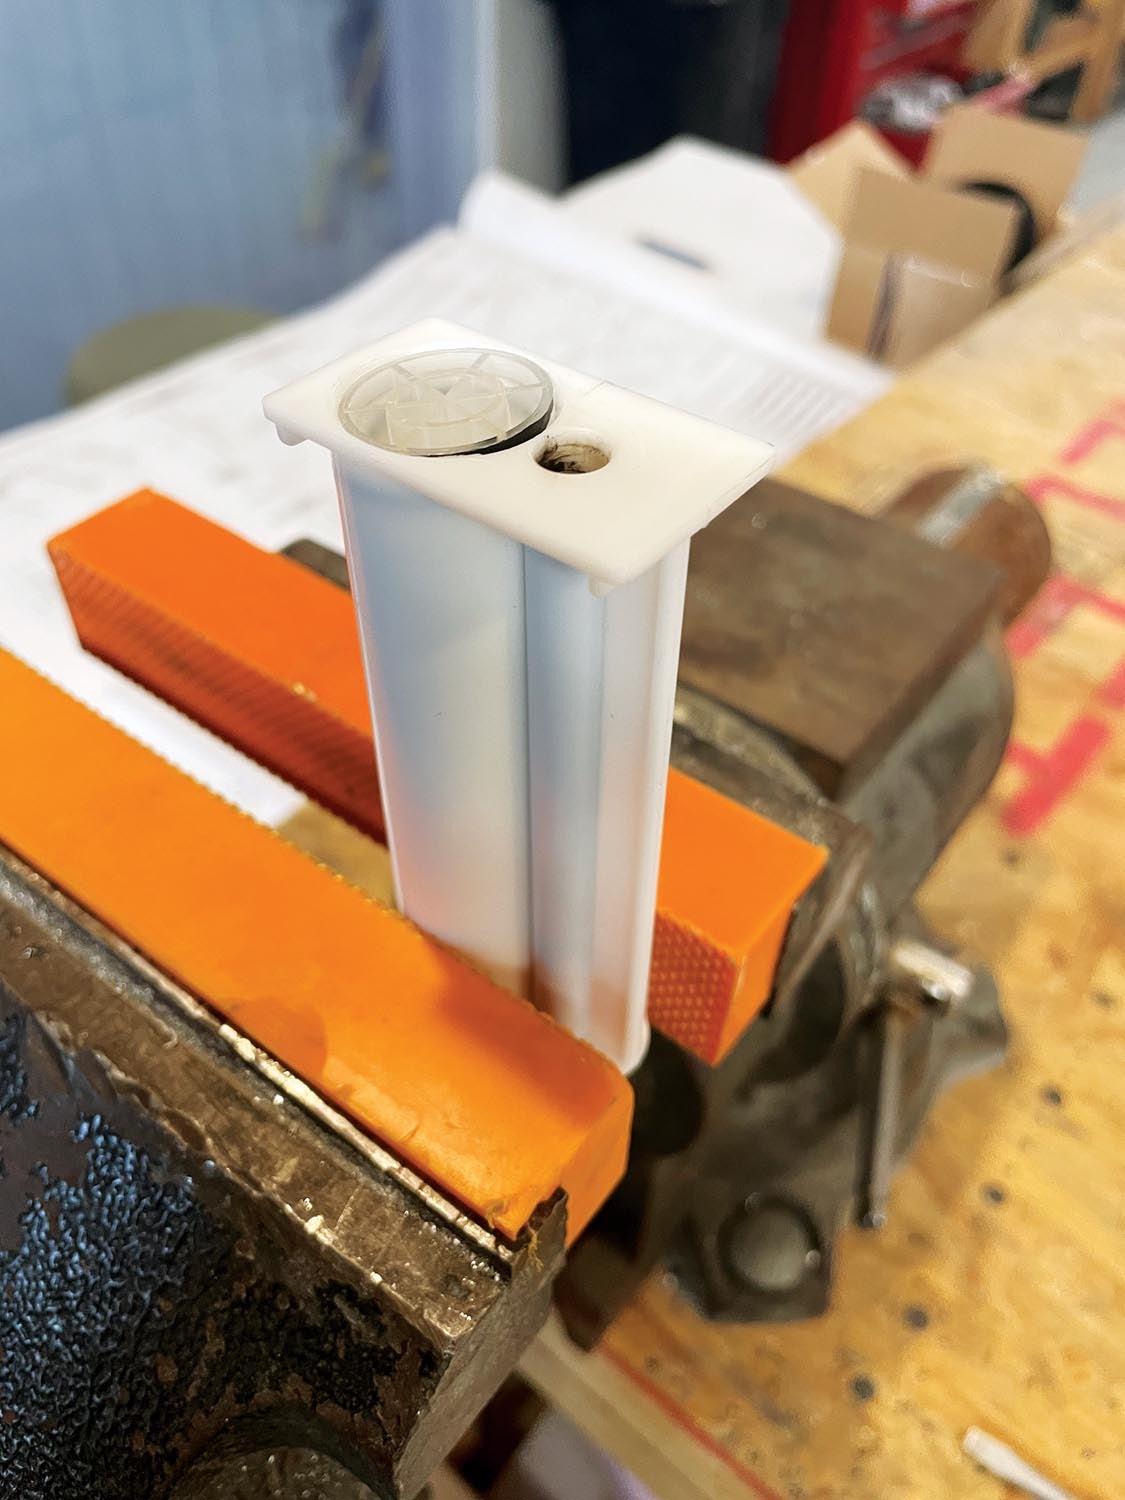
The actual filling process is simple. Support the cartridge, back end up, in a vise. Remove the cap where the nozzle will go—this will allow air to escape the bottom as you fill from the top. Put a paper towel underneath it so that if (when) some polysulfide drips out, you don’t get it on the vise or the floor. Put a piece of tape over the small chamber hole to keep the white stuff from contaminating it. Now use a popsicle stick to scoop material into the large chamber. This gets ugly and takes time because you have to scrape it off with another popsicle stick and poke it down into the chamber with the sticks, needles and safety wire. Keep going until you see it bulging out the bottom. Fill to maybe a half an inch below the top—you’ll need room for the piston.

When the big chamber is full, clean off any and all spilled gunk from the outside of the cartridge, your tools, yourself—and close the can! Take the large plastic piston (with the O-ring down) and push it into the chamber, tipping it slightly to let air out. Push it down until you squeeze a little material out the dispensing end. Now clean things up again. Make sure the area is surgically clean, then remove the tape from the small chamber and put a fresh piece of tape over the large chamber. Repeat the filling process for the catalyst. You’ll find the safety wire works better than the piano hinge in this small chamber. Fill to the same height as the other side. This is important because the plunger on the applicator gun has two pistons that are the same length—they will push on the pistons and if there is air or less material on one side or the other, you will get an uneven mix until the levels even out.
All of this sounds messy and finicky—and it is. An industrial filling process would use a pressure feed from the bottom to ensure no air gets trapped and both sides get filled to the same level. There would be no mess because the material is never out “in the open.” But this is a workshop experiment—so it’s far less than ideal.
Using a Filled Cartridge
Now that you have a filled Pro-Seal cartridge (you might as well label it with an indelible marker with the contents and expiration date because it will not be reusable for anything else) you’re ready to apply some Pro-Seal! Put the cartridge in the gun, attach a mixing tip and squeeze the trigger until goo starts getting to the nozzle. Enjoy the sight of the mixing process as it travels down the nozzle. Then discard the first bit of stuff—it isn’t going to be properly mixed because you didn’t get all the air out in the filling process. It will take a little pumping until you get a nice dark gray mixture coming out of the nozzle.
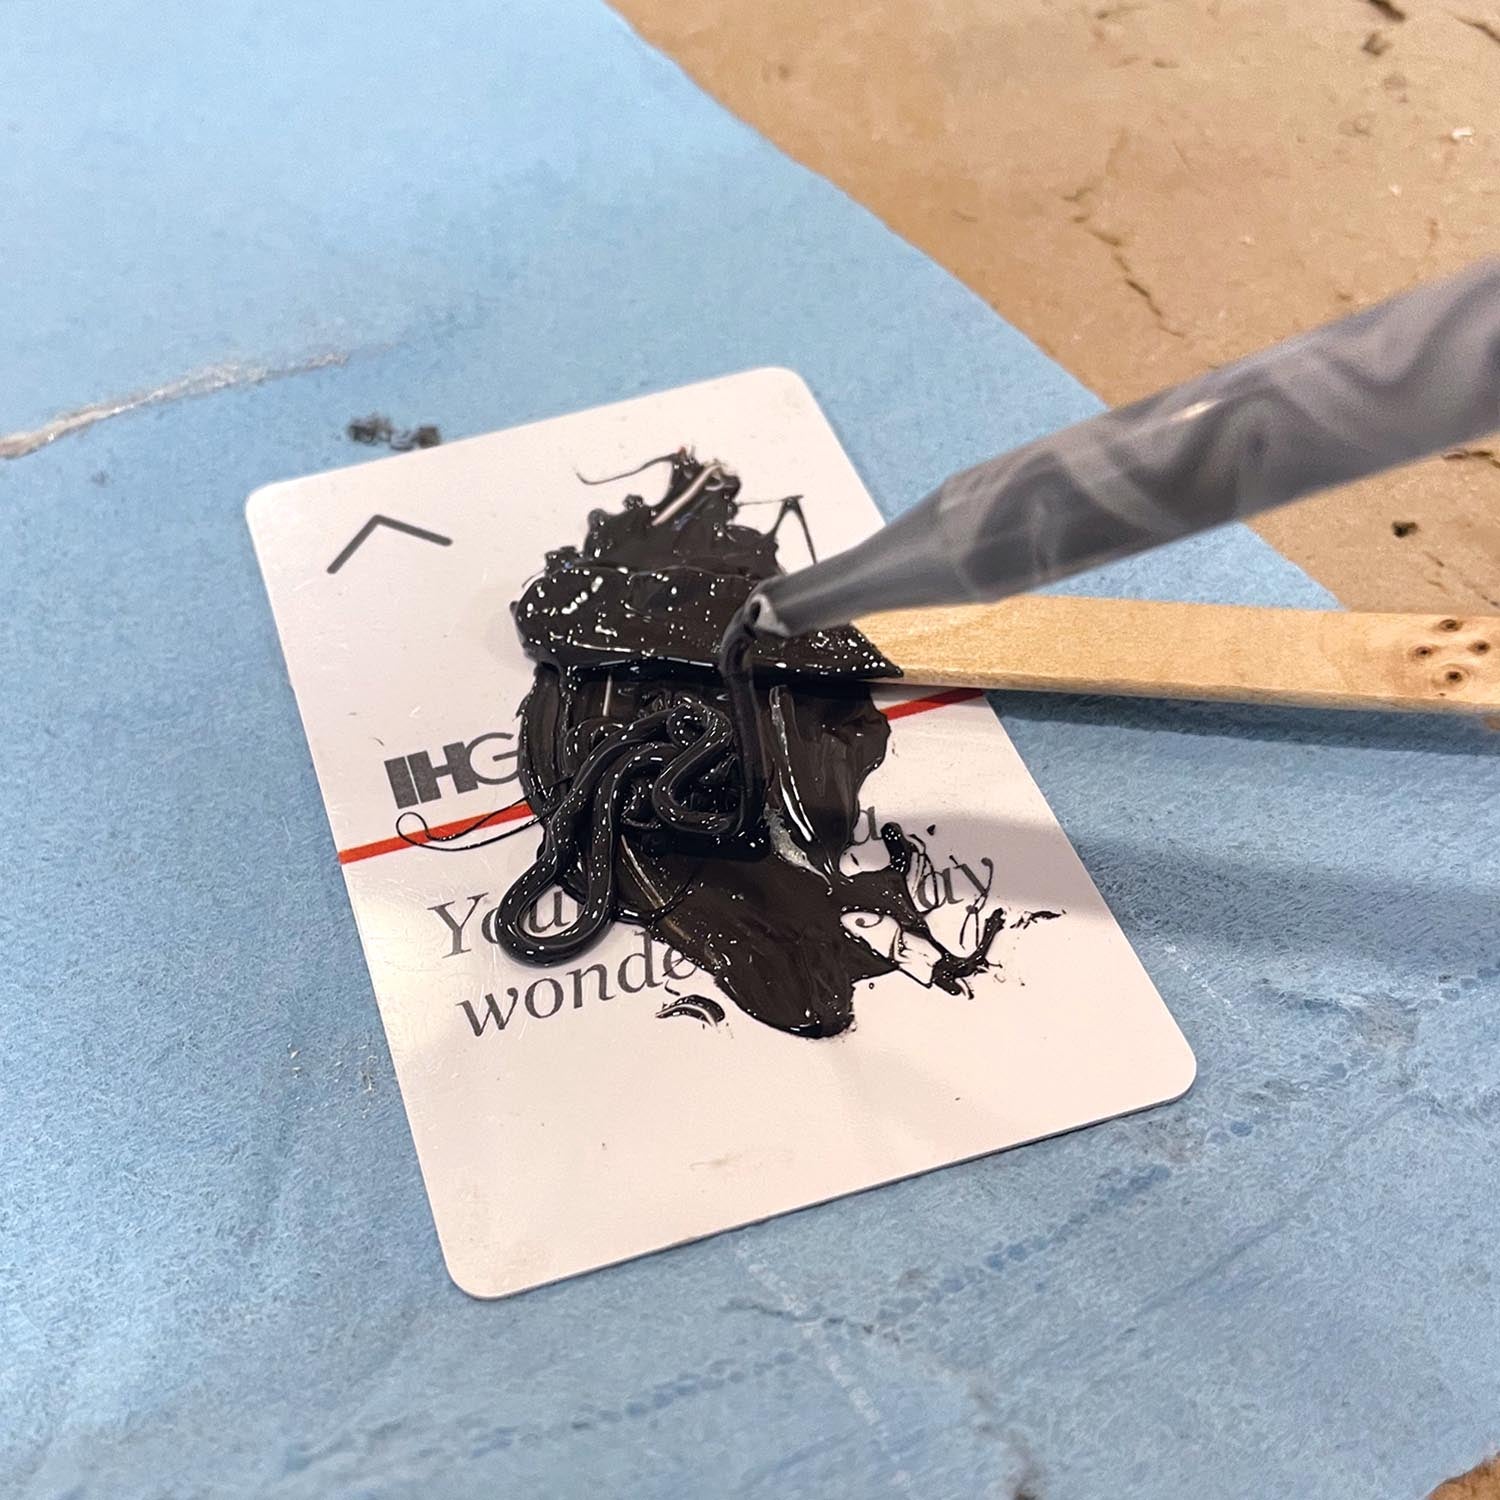
Before then, you might have some streaks where the mixture ratio was right, but the mixing wasn’t complete. If you want to eliminate waste, squeeze this onto a mixing surface and stir with the stick until it is nicely mixed. Yeah, this is exactly what you would have done if you had done the mix manually but you still would have had to measure accurately. At least that part is now done for you!
Eventually, you will have a perfectly mixed bit of Pro-Seal coming out of the dispensing nozzle and you can apply it directly where you want it. You might still end up using a stick or spatula to make a nice fillet, of course.
You Always Learn Something
All experiments are useful—many times, they simply tell you what doesn’t work. In the case of using cartridges for Pro-Seal, I’d say that we have, er, mixed results. Yes, it works. You get a nicely mixed product coming out of a nozzle that can be applied directly to a spot. When you’re done dispensing, you can take off the nozzle, put on a plug, take the cartridge out of the gun and throw it in the refrigerator for next time—just as I had hoped. You haven’t wasted as much as if you used a full cartridge that mixes it all at once.
However, the downside (as it is with all cartridge/adhesive use) is that you waste a lot of material in the disposable nozzle—so you sort of want to need more than a drop in order to be efficient. Along with this inefficiency, the process of filling the cartridges is extremely time-consuming and potentially very messy, especially when you are new to it. In the end, it probably takes less time to just get out the gram scale and cans of Pro-Seal, measure and mix what you need on a platen with a popsicle stick and use it directly. The extra convenience of using the gun-cartridge-nozzle is nice but you will probably end up getting out a popsicle stick anyway to shape your mound of Pro-Seal to the workpiece.
All experiments teach us something. This one taught me that the process works, just with more overall effort than the old method. It probably has its niche uses and I now have a couple of filled cartridges in the fridge for the next time we need just a dab of sealant. I saved the tooling I made for filling and can do it again in the future, but will I? That will depend on the exact amount of sealant I need and where it needs to be applied. So chalk this one up to “maybe” and add it to the big bag of builder tricks.


Hi Paul:
Great tip for small quantities!
For sealing fuel panels on corporate jets, we used SEMCO (air) sealant guns, mixed pooky on pieces of aluminum or cardboard, wrapped masking tape around the end of SEMCO sealant tubes, scrapped across the pooky on the board to fill them, pulled the tape off the tube, inserted the piston, screwed on the nozzle, and put the tube into the gun.
Pull the trigger – pooky! With practice, you can tool the pooky seam with the nozzle as you apply it, avoiding any mess. Then pull off your tape masking from the seam… Soapy water on your finger allows you to touch-up the pooky, if needed.
My two secrets – add a little dab of water as you mix the pooky (we used to spit in it – gross!) and coat your gloves with KY before you pull off the masking tape – that avoids the giant furball of sealant & tape sticking to your gloves when you try to put it in the trash. Everyone will laugh, yes, but the tape won’t stick…
Regards,
James
As a civil service aircraft mechanic I spent years cleaning this off and reapplying in fuel tanks on F-4’s, F-111’s, C-130’s and other aircraft. Though messy, it applies easy, dries over night, lasts almost forever, fairly flexible, and is a pain to remove. Nothing seems to effect it, acetone to jet fuel. Paint covers it nicely to for external applications. Used pint size 2 part cans to loaded tubes with special mixers. I ruined a lot of overalls with this stuff. Have never found anything that can compare in the big box stores or specialty places. ProSeal is expensive but works.
Retired from 33 years McClellan AFB, Sacramento, CA
Curt
Comments are closed.