 Ted asked a simple question, “Where is the manual?” Brett’s answer: “Why?” “Because I need to find out what to torque this engine bolt to.” Again, a non-answer, “Just get it tight; everyone knows what tight is.” “No, we don’t. There would not be a table of torque values without a need for them,” Ted said. “OK, well, I don’t have the directions handy.”
Ted looked over at Brett and shook his head with a sigh. “If you want my help here, you need to get with the program. There is a reason for torque values, and if you don’t have them handy, you are more likely than not to make something up. Making things up will not help you in your quest to fly a safe airplane.” Eventually, Brett relented. “Let me go find the information that came with the kit. It’s here somewhere.”
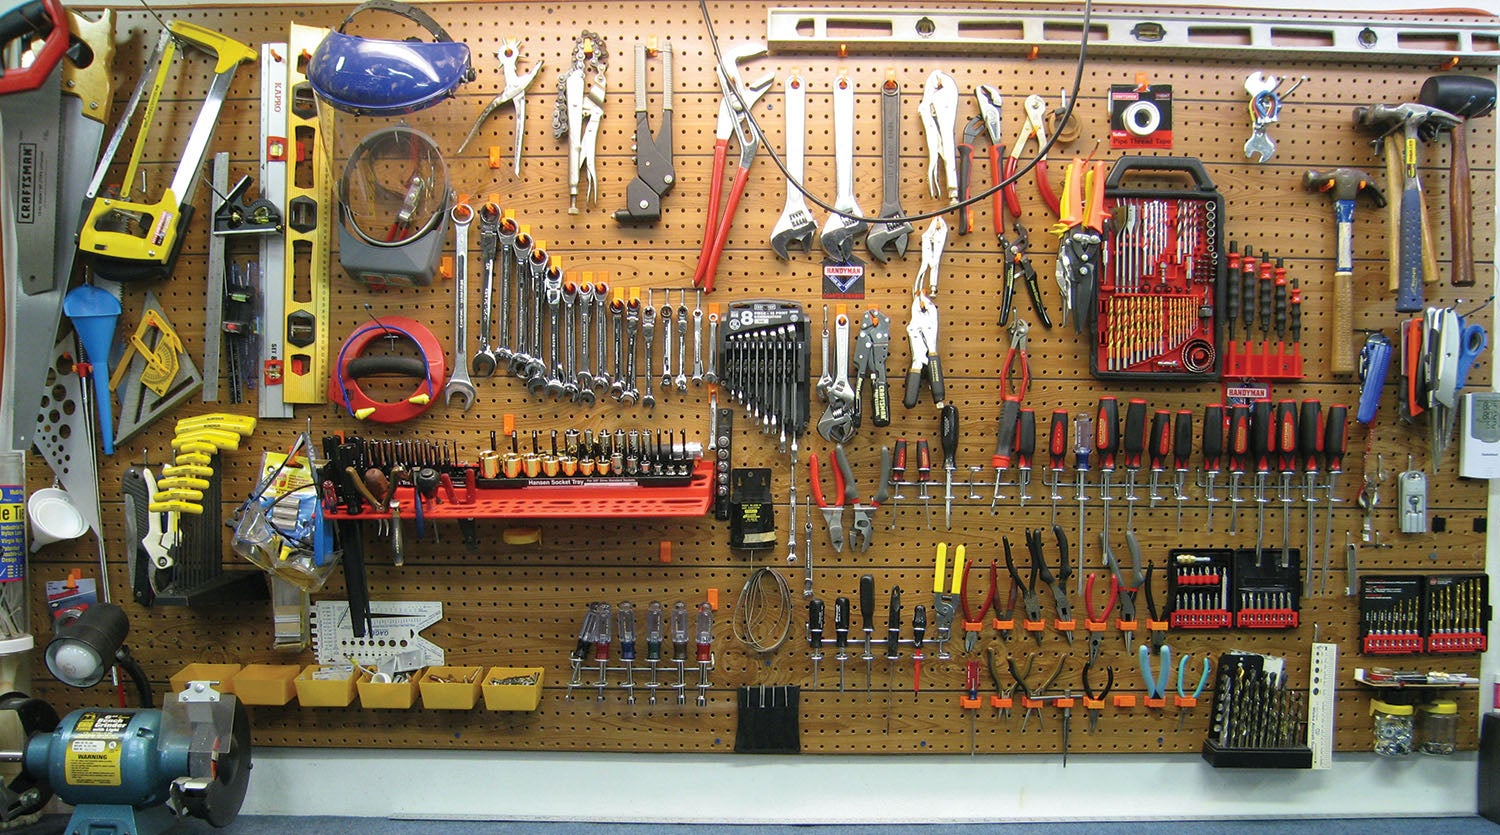
Ted looked around at the garage workshop. It was littered with tools and airplane parts. “I can see why you’re having trouble finding things.”
Most builders are not this haphazard, and I don’t mean to cast aspersions on the few who are; however, in my technical counselor/flight advisor career, I’ve seen enough inability to find the correct information at the right time to fill a book. Whether you are the neatnik who has your workshop clean, organized and ready or the throw-it-together, I-can-find-it person, organizing your documentation will reduce risk and pay off both financially and psychologically.
The Whys
Efficiency. When you’re working on a building task and need a piece of information, having it at your fingertips shortens the time the task will take and reduces aggravation and stress. This improves your outlook and lessens the hours of building, getting you in the air faster.
Warranty claims and exchanges. During your build, you will have something—maybe many things—that aren’t right and have to be returned, exchanged or sent out for service. If you already have all of this information—from part numbers to addresses—in a notebook, it will be a breeze to get it done.

Aircraft differences. No two Experimental aircraft are the same. They may come with the same plans, the same checklists, and the same directions, but in the individualized building process, the airplane will be unique.
Maintenance and overhauls. Having all of the maintenance information together, along with the detailed specifications (right down to, for example, the exact paint type and color numbers), will simplify future maintenance, rebuilding, condition inspections and overhauls.
Resale and for others. If you decide to sell your completed aircraft or your project in process, having all of the documentation organized will impress your potential buyer and please a future owner. If something unexpected happens to you during your project or after you begin flying, the people sorting through your belongings will thank you. Not to be macabre, but last month I visited the home of a fellow pilot who was working on a Cozy Mark IV. He went outside to do lawn work and died suddenly of a heart attack. He left behind a beautiful Cozy one-third completed with parts scattered about. We couldn’t even find the builder’s log. Now it falls to the family to figure out what to do.
Safety. I’m a fan of checklists. From assembly to preflight to condition inspections, checklists will make your build and your flying safer. Following directions explicitly, step by step, helps reduce error. At the end of your build, you’ll have lots of checklists. They should be consolidated, added to and customized.
Here’s How
In preparation for the kit arrival, identify where and how you will store everything; get the storage in place ahead of the kit. Put all of the documentation in one spot. I can’t emphasize this enough. We have all experienced situations where we bought something that had to be assembled and almost immediately misplaced the instructions.

Buy some notebooks. I use five, which I’ll talk about below. Feel free to change it up if you think it’s overkill. Some builders like to scan materials to put in an online file; for many projects, this is an overwhelming task, and I’d not feel compelled to do it since the notebooks will work fine. You may want to use an online builder’s log or a combination of log software with printed materials.
How you organize and store all of this material is up to you. Whether this is a file storage organizer, hanging file organizer, magazine type file holder, bins, document bags, binders or notebooks, keep the whole mess in one or two spots where you can quickly locate it, and it remains portable.
Since the keyword for homebuilt is variability, you might get a lot of documentation with your kit or very little. The less you get, the more critical it will be to assemble the rest of what you need. Go through this list and identify what you do have:
The work you do next will make the rest of your build and flight time with this aircraft much easier, safer and less stressful. The idea is to organize everything in a way that makes sense to you. I’ll lay out here how I did mine.
Airframe Notebook
Put the obvious items in this notebook. Be sure to label the outside and the spine so that it’s easy to recognize and locate. I like to use different notebook colors. I get in the habit of grabbing the color, knowing what’s in it. Here are some items that should go here.
Airplane specifications and performance with a three-view drawing; descriptive data—use the info you already have from the kit manufacturer. If you don’t have this, it may be available online. You can use it as your aircraft identification for certification.
Operating limitations. Have a spot here for the operating limitations that you will receive from the FAA inspector or DAR. The original can go in the airplane, and a copy can go in your notebook. Include items like airspeed limitations, placarded data, load and fuel information and limits, etc.

for getting your project signed off.
Emergency procedures. Include information the manufacturer gave you, plus checklists and notes that you have made. The sky is the limit here. Over a dozen pages are devoted to this topic in the Cessna (certified) manual. You will want to format and laminate these later for flying.
Normal procedures and preflight. Put your normal procedures checklists, including your walk-around inspection, in this section. My advice is to ask the best A&P or flight instructor that you know to observe your preflight and offer constructive criticism. Then ask your technical counselor to do the same. After modifying your list to include their advice, send a copy of the checklist to the kit manufacturer and the builder group for more advice. The preflight checklist may be the single most important document you use every time you fly, so make it the best it can be. When it’s polished, encase it in plastic (laminate) as your checklist card.
Weight and balance. Put a copy of your weight and balance information here.
Engine/Prop Notebook
Assemble all of the relevant information on your engine and propeller here. When you receive your firewall-forward kit, it will include an engine operating and maintenance manual. Some builders like to use a separate notebook for the prop, especially if it is a constant speed model. This is your choice.
Avionics and Accessories Notebook
Assemble all of the panel avionics, antennas, electronics and other accessories here. Diagrams, plans, instructions, templates and your wish lists go here. These are the items that tend to go missing the most. After you use the wiring diagram, for example, make sure you put it back where you can find it. Consider making copies of some of the things you’ll use most often. You can drip coffee on them and make notes; make sure you transfer any notes to the original at the end of the build.

Documentation Notebook
Put your builder’s log here, along with photographs. Also, include a section for your flight test plan and data. Make this section as thorough as possible. As you proceed on the build, make notes of anything that went wrong and what you did to correct it. Add notes that should end up on a checklist. Also, document any changes you made and the manufacturer’s advice you received. Document cool tips or tricks you discover! Other builders will be grateful. Sign and date your work at the time you develop it and take lots of photographs.
The documentation notebook is also a great place to put extra resources, such as FAA booklets, checklists, articles, and the like. Or you can assemble a separate notebook for articles—I did—most were KITPLANES® how-to articles. You’ll be glad you did when you say, “What did I do with that issue from last year on wiring my antenna?”
Maintenance Notebook
Put your maintenance manual here along with maintenance records, service bulletins, ADs for certified components and your condition inspection advice, checklists and factory informational letters.
Find the best condition inspection template you can for your aircraft if the kit manufacturer has not provided one. Check with your builder group too. The template to start with is in Appendix 1 of the FAA Advisory Circular AC 90-89B: “Amateur-Built Aircraft and Ultralight Flight Testing Handbook.”
Van’s Aircraft has a document called “What’s Your Condition Inspection,” which is a very handy how-to guide on conducting the condition inspection, as well as how to find relevant ADs. They also have a terrific condition inspection template.
Along with your preflight and inflight checklists, the service and maintenance procedures will contribute heavily to safe operation, particularly for those who fly the airplane after you. Use what the kit manufacturer gives you, and along with Appendix D to Part 43, add notes to help you inspect and service each item.
Backtracking
As a Technical Counselor, I sometimes get a call from a builder halfway through their project. They encountered a problem and need help, or they want advice overall. When I arrive, the documentation is in full scatter mode. While I could just let that go and get on with the questions, I always explain that a weekend spent assembling all of the stray papers and manuals and organizing them into a coherent set of binders will pay off in every way. After listening to my appeal, about 80% of the builders say yes, and I help them organize.

Invariably things are missing as we put everything together. See what things you can get from the manufacturer. I’ve found that they are happy to supply missing information and often don’t charge for it.
After reading this appeal to organize, I expect you are either depressed or excited. I hope you are excited and thinking about why it’s such a good idea to put things where you can find them. And if you are the neatnik, I hope I’ve given you some ideas you had not thought of already.
The bottom line: Be a Ted. Don’t be a Brett.
![Aircraft designs now can be built in a fraction of the time necessary in the early days of homebuilding. [Credit: Adobe Stock]](https://www.kitplanes.com/wp-content/uploads/2026/02/AdobeStock_1336488.jpg?w=218&h=150&crop=1 "Kit Building Then and Now")


Every important manual is now available in a searchable pdf format, downloadable into your tablet or smartphone. Mine contains all the FAA Guidebooks, POH and RV Builder’s Guide. I’ve extracted all checklists and critical numbers to my Notebook App.
Barry, thanks. Some builders are not as internet savvy; this is definitely the way to go. You’ve done everything right.
Comments are closed.