 Sheared wingtips are a pretty common modification to Experimental airplanes. The primary—perceived though sometimes not realized—advantage is increased top speed through drag reduction at the expense of higher wing loading and higher stall/landing speed. Removing area from the tips reduces the bending moment on the spar, so compared to an extension or winglet, it’s a safe mod as far as spar loads go.
My SR-1 race plane hasn’t flown yet so we don’t yet know its flight characteristics. Nevertheless, having the ability to replace the crescent-shaped tips with sheared tips has been part of the game plan since the initial design. I decided to go ahead and make the tips while the wing was still unpainted, though as you’ll see, with a little bit of care you can do this on an already flying/painted plane with no problem.
This method uses the existing wingtip as the basis for a mold—in essence, we are going to truncate the tip with a plane. The plane can be either vertical, perpendicular to the angle of dihedral or some other angle you decide. If a truncated version of what you already have doesn’t suit you, then you’ll need to do some extra work creating the shape you want and then pulling a mold off of that. But I want to keep this as simple as possible, so we are going to assume a truncated tip. If you want something fancier then this may serve as a good starting point. We’ll use a show-and-tell method with pictures from here on out to describe the process.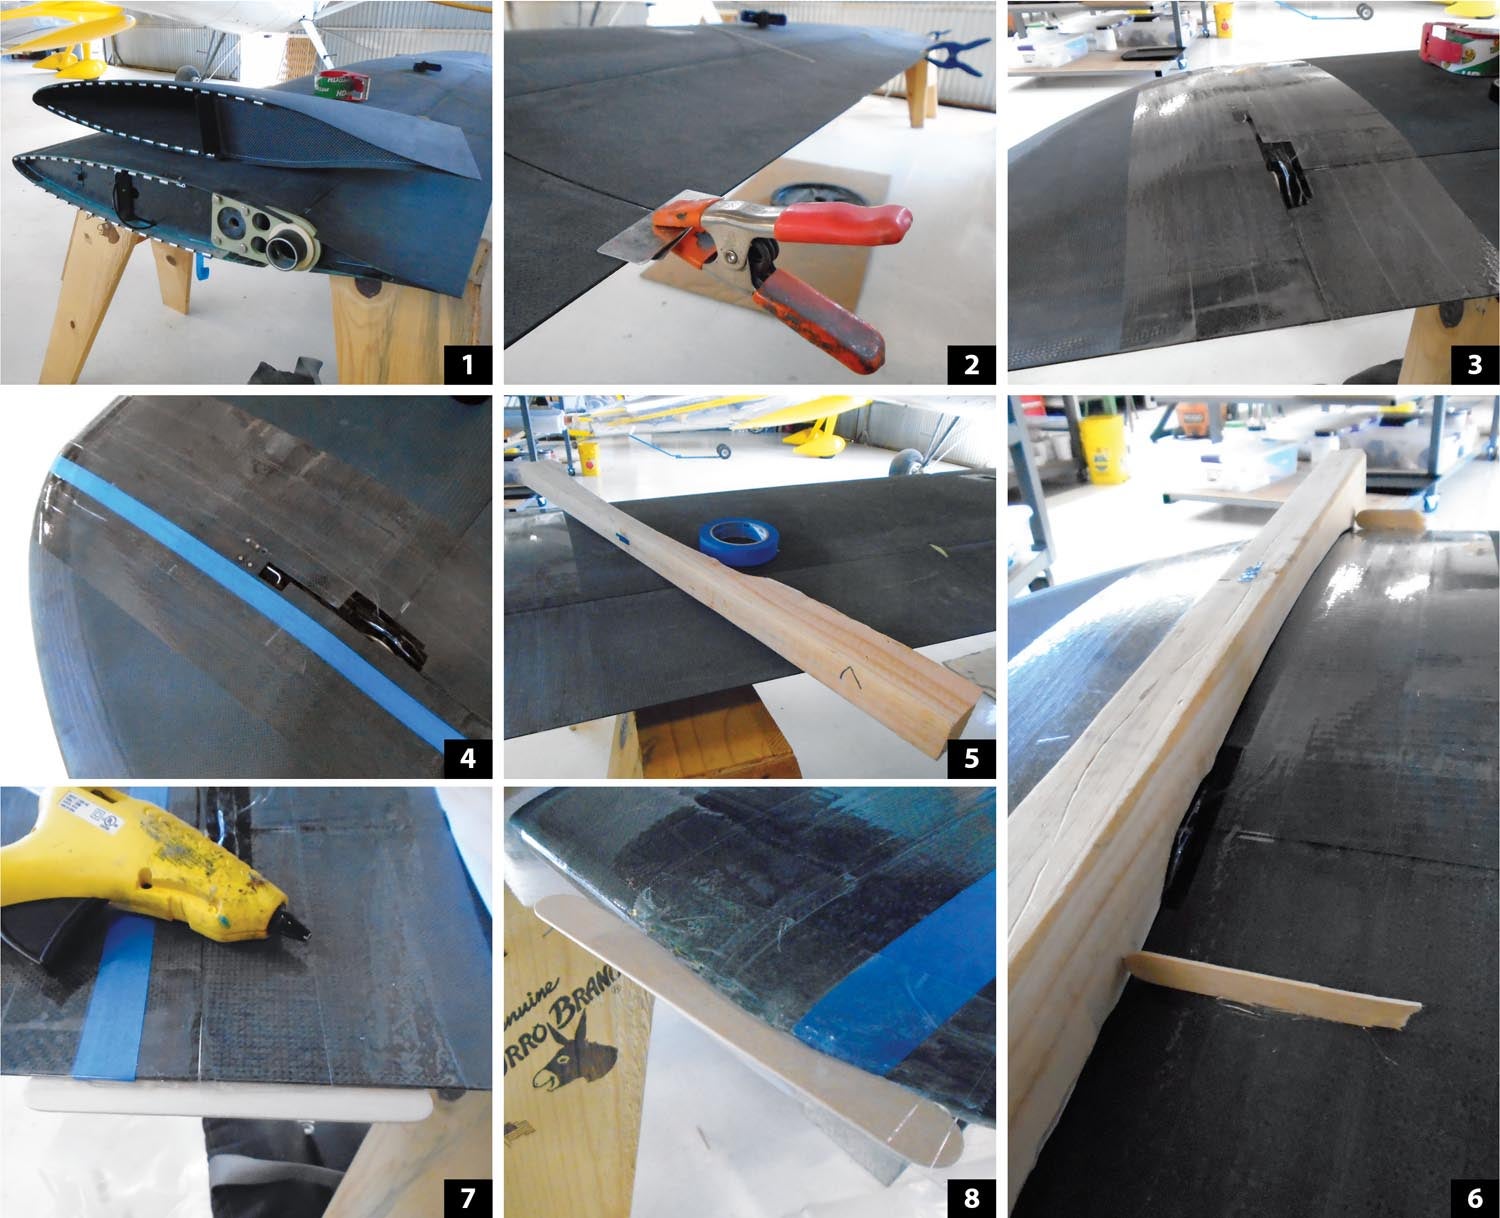
Image 1 shows the existing right SR-1 wing and crescent (not sheared) wingtip. Note that the wing is upside down.
One of the first steps: If the ailerons extend to the wingtip, clamp them in place (Image 2).
We are going to make a Bondo splash mold of the wingtip, so the first thing to do is put some clear packaging tape over the seam between the wing and the wingtip (Image 3). Go about 6 to 12 inches either side of the seam. Lay the tape down as smoothly as possible since this will be our mold surface. Vinyl or electrical tape works well if you need to go around curved surfaces.
Next, establish the truncating edge (Image 4). I wanted the smallest tips possible. Since my tips attach with piano hinges and the hinges are about 3/4-inch wide, I made my tips 1 inch deep to accommodate the hinges that needed to go inside. To do this, I simply laid 1-inch-wide blue tape on the wingtip, butting up against the end of the wing. I then laid a second strip of blue painter’s tape against the first strip and peeled the first strip up. Voilà! A 1-inch offset, no measuring required. Since Bondo will stick to the painter’s tape add a second layer of packaging tape over the blue tape as a release, with the edge of the packaging tape flush with the inboard edge of the blue tape. Don’t be tempted to lay down the blue tape under your first layer of packaging tape. The above method yields a nice crisp edge that will serve as a handy reference line later on.
The mold needs a spine for support. I just used an old two-by-four (Image 5). Cut the spine to the approximate shape of the wing surface. We will later sand the Bondo mold to the reference line established in the previous step. Bondo is easier to sand than a two-by-four, so the spine should stop short of the reference line about 1/8 inch. That way, we’ll only have to sand Bondo, and not wood, to create the reference plane. The inboard side of the spine should extend about an inch past the wing/wingtip seam.
Our reference line will get covered in Bondo in the next step (Image 6). In order to position the spine and maintain the 1/8-inch gap once the reference line is hidden, hot glue some popsicle sticks to the inboard side of the spine as a stop. What, you don’t have a hot glue gun and popsicle sticks? What kind of an airplane builder/single guy without kids are you?
Hot glue tongue depressors to the trailing edge and leading edge; this will form the LE/TE mold flange (Images 7 & 8). However, try to avoid any glue squeezing out onto the stick—we want a nice crisp edge here. Once the glue has hardened, apply packaging tape over the sticks as a release.
 Time to mix up the Bondo! Smoothly apply half the batch to the area between the wing seam and reference line, being sure to extend about an inch or so past both (Image 9). No bubbles—this is your mold surface! Apply the other half to the spine and push the spine onto the wing.
Before the Bondo cures, use a tongue depressor to form a generous fillet between the outboard side of the spine and wing (Image 10). This fillet is important! If you don’t have enough squeeze-out or the Bondo cures too quickly, mix up more Bondo and add the fillet.
Avoid the temptation to pop the mold off just yet! We still need to do the other side of the wing and that needs to mold up against the flanges we made with the first mold. If your wing is freestanding, flip it over at this point. Otherwise, you will be using the Michelangelo technique—working upside down. Here’s the view of the leading edge after the wing has been turned over (Image 11).
Pop off the tongue depressor (but not the mold!) and remove its packing tape (Image 12). We want a nice clean edge between the flange and the leading edge here, so if there is any leftover hot glue stuck to the wing or flange, you can easily remove it by spritzing with alcohol, which releases hot glue.
Use a Dremel tool or similar to make a small locator in the flange, about ¼-inch in diameter (Image 13). Do this at both ends, leading edge and trailing edge.
Apply release tape and the edge reference tape the same as you did for the other side. Don’t forget to release the leading/trailing edge flanges as well. In this picture (Image 14), I’ve applied edge reference tape at the wing/wingtip seam as well because the very precise fit of the wingtip doesn’t leave a reference line in the tape. For most airplanes, this won’t be a problem; the step or seam is pretty obvious. Also shown is the spine.
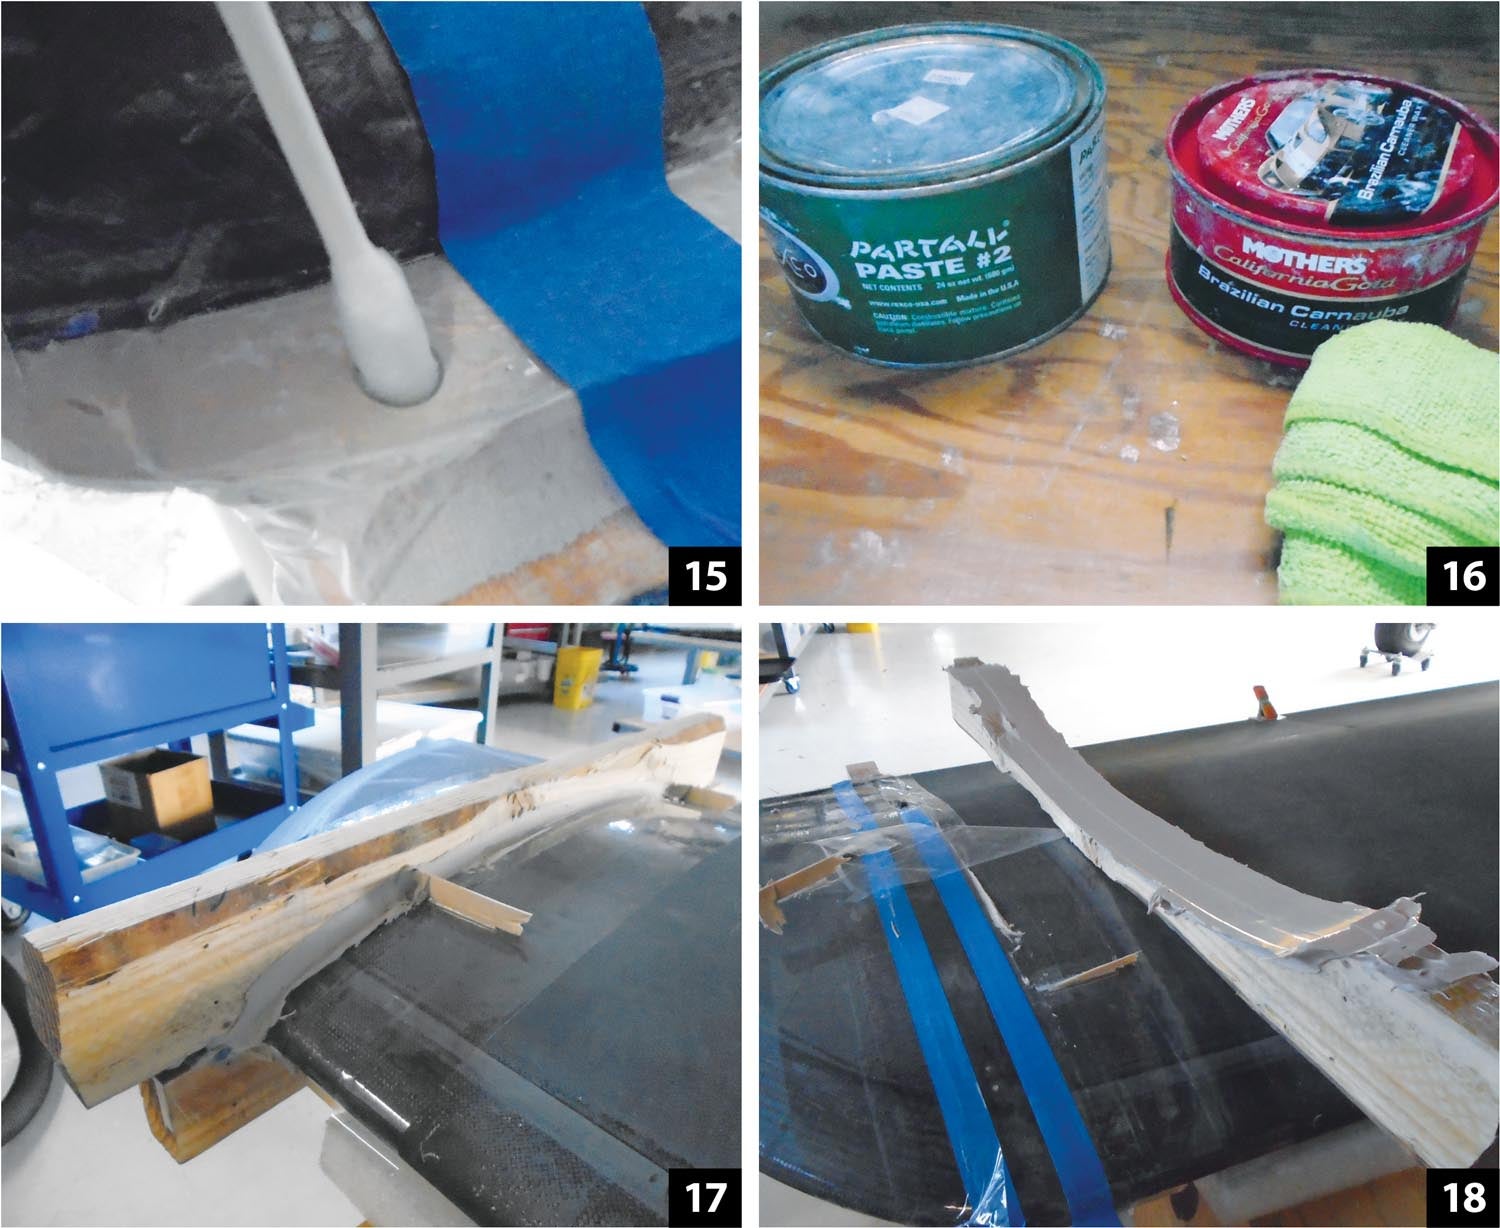 Cut away the tape around the locator and use a Q-tip to release it with mold release wax (Image 15). Partall #2 and Mothers Brazilian Carnauba are both good mold release waxes (Image 16).
Bondo the lower spine onto the wing (Image 17). Don’t forget to hot glue popsicle sticks to maintain your 1/8-inch edge reference distance.
OK, now you can pop off the mold! If you did a good job, you should have a bubble-free mirror mold that spans past the wing/wingtip seam on the inboard side and past the edge reference line on the tip side (Image 18).
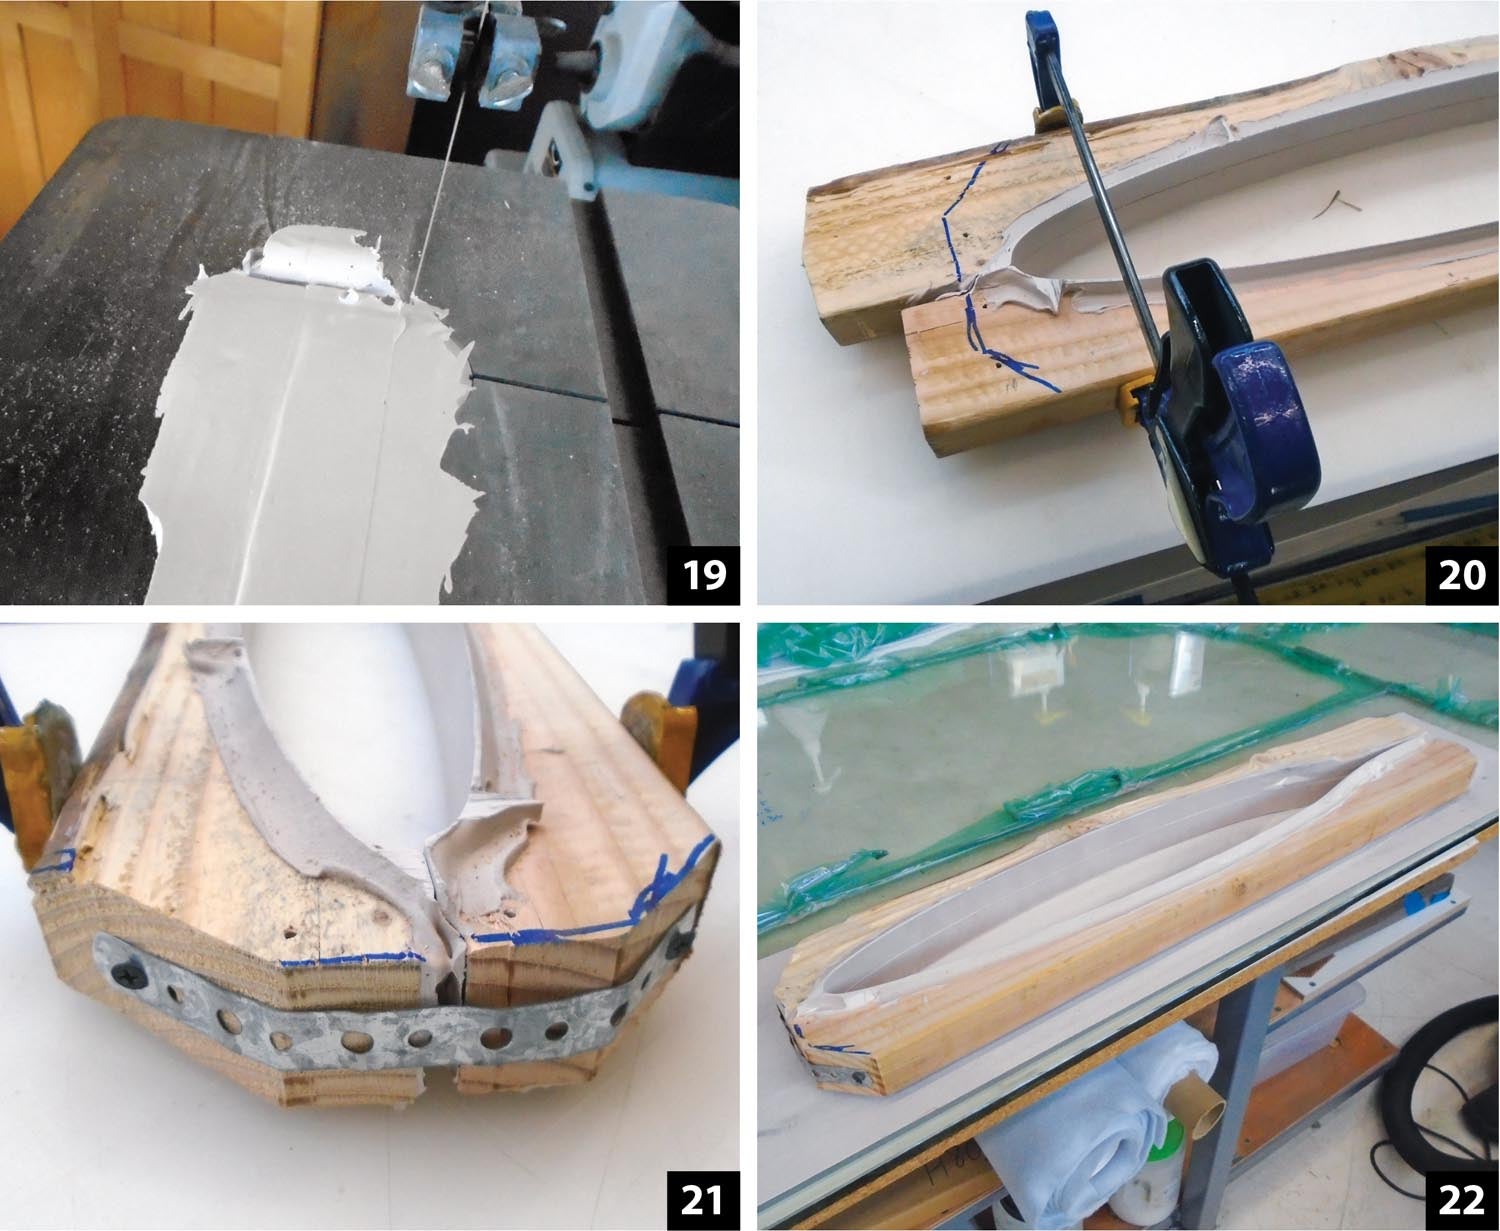 Trim the excess Bondo to within 1/8 inch of the edge reference line with a bandsaw (Image 19). On the inboard side, you can trim the Bondo flush with the spine. Here the wing-to-wingtip seam (left) and edge reference line (right) are easily visible. Reassemble the mold halves on a flat surface (Image 20). The flange surfaces should match up perfectly, assisted by the locator bumps. Trim the ends of the mold, as shown by the blue Sharpie line.
The mold needs to be assembled when making the part but it’s easier to wax and to remove the finished part if it can be disassembled. This is easily accomplished using steel plumber’s tape as shown (Image 21).
On a flat surface (here, a sheet of tempered glass on my layup table), apply adhesive-backed 220-grit sandpaper to create a sanding table (Image 22). With the mold halves firmly assembled, we are now going to sand the mold on edge to the reference lines, which should be clearly visible in the mold halves. You don’t need to sand the inboard edge flush to the spine, but sand it enough so there are no sharp edges, especially if you plan to use the mold for vacuum bagging. If you sand the inboard edge, be sure to leave at least 1 inch of mold extending past the wing/wingtip seam.
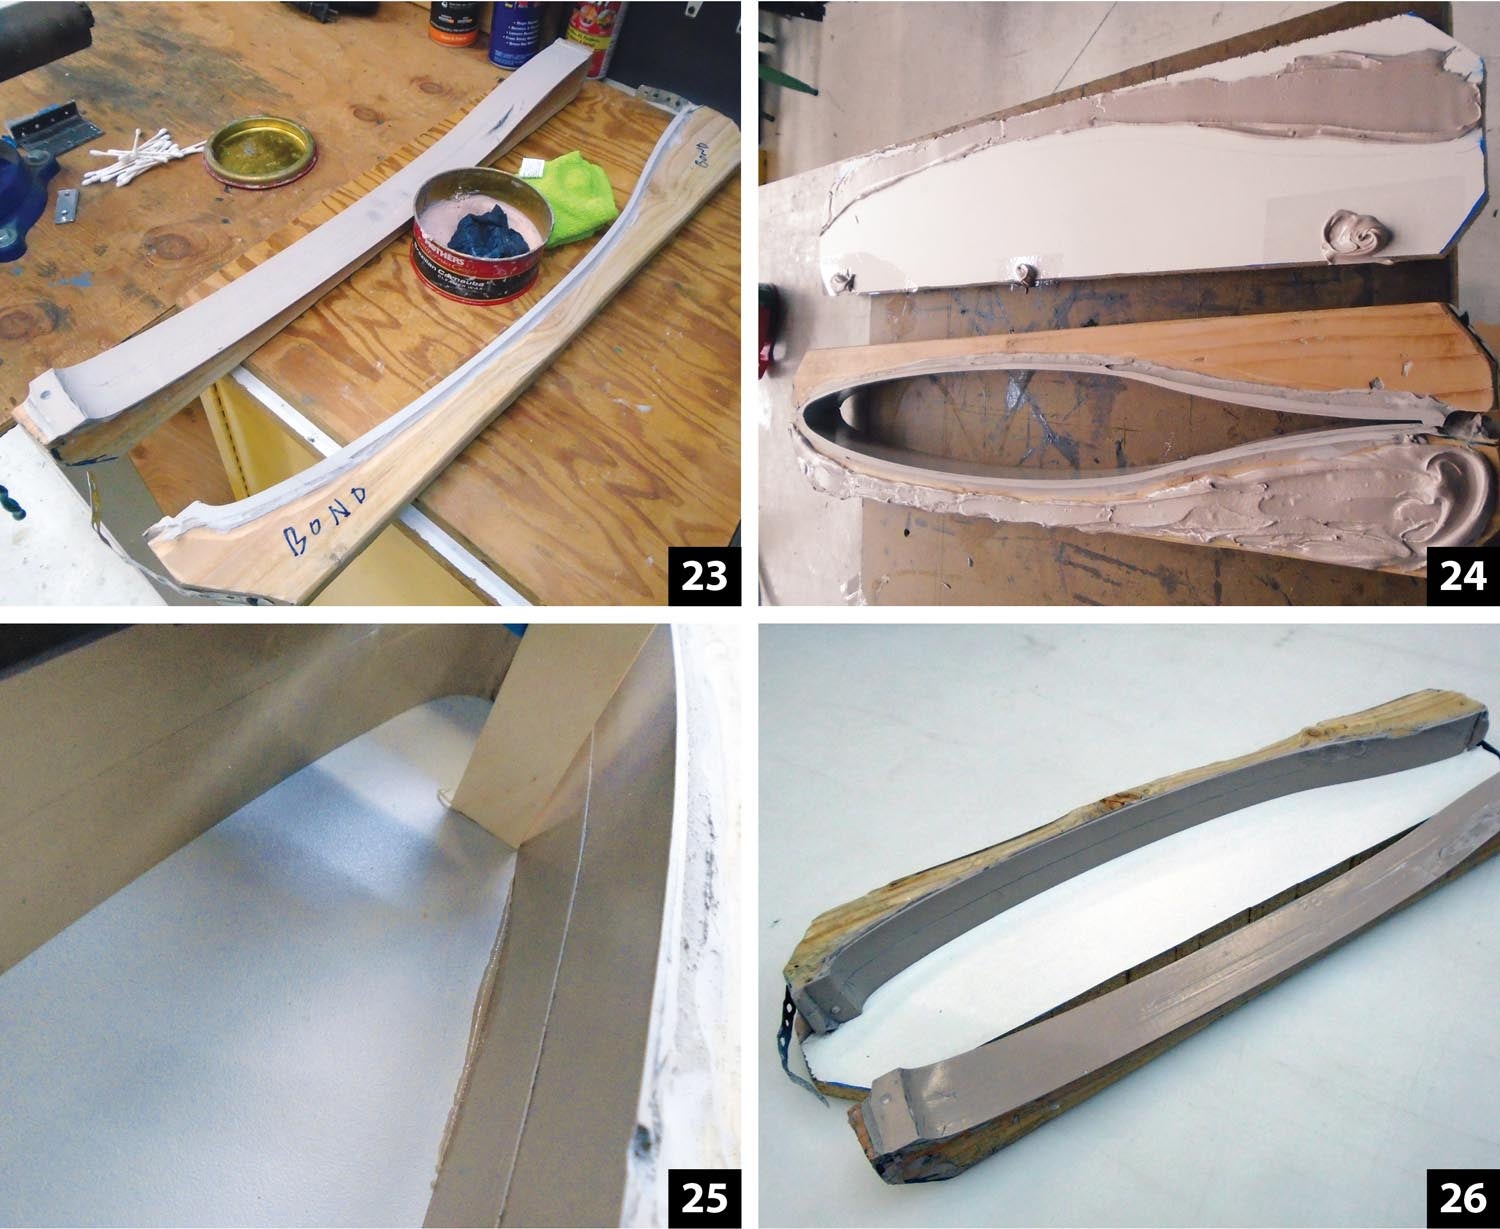 After sanding has established the truncating plane of the tip, we’ll bond one half of the mold to a base of melamine-faced MDF. To be safe, wax the mold surface a couple of times (Image 23). We are going to be careful when applying the Bondo to try and avoid having any squeeze out onto the mold surface, but just to be safe, wax the Bondo mold surface a couple of times.
After waxing, the mold halves can be reassembled. Bondo is applied to one side of the mold half as well as to the MDF base (Image 24). You can also see three dabs of Bondo applied to the left side of the MDF base. These are simply to support the other side of the mold when vacuum bagging. Notice that the dabs are all released by strips of packing tape under them.
Despite our good intentions, we still got a bit of squeeze-out on this one. No worries, just square off a tongue depressor and wipe up. Any residue can be wiped clean with a rag and acetone. Any squeeze-out should not stick to the waxed mold surface (Image 25).
The finished mold, disassembled for waxing (Image 26). For the initial pulls, I usually wax my molds four or five times. I also shoot them with PVA if I want extra insurance, but if you do a thorough wax job this isn’t strictly necessary. On the other hand, PVA alone is not a sufficient release—it must be applied over a base of wax. Make sure the wax has time to haze between buffings (but not too dry, or you’ll really be working to buff off the residue).
 Prepare your materials (Image 27). You can use either fiberglass or carbon, vacuum bagged or not. Here you can see materials prepped for vacuum bagging—from left to right: breather fabric, perforated release, peel ply and carbon fiber. At the top of the photo is a template used to cut out the materials, a grease pen for marking outlines (sharpie will bleed into your part and possibly the paint later on) and electric scissors.
For the layup itself, I recommend vacuum bagging if possible. I’ve covered the process in previous articles, and it’s not difficult, but it’s certainly easier if you can find someone to give you a hand if you’ve not done it before.
Cut your fabric on the bias (45° to the chord line). This makes it much easier to conform into the mold. Also, for deep/tub-shape molds, putting the fabric into the mold dry and then wetting out is much easier than wetting the fabric out and then trying to put it in the mold. For the best surface finish, I first apply a neat layer of epoxy into the mold and then drop in my dry cloth, followed by more epoxy to completely wet out the cloth before dropping in the next layer of cloth.
A foam brush is used to apply the neat layer, as well as push tow (carbon fiber ribbon) into the edges. I like foam brushes for this step since they are less likely to scratch the PVA coat as compared to a chip brush, which I prefer for subsequent steps (Image 28).
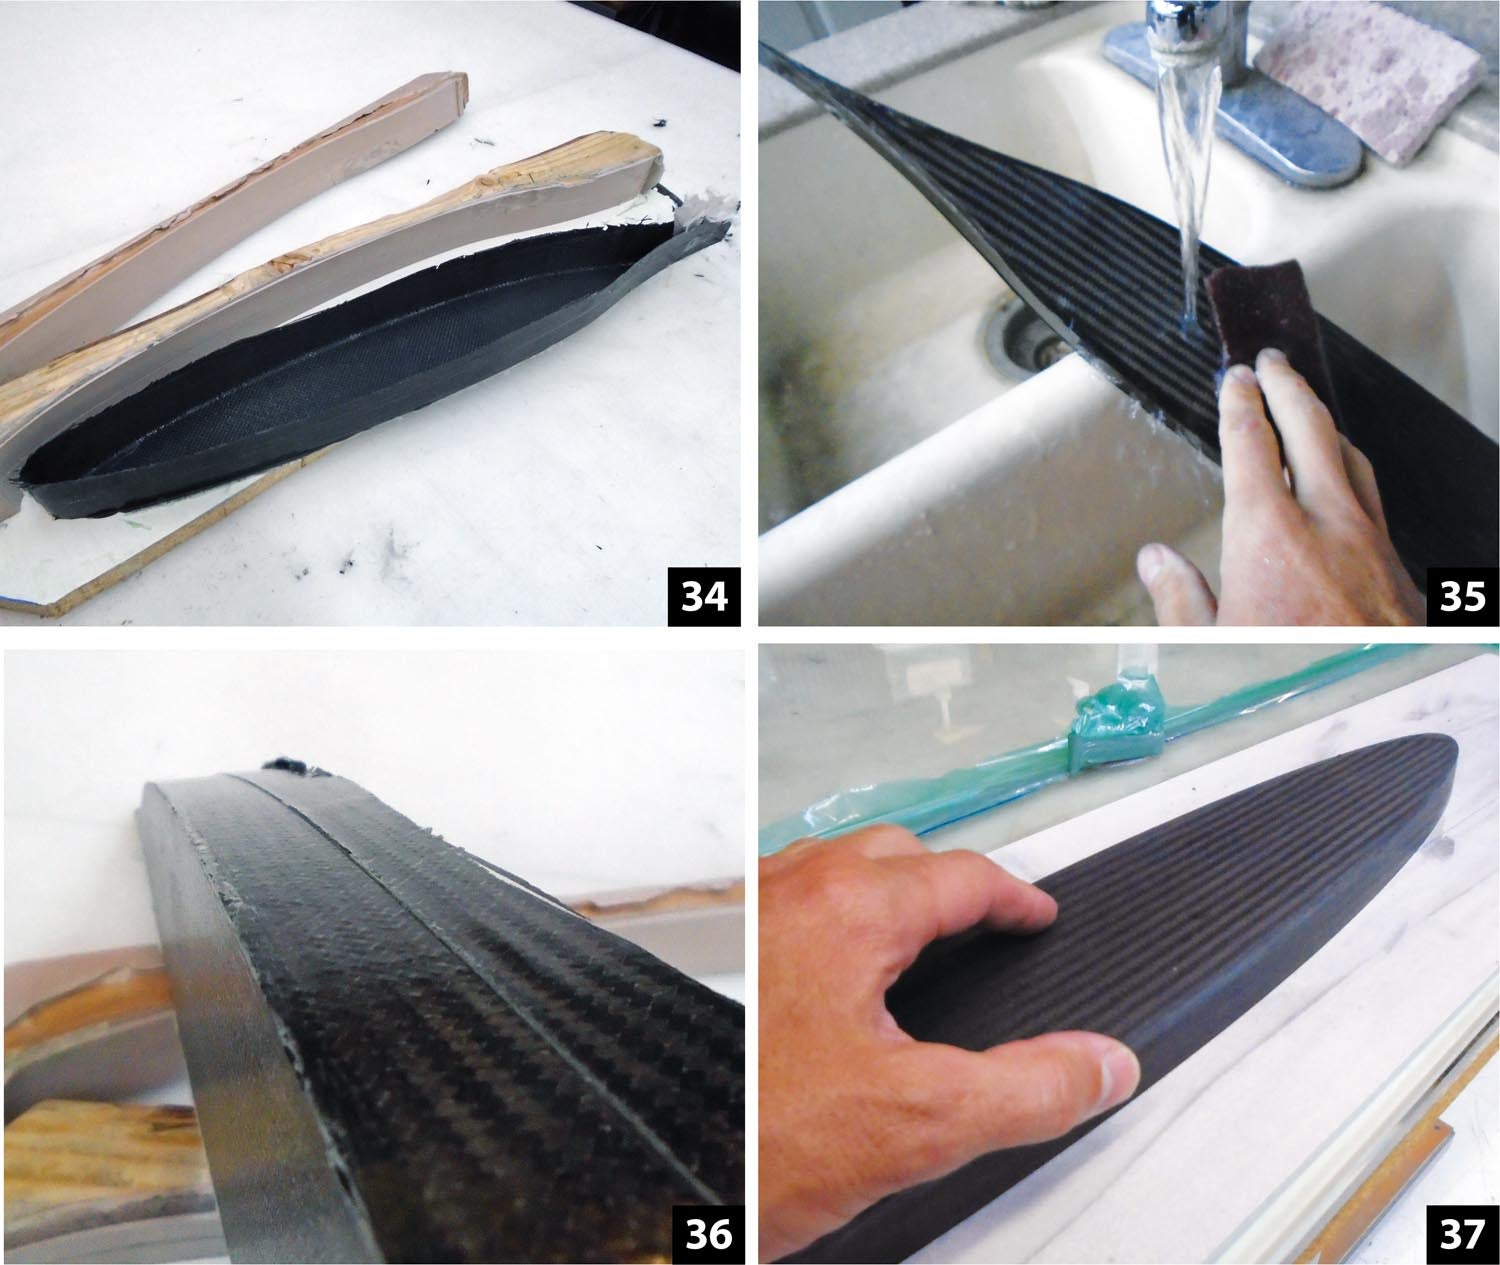
Use a tongue depressor to push the tow into the trailing edge (Image 29).
 After dropping in the first layer of cloth, wet out thoroughly before dropping in the next layer. If you don’t know how many layers of fabric to use, simply measure the thickness of your existing wingtips and use this as a baseline (Image 30). Six-ounce carbon is about 0.009-inch thick and 8-ounce fiberglass is about 0.013 inch. If you are replacing fiberglass tips with carbon, you can reduce the thickness by about one-third. That said, if you plan to attach the tips with rivets or flush screws, be sure to use enough material to allow you to countersink (if desired).
Even if you vacuum bag, the fabric is unlikely to pull into the 90° corners of the mold perfectly, especially at the leading and trailing edges. I suggest either filling the corners with a mixture of shmoo (epoxy mixed with microballoons, plus Cabosil and cotton flox if desired) or laying strands of carbon tow in those areas. Here you can clearly see the carbon tow along the 90° corner of one rib, and the white shmoo filler in the leading edge of the other (Image 31).
The bias orientation of the fibers is easily seen in this picture (Image 32).
If vacuum bagging, use a high-stretch film like Stretchlon TM200—and be sure to use large pleats. This is your best chance of making sure the fabric gets pressed into the corners (Image 33).
 Once the part has cured, you can easily remove it from the mold by running an old credit card between the part and the mold to free the edges. Then unscrew the plumber’s tape, and the mold half and part should separate freely (Image 34). If you used PVA release, don’t forget to wash the PVA off (Image 35). Warm water and a Scotch-Brite pad work well.
 Use a Dremel tool with a diamond grit cutoff wheel to trim to within about 1/8 inch of the wing/wingtip seam line (it should be easily visible, as in Image 36).
Then go back to the sanding table and sand the edges down to the seam line (Image 37).
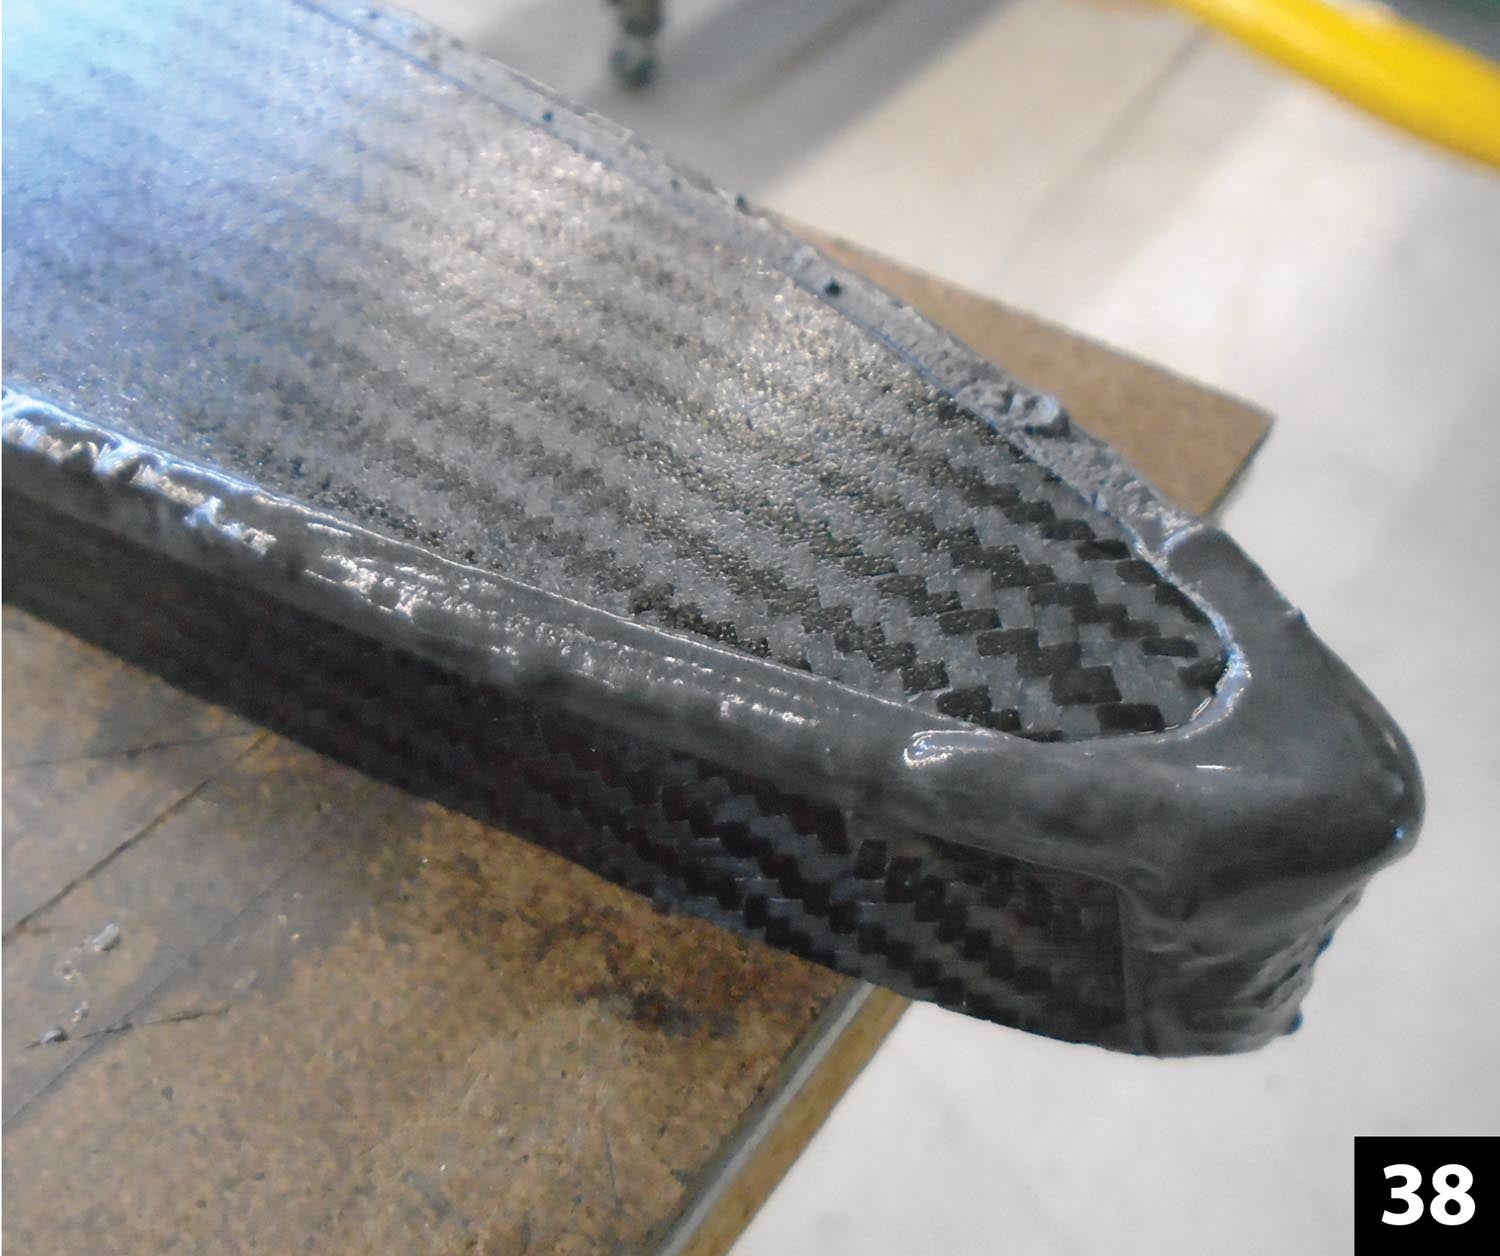
If the edges or nose have voids, apply shmoo filler and sand as desired (Image 38). The final job is then to attach the tips in the same manner as the original tips. In my case, this was accomplished by bonding in a carbon fiber piano hinge.
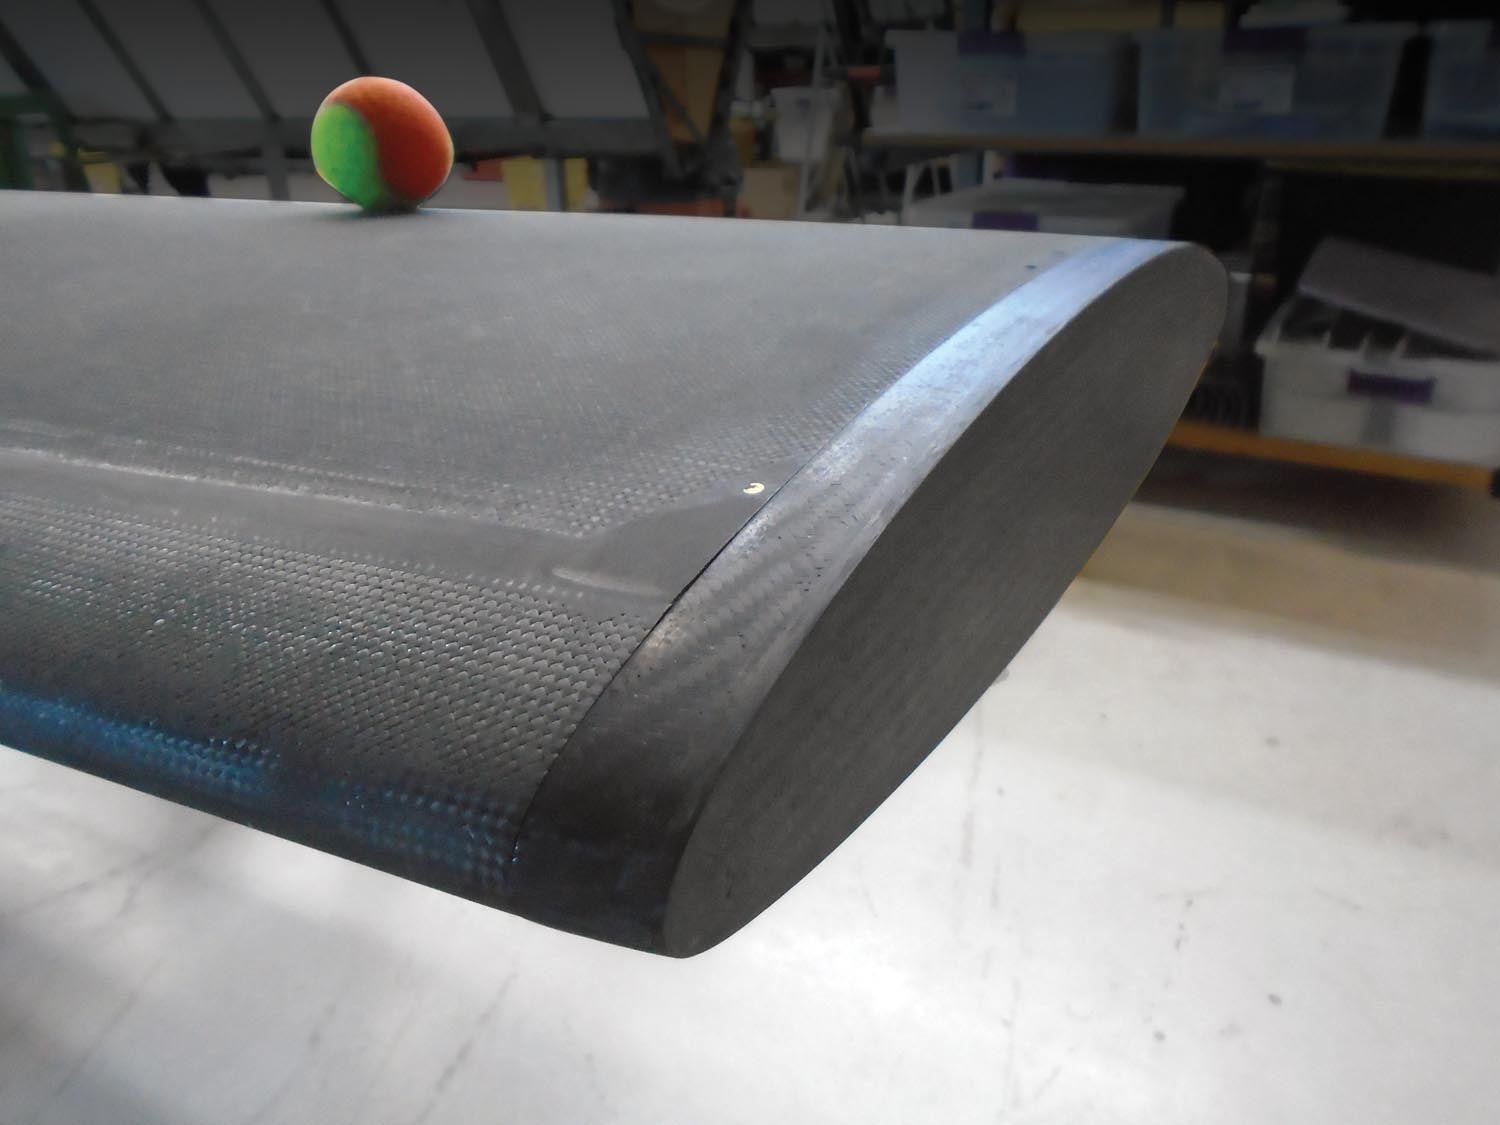
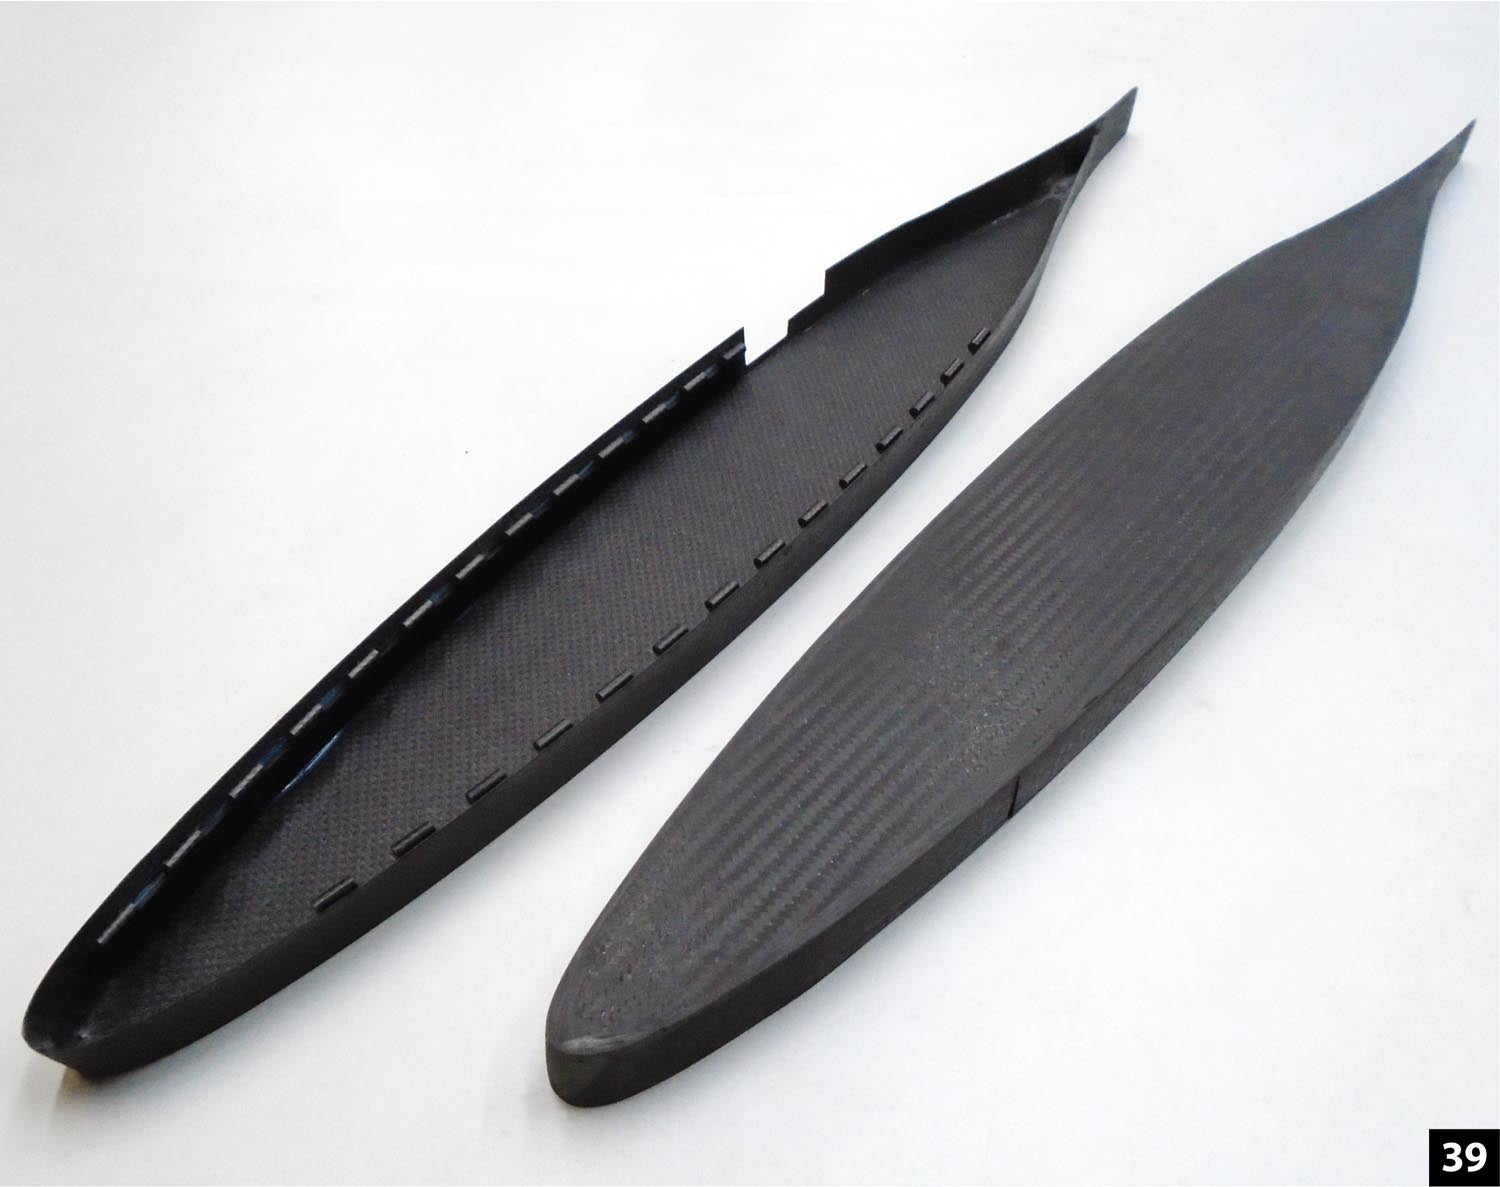 The finished wingtips (Image 39). The final part should fit perfectly flush with a small gap or no gap at the seam. I think most folks are more cautious of composites than is really necessary, and this is a good project to take on if you want to try molding your own parts.


