 With the proliferation of GoPro and similar cameras mounted on airplanes, many different mounts have been devised. These range from duct tape or Velcro to slick, professionally designed mounts. Over the years I’ve experimented with a variety of mounts, including helmet mounts for paramotoring, bicycle handlebar mounts clamped to the tubes of ultralights, Velcro straps and suction cups.
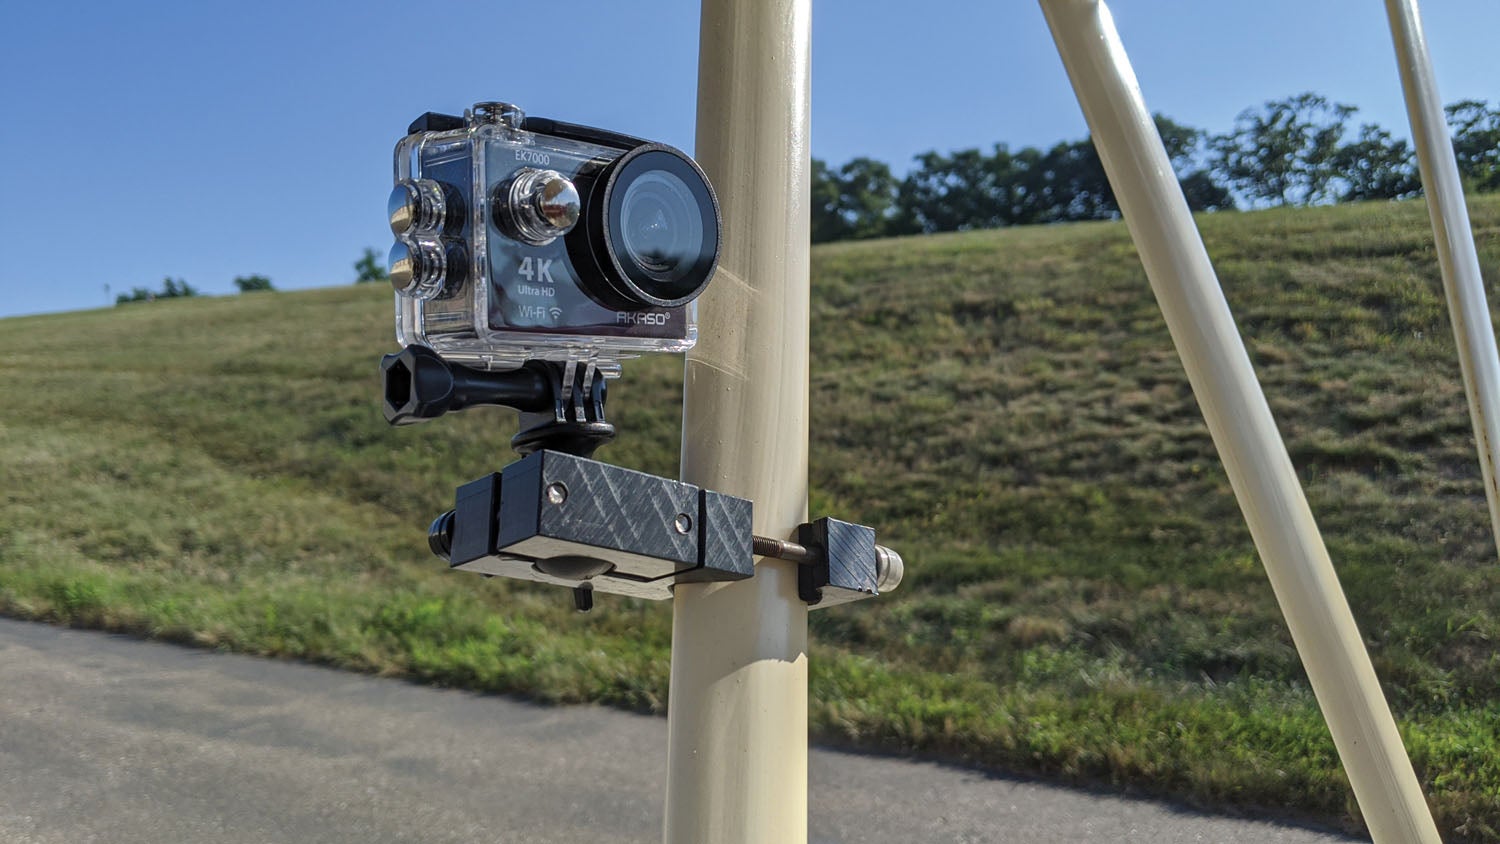
When I bought my Hatz biplane, I wanted something that would clamp securely to the streamline tubing of the cabane and interplane struts while allowing the camera to be angled wherever I wanted it, which usually means a ball and socket arrangement. There are some nicely made mounts being sold for the larger wing struts on Cessnas and the like, but I haven’t seen anything offered for the smaller streamline tubing on a typical biplane or older light plane.
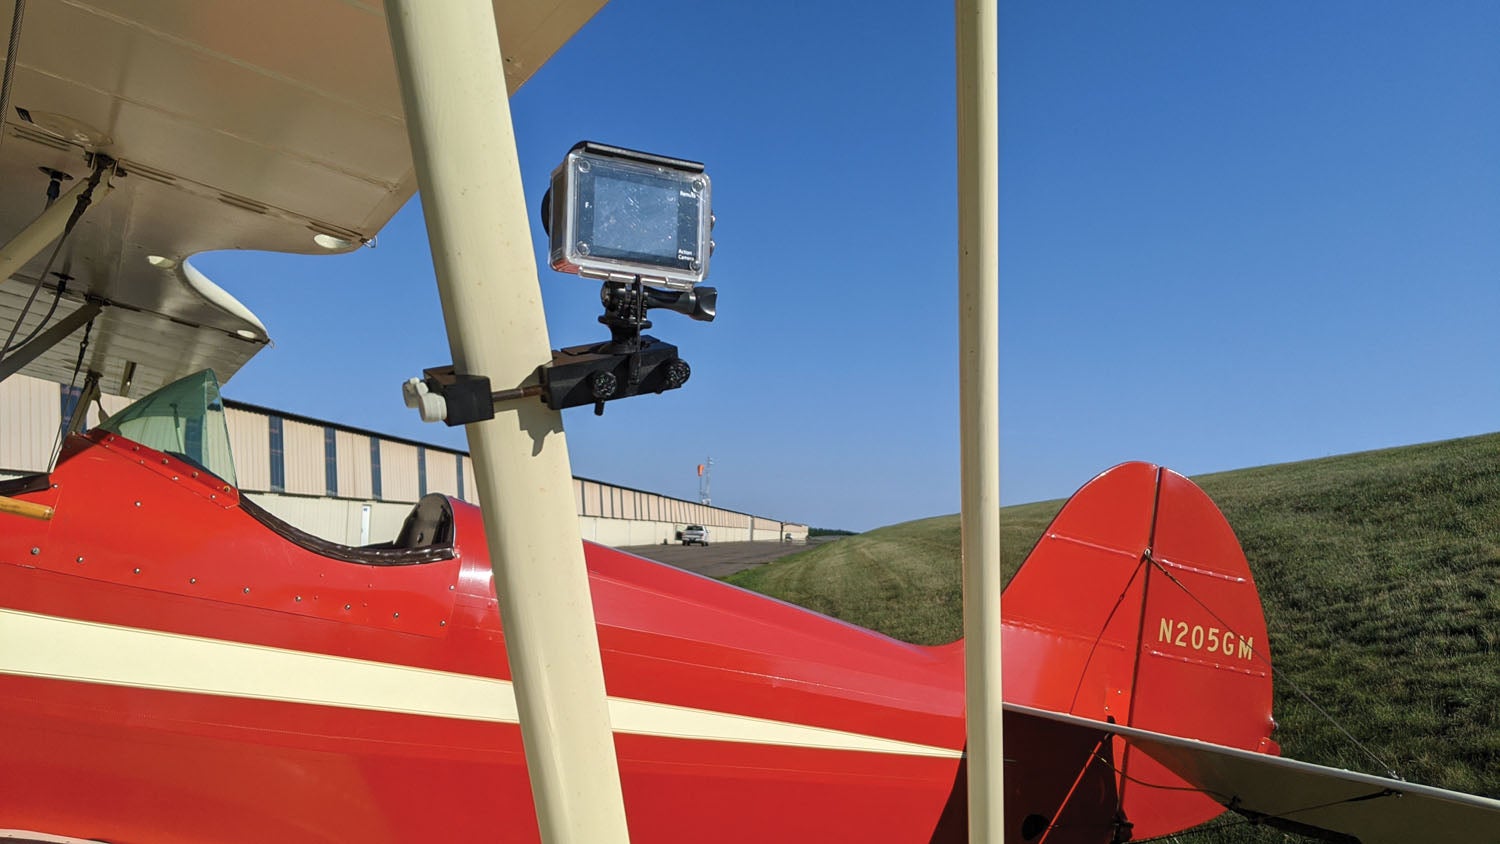
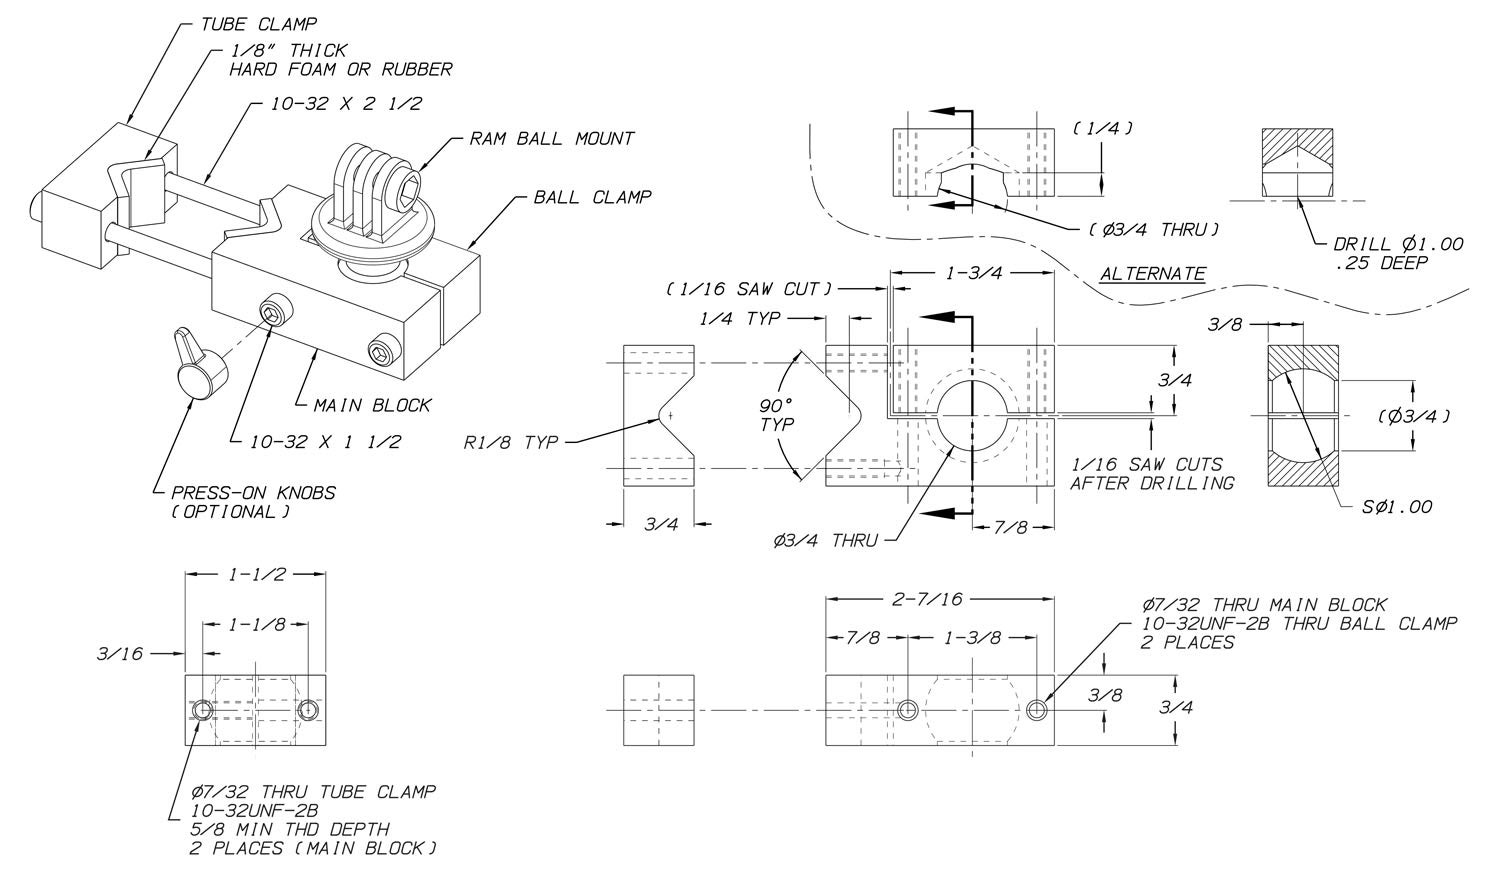
RAM Mounts have become the industry standard for solid and secure ball mounts, just as the GoPro mounting system has become the standard for action cameras. Naturally, you can buy a RAM Action Camera Universal Ball Adapter, which is what I started with. Their 1-inch diameter “B” ball seems to be the most common size, and the rubber coating on the ball means it clamps securely without slipping.
The design presented here will accommodate streamline tubing up to 7/8 inch wide (the minor axis of the tube), with longer or shorter screws used for other sizes than the 1¾x¾-inch tubing used on my Hatz. The mount can be easily adapted to larger sizes by starting with larger size bar than the ¾x1½ inch I used, and using longer screws farther apart. The material can be whatever is available. I like Delrin (acetal) for its strength and easy machinability, but other plastics such as nylon or polycarbonate—or even aluminum—would work just fine.
Using a milling machine will give the nicest results, but it can also be easily made with nothing more than a drill press and a hacksaw. A 3D printer is also an option, though the screw holes will still have to be tapped afterwards.
For best alignment, drill the 3/4-inch-diameter hole for the ball and the .159-inch-diameter pilot holes for the ball clamp screws before cutting the ball clamp from the main body, after which you can tap the ball clamp holes and open up the main block clearance holes to 7/32 inch.
Once the pieces are separated, the ball pockets are cut on each piece with a 1-inch-diameter ball end mill. If you don’t have a mill or ball end mill, a 1-inch drill going ¼ inch deep will work as well; the ball will rest on the conical surface made by the drill point, though you may have to relieve the top edges of the holes slightly to let the ball drop all the way in.

The clamping screws are standard socket head cap screws. I used plastic knobs that press onto the screw heads, but short lengths of threaded rod with wing nuts would work just as well. If using threaded rod, you might want to apply Loctite to the rods as they go into the plastic block, or apply it to the wing nuts. I used neoprene foam rubber with adhesive backing to cushion against the strut, but solid rubber sheet would work as well.
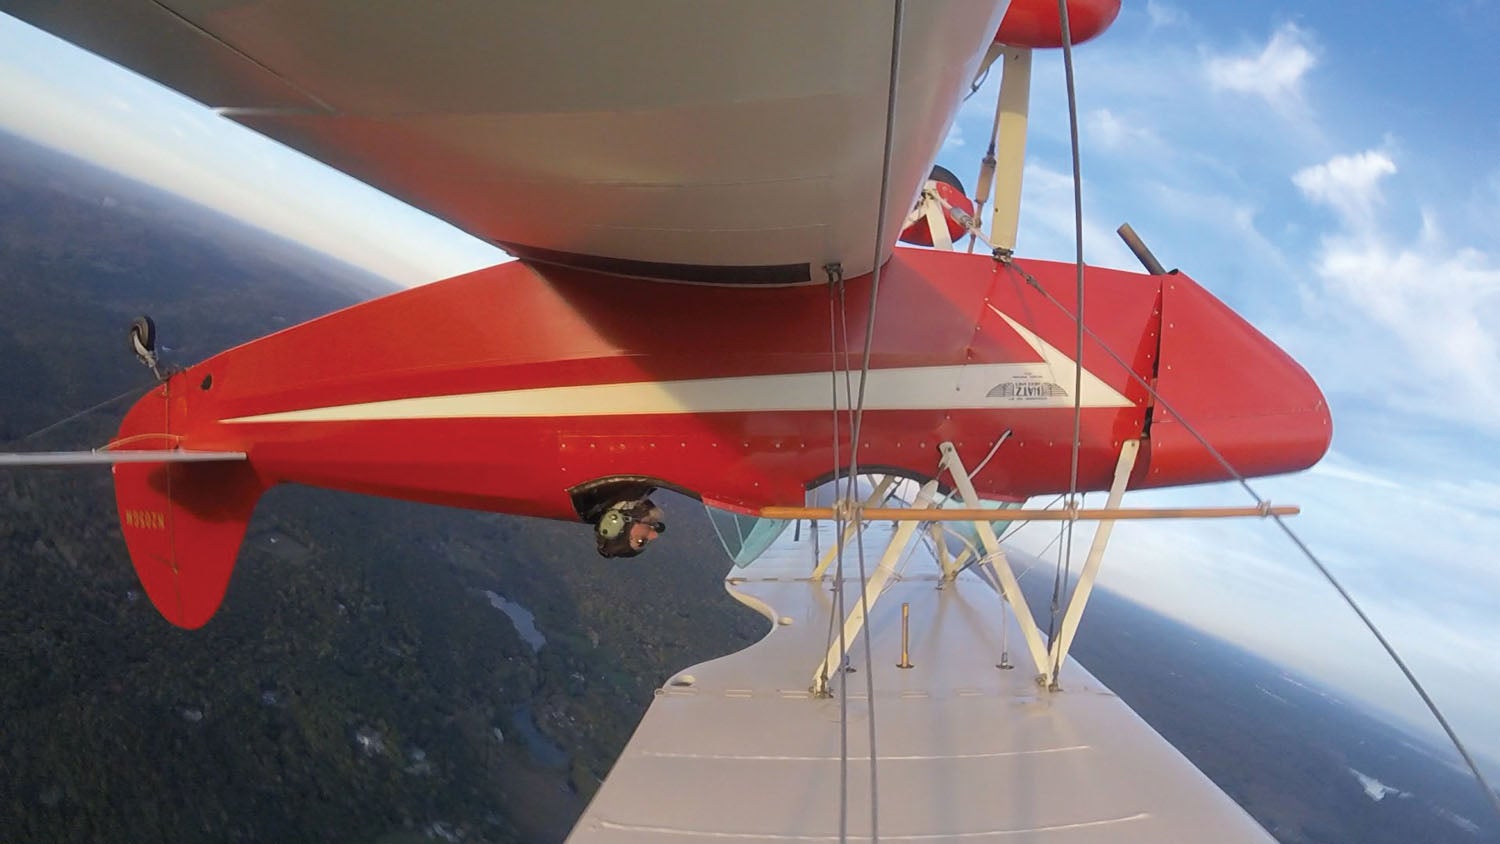
I’ve been using this mount for about a year and a half now, and the camera has never come loose or even slipped, though I usually use the camera lanyard wrapped around the strut for extra security. I may not be getting the hundreds of thousands of views that some of the current YouTube aviation stars are, but that’s not the fault of the camera mount!


Hello Dana, would you consider making us a couple of these mounts for a wildlife survey in Africa? For fitting to a BatHawk microlight, forward or rear strut (both sides). Many thanks, Richard
I’m not in a position to make parts for other people, this article was to encourage others to make them for themselves, give it a try. Failing that, any machine shop can make it from the drawing provided.
Hey Dana! Interesting to come across your writings. Do you still fly PPG? I started again. But, I fly WPPG now and moved from CT to SC. I also own ParaOrange.com thanks to Eric Dufour. Good to see you!
Hi Karyn, long time no see… I haven’t flown PPG in about 15 years, still have all my stuff, probably should sell it. Once Griswold closed it just wasn’t the same. Good to see you’re still doing it, your website looks good. Check out my Dana’s Wings youtube channel, there’s a bunch of PPG video from the old days there as well as newer stuff.
Comments are closed.