 A small group of students in a well-equipped private school have constructed an electric Experimental/Amateur-Built ultralight aircraft. They have done a spectacular job performing sheet metal work, chromoly tube coping and welding, electric motor and controller installation, battery pack sizing and construction, custom instrumentation and avionics design, and fabric covering.
The number of different skills they’ve honed on a single project is a testament to their dedication and also to the plane’s designer, Brian Carpenter. Brian and his wife, Carol, are proprietors of Rainbow Aviation, formerly in Corning, California, and now in Kingsville, Missouri. Multi-talented in teaching classes on Light Sport Aircraft maintenance, Brian is also a gifted designer, producing the EMG-6, a grand example of which is now being completed at the ‘Iolani School in Hawaii.
Brian commented, “In Honolulu, Hawaii, the ‘Iolani School is obviously a very special place. Instructor Martin Emde has engaged his students to start building an EMG-6 electric motorglider. Looking at all of the state-of-the-art, modern-day equipment this school has purchased for its students to use really shows a vision and understanding of where the future lies.”
The Airplane
The EMG-6 started as an ultralight glider, somewhat along the lines of Mike Sandlin’s BUG (Basic Ultralight Glider) line of flying machines. While Mike’s craft can be built with simple hand tools and are made mostly with aluminum tubes and angles riveted together, the EMG-6 has a welded tubing fuselage frame, an aluminum tail boom and wings originally from a Quicksilver ultralight. Brian used some fairly sophisticated computer numerically controlled (CNC) machines to produce parts for the prototypes and planned kits. But he also made it possible for a person of average skills to successfully make the craft.
Unfortunately, beyond the stunning free drawings he made available to potential builders and an assemblage of parts customers might not be able to make themselves, the EMG-6 project was nearly doomed by thieves who stole machinery, supplies and even Brian’s display trailer that had been a fixture at airshows around the country.
When the Carpenters were ripped off, several builders were working on their own EMGs, but the ‘Iolani students may be furthest along. They have made many changes and additions of their own.
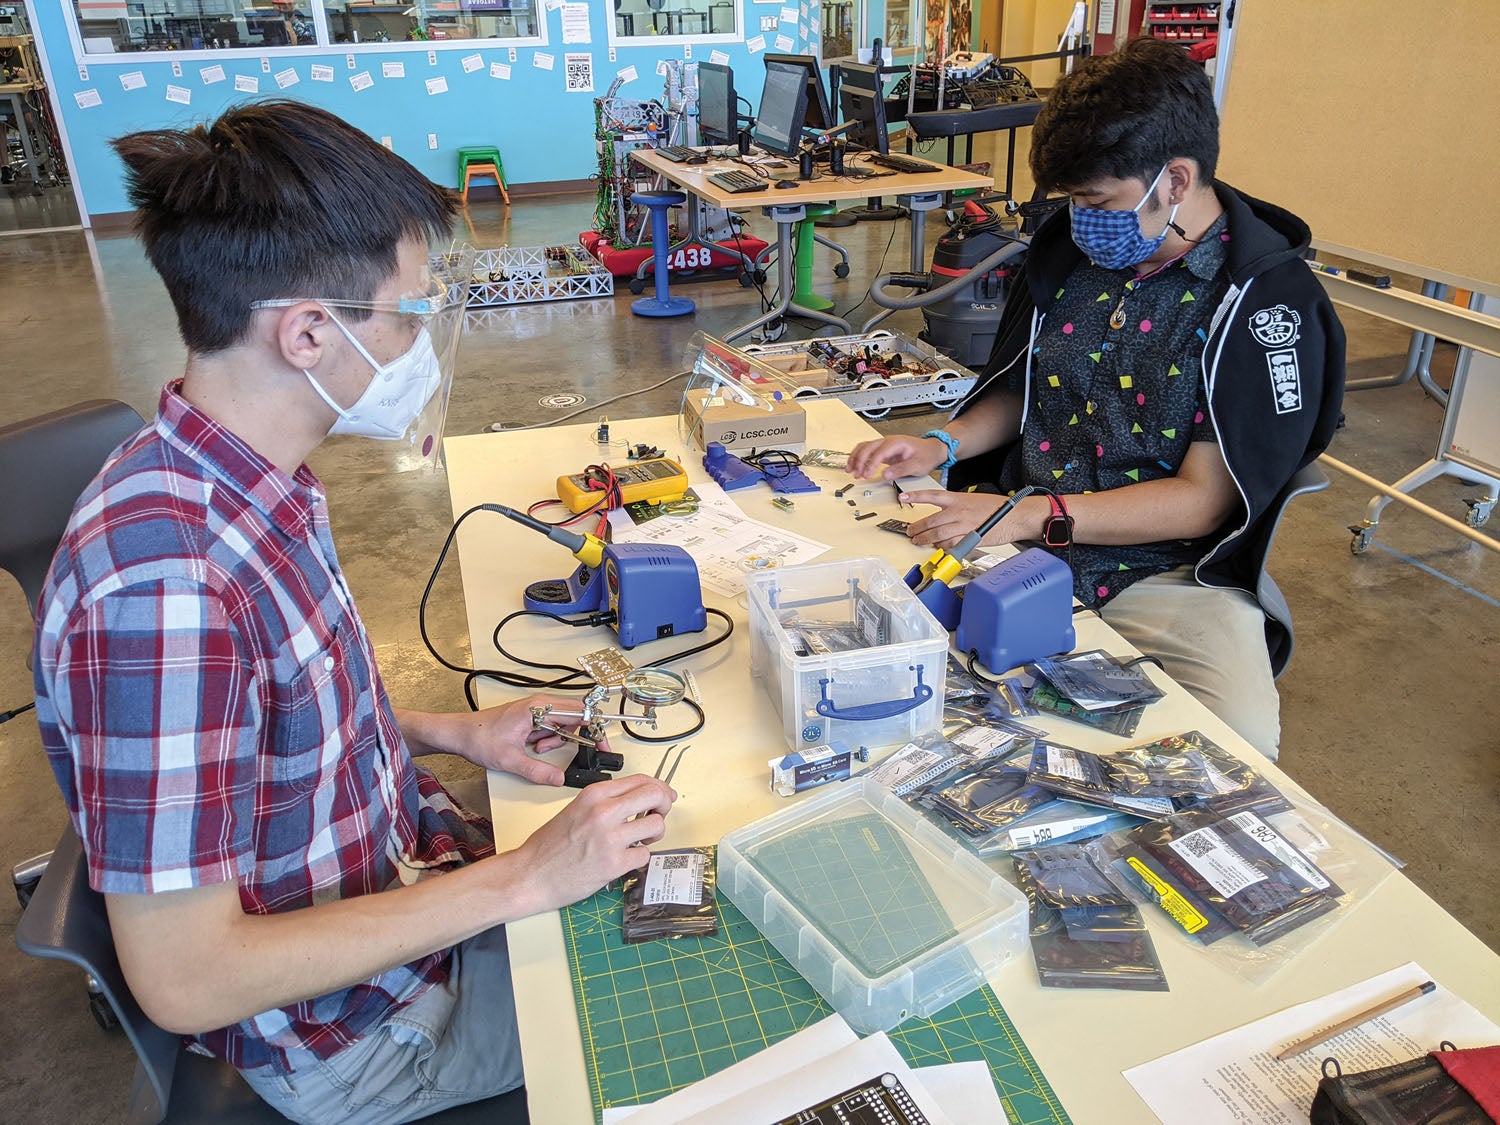
The project, organized into two major phases with a number of subprojects, enables students to fit and weld chromoly steel tubing; cut, bend, drill and rivet sheet metal; design and fabricate battery packs; and design, make and program the controls and instrumentation that will eventually make the first flight possible.
The Team
The small group of young people working on the project have accepted the challenges and excelled. Pictures of the various components and modifications developed by the students show a high level of ingenuity and craftsmanship.
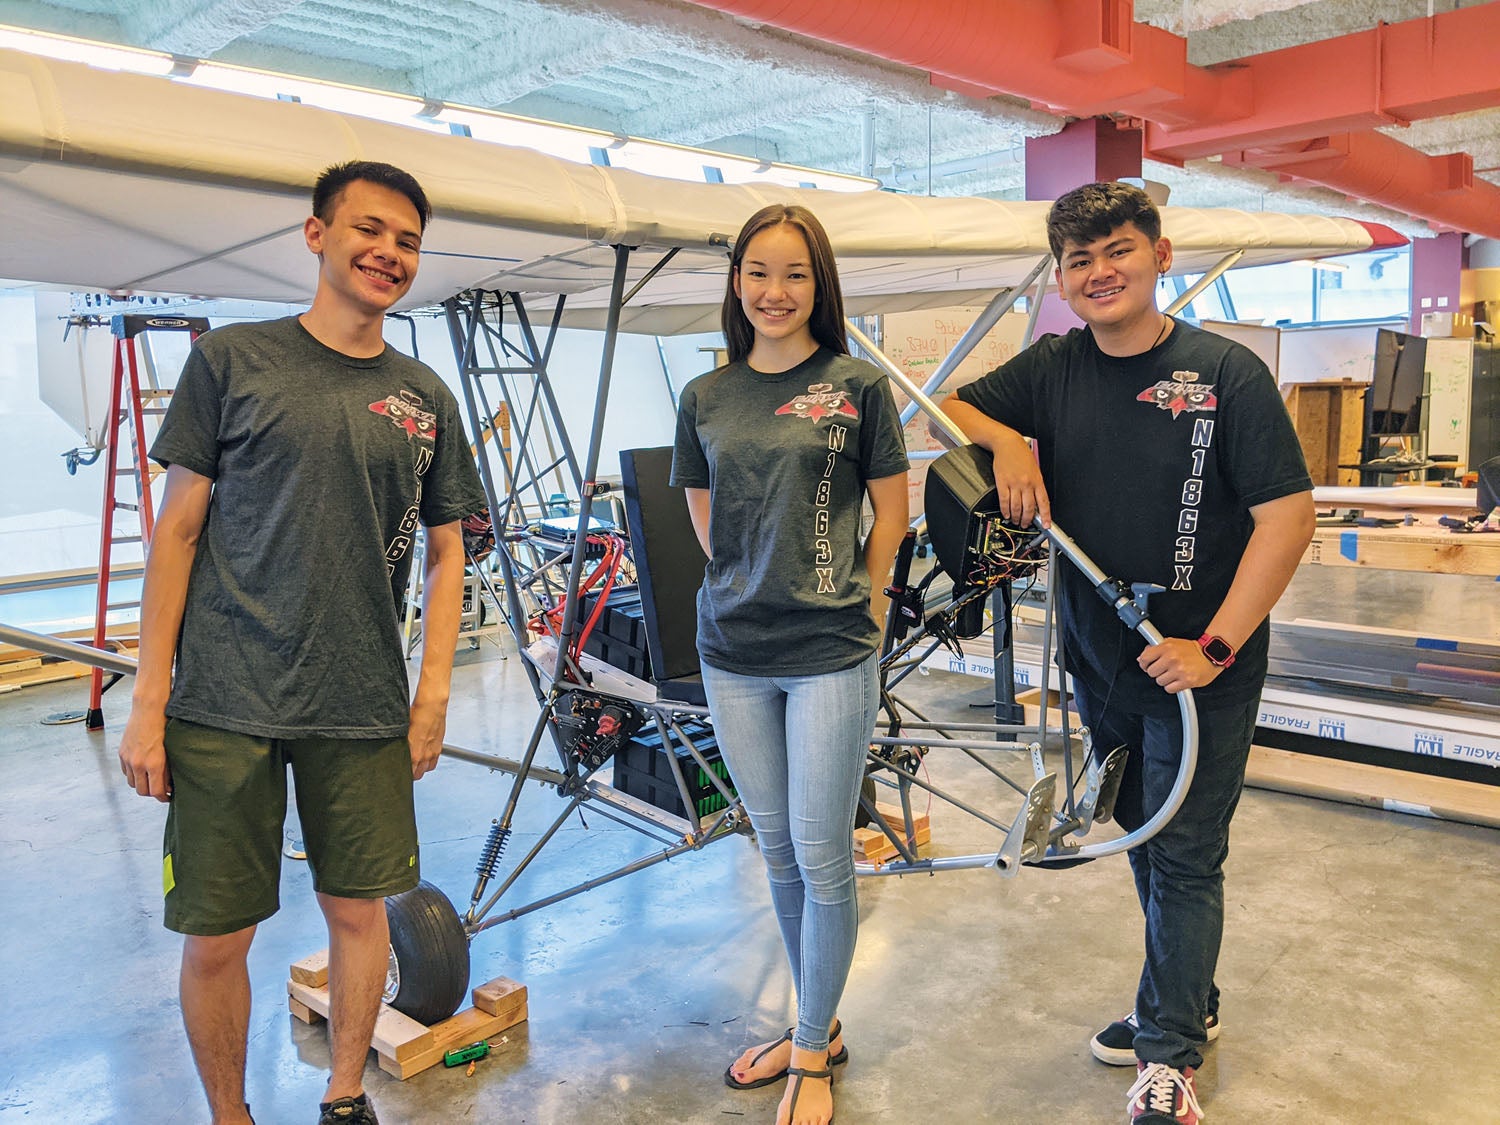
Surprisingly, only 12 students have taken part since the build’s start in 2017, and three are named as the current team. Mariko Storey-Matsutani, Jonah Yoshida and Dylan Dinio each bring their interests and skills to the project and have grown from exposure to the different disciplines involved.

“Even though we are currently only a team of three students, we work on entirely different aspects of the plane,” Jonah explained. “Such a broad-spanning project enabled me to learn everything from programming to PCB design, to how a mechanical enclosure should work. My first three years of work on the E-Hawk were primarily to develop power tool and assembly skills (reading blueprints, drilling, using a chop saw, etc.), but this last year was especially enriching because I worked independently to make a lot of my own parts.”
Mariko, too, has grown with the project. “When I joined the E-Hawk team as a high school freshman, I didn’t know what an aileron or fuselage was, and I had near-zero prior experience with CAD, power tool usage, or media/outreach. I barely even knew how to use a drill!” Beyond learning new technical skills such as media and electronics, “I’ve been able to gain leadership, collaboration and communication skills that are essential to engineering and to life overall.”

Dylan, the newest builder, reflects that, “I’ve learned more about solving different computer science problems, but also new skills in things such as electrical design. It’s been a valuable real-world experience to work with talented people with different skill sets than me and see a combination of our different efforts come to life.” Nine other members previously engaged in the endeavor are now in college or pursuing post-high-school ambitions. A couple already have their pilot’s license, and one is even at Embry-Riddle Aeronautical University.
Structural and Electrical
The project is divided into two major phases, structural and electrical, with a number of subprojects. Asked how students filled different roles, the team responded that subprojects are mainly headed by individuals based on their interests and different strengths. Mariko works largely in the mechanical and design of the aircraft; Jonah focuses on electrical design, instrumentation and data logging; and Dylan focuses on instrumentation software and aircraft certification. Team meetings help coordinate activities and decision-making. Overlapping activities, such as data collection and communication between the electrical system display (altimeter, airspeed, etc.), need such teamwork.
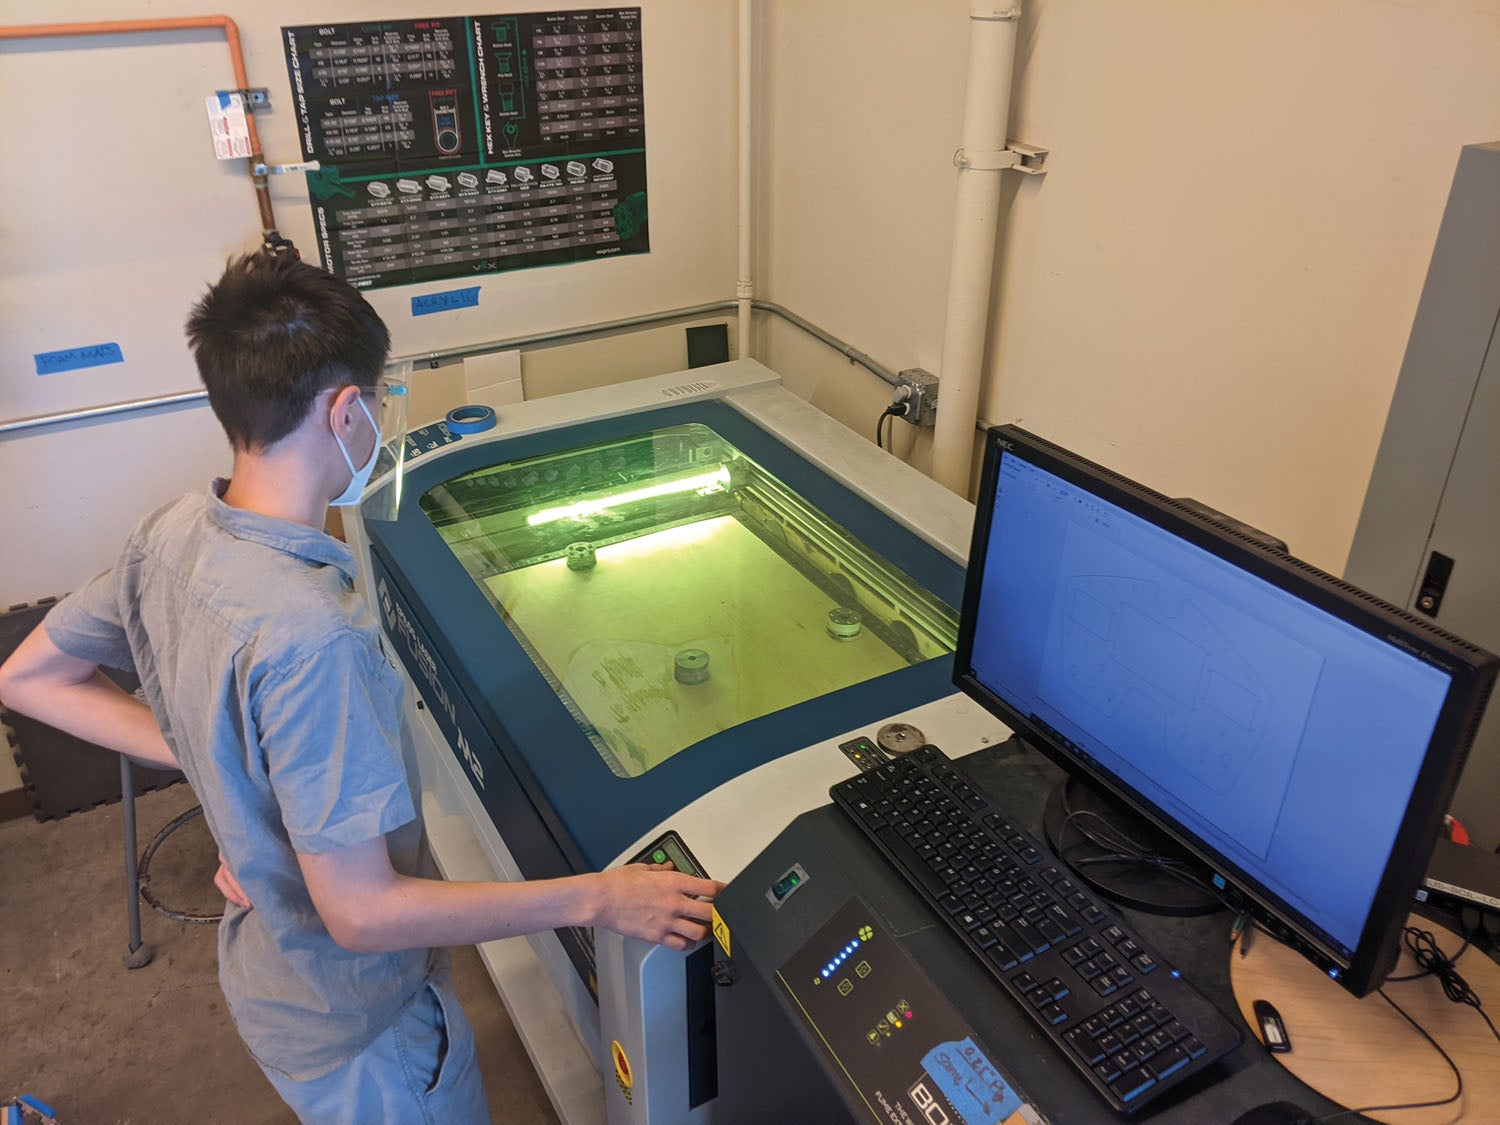
The breadth of equipment available to students comes through in Martin’s explanation that “Students who enroll in courses within the Sullivan Center for Innovation and Leadership at ‘Iolani School benefit from learning a myriad of skills through the offered robotics electives and the extracurricular competitive robotics program. These skills include mechanical design using CAD; fabrication techniques using 3D printers, laser and waterjet cutters, CNC routers and mills; electrical circuit design; and embedded microcontroller programming.”
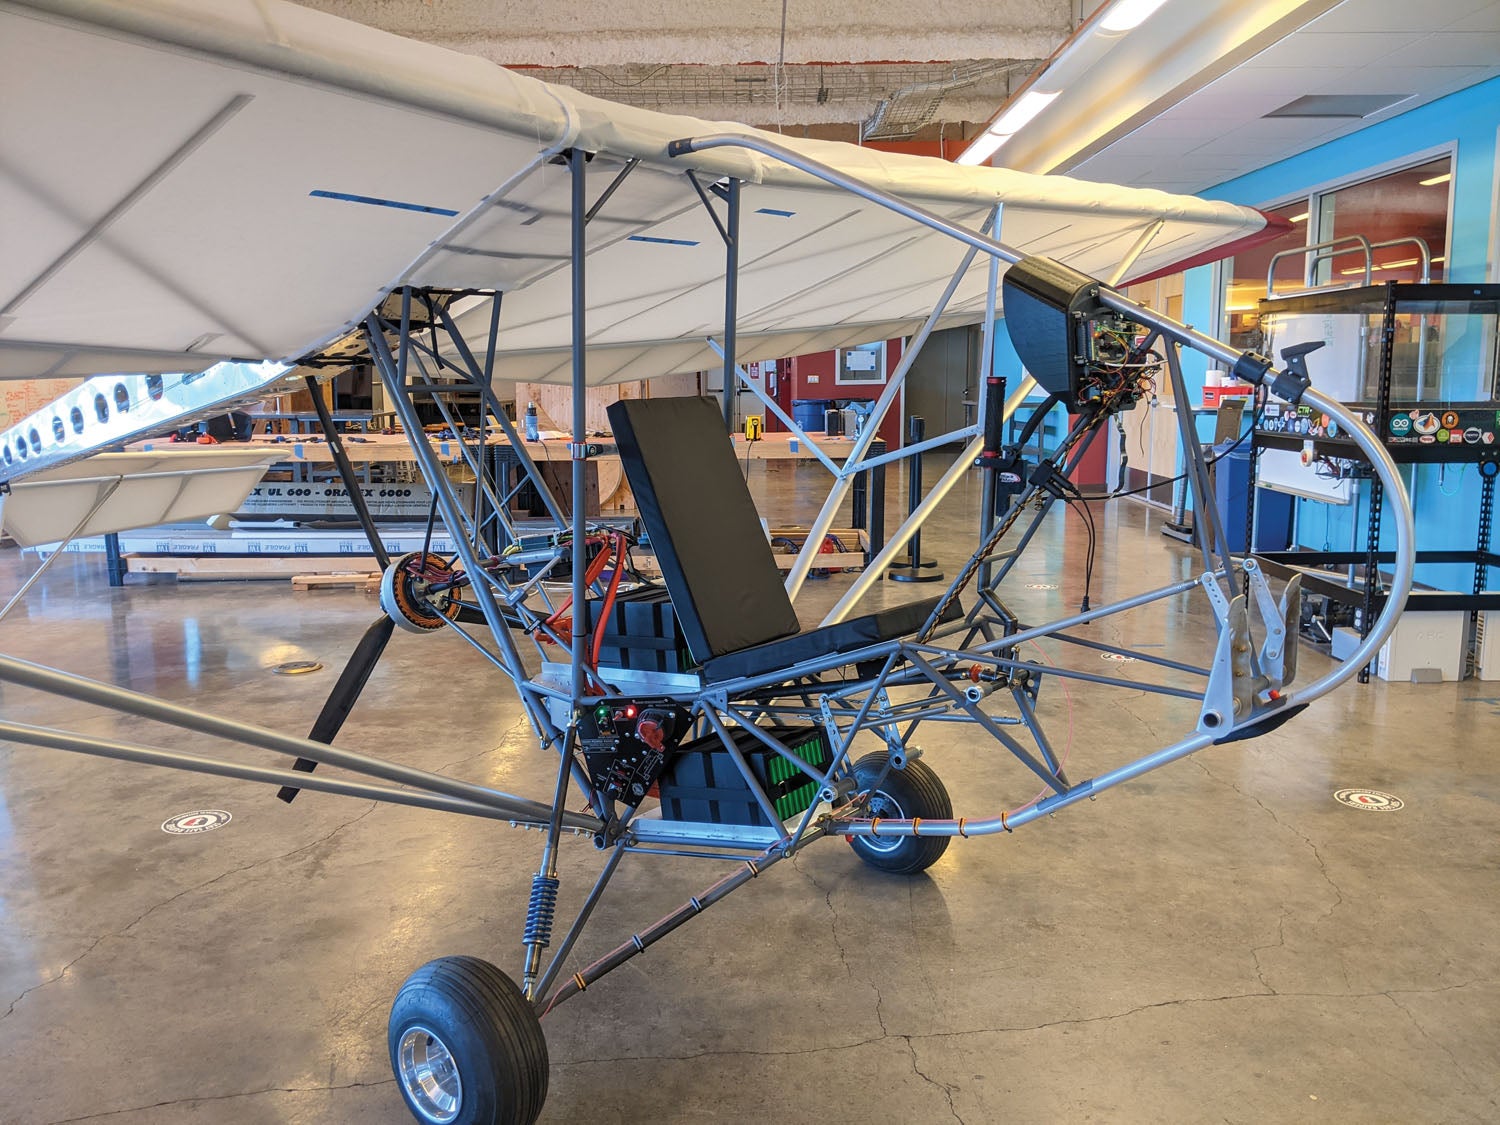
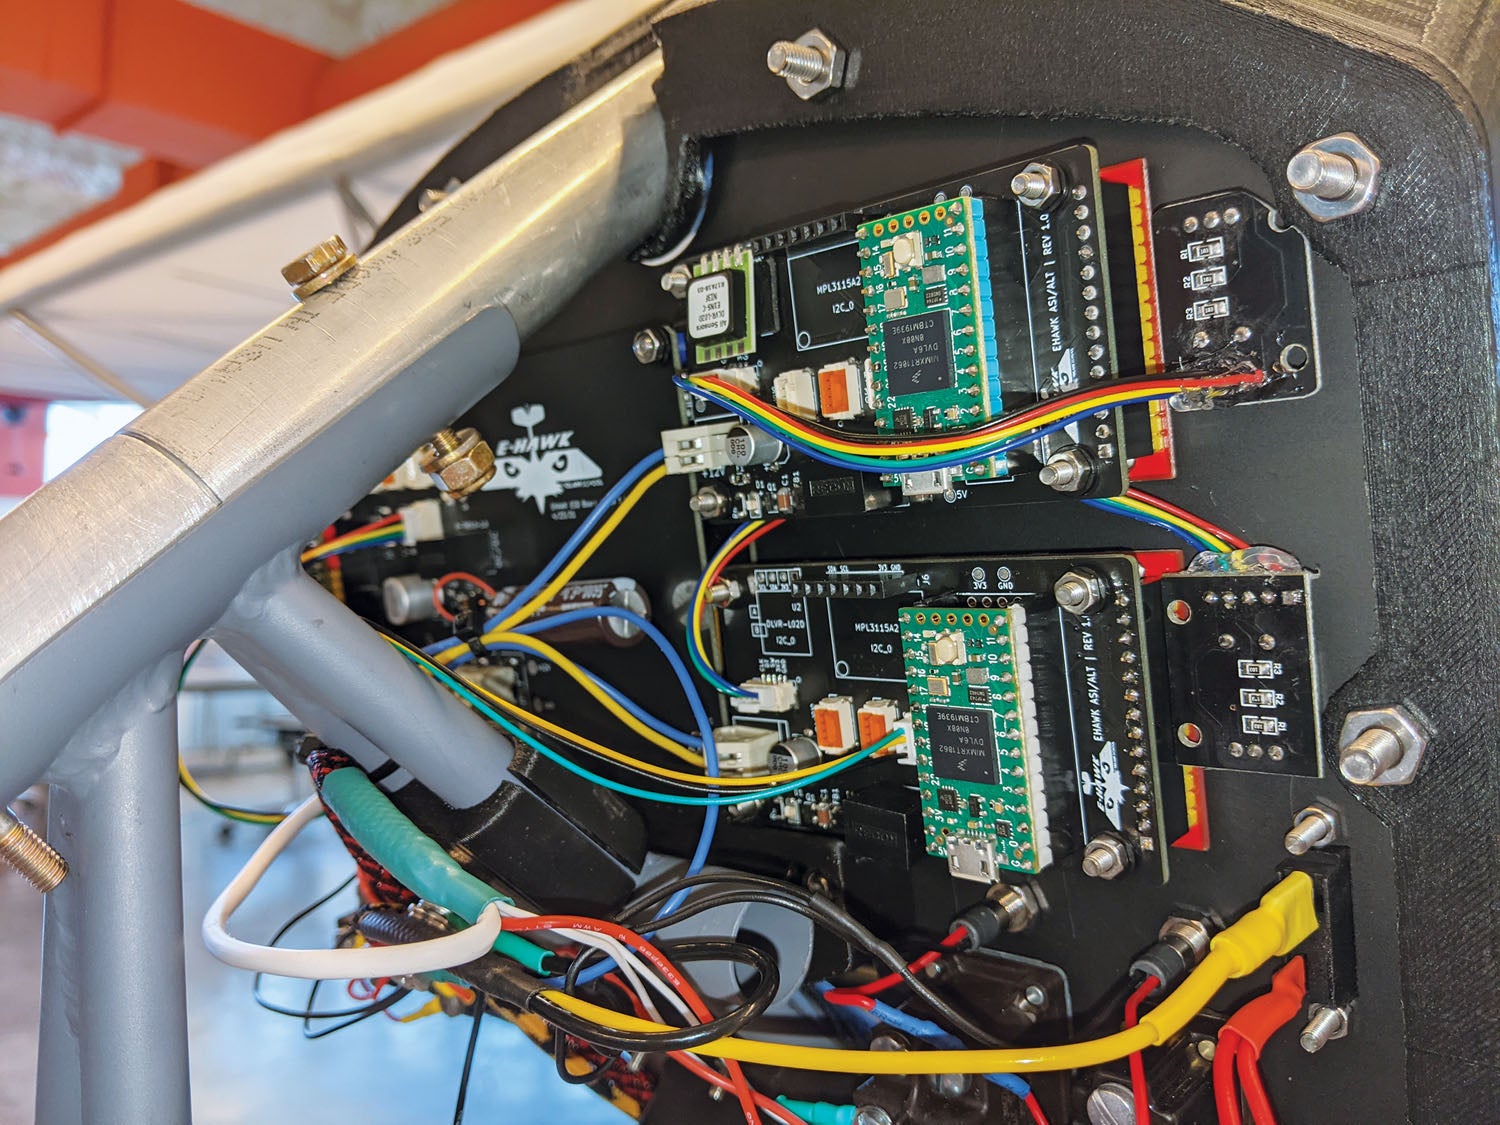
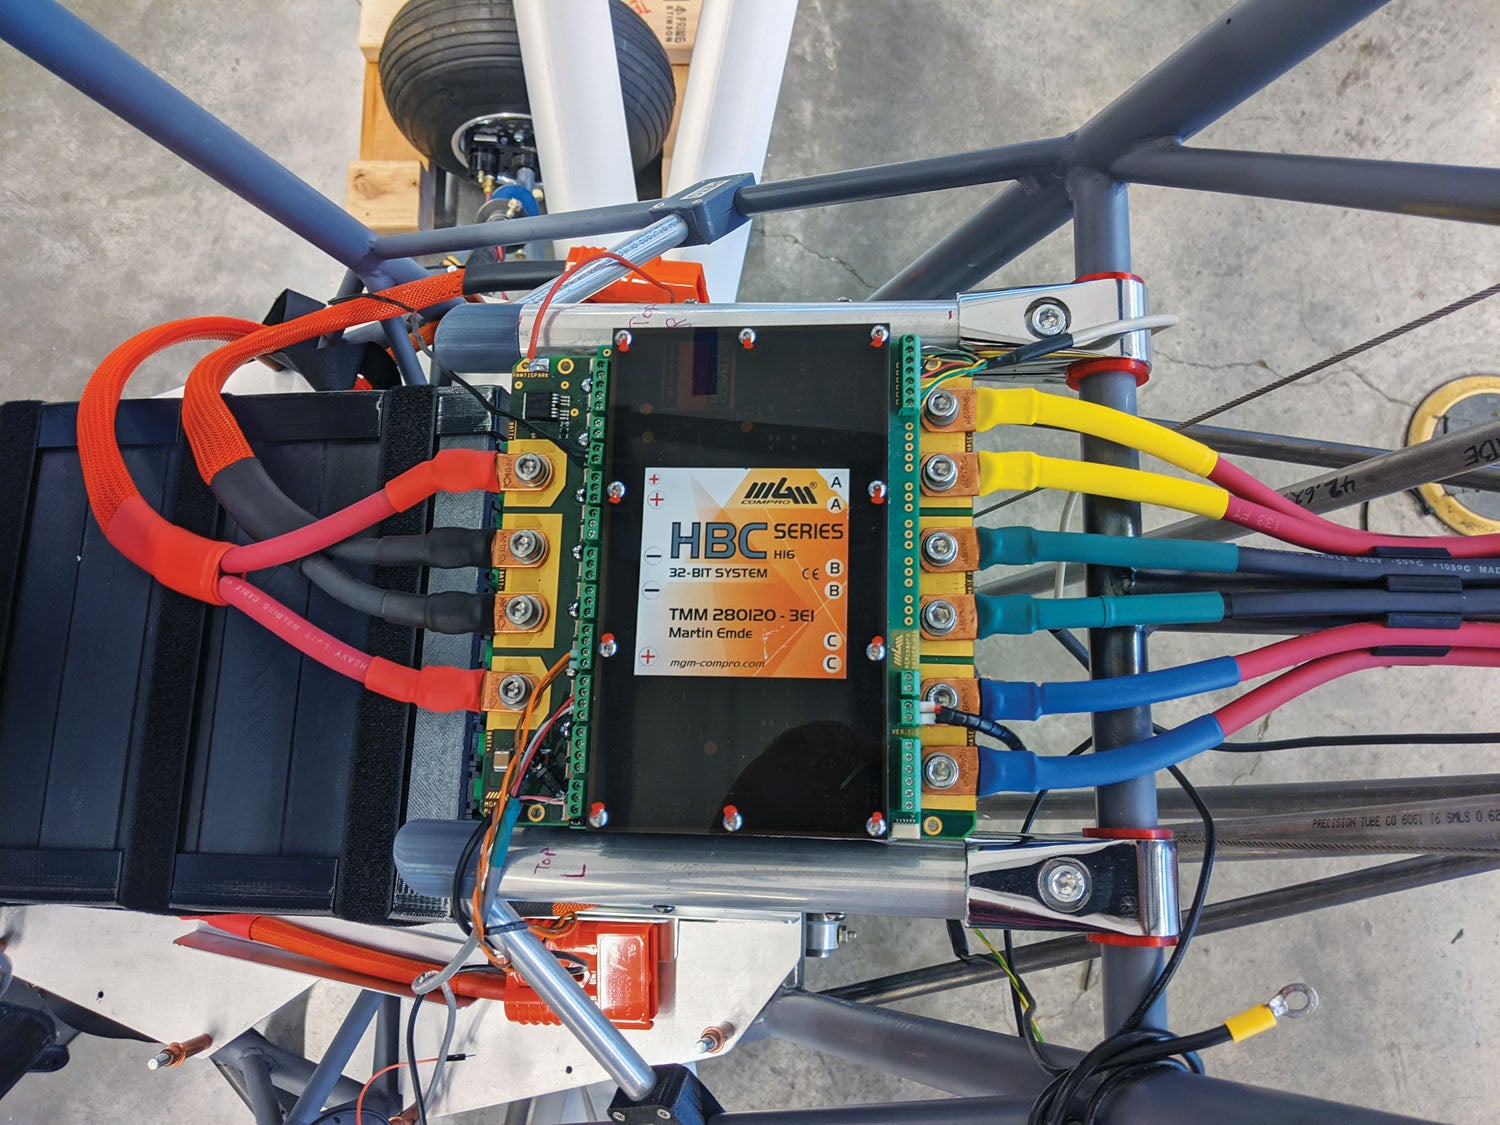
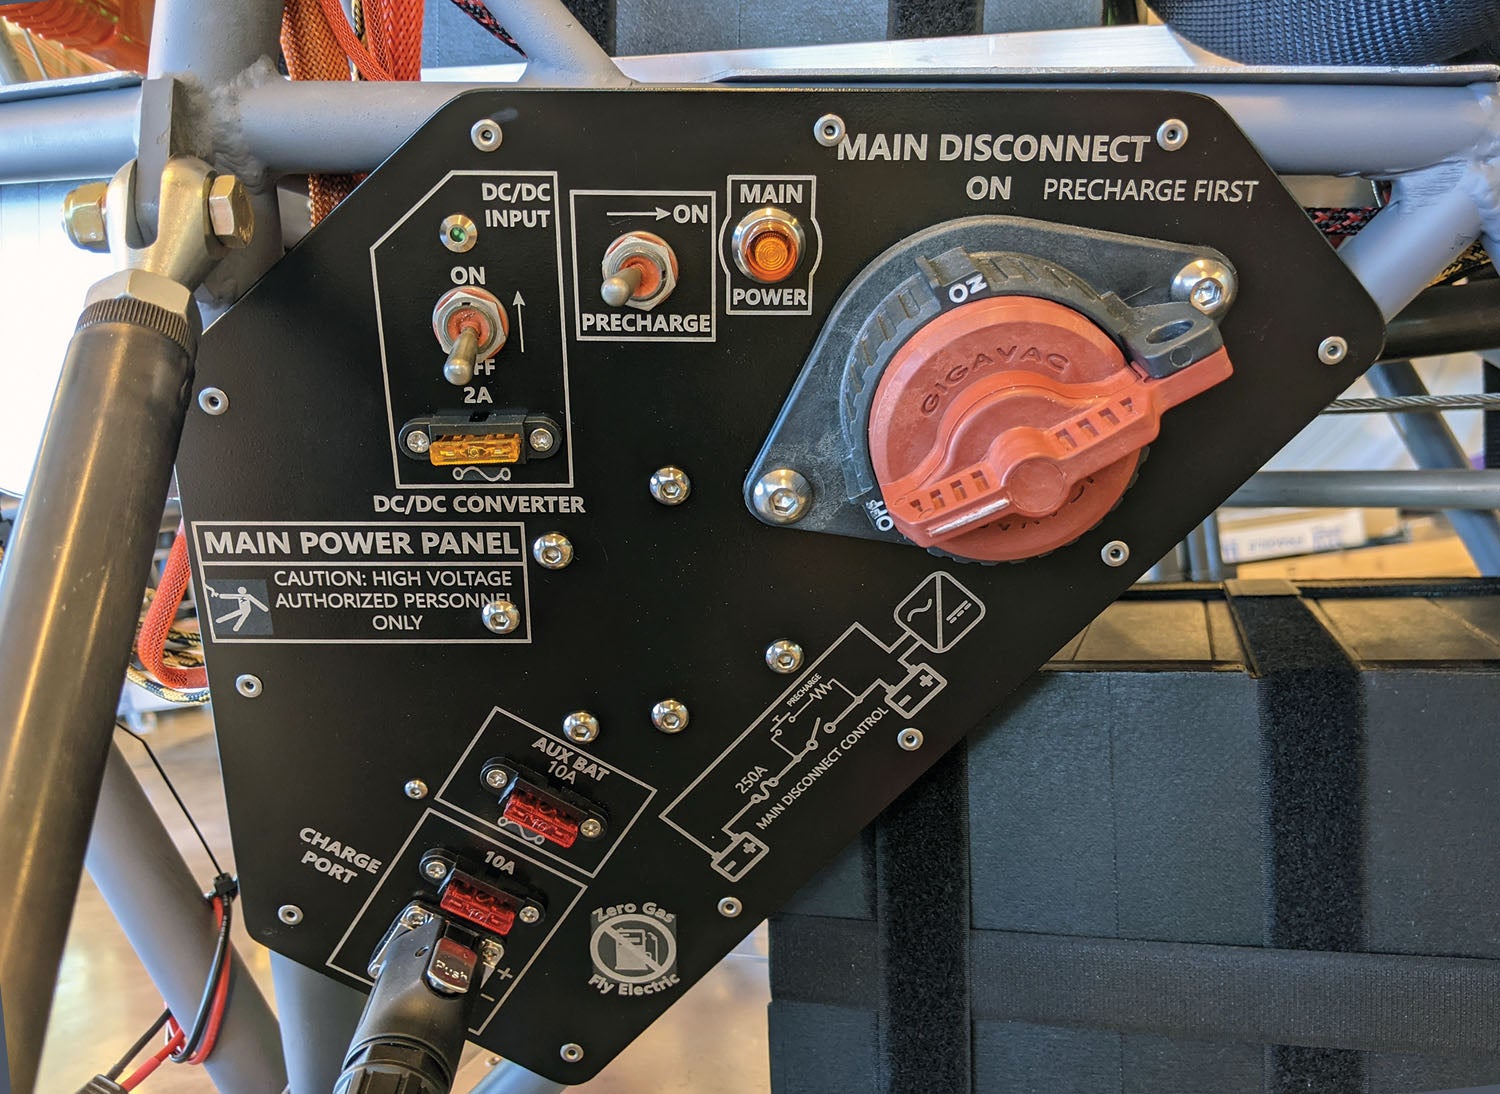
The students report, “The majority of the structural components of the aircraft, such as the fuselage, tail boom, wings, flight controls, etc. were constructed based on the EMG-6 open-source plans. However, all of the electronics-related components were designed by members of the E-Hawk Team. These include the motor and controller mounts, the battery modules, main power panel, instrumentation circuit boards, instrument panel and glareshield, and the radio and antenna mount.”
Because of limitations within the workspace, the welding of the fuselage was done by Martin. He used Brian’s templates, “that could be printed on a sheet of paper and then wrapped on the end of a tube. A bench grinder was used to remove the required amount of material to get the proper fit. Welding fixture plans were also available. The fixture parts were cut with the CNC router and used to hold the subassemblies in place during welding.”
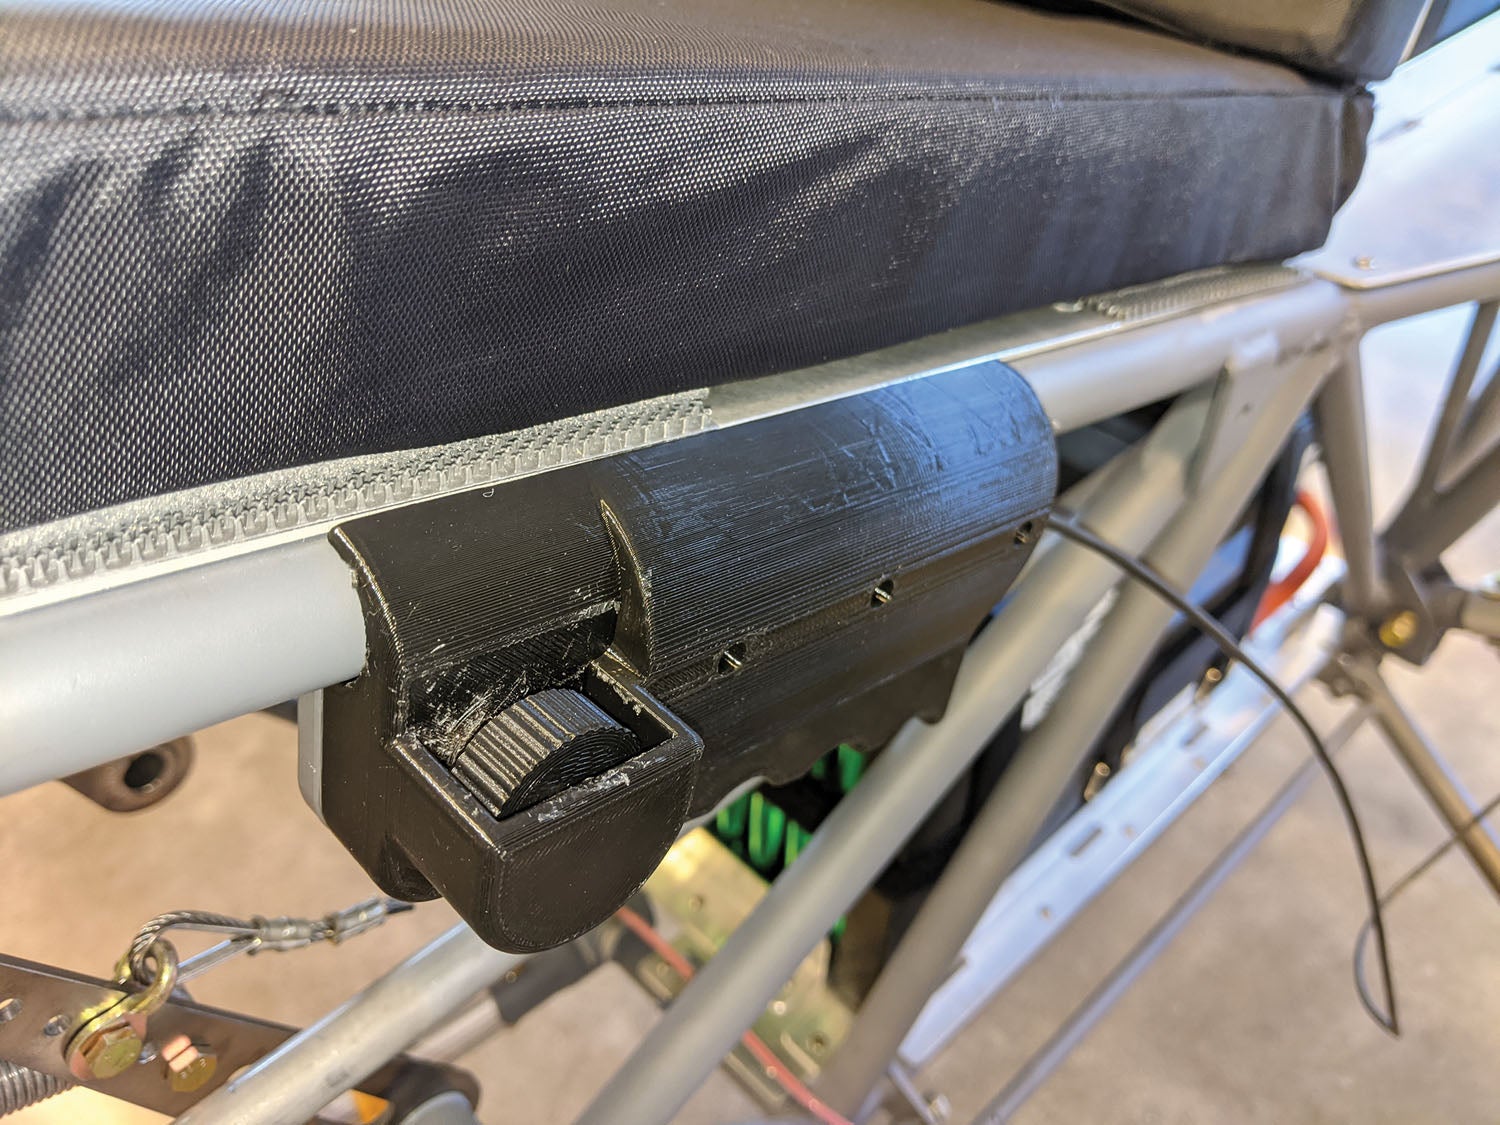
For many subassemblies, the group designed custom 3D-printed parts. They designed and fabricated the metal plates and cushions for the seat, a departure from the lattice-metal seat in the original. They chose Oratex covering for the horizontal and vertical stabilizers and flight control surfaces. “Similar to the EMG-6 prototype, we used pre-sewn Dacron sails to cover the wings.”
Perhaps surprisingly, Mariko found fabric covering to be a big hurdle. “I consider the covering of the vertical stabilizer to be the most challenging task. After several attempts at a custom-sewn Dacron sailcloth covering, we opted for Oratex covering instead and decided to add crossbars that the Oratex could adhere to.”

Motor, Controller and Avionics
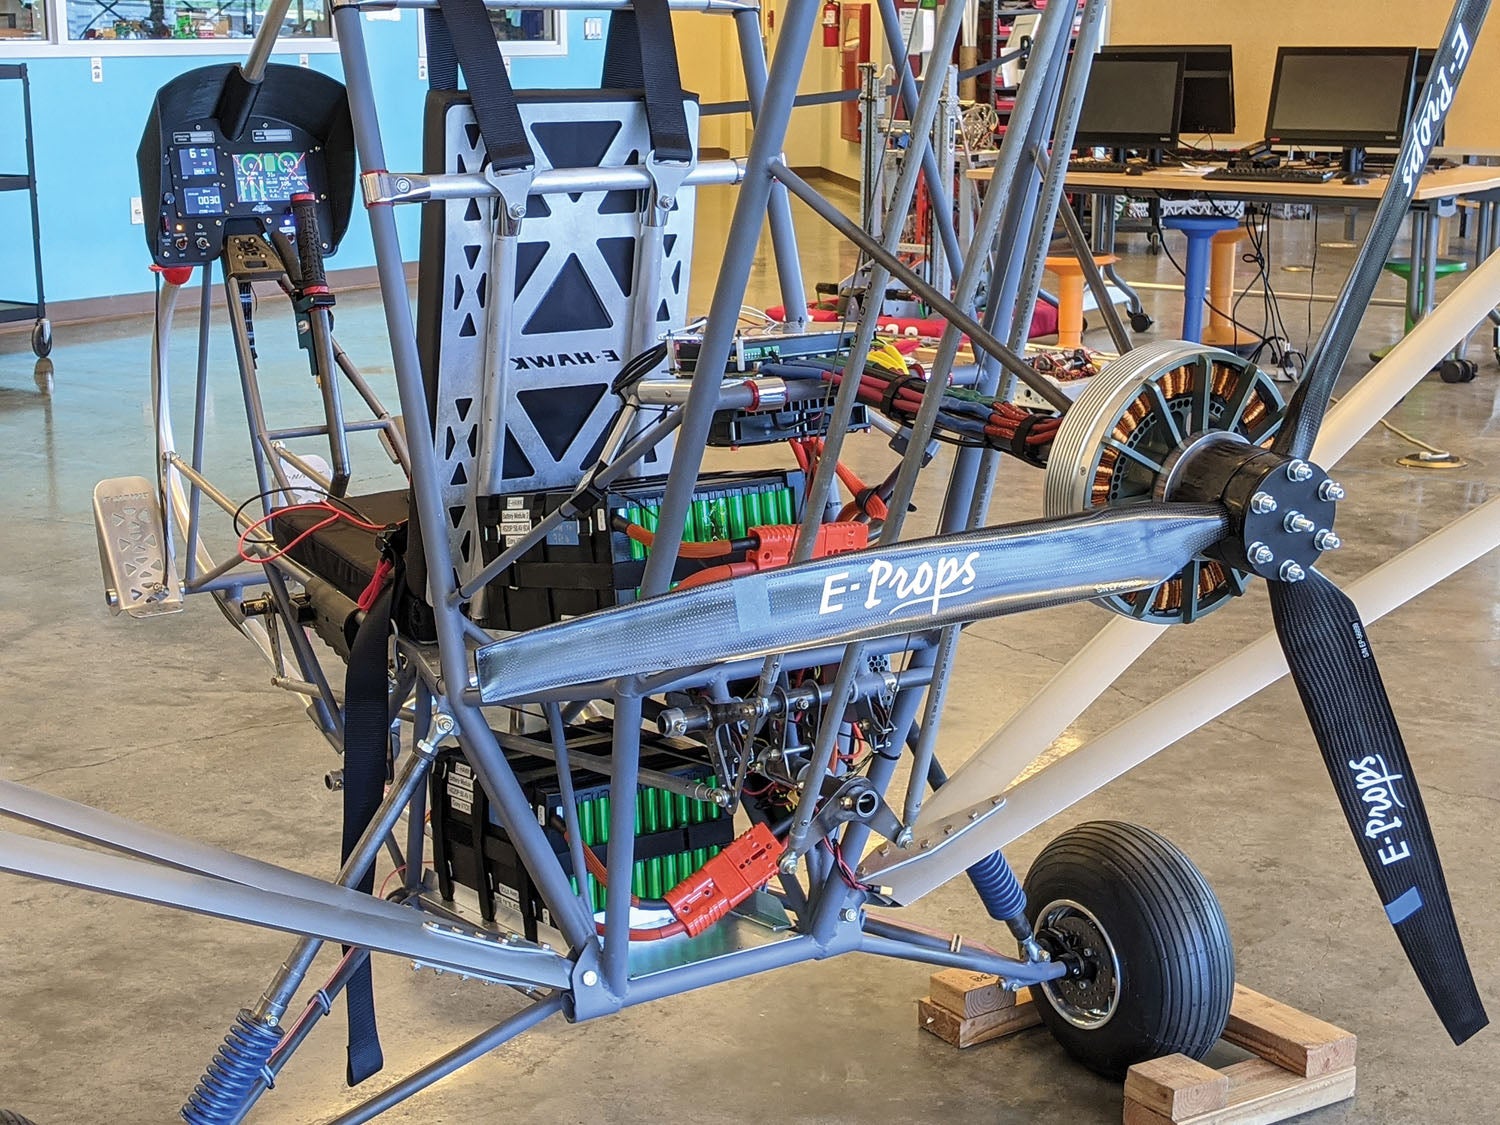
A few different options were considered for the propulsion system. The team looked at everything from large drone motors to electrically powered paraglider motors to the Zero electric motorcycle system. The team ultimately decided on the same MGM Compro REX 30 motor/controller combination that Brian had intended to use but never made it to testing.
According to Mariko, who acted as spokesperson for the group, “After some research we decided to go with this propulsion system as similar MGM Compro systems were successfully installed on other aircraft with proven results. We expect that the motor will deliver a maximum of 20 kW for short durations (takeoff and climb-out) and 10 to 12 kW for continuous operation, which should be able to sustain level flight. Our major concern at the moment is that we are able to sustain this continuous output without the motor overheating as it only relies on air cooling provided by the passing slipstream.”
Brian had tested several motors, including a Plettenberg originally intended for large model aircraft. That was sufficient to enable sustained flight, but not self-launching.
Most surprisingly, the team not only installed the MGM Compro REX 30 motor and controller, but designed, programmed and tested the flight instruments, motor, controller and battery instrumentation. This takes the ‘Iolani project beyond many other efforts.
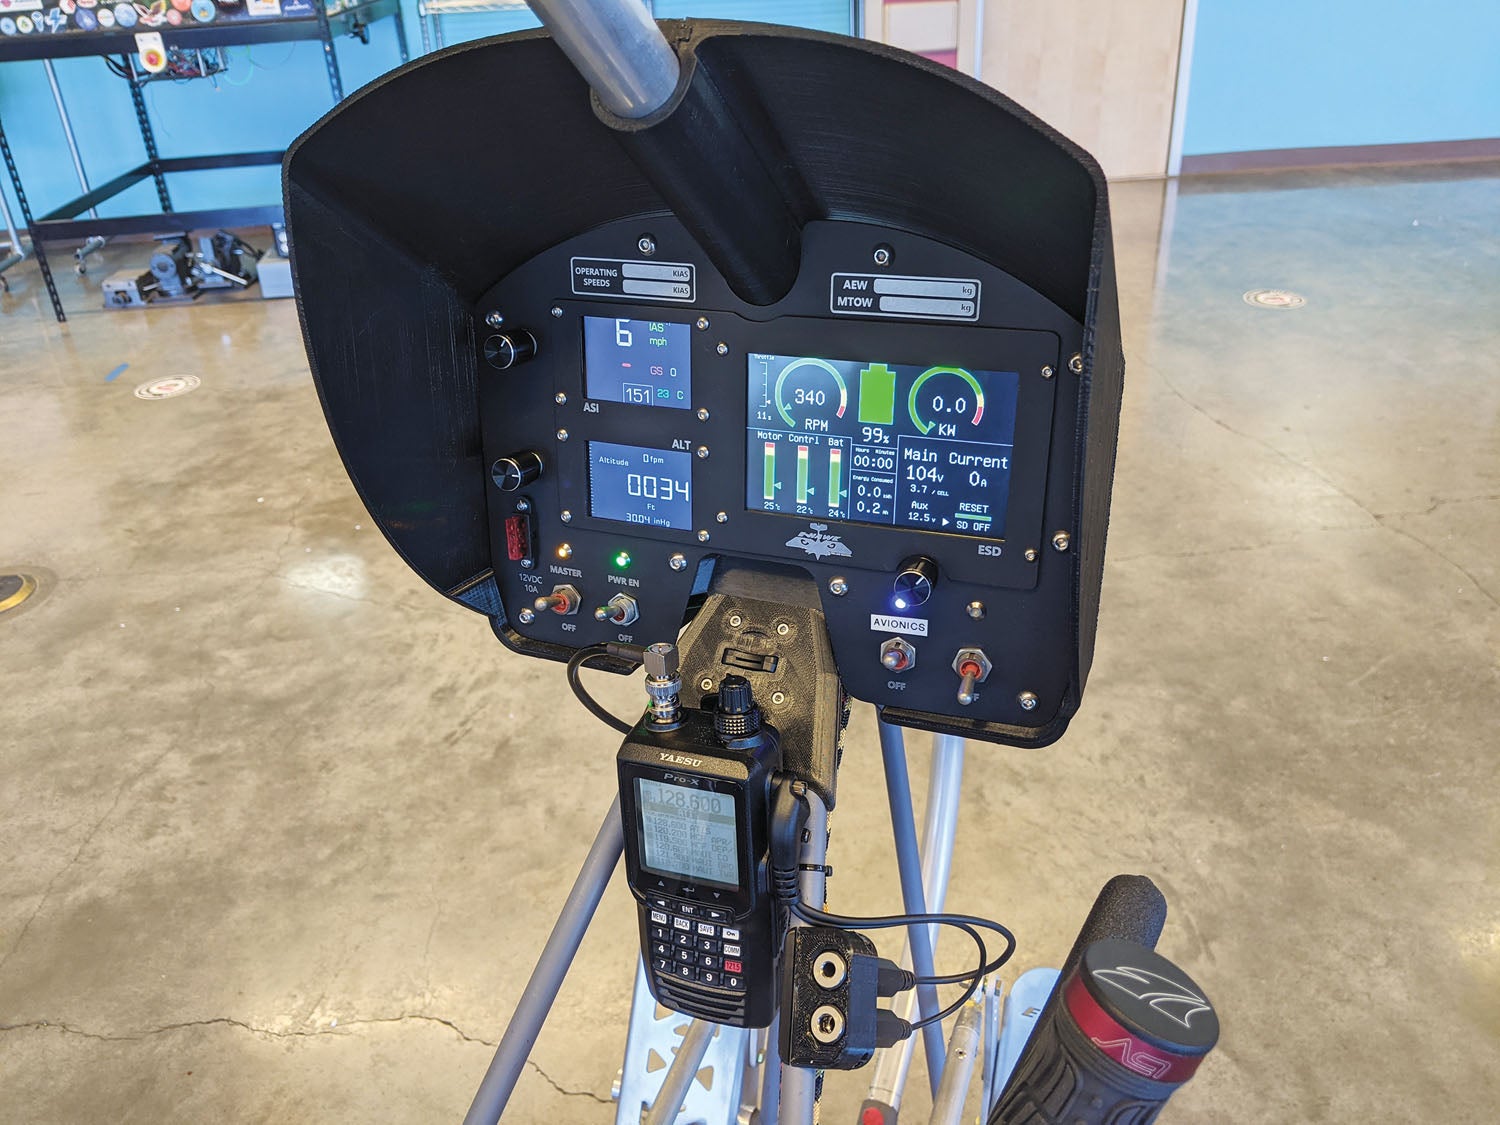
“Our display panel is a thin aluminum piece similar to the EMG-6’s,” Mariko explained. “The big difference between our designs is that the E-Hawk has no windshield, meaning that the panel is not constrained to a semicircular shape. We water-jetted [a sign of how well equipped their shop is] our panel from scratch at school, and we used a somewhat organic shape to neatly fit in all of our instruments. Another difference is the instruments themselves; we use flat TFTs [thin film transistors] to display information to the pilot whereas the EMG-6 prototype uses deeper, cylindrical instruments.”
The students attached their electronics cover and panel to the fuselage, “But the shroud and cover piece are screwed on using embedded nuts that rest inside the front cover,” said Mariko. “As for the electronics, we did some research into existing designs for electric aircraft displays and listed parameters that we would have available from the motor controller/external instruments before coming up with digital layouts that would be used on the main electrical systems display (ESD) and side displays (altimeter and airspeed indicator).”
The Battery Pack
Part of crafting a battery pack for an electric aircraft is arranging a large number of cells in series (S) and parallel (P) to get the desired voltage and amperage to the controller and on to the motor. Simply, volts determine the speed at which the motor turns, and amps determine the torque that provides the “push” (or pull) the propeller can generate. It’s interesting how students determined the overall battery configuration and then a physical arrangement that helped aircraft loading.
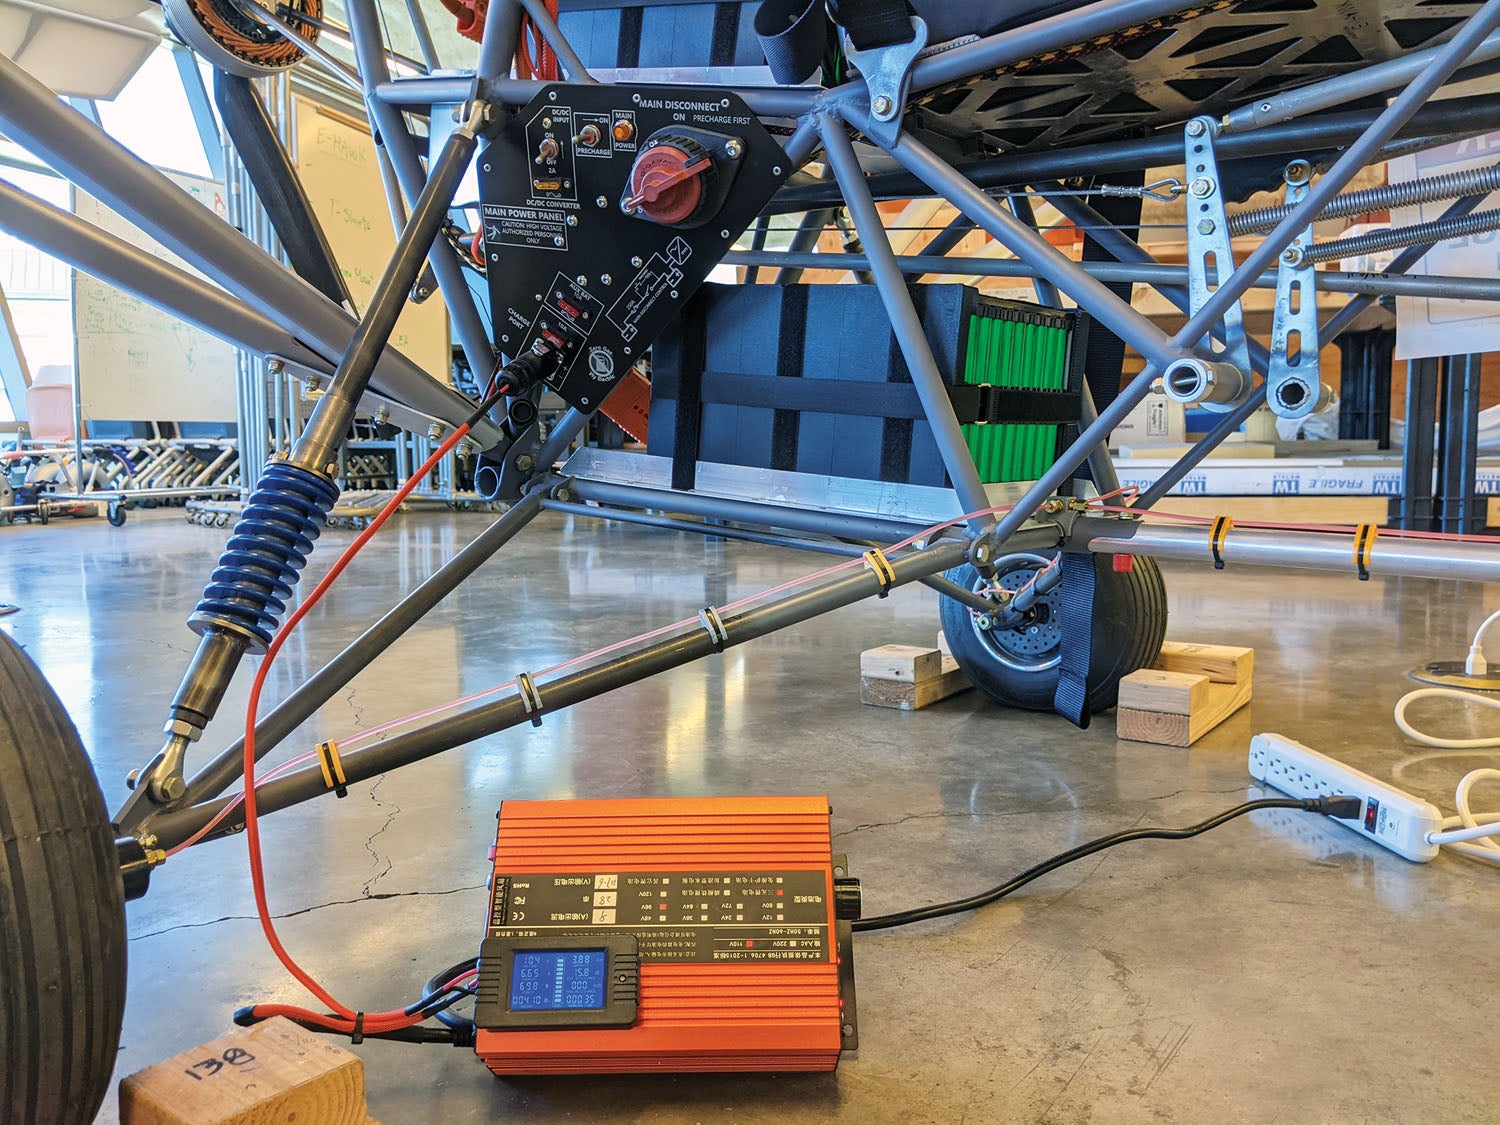
According to Mariko, “Since our motor controller is designed for voltages up to 120 volts, we decided to implement a 28S battery configured using 1S20P modules. The individual 18650 cells (Sony VTC6) are rated at 3000 mAh, which yields a roughly 60Ah module. The modules were designed with large copper terminals that could easily be connected in series using short bus bars. Initially, our battery was to be housed in a single enclosure, but we found that splitting it into two 14S packs would allow us more flexibility in adjusting weight and balance.”
Assembling battery packs can be hazardous since pack power grows as more cells are incorporated. Mariko noted that the team employed standard safeguards such as using insulated gloves and wrenches. “Before making the series connections of the modules, we double-checked the polarity of all terminals to avoid any short circuits in the assembly process.”
Reflections on Their Accomplishment
The team found what many homebuilders find—that the project and processes are not the biggest barriers to success.
Mariko, echoing the team’s opinion, explained, “The most difficult aspect of this project was not the physical construction of the aircraft. Rather, we struggled with time management and scheduling. Before the project was incorporated in the Advanced Innovation and Leadership Course, the E-Hawk project was considered a club, meaning all of the members came into work during their free time. Though we were all very excited about the project, other responsibilities and time commitments often took precedence, leaving us with little time to work on building the plane.”
Asked to comment on the overall experience, Mariko responded, “The E-Hawk project has provided opportunities to students that they normally would not experience until college or beyond.”
Team mentor Martin says “The design and build of this technically challenging project has exposed our students to varying disciplines including mechanical, electrical, and software engineering. Using state-of-the-art CAD software and fabrication tools, the team has become proficient in the many skills that are required to develop a product. Much of what they have learned has not come in the form of direct instruction, but rather from their willingness to do the research necessary to acquire the specific skills themselves. In addition to the technical skills, the E-Hawk project has taught our students what it takes to work efficiently and effectively in a team environment and how to overcome tough challenges.”
Considering these students are involved in academic, athletic and other school-based activities, their achievement is all the more exciting. We’re looking forward to seeing the team reach final assembly, certification and test flights—and where these young people go in what promises to be fulfilling lives.


Superb job.
I would love to see the E-Hawk at a future EAA AirVenture Oshkosh fly-in in Oshkosh, Wisconsin so that the world can see this remarkable design and accomplishments.
We here at Flying Club 1 would interested in your aircraft as a possible addition to our lineup as a tail dragger trainer. Please keep us informed as to the certification process and pricing. We operate UL and eLSA aircraft in Northern VA./DC/Maryland metropolitan area.
Fabian Georges
FC1
CFO/Board Member
Old guy: Those darn kids today… Their power panel looks absolutely professional, as does the rest of the aircraft. I designed and built my first hang glider at age 12 in 1972 while in junior high school and taught myself to fly it. The tools available to young people today, like CNC mills and lathes, lasers, waterjets, 3D printers, CAD software, computers, and most importantly the internet; back in the day, we had magazines (like the June 1972 Popular Mechanics). Excellent that the school and the mentor were involved and support projects like this. Remarkable.
For more information and videos of test flights see: ehawk.iolani.org
Comments are closed.