The popular, lightweight and affordable Slick magneto has bounced around, but it is now owned by Champion Aerospace of Liberty, South Carolina, a division of Transdigm Group Incorporated of Cleveland, Ohio. The Champion Aerospace 4300/6300 Magneto Overhaul and Inspection Manual is listed as part number L-1363F. The latest revision (F) was incorporated on January 5, 2011. This and other Slick magneto information can be obtained on the Champion Aerospace web site.
This Champion overhaul manual details the procedures for both 100- and 500-hour inspections, overhauls, operational checks and post-assembly testing. It also includes maintenance checklists, troubleshooting guides and illustrated parts breakdowns.
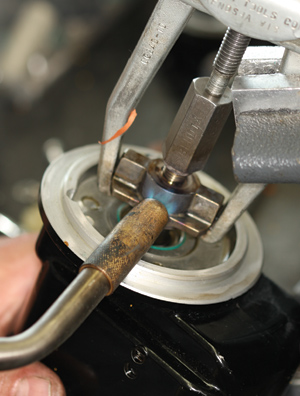
1. The drive gear (p/n 61163) of non-impulse coupling-equipped magnetos is removed with a gear puller. A thread protector should be installed to protect rotor threads. A little heat, judiciously applied, speeds disassembly.
100- and 500-Hour Inspections
The 100-hour inspection requires timing the magneto to the engine (external timing) and a thorough visual inspection of P-lead wiring, vent holes and overall condition, filters, the inlet nozzle and the orifice vent on pressurized versions.
The 500-hour inspection requires magneto removal and disassembly only to the point required to clean and inspect the following items: the ball-bearing assemblies, the impulse coupling (if installed), the rotor, the coil, the contact point sets, the condenser, the distributor block assembly and the carbon brush.
Although the manual does not require replacement of the points-in fact, there are no mandatory replacement items during the 500-hour inspection-experienced Slick magneto service personnel rarely return one of these magnetos to service after a 500-hour inspection without replacing the primary point set and the cam. Other parts replacement is dependent on what was found during the inspection.
Overhaul
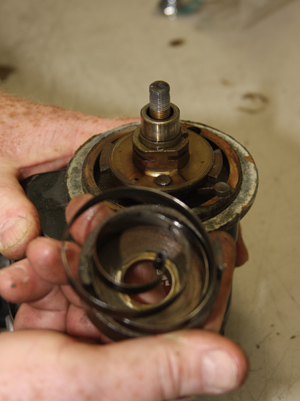
2. The impulse coupling spring and shell are removed. Detailed inspections of impulse couplings are mandatory due to the seriousness of a coupling failure.
According to the manual, all Slick magnetos must be overhauled at each engine overhaul. Magnetos must also be overhauled following an aircraft lightning strike, a sudden engine stoppage or prop strike, or any immersion.
This photo essay shows general disassembly, test and reassembly procedures that were done by Cliff Orcutt and his son Don at Aircraft Magneto Service in Seattle. Beyond what you’ll see on these pages is this nugget: Orcutt says that based on his experience, "If your Slick magneto has failed, chances are it’s the coil." In essence, then, the rest of the magneto is fairly durable; it’s the coil, arguably one of the hardest working components in the magneto, that will give you problems.
Aircraft Magneto Service in Seattle Washington charges $250 for a 500-hour inspection on a Slick magneto. That’s $1 per hour of magneto service-assuming you’re running dual mags. All you get for that dollar is a magneto that’s been thoroughly inspected, has had the rotating magnet re-magnetized and been tested in a magneto test bench in accordance with the testing mandated for an overhauled magneto. That seems like money well spent.
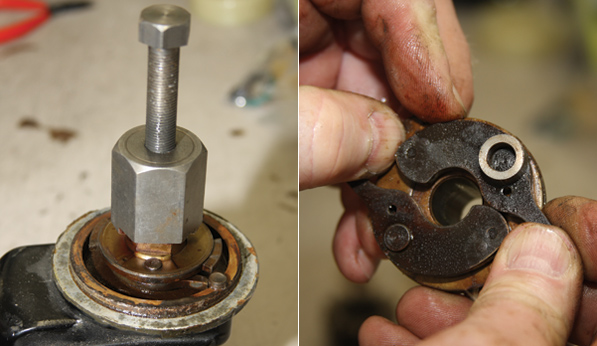
| 3. The Slick T-106 hub puller is used to remove the impulse coupling hub. Remove the Woodruff key from the rotor shaft. Inspect the shaft for damage from impulse coupling operation and for cracks at Woodruff key slot with illuminated 10X magnifying glass. Replace shaft if defects are found. | 4. Impulse coupling inspections are exacting and detailed. This shows the pawl rivets being checked using T155 rivet gauge (silver ring). |
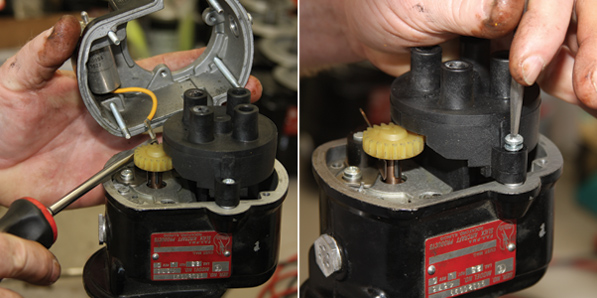
| 5. The distributor housing assembly is removed. Slide the yellow condenser wire off the connector on the point set. The condenser (capacitor) must be checked for capacitance and resistance to leaks. These tests cannot be done with a digital multimeter. The rotor gear is exposed. | 6. Remove the two screws that hold the distributor block and gear assembly in place and lift the assembly free. Pay attention to the possibility of spacers and note their location. |

| 7. Remove the distributor block bearing bar. Note the spring-loaded carbon brush in the center of the distributor gear. The carbon brush and spring must be inspected for wear and dimensional limits. The bushing in the bearing bar is re-lubricated by baking in a 200 F oven for two to three hours. | 8. Remove the distributor gear. Inspect for erosion on distributor block contacts and distributor gear finger. The bushing in the distributor block is re-lubricated by baking in a 200 F oven for two to three hours. | 9. Using light finger pressure, check distributor gear finger for looseness. If any is detected, replace the gear. |
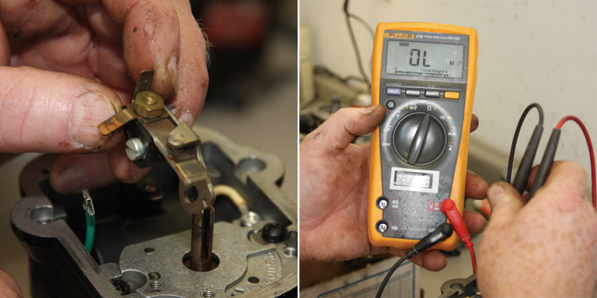
| 10. Remove point set. Point set may be inspected and returned to service if it passes the inspection detailed in Chapter 3.3.6 of the manual. Any signs of discoloration or pitting are cause for rejection. Accessory overhaul shops almost always replace point sets during 500-hour inspections. | 11. Inspect coil for visible radial cracks. If any are found, reject the coil. Check that the resistance values of the primary and secondary windings of the coil are within specs. Inspect coil high-tension tab for wear. |
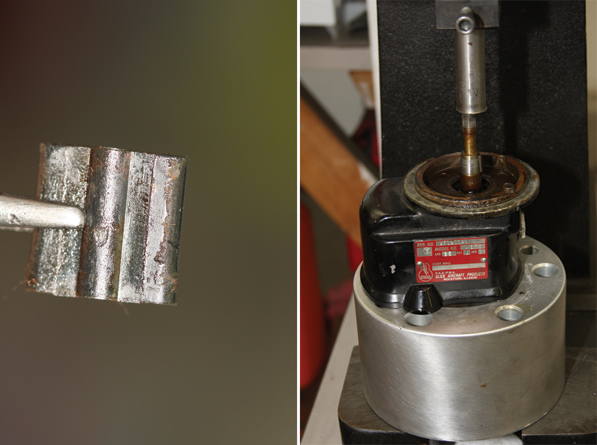
| 12. Pull cam up out of rotor shaft slot. This photo shows a close-up view of a used cam. A new cam, point set, lube and hardware are included in contact point kits for sale at aircraft parts houses. | 13. In this case, the shaft was stuck in the bearing in the magneto frame and it was necessary to press the shaft out. Heat is applied to loosen the parts. |
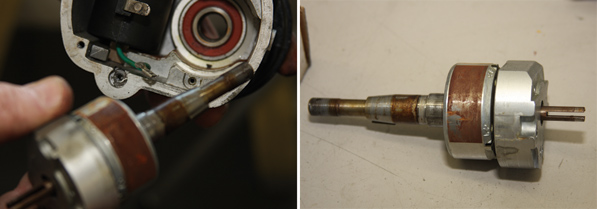
| 14. The rotor shaft, bearing cap, bearing (orange colored) and magneto frame are seen in this photo. | 15. The bearing cap and rotor assembly. |
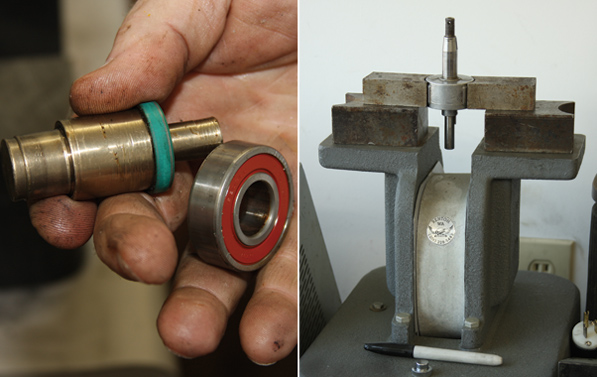
| 16. The sealed bearing after removal from the bearing cap. All bearings that are removed during maintenance must be replaced. | 17. This shows the magnetic core of the rotating magnet being re-magnetized. If rotor magnets are not stored with keepers or are not re-magnetized, spark output energy may be reduced. |
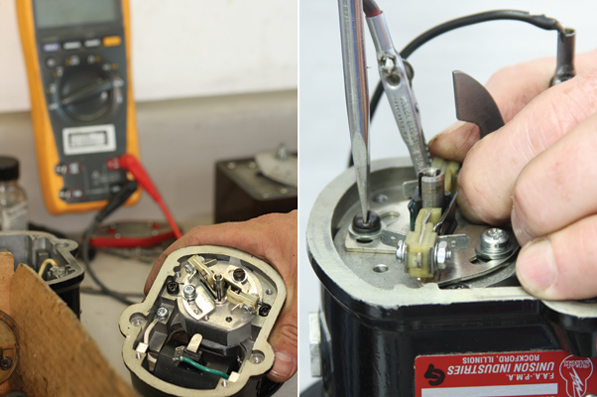
| 18. The magneto has been reassembled, and new primary and secondary point sets are installed. Secondary point sets are not installed in impulse coupling-equipped magnetos-they’re required for ignition vibrator starting systems. | 19. The primary point set gap is being adjusted with the T-150 timing tool to set the internal timing of the magneto. Point set cam follower wear and cam wear rates are designed to maintain proper point opening timing over long periods of operation only if the proper cam lubrication is applied prior to returning the magneto to service. |
For more information on overhauling Slick magnetos, visit Champion Aerospace at www.championaerospace.com or Aircraft Magneto Service at www.aircraftmagnetoservice.net.

![]()
Steve Ells is what you call a gen-u-ine mechanic, a bonafide A&P with an Inspection Authorization. Former West Coast editor for AOPA Pilot and tech guy for the Cessna Pilots Association, Ells has flown and wrenched on a wide range of aircraft. He owns and wrenches (a lot!) on a classic Piper Comanche. But don’t hold that against him.


