 Garmin figured out that not everyone was in the market for a full G3X EFIS suite. Some homebuilts out there still have six holes in a three-by-two arrangement in front of the pilot, and their owners aren’t always thrilled about tearing out the whole lot to gain redundancy, reliability, or capability. And that’s how we get the Garmin G5 mini EFIS.
Of course, others have been there. Notably the Dynon D10 “10 in one” EFIS with a similar footprint—that is, designed to fit into a 31/8-inch instrument hole—that came out in 2003. Like the G5, the D10 crammed airspeed, altitude, heading, and attitude into one compact package. By adding various sensors and connections, it could calculate vertical speed, airspeed rate of change, turn rate, and display both vertical and lateral guidance. For builders wanting to add redundancy, some form of the old vacuum-instrument system could remain to backstop the newfangled instrument.
But it’s no longer 2003 and by 2016, when Garmin introduced the G5, the landscape had changed. So the G5 is pitched as both a primary instrument for aircraft with limited panel space or for retrofits, and as a backup instrument for a now-conventional all-glass panel. That the G5 carries its own sensor pack for attitude and pitot-static—along with its own internal GPS—provides an affordable source of redundancy.

Compact? Did I mention how compact? Try 3.4 inches wide, 3.6 inches tall, and just 2.6 inches deep before you add the backup battery, which then makes it all of 3 inches deep. Think about that. Virtually every instrument you need, packed into something half again larger than a Rubik’s Cube. How Garmin did that is both miniaturization of the key technologies, but also by moving ancillary features out of the main case and into external modules. And that influences how you go about…
Buying One
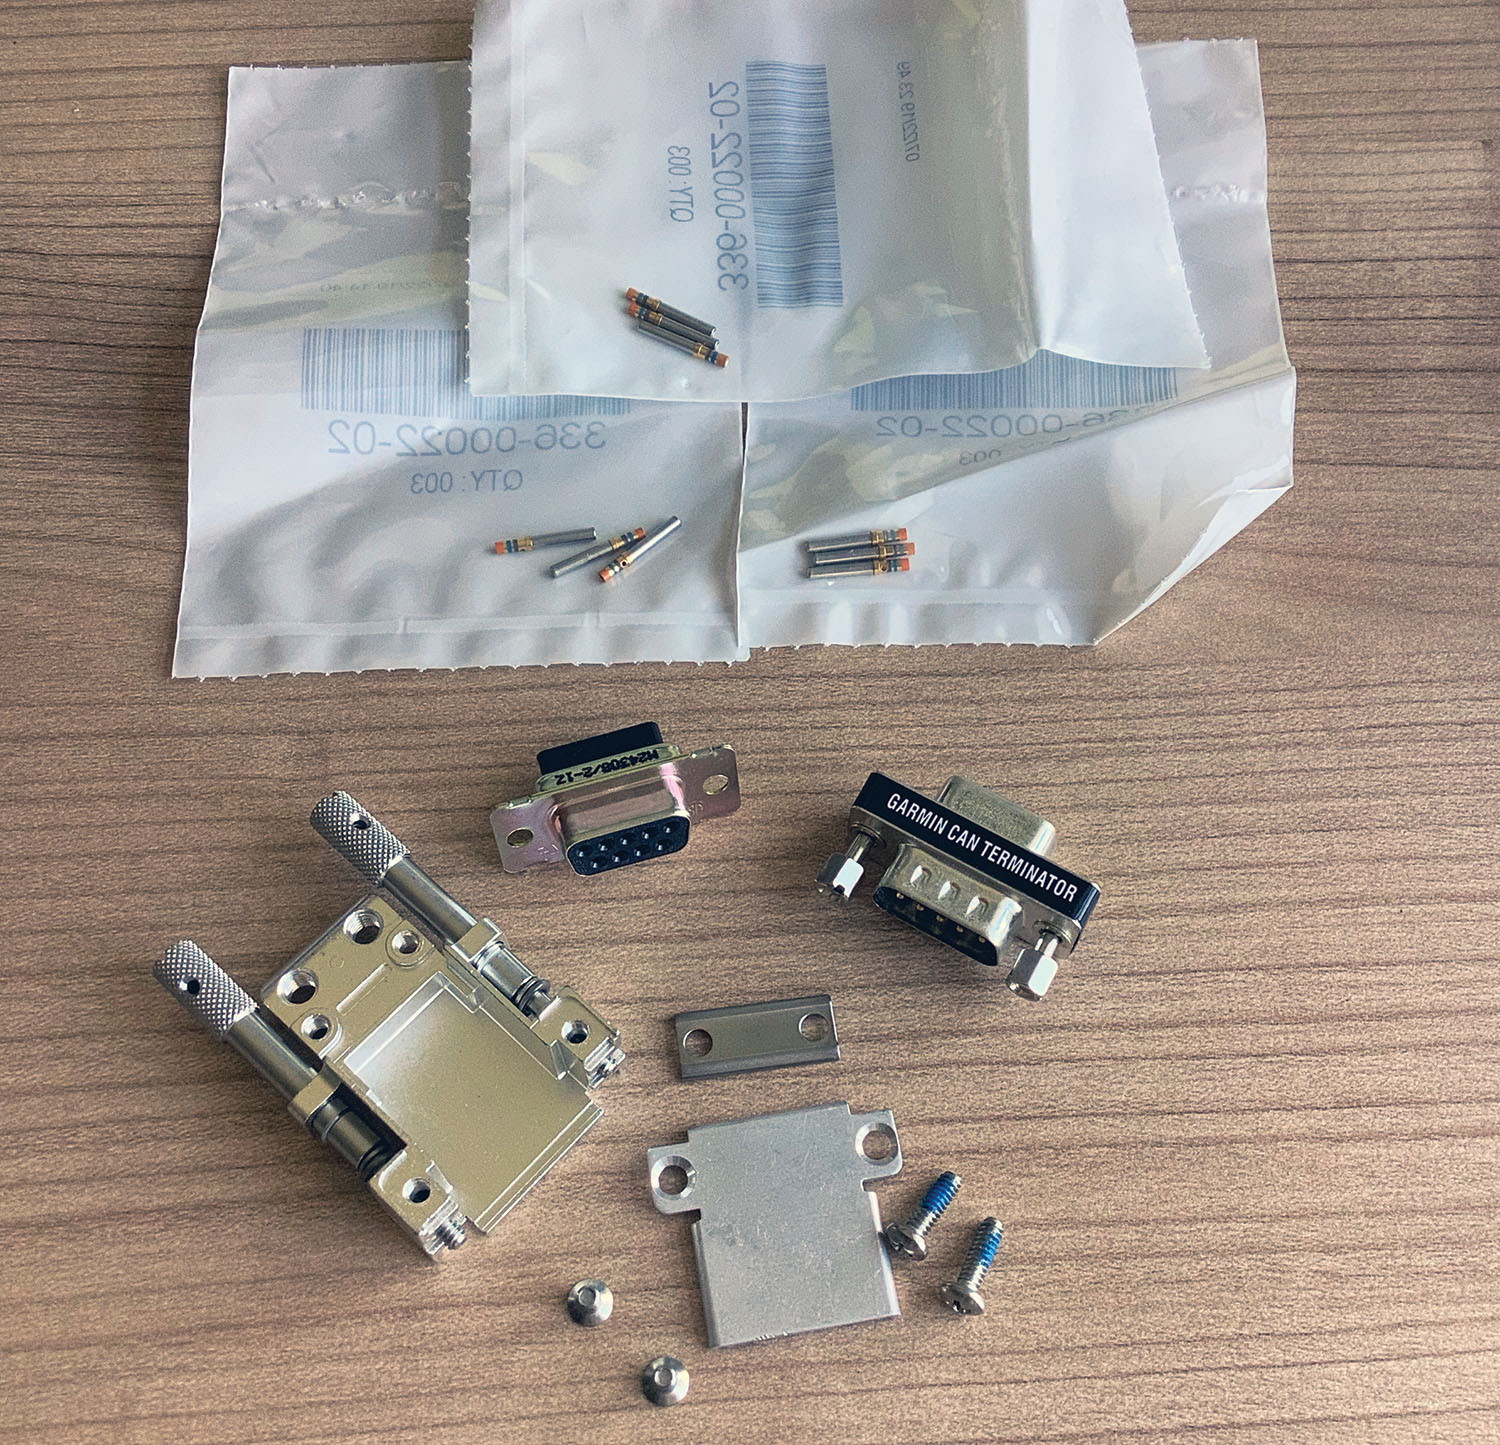
At first, the G5 seems really inexpensive for what you get. And it is a good value, but budget carefully. The bare unit lists for a buck under $1250—and it’s literally that, the G5 head module in a box. Garmin says that many builders request the install kits separately so that they can prepare their panel for the instrument without having to buy it. In this case, $50 gets you a nice DB-9 socket, a network terminator (more on that later), and a clever C-shaped ring that fits into the back side of a conventional 31/8-inch instrument hole. Note that the G5 is designed to use button-head screws from the front side of the panel. So no worries if your panel does not have countersunk screws. (If it does, though, you’ll need to provide your own 6-32 screws.)
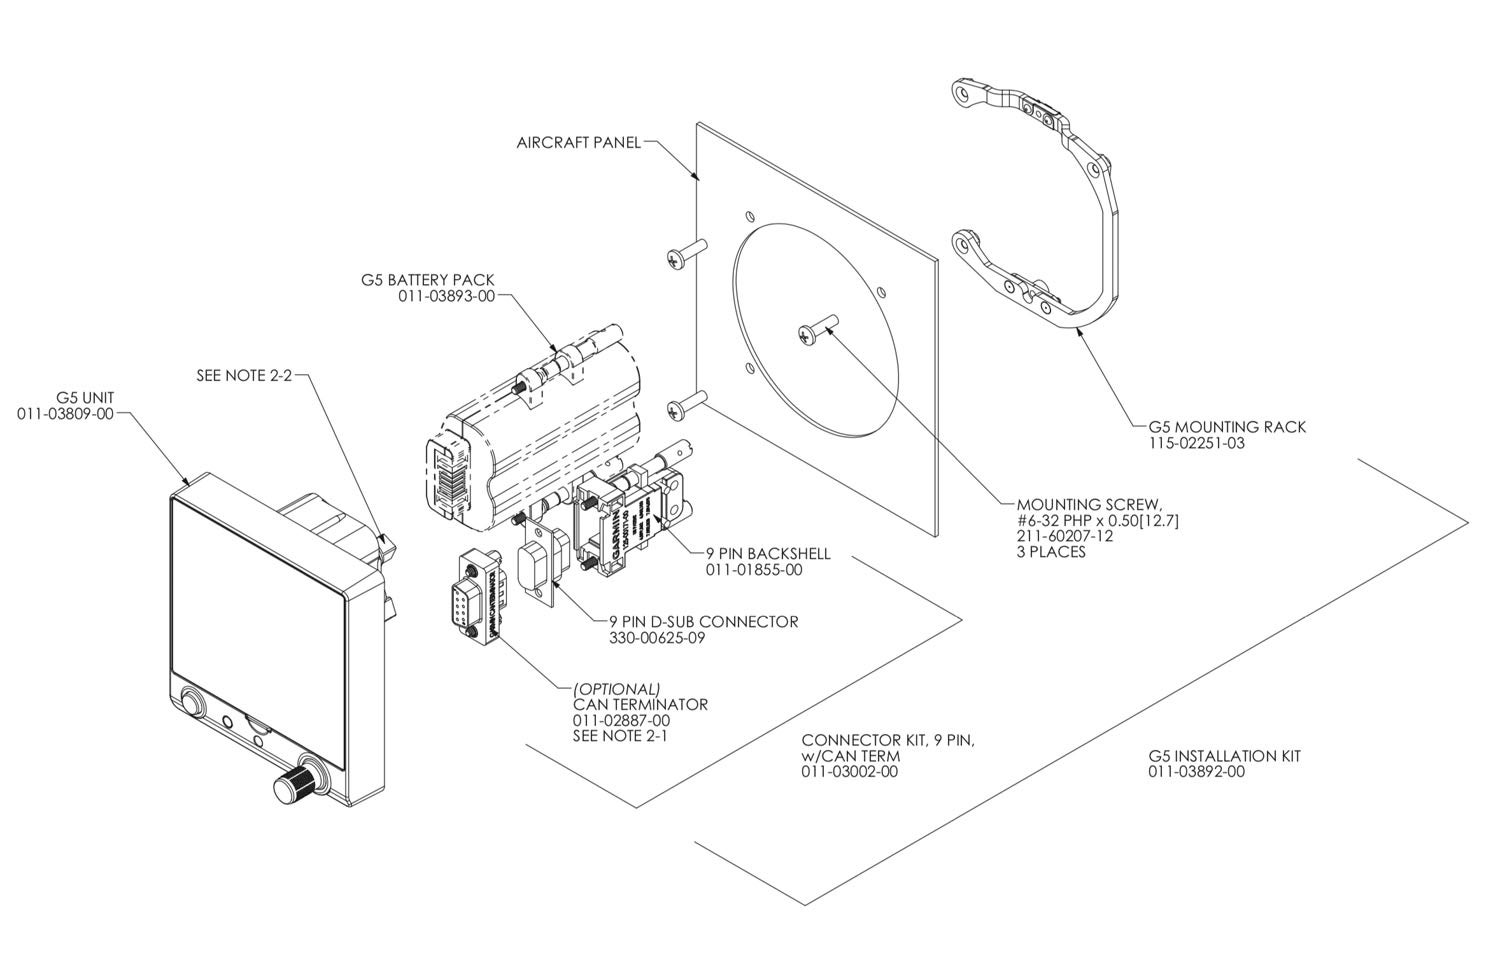

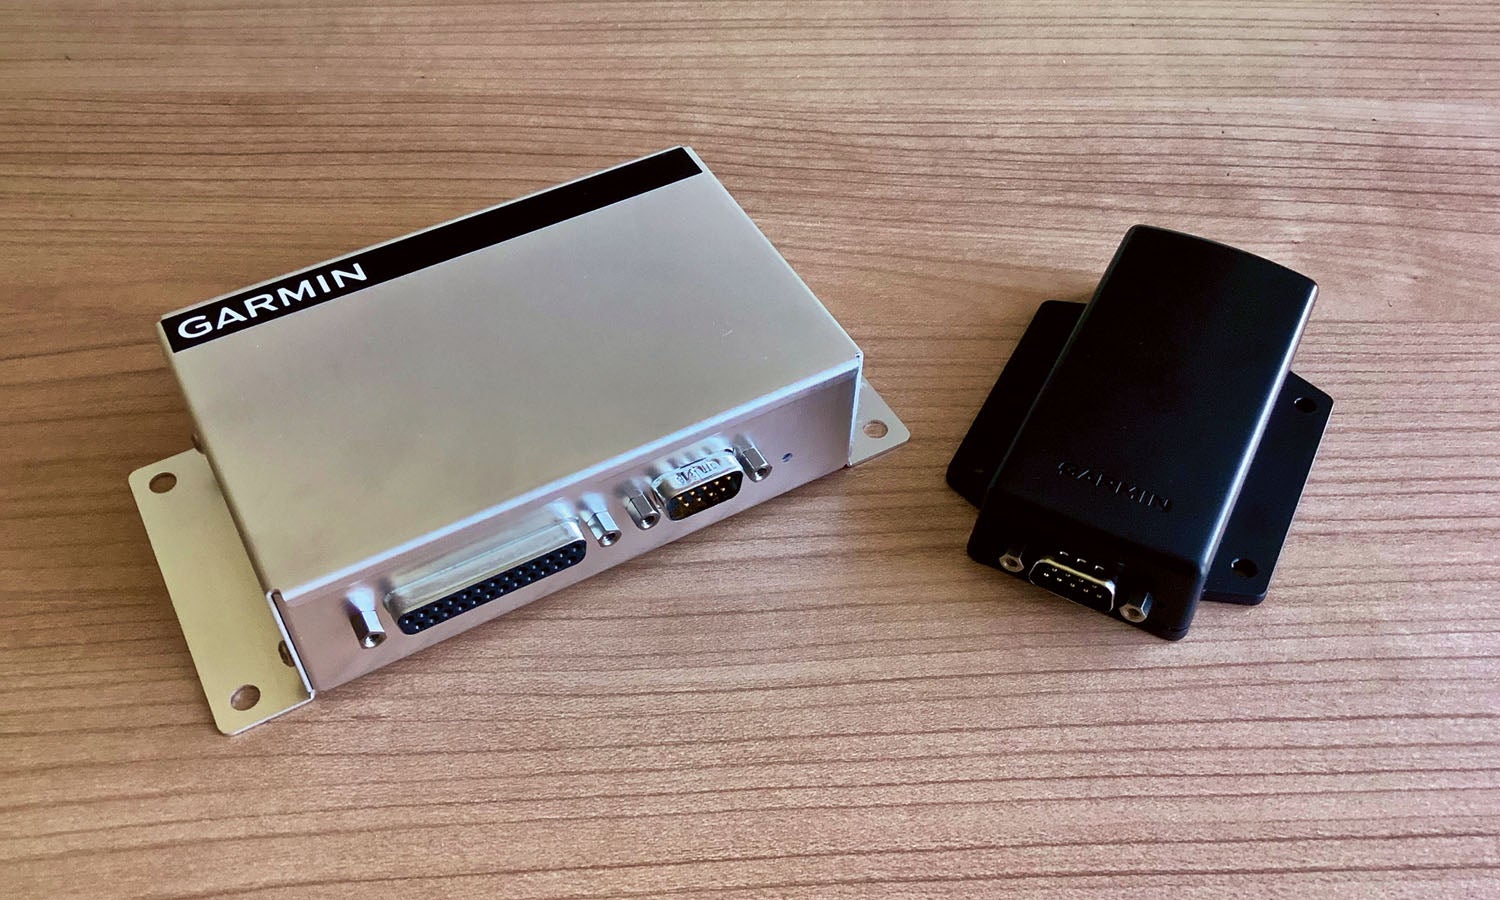
Okay, you’re not done. In base form, the G5 will connect to the pitot-static system through conventional 1/8-inch NPT fittings and can use its internal GPS antenna to put ground track on the instrument. Note that it does not have an internal magnetometer. That means you technically can’t remove your mechanical HSI or DG and rely on the G5 as a standalone replacement until you add the GMU 11 magnetometer, which lists for $275. Likewise, the GMU 11 does not have a connector kit or a CAN terminator in the box; that costs $31.50.
So far so good. Garmin recently added features to the G5 that allowed it to display outside-air temp and calculate both density altitude on the ground and true airspeed in the air. That requires the GAD 13 OAT module. Now, you can buy Garmin’s bundle of the GAD 13 module—which is less than 2 inches wide and long, and less than 3/4-inch tall—along with the GTP 59 OAT probe for a throat-tightening $470. Before you tag Garmin on social media with nasty comments, understand that the GTP 59 is a high-accuracy probe designed for everything up to large bizjets. Fortunately, the GAD 13 accommodates other kinds of probes, including the Davtron 655 ($85). The GAD 13 by itself is $139. Add a connector kit for $37.50. It’s worth noting that the G5 will do winds-aloft calculations but only with both the OAT sensor kit and the magnetometer installed.
More Connections
Without adding anything else, the G5 will connect to many navigators through its single RS-232 interface; it has one input and one output. The input can handle a basic GPS lateral input as well as both the vertical and lateral data from the GNC 255 or SL 30 nav/com. But as it’s one input, without internal switching, if you want to feed the G5 from multiple nav sources, you’ll have to set up an external switch and hope that they can both output the same data protocol. That’s because the G5 has you determine the protocol in the setup phase and doesn’t “auto detect” when it sees a new data stream.
For outputs, the G5 will send its internally sourced position data to an external autopilot through the RS-232, but it won’t send selected course guidance from the heading bug. It can also communicate with the GNC 255 and SL 30 to provide GPS data and selected course to those radios, or it can provide an altitude encoder function through the RS-232. But, again, since it has just the one RS-232 port, you’ll have to decide which you want. Fortunately, the G5 can be configured to do one thing with the input and another with the output.
If you have a need to get your IFR GPS navigator’s course guidance to display, get the ARINC 429 adapter, called GAD 29; it costs $475 plus $50 for a connector kit. With the GAD 29, you can have lateral and vertical guidance from your IFR GPS shown on the G5. The G5 can accept simple lateral data through the RS-232 from your IFR box but it won’t include vertical guidance.

What if you don’t already have an autopilot? Garmin’s got you covered there, with an autopilot option. For each axis you want to control—yes, including yaw—put a $750 GSA autopilot servo in your shopping cart. But don’t forget one GMC-series autopilot control panel, the cheapest of which is $750. So to add a two-axis autopilot driven by the G5 increases the bottom line by $2340, including the connector kits.

Finally, you can connect the G5 to an existing or future G3X suite through the CANbus arrangement, and doing so allows tremendous interoperability and convenience, including allowing the G5 to drive the air data portion of a failed G3X sensor, act as a backup autopilot position source, and many other things. Garmin has really put a lot of effort into the way the G5 networks into the other devices in its line. And, as you would imagine, most of those add-on boxes are unnecessary if you have the G5 patched to a full EFIS suite. Conversely, if you start with the G5 and add an EFIS later, these modules will work.
The Installation
But that’s not the setup we’re looking at here. At its simplest, you could hook up power and ground, bolt the G5 to your instrument panel, and have a fully functional attitude indicator with GPS-derived ground track and ground speed displayed. Connecting pitot and static lines gives you all the related instruments as well as the capability of it acting like an altitude encoder for your transponder.
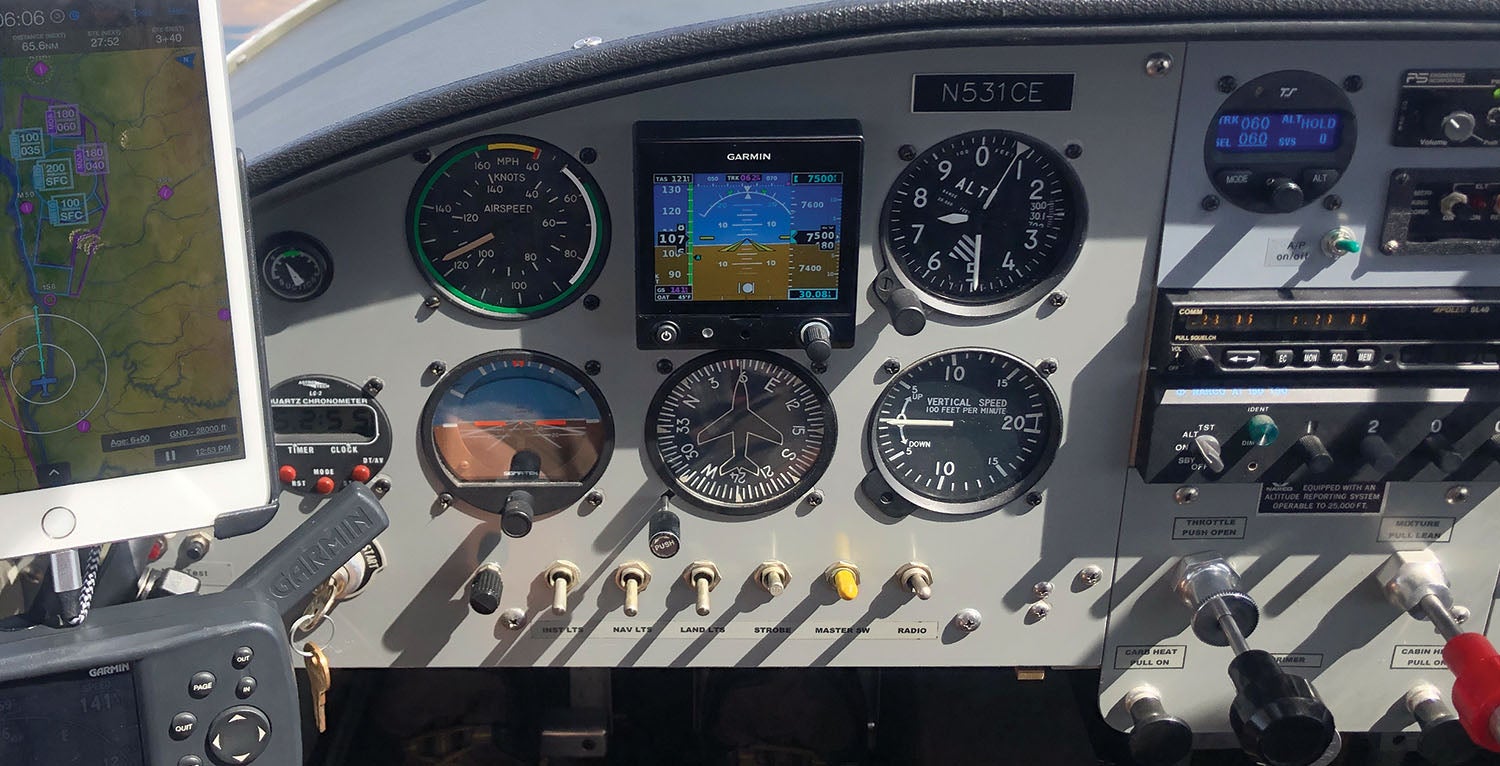
In my particular installation, I added the OAT module and probe to get TAS and density altitude (very handy) and relied on the RS-232 ports to feed GPS position data to the existing TruTrak autopilot; but that only provided ground track that the TruTrak could be set to mimic. I also had the VFR GPS in the airplane provide lateral guidance to the G5, and that worked fine. But note that without the magnetometer installed (yet), there were no winds-aloft calculations.
Creating the simplified harness was easy, and the remainder of the physical installation went smoothly, helped immensely by the G5’s tiny form factor. I opted for the optional backup battery ($150), which simply bolts to the back of the unit and provides 4+ hours of backup. I was able to get the functioning unit to estimate more than 5 hours’ endurance by turning the backlight down; in any case, that’s more fuel than my airplane carries, so I consider that sufficient.
It is worth noting that the backup battery powers the G5 unit itself. Each of the external units requires its own power source, so a catastrophic loss of 12 volts in the airplane would mean you still have attitude and pitot/static information, but you’d lose the magnetometer (and so be down to the internal GPS for ground track in lieu of magnetic heading) and you would lose OAT function (meaning you’d be down to sticking your finger out the window for an ice check).
The Flying
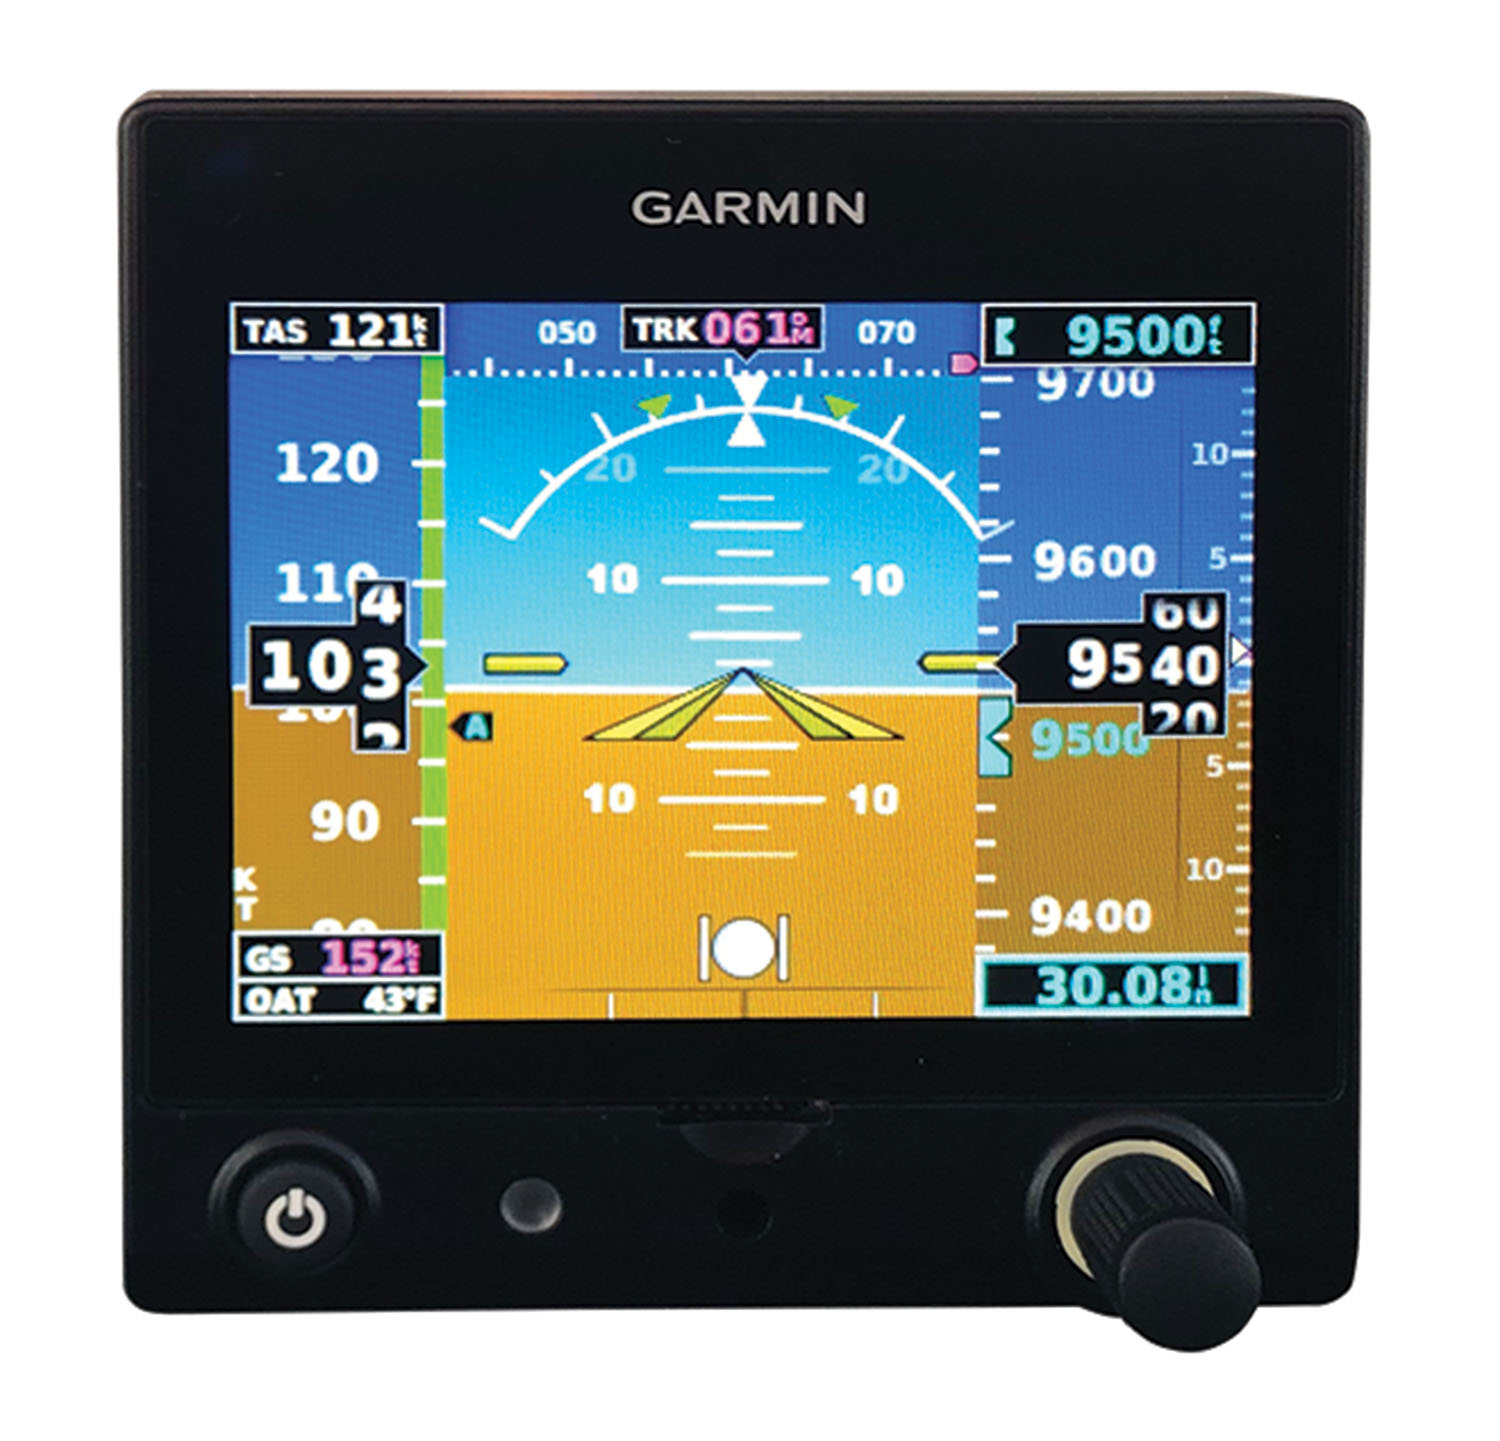
Once you’ve completed a straightforward systems check and calibration, the G5 is ready to fly. And it does so splendidly, constantly reinforcing the idea that old-school gyro and analog pitot-static instruments are wiggly, jiggly, and prone to failure. The visual layout is a miniaturized version of Garmin’s established EFIS paradigms, and includes programmable markers on the airspeed tape for things like Vx, Vy, and Va, as well as the color bands for the other limitations. You can choose from different flight director cue styles, as well as either sky- or ground-pointer AI layouts.
Two bugs are available, one for heading (or track) and one for altitude, easily accessible through the single front panel knob. Press once to get to the menu. Rotate to the item you want, press the button again, then make the change you desire. It’s easy once you stop trying to touch the screen. The default setting on the knob is baro; just turn it without pushing to change the altimeter setting.
Overall, the presentation is very good and remarkably clear for what is really a small instrument. (Somehow the photos always make it look bigger in the catalog.) My one legibility complaint is that the vertical-speed tape on the far right edge is fairly small. You will get used to it, but it’ll take some time behind the instrument before a glance will do it.
In addition to the full EFIS display, the G5 can act like an HSI, and that’s how you’d likely configure a pair of them in the same panel. The second one can share all the data from the external modules and be configured to come up as the HSI on startup. It’s there, by the way, that Garmin elected to place the winds-aloft data not on the PFD page, which is probably smart considering how much data is already there.
Still, Garmin has packed some great features into the display. For example, the G5 shows both a slip/skid ball and a rate of turn at the bottom of the display. There are small tick marks to show a standard-rate turn, but the device will also show green triangle-shaped pointers in the bank-angle display that move based on airspeed. That way, you can nail exactly the right bank angle that results in a standard-rate turn for that speed. It’s nice stuff for the little guy.
If you had your calculator out, you know where we are on costs. We start at $1300 (G5 and the install kit), hit just over $1700 in my current configuration (OAT system and backup battery), but would then have to go to $2017.50 to add the magnetometer and allow me to ditch the vacuum system in my airplane totally. Adding the ARINC 429 system gets us to $2542.50, less your time, wiring, tubing, fittings and all the miscellany. Even with a professionally built harness, you’re still really close to $3000.
What you end up with is a compact, highly functional, low-consumption (even with the battery charging, the G5 will pull at most 0.76 amps), lightweight (about a pound), flexible instrument that is a huge upgrade in reliability and redundancy to a conventional six-pack panel in an older homebuilt.
![[Credit: JetStream Rider]](https://www.kitplanes.com/wp-content/uploads/2026/04/AdobeStock_345999332.jpg?w=218&h=150&crop=1 "2026 Avionics and Lights Buyer’s Guide")
![[Credit: Dynon]](https://www.kitplanes.com/wp-content/uploads/2026/04/EMS-stand-alone_HDX.png?w=218&h=150&crop=1 "Dynon Unveils Scalable Engine Monitoring for Kitbuilders")


