 When I first started construction on my RV-10 in 2007, old-school incandescent lights were making their way out of the market and LEDs were just coming in. I purchased a kit from Kuntzleman Electronics, which gave me LED position lights and conventional strobes that have served me well for more than 800 hours. For exterior lighting, that just left the landing/taxi lights as the next decision to make.
For simplicity of construction and low cost, I initially opted to go with Van’s MR16 incandescent package. (MR16 bulbs are typically used in track lighting and most commonly are rated for 50 watts.) When wingtip lights migrated from draggy external to sleek internal, FAA requirements still mandated minimum viewing angles for position lights. This mandate required raking the forward face of the wingtip cavity back several degrees to meet viewing angle requirements. This required using an offset mounting assembly to mount the forward oriented lights through the angled face plate of the wingtip cavity. The result wasn’t necessarily pretty, but it worked. The Van’s landing-light package resided at the back of this cutout, obviously facing forward, inside the wingtip.
Before first flight, I came across an HID (high-intensity discharge) light package, the “bulb” of which was the same size as Van’s MR16 bulbs and fit nicely into the same Van’s mount. The upgrade promised more light output for less power consumption. Swapping out required adding the HID ballast assembly, but those fit easily in the wingtips, and the original wiring and switch/breaker were used.
Fast forward several years—one of my HID lights failed. I contacted the vendor and was told that the original components were no longer available and that I would have to buy a whole new assembly. By this time, HIDs were falling out of favor, and there were vast improvements in the development of LED landing/taxi light options. I temporarily reinstalled the original Van’s light in place of the failed HID, leaving me with a moderately bright white light on one side and a dimmer yellowish light on the other.
Not Gonna Cut It
My night currency recently expired, and with a trip coming up that would require night flying, I went out one evening to do my required currency landings. That experience was a vivid reminder that it was time to take a crowbar to my wallet and upgrade to current lighting standards. I began the market research in earnest.
My desire was to get the most bright for the buck. I was open-minded to mounting options like wingtip, wing leading edge or cowl mount. My strobes and LED position lights were fine, so I ruled out integrated all-in-one modules that I may very well have chosen if still building. I like Aerosport Products, but their cowl-mount option appeared to conflict with a cowl bubble I have to accommodate my (beloved) air-conditioning compressor. That put me back to the wingtip, but the inherent size constraints at the tip eliminated the brighter PAR 36-sized bulbs. For me, the best option became wing-leading-edge mounts.
When I originally built, Van’s didn’t have an official RV-10 leading-edge light install bracket kit. A few intrepid craftspersons designed and fabricated their own, but most early builders seemed to go with the original wingtip options. Today, Van’s has an install kit. Duckworks also has a kit. The former is cheaper and has a larger lens area but mounts with rivets in the wing skin. The latter is more expensive with a smaller lens area but mounts internally to the wing ribs. I opted for Van’s install kit.
The final purchasing decision was the light fixtures themselves. Several options were attractive. However, four factors wrapped up the decision for me to purchase the Seven Stars fixtures from Flyleds of Australia. The first was a hefty 9000 lumens per unit. The second was purely subjective as I liked the look of the light clusters versus a more traditional single-bulb look. The third was that I was intrigued by the option of assembling the unit myself from the kit parts. Fourth, I was impressed by owner reviews of both the components and the customer service. I am not saying that my choices are the best for everyone, just the most attractive for me during a short snapshot of a rapidly changing market. (For more about modern LED lighting, see our upcoming lighting buyer’s guide.)
Roll Your Own
The kit arrived an impressive five days after ordering—all the way from Australia—and the components were well packaged and gave an immediate impression of quality. The assembly instructions were complete, including numerous images of the process. Some kits from Flyleds require soldering but the Seven Stars kits do not. The key to success is diligently reading the instructions and careful handling of the components. Leave the electric driver in the tool chest. This project requires nothing more than a small Phillips screwdriver and a careful touch. Good workspace lighting for assembly is essential, especially for those of us with more experienced eyesight. There is an option to order the lights fully assembled for an additional fee, but I found the assembly process to be interesting, educational and enjoyable.
There are a couple of options available with the Seven Stars lights that create more decisions. The first is adding a wig-wag module to the system, but that can easily be added later. The second one is that the light modules are composed of one center light module surrounded by a circle of six additional ones. All seven modules illuminate in landing-light mode, but there is an option to use just the center one alone as a taxi light. The kit also includes an optional snap-on diffuser lens cap to enhance the spread of the light pattern for taxi purposes.
From the module itself, the taxi light option is extremely easy as the requisite circuit connection is already embedded into the main board. The option requires a second power wire and switch connection, which is relatively easy for a new build but can, as I will explain below, require significant work to accomplish on a flying airplane, depending upon configuration.
I’ve never flown a single-engine aircraft with a separate land/taxi light option, but also never flown one with landing lights bright enough to be a hazard to other aircraft. In the airline world, separate landing and taxi light circuits are essential. Any cowboy who taxis around with blaring landing lights (or strobes) is going to get ridiculed and cursed in neighboring cockpits and even get callouts on ground frequency. The lights available for homebuilts today are as bright as the best airline gear, so I feel that the land/taxi option should be required. Not only for courtesy but for safety, even if it complicates installation.
Make It Happen
The bracket kit is typical Van’s high quality with full-sized plans and drawings. In addition to all required components and hardware, it also includes full-size templates for each wing to cut the lens opening and mark the rivet- and screw-hole positions. Take note that each wing has a separate template with tops and bottoms that must be oriented correctly.
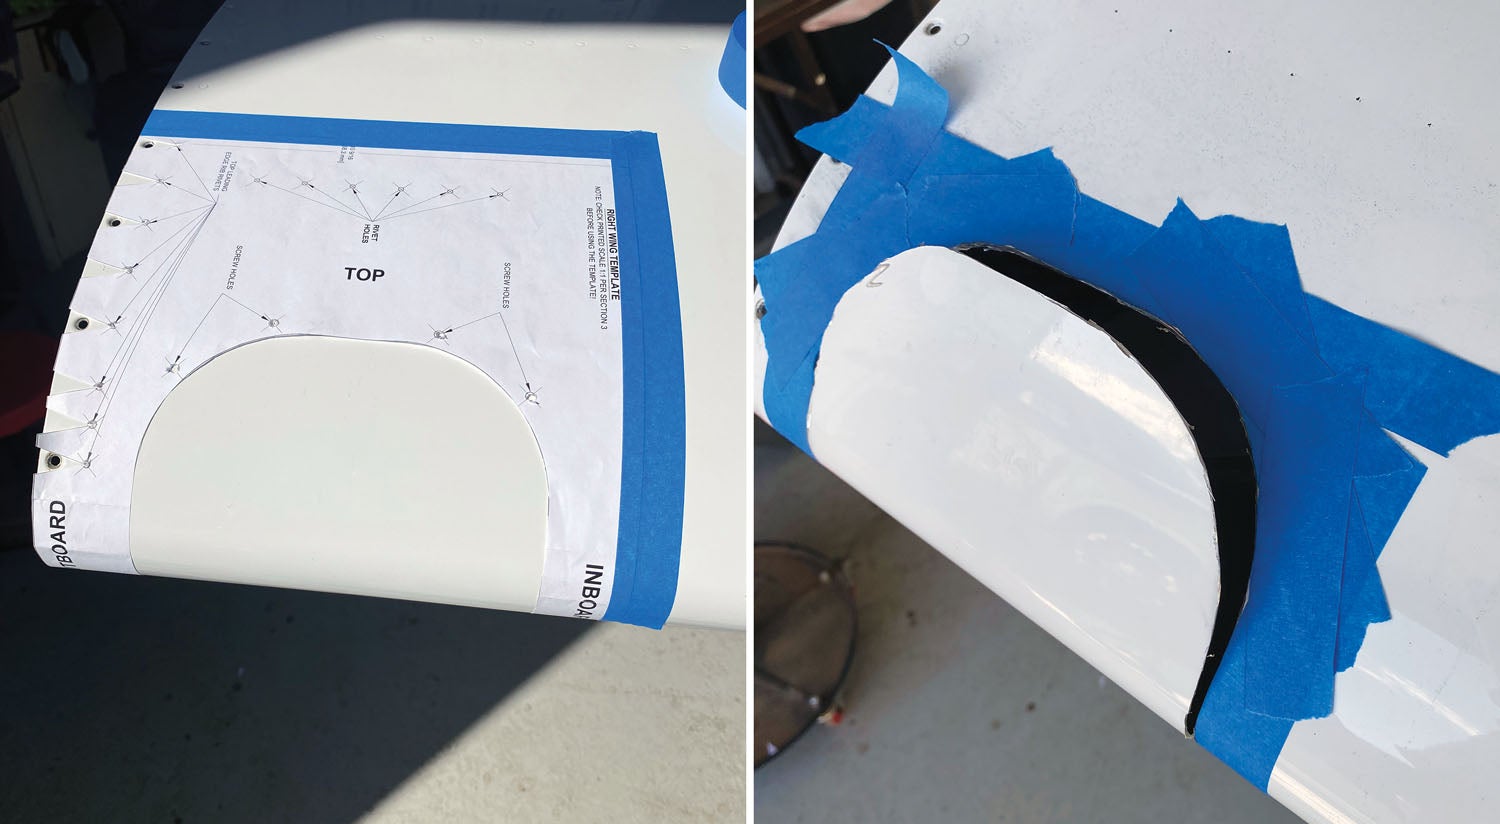
After removing the wingtip and aligning the proper template to the rivet pattern of the wing skin edges, the first step is taking a spring punch to the skin to mark the hole positions. Leaving punch dents into the surface, while nerve-wracking enough, pales in comparison to firing up the Dremel and carving a big hole into the painted surface of a finished airplane. You don’t expect that the wing skins are under stress from the leading-edge bend, and when they release from the cutting process, each pops out an inch or two with a considerable bang. The force and startle of the first one lifted my hand and the running Dremel tool causing an errant “run” of the blade against the surface and perhaps a light leak of bodily fluid. Fortunately, the scrape occurred on the scrap surface and not the remaining surface. On the first wing cuts, I started at the leading edge and worked aft. On the other wing, I started aft and worked forward and the separation “pop” was much less pronounced.
The rest of the bracket installation was fairly easy. The only note is that the line of top and bottom rivet holes that need to be dimpled are about 3.5 inches from the edge of the lens opening and the widest yoke I had for my squeezer was 3 inches. Wider yokes are available but are expensive and back-ordered. I ended up using the inexpensive pop rivet gun pulling a nail through a special dimple die kit. (Aircraft Spruce part 12-00613, if you’re shopping.)
One last note for painted surfaces. I was fortunate in that all of the touch-up required on the lens opening edges, rivet and screw heads and so on were Matterhorn White, one of the most common aircraft colors. I discovered years ago that Dupli-Color Chrysler bright white paint pens (BCC0362) are a perfect match for touch-up.
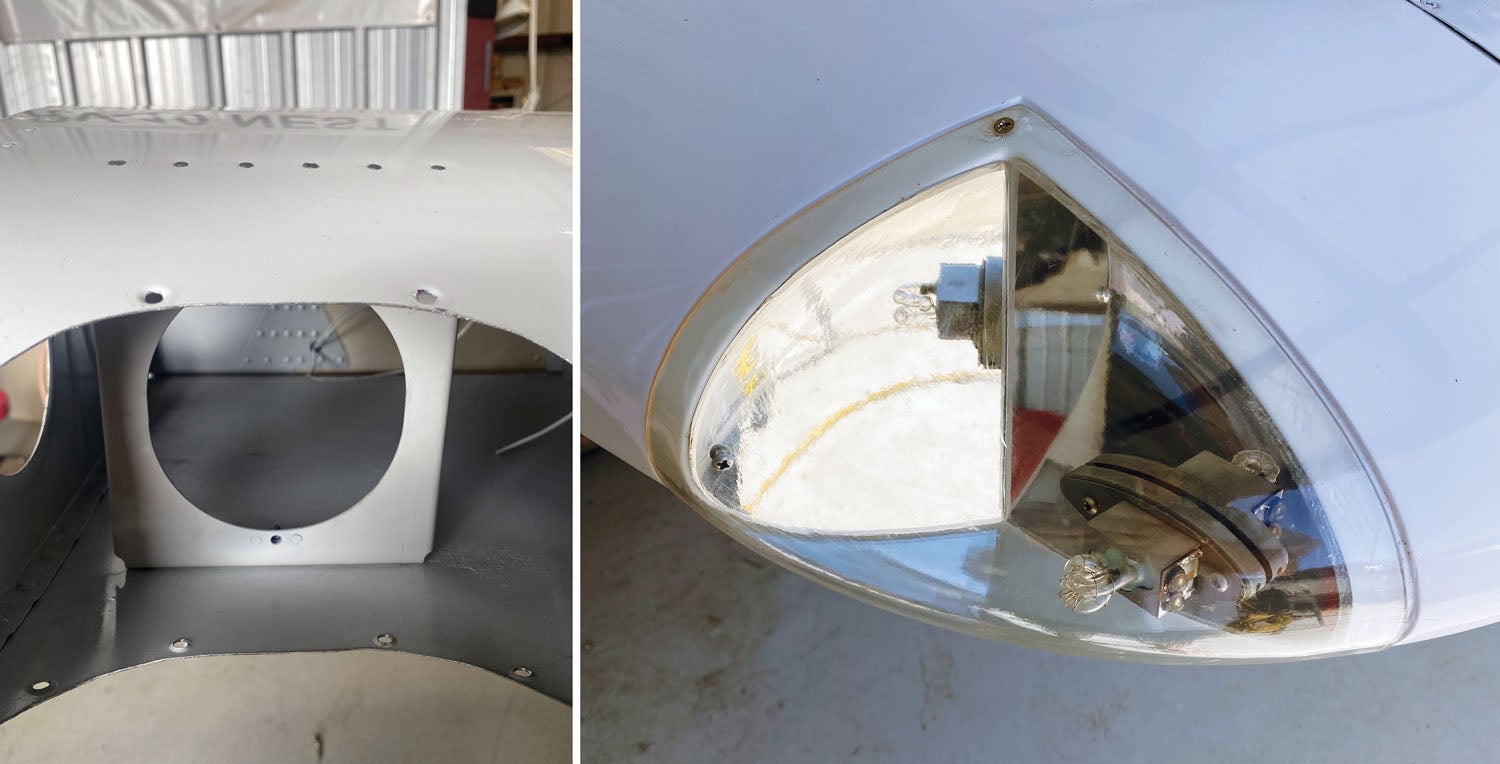
Mounting the Seven Stars to the bracket face required another compromise. The fixture has tabs with screw holes on opposite ends, with one tab incorporating the wiring connections. Mounting vertically works but leaves little space for the wire connections and makes for difficult access to the mount screws through the opening. Mounting horizontally put the screw holes wider than the bracket face. Mounting a wider plate to the bracket would be one solution, but I decided to mount on a slant, putting the top and bottom pairs of lenses parallel to the wing spar. This option gives easy access to both the wire connections and the mounting screws.

Wire It Up
The good news is that the original wiring for the previous lights works fine for the landing light. The bad news is that the taxi option requires separate wiring and switching. And while I ran five extra leads of various gauges the length of the fuselage, I didn’t run any extra leads out to the wingtips. (Take note, builders.) Fortunately, I did include a couple of runs of high-strength dental floss as fish leaders, and it worked perfectly for running the taxi circuit wire through the snap bushings in the ribs. That completes the process for the wing.
Turn It On
One of the realities of utilizing the taxi option is that separate circuits require separate switching. It would have been easy if there were switch breakers with three position options, but I couldn’t find any and was told repeatedly that none existed that would mount into my traditional Van’s switch bus setup. I also didn’t have any panel room for a second install next to the first. (Another note to builders.) Several different options existed, but in the end, the least undesirable to me ended up being leaving the primary switch breaker in the panel and using it for circuit protection and to power a second, three-position switch installed remotely on my lower panel. A compromise, but at least I can now toggle between taxi and landing position without removing my hand from the throttle.

Glorious
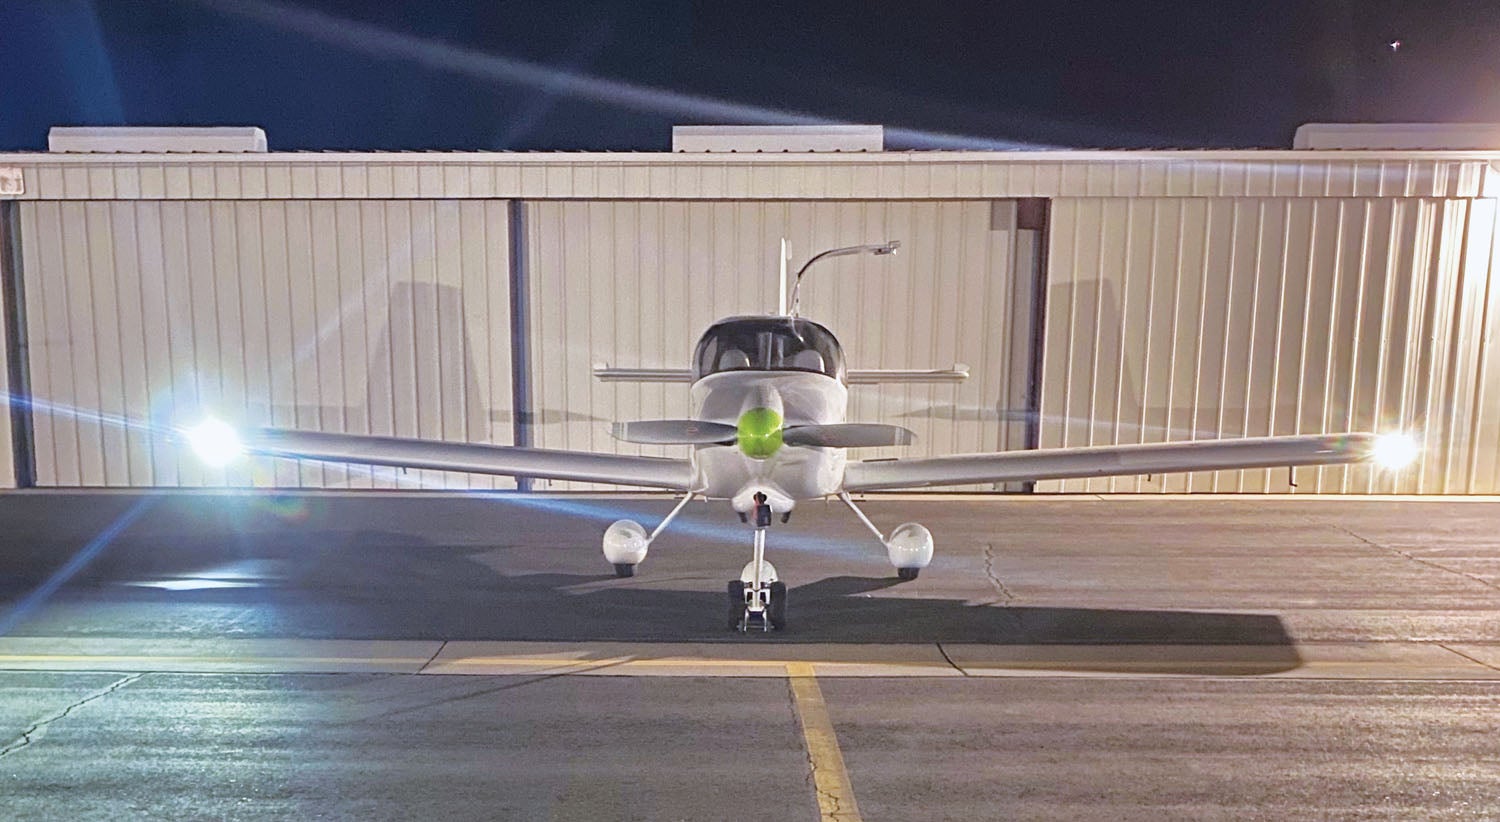
Any frustrations encountered by the installation process were quickly forgotten the first time I powered the lights up. Wow! Even the taxi-only option is more illuminating than the old original lights, and the full option is airliner level. Consider me an impressed and, assuming the system proves as durable as it appears it should, happy customer.


FlyLEDs are available directly from Paul McVitty in Australia, but also available directly from Blake at U.S. based http://www.flyboyaccessories.com. Same products, same team, same great service, just slightly faster shipping to U.S. addresses.
Comments are closed.