Control cables are overbuilt parts. They have to be. When a cable connects a stick grip or control wheel to a critical flight control, the safety of the airplane is at stake. Fortunately, aircraft-grade cables are more than up to the task.
Cable-controlled systems aren’t as common in homebuilt aircraft as they are in production-line machines for a variety of reasons. Designers like to keep things simple, and cable designs tend to have a lot of extra parts compared to a pushrod- or torque-tube-based system. Even so, the vast majority of the popular homebuilt designs use control cables somewhere in the scheme, most often for rudder control.
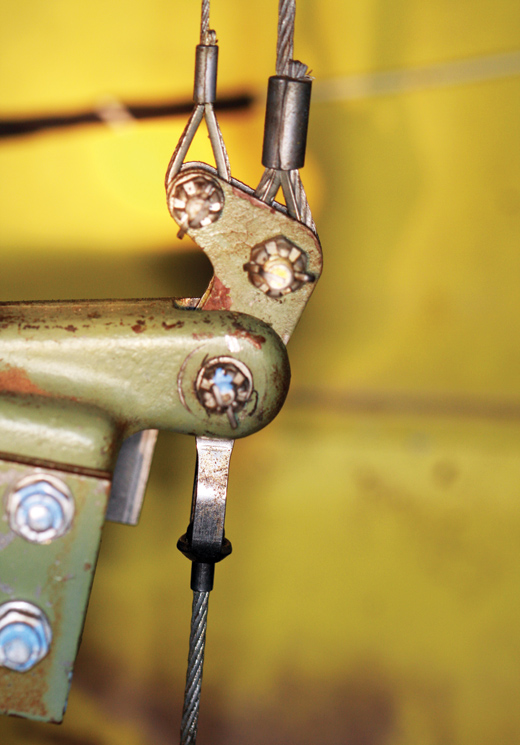
How strong are those cables? Each aircraft-quality 1/16-inch galvanized steel cable is manufactured to a minimum breaking strength of 480 pounds—strong enough to lift all but the most powerful aircraft-engine assembly. And that’s a size smaller than is normally used for the rudder.
The primary control cables are typically 1/8-inch diameter 7×19 cables. These have a minimum breaking strength of 2000 pounds if made of galvanized steel, 1760 pounds if made of stainless steel.
Stainless-steel cables are used in place of the galvanized steel cables in hot, humid parts of the world, where the potential for rust is elevated, and in airplanes that operate on floats and/or near salt water.
Stresses on control and trim cables are low because the resistance-to-movement forces are slight: the bearing or bushing drag at the wheels, the bellcranks and actuators, the friction drag at the axles of pulleys and fairleads used to change cable run directions, and the force required to overcome aerodynamic forces at the control surfaces and tabs.
The forces are so slight that there might have been a MacGyver episode where the clever TV hero removed all of the primary control cables from his crashed airplane, bolted them together into one long line and used it to lasso a busload of Third World orphans seconds before they toppled to certain death in a toxic waste dump filled with hungry alligators and piranha. The cables would have been up to that task.
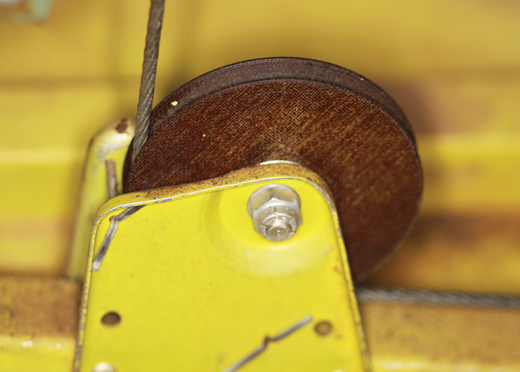
Pulleys are used for control cable changes of direction. The cotter pin installed in the pulley bracket prevents the cable from moving out of position (out of the groove in the pulley). It’s called a cable guard.
On the Plus Side
Aircraft cables are classified as non-flexible, flexible and extra flexible. As far as I know, only extra-flexible cables are used in light aircraft control systems; the others are too stiff for the direction changes required during cable routing.
Extra-flexible aircraft cable is tough and strong, requires little periodic maintenance, is easy to cut, readily available, can be terminated with a wide range of ends, can be worked on with field tools and is relatively stable with regard to temperature. Cables are steel (or stainless), so they aren’t as light as the wiring in electrically controlled trim systems, but the weight penalty is offset by the fact that there hasn’t been a case of runaway trim (an emergency checklist item in electric-trim equipped airplanes) in a cable-controlled trim system.
A Typical System
For those homebuilt designs—typically high-wing aircraft where a pushrod roll system isn’t quite feasible—a normal aileron control system consists of three cables. Two are called direct cables, and these are routed from ears on the control stick, or from drums that are rotated by the control wheels, to the left and right bellcranks mounted in the wing structure near the ailerons. The third cable is called a carry-through (or balance) cable and connects the other side of both the left and right aileron bellcranks. These three cables form a closed loop.
The loop configuration is easy to understand with a control stick, but it’s a little more difficult to see with control wheels. Here’s how one major light plane manufacturer did it. The left and right control wheels are synchronized by being tied together with a length of extra-flexible aircraft cable that is terminated at each end with an AN 664 single-shank ball end. The ball ends fit securely into little depressions in the left and right control wheel drums before being wrapped for one and a half turns around each grooved drum. The left and right direct cables are wrapped around these same drums (in different grooves) and terminate at ball ends that are locked into position in depressions on the drums. Each direct cable is wound around its respective drum for one and a half to two revolutions before it’s routed to the bellcranks. The drum tie-together cable, along with the direct and the carry-through cables, close the loop between the control wheels and the ailerons. Every cable-controlled flight-control system is made of loops. (And now, perhaps, you see why a pushrod system is so enticing to designers.)
Rigging, Tension and Travel
Cable systems are length adjustable through the use of turnbuckles. At least one cable in each loop system has a turnbuckle between two lengths of cable.
The barrel (turnbarrel) of a turnbuckle is a threaded bronze tube that serves as the length adjustment connection between two threaded cable terminal ends. One threaded terminal has left-hand threads, and one has right-hand threads so that when the turnbarrel is turned, both cables screw into or out of it at the same time.
Cable length adjustments are required because control-surface systems need to be fitted for full control-surface travel, neutral stick or control-wheel positioning when control surfaces are in the neutral travel position, married control wheels, correct cable routing and correct control cable tension.
One rigging check is to ensure that both aileron bellcranks hit the aileron up and aileron down stops before the control wheel (or stick) reaches its limit of travel or control stop. Additionally, control surface (ailerons and elevators) bellcranks must be centered in travel when the control wheel or stick is in the neutral position. Finally, the control-cable tension must be adjusted in accordance with the manufacturer’s specifications. Bear in mind, too, that some kit designs may deviate from production-aircraft norms, so always follow the recommendations of the kit manufacturer.
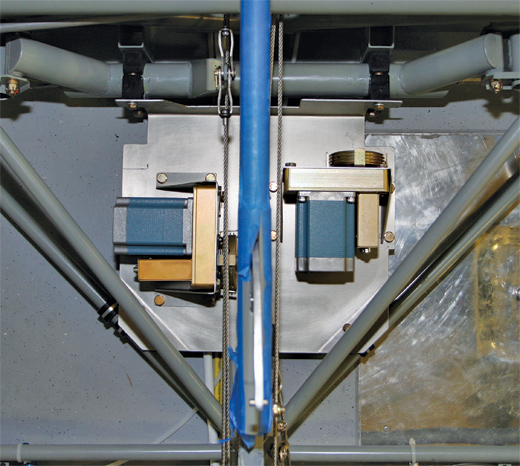
Smaller cables called bridle cables join autopilot servos to the main control cables.
As mentioned, each system is a loop, so all adjustments on one cable affect all of the components in that system—a critical point to understand during control-surface system rigging adjustments.
Let’s look at an example: One day Joe Homebuilder determines that his ailerons are too sloppy, and he decides to tighten up the cables. He finds a turnbarrel in an aileron direct cable and turns it to tighten up the cables. As he turns, the direct aileron is shortened. As a result, the aileron bellcrank will no longer be in the neutral position when the stick is in neutral. The cable tension numbers will go up, but in addition to the bellcrank no longer being in neutral, it’s likely that at least one of the aileron bellcranks will no longer hit the stop in one direction.
Any change or adjustment in one cable affects all other cables (and bellcrank positions) in that control system, so adjustments are always a balance of give and take. If tension is increased in one cable, it will have to be decreased in one or both of the other cables to 1) get full travel at the bellcranks, 2) have correct control stick or control wheel and bellcrank positioning and 3) maintain proper cable tensioning in that system.
Tools and Supplies
You may see reference to a five-tuck Navy splice in an old aviation maintenance book or in a museum (the reddish coloring is the dried blood of the splicer), but they haven’t been used in aircraft production for many decades.
Today’s control cables are formed by swaging the required fork ends, eye ends, stud ends, turnbuckle ends, eye and fork ends, and balls. Aircraft-quality cable assemblies are made to order from well-known suppliers such as Aircraft Spruce & Specialty (www.aircraftspruce.com), McFarlane Aviation (www.mcfarlane-aviation.com) and independent cable manufacturing companies. I found two such companies—California Swaging & Cable Products Company (www.californiaswaging.com) and Lexco Cable (www.lexcocable.com)—during a quick Internet search.
Cables can be made locally using a Kearney M1-K roll-swaging tool, which retails for more than $6000 (used tools are available). To be safe, send the first cable built with the Kearney machine to be strength tested before installing it. If the cable meets or surpasses the cable minimum strength standards, it’s safe to install. If it doesn’t, the Kearney tool needs to be adjusted, or the swaging dies need to be replaced.
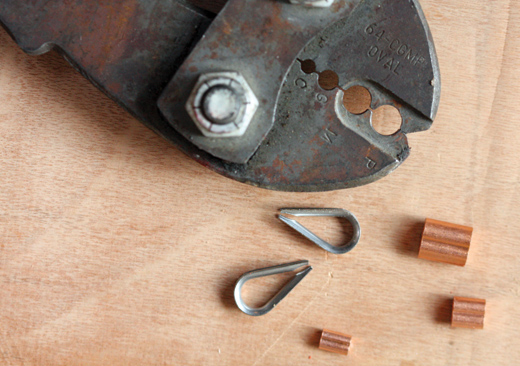
Nicopress sleeves for 1⁄8- and 3⁄32-inch cables, two AN 100 thimbles (for 1⁄8-inch cables) and a 64-CGMP Nicopress crimping tool. The 64-CGMP crimps 1⁄16-, 3⁄32-, 1⁄8- and 5⁄32-inch diameter cables.
Nicopress and LocoLoc
Simple loop end cables and cable splices are made using oval-shaped copper sleeves from Nicopress and LocoLoc. Tools required to properly compress the sleeves range from a simple two-part, bolt-together tool that retails for less than $20 to a compound leverage Nicopress tool that retails for just under $300.
The one tool that must be purchased to set the tension on cables is a tensiometer, which ranges in price from $200 to $750. I’ve been using the less expensive Burroughs cable gauge for years, and it’s been satisfactory for small aircraft work.
When turning the turnbarrel (threaded bronze center part) of a turnbuckle, the two threaded cable end terminals must be simultaneously prevented from turning. There are tools for this, but I’ve found that a piece of a wire coat hanger, bent and inserted into the holes in the threaded terminals, works fine to prevent the cable ends from turning.
Earlier I mentioned that cables are stable over a large temperature range. It’s common for this temperature effect to be accounted for in the cable tension limit table supplied by the airplane manufacturer. For instance, the elevator cable tension Cessna specifies for its 4000-pound maximum takeoff weight (MTOW) 210 is 30 pounds +/-10 pounds at the average temperature for the area where the plane is flown.
Inspections
Cables don’t get inspected as often as other control-system parts such as bellcranks, actuating rods and rod end bearings, bushings and control-surface actuation arms. But they must be inspected for wear, especially the area of the cable that is re-routed around a pulley. The only way to inspect a cable at a pulley re-route is to disconnect one end of the cable and pull it clear of the pulley.
The most common cable inspection technique is to wrap a shop towel around the cable and slide it over the length of the cable. Broken strands require replacement of the cable. These strands are hard to see when the cable is straight, so a common inspection technique involves bending the cables and using a magnifying glass for a close-up inspection. Hidden internal breaks can often be detected by the sound when the cable is flexed.
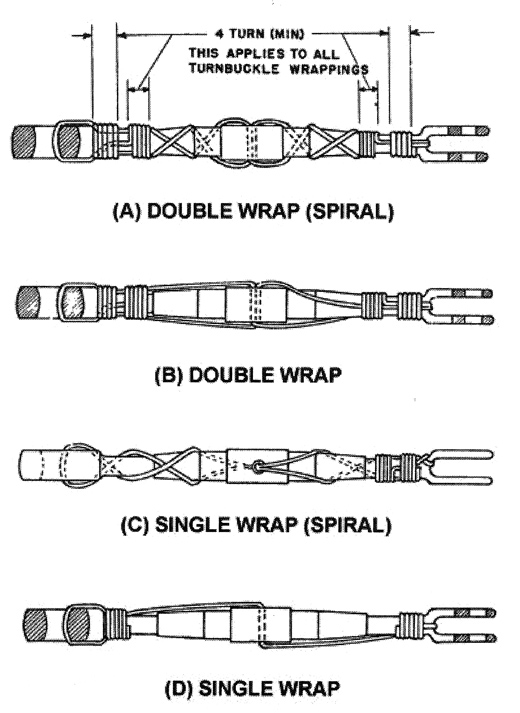
These are the four methods of using safety wire instead of spring clips to safety turnbuckles.
Turnbuckles and Safetying
The turnbarrel is available in 2½- and 4-inch lengths. Turnbuckles must be safetied to prevent loss of cable tension, and there are various methods. The modern method uses clip-locking turnbuckles that are locked with snap-in spring clips.
Turnbuckles that aren’t manufactured to accept the spring clips must be wrapped with safety wire to prevent rotation. There are four accepted wrapping schemes—double wrap (spiral) or double wrap, single wrap (spiral) or single wrap.
Each of these wrapping schemes prevents the turnbarrel from turning by threading one (in the single wrap method) or two (in the double wrap method) lengths of safety wire through the center hole in the turnbarrel before threading the remaining wire through the cable terminal and securing each end. To do a single wrap safety, adjust the length of the safety wire so it’s centered in the center hole. Bend one end 90° at the barrel and thread the end through the cable terminal, and then bend it back toward the turnbarrel. Pull the slack out of the wire before wrapping it around the turnbarrel/cable terminal junction area at least four wraps. Do the same at the other cable terminal. Double-wrap schemes use two wires, but the procedure is otherwise the same. The main difference is that each wire is captured under the other wire during the wrap sequence. Spiral wrapping looks like it should be more secure, but it isn’t, so it’s not as commonly used in the field.
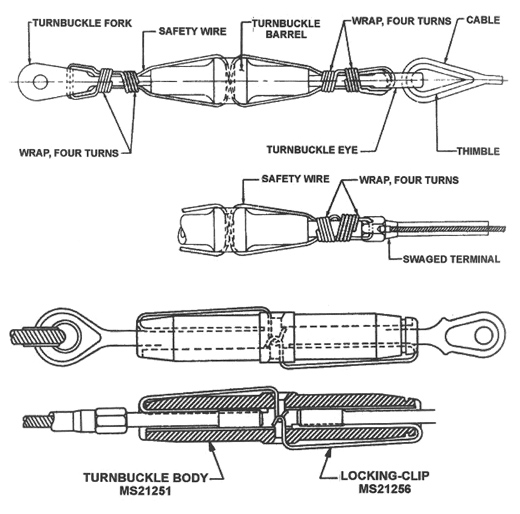
The safety wire double wrap (top two illustrations) and the locking clip methods (lower two illustrations) of safetying turnbuckles.
Tips
When checking and/or adjusting the elevator up cable and down cable tensions, support the trailing edge of the elevator on a ladder or bench so it’s in a neutral position.
Make sure you’re taking the system tension reading on the correct cable. In Cessna single-engine aileron cable systems, system tension is taken on the carry-through cable only; taking a tension off of either direct cable will yield a false reading.


