In spite of your best efforts and intentions, you need a component that you just cant make. It happens. But the concept of going to the local machine shop scares you silly, because you think they’ll laugh at your trivial parts and crude drawings, and when they can do it, the cost will leave you feeling like a cheapskate who should know better than to play with the big guys. Well, we’re going to assuage those fears and see what we can do to lower the cost.
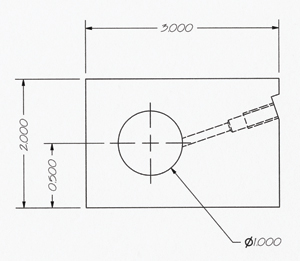
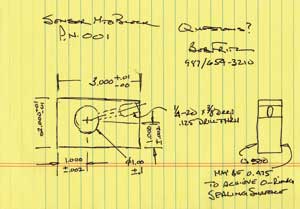
First and foremost, you must have a good drawing. Now that does not mean you have to stay up all night learning a computer-aided design (CAD) program. It does mean the drawing should be readable. If there’s something missing, your machinist will need to spot that problem and solve it with a simple phone call.
To that end, Ill give you some dos and don’ts:
- Do make the text large enough to be easily read even when its smudged with lubricants.
- Do make your lines high contrast and sharp.
- Don’t use light gray or blue colors. They don’t fax or copy well.
- Don’t even think of using yellow as a line color. It’s low contrast and near to invisible on white paper.
One of the other elements, often overlooked, is part numbering. Don’t spend all afternoon on this. Call it 001 if you want to, because no one is going to be impressed if it has some complicated number such as 21A-31255/C. In fact, thats noise in the system.
Similarly, give it an obvious name: Tailwheel bracket is fine; Part One is not. Somebody else likely beat you to it and, believe it or not, the guy in the shop really enjoys knowing what its for. If he’s a reader of this magazine, he may even invite you to chat over a cup of coffee.
What you want it made of is important, of course, so be as specific as you need to without going off the deep end. Example: Material should be 6061 aluminum. If its to be a component that is frequently whacked by stones, you may want to add T-6 (T-0 is dead soft, T-6 is very hard) to that specification. If you’re going to be welding on it later, don’t bother with the T designation, because the heat of welding will destroy the hardness anyway, and T-6 costs less than T-0 simply because its the standard.
What finish do you want? Cutting metal usually leaves small burrs. Hand deburring is expensive, so small parts-up to the size of a baseball-are frequently tossed into a tub filled with abrasive stones and left to vibrate. When the part comes out it has no burrs, but the surfaces are dull and not pretty.
On the other hand, if you want snazzy looking parts, tell the shop that you want it to look nice. The machinist will give you something thats really pretty, and it wont cost a fortune. Surface roughness is designated in a fairly arcane fashion such as √125 or similar. Don’t worry about how that is derived, just know that √8 is almost a mirror, √32 is typical of CNC, and √500 is a raw casting. Tell the shop what its for and you’ll get a nice item.
If you do need a razor-sharp edge somewhere, say so and wear gloves to handle the parts. I could show you some dandy scars where stitches were required.
If possible, use CAD to create the drawings, especially if the part has depth to it, that is, its not sheet metal. The web site www.Alibre.com is a source for a first-class, free CAD program.
Remember to print out the drawings. Sending a file to the shop and having them convert it to a machine language (usually G-code) is a good timesaver, but when you visit in person you should have the drawing in hand along with a red pencil for discussion.
Another don’t: Don’t design a part on CAD and then alter the dimensions without letting the physical appearance come up to date. The reason is that CAD implies perfect scale; without this, it really throws the eye all to whack. Obviously, with drawings done by hand, the dimensions rule. Still, try to stick to a close approximation.
How Close Is Too Close?
Having done all this you’re getting ready to run to the shop, drawing in hand. Stop. There are a couple of places where you can save a bucket of money. The biggest one is on tolerances. You don’t have to learn geometric dimensioning and tolerancing (GD&T) to take advantage of the savings. Just don’t make anything more precise than it needs to be. Example: Joe Engineer walks in with a drawing that looks pretty good. Its on professional paper with the title block down in one corner, and it’s clean and clear with sharply drawn CAD lines. When Joe gets a quote on it, though, he explodes faster than a string of firecrackers in a Chinese New Years parade!
It seems Joe didn’t offer any guidance as to what was important, so everything was made to block-tolerance, which seems innocent enough. But let’s assume you dimensioned your tailwheel mount to three decimal places and offered no other clues. With a typical generic-block tolerance this means every dimension must be within 0.005 inch for our example. However, the only features that really need to be that close are the holes and the slot for the wheel. But you would be paying for every surface to be machined when, if you had simply said that the outside dimensions are to stock material thickness, you would have gotten the pretty finish you want, and it would likely have been within 0.005 inch. The computer numerical control (CNC) equipment is better than that by far. Its just that you wouldn’t have been buying inspection and a guarantee.
In a much earlier installment of this series I spoke of threads and explained that they are not all alike. You’ve likely seen a nut that was a sloppy fit even though the bolt and nut were the same specification, say, -28. What was different was that the quality hardware was built to a higher class, and the allowed tolerances were smaller. Class 2 is standard and is just fine for 90% of the applications, so resist putting Class 3 or 4 on the drawing. It adds inspection and thats really expensive.
If at all possible, choose two or, if needed, three flat surfaces and place all of your dimensions relative to them. There are two good reasons for this: First, thats the way the shop will work. Heres the start point, now go 3.200 inches in the X, 1.75 in the Y direction and drill a quarter-inch hole; now move 1.222 inches in the X direction…you get the idea. Second, you’ll avoid tolerance stack-up. Let’s say five holes dimensioned from hole to hole at 1.000 0.005 with the first hole that same distance from the edge, could have the last hole at 5.025 inches. That same pattern with each hole being independently dimensioned from a datum would have each hole at the proper position within 0.005, so the last hole is now at 5.005 inches. Thats a big free improvement.
It might be hard to believe, but with the advent of CNC your main costs are now in insurance, guarantee and inspection. The machines themselves have gotten accuracy and repeatability down to where the first part looks like the last part, and every part is to a tolerance not even dreamt of as recently as 1980.
A Lot Has Changed
When I was in high school (1966) we spoke of blue-printing an engine as a way to get it more horsepower. What we were acknowledging was that the cylinders were made to 4.000 0.005, while the pistons were 3.990 0.005. Theoretically, you could get a worst-case of a cylinder at 3.995 and piston of 3.995, and another set up right beside it with 0.020 clearances. You had to drive the car for 500 miles not exceeding 50 mph and change the oil, and then drive for another 1500 miles not exceeding 60 and change the oil. You were finishing the machining by rubbing the parts against one another!
CNC now makes these routinely to 0.0005 (thats a tenth of the previous tolerance) and even 0.0002 for the best shops. Thats far better than we were doing when we were carefully eyeballing every part, and even then we were still playing mix and match to get optimum clearances. The result is that the owners manual on a new car today doesn’t even talk about a break-in period.
Why the high cost occasionally? For all of the reasons just mentioned! Before, if out of ignorance you asked for something, you might have been challenged with Do you really mean this? Now they just go ahead and do it. It doesn’t cost as much as it used to, but the inspection and guarantee costs are still there.
Design for Manufacturing
Heres where you can be clever. First, think of the process. Just because you can draw something, that doesn’t mean it can be built, or at least that it’s the cheapest way to achieve the goal. Let’s go down a checklist of design issues that add to the cost.
Consider endmill tool paths. They cut a sharp corner at the ends, but a radius up the sides of the tool. Therefore, design your part to avoid sharp inside corners unless that happens to be both necessary (usually not) and tolerable. Sharp inside corners are stress concentrators and just might be the weak link, they’re hard to keep clean and dirt can be corrosion inducing, and its much easier to machine a small radii into a corner rather than making it sharp/square.
If you have to fit something square into a pocket, put a circular relief into the corner.
When you specify a corner radius, make it a bit larger than the fractional size of endmills. For instance, a radius cut to 0.250 would be fine. However, the endmill comes as 0.250, so make your corners 0.270.
The reason for this is that when the tool is moving in a straight line, it is cutting a consistent depth, but when it comes to an inside corner and abruptly changes direction, there is a short period where the cut is extending around the endmill. This change in total load and net direction of that load causes unwanted deflection of the tool with the result being an unsightly finish.
If, however, you let the endmill cut a radius larger than that of the tool, the direction of the load will change gradually as the line of contact rotates around the side of the endmill. This eliminates the momentary pause as the tool stops its motion in one direction and takes off in another, and the result is a nice, clean continuous cut.
Limit the depth of the cut to about four times the diameter of the endmill. Unlike a drill bit, an endmill typically is using the side of the tool to do the cutting. More than 4L/D means that the endmill will flex, causing the finish and tolerances to go all to pieces.
If you must have something like this, try to design it in several parts that you can bolt together.
Similarly, limit the depth of drilling to about five to one. That is, don’t expect the machinist to easily drill a 0.250-inch hole beyond 1.250 inches, and even thats pushing your luck. The reason is simply that the chips will clog the flutes of the drill and either push it off the straight path or, worse, break the drill. They can do it, but it requires whats called peck drilling, which is just what it sounds like.
Tapping? Same idea, but take a look at a typical nut, any size, just go get one. It has only about five to six threads. Any more than that and the bolt will break before the threads will strip. The rule of thumb, then, is that the depth of the threads needs be only about one and a half to three times the diameter of their diameter. Example: You want to tap a hole -28. So 1.5 x 0.25 = 0.187 of threads; 28 tpi x 0.187 inch = 5.25 threads. That doesn’t sound like much does it? Go look at that nut again.
If you must get around this, one dodge is to put the threads on the far side of the material, and then drill the near side for clearance using a really long bolt. Another advantage to this technique is that the screw, when inserted, has a long passageway lining it up, so you can forget cross-threading problems. Keep it simple.
Think Ahead
Although CNC is capable of making incredibly complex parts, it’s not always advisable. For instance, say I send El Supremo Machining a casting for which I paid a couple thousand dollars. It needs a minor modification, say a boss machined off, so I decide to engrave my initials into it at the same time. No extra cost? What happens if someone misreads REF? Or add a bit of smudge on the drawing, or some beers at a Friday lunch and it comes back to me FER. Ill have a problem insisting that the shop that charged me $200 for the job should now put out $2000 for a new casting. That seems extreme, but it has happened…and worse.
Applying the KISS principle throughout will save you a lot of money on programming time as well. For instance, don’t machine all the surfaces on a casting, just those that directly mate to another or need a beginning surface for measurement or starting a hole.
Design your part to be held in a vise or, failing that, held as easily as possible by bolts and clamps. If it’s a curved surface, your shop will likely machine a set of jaws that fit opposing curves, so give them those surfaces. No good opposing surfaces? Can you add a couple of holes for bolting it to another plate? Then that plate can be clamped in the jaws.
Another alternative is to hold the parts with double-sided tape. But it won’t work on materials that require flood cooling, such as steel, and its not a good choice unless the part is thin and has a lot of surface area for the tape.
Have you noticed that I keep advising you to work with the shop? Thats because good machine shops want to help you get your parts out the door inexpensively. If they have to go to extremes to make your parts, you wont buy a lot of them. But if they can show you how to get a great item for a lot less money, they have a regular customer. So admit to what you don’t know, get their help in locating and eliminating the takes special tooling features, and make this a partnership. Come to think of it, that applies to your own machining endeavors as well!
Finally, if you want to keep the cost down, consider that you may have a good solution to a problem other builders have faced. One part might cost you $250, and 10 of them only $450. Go sell the other nine on eBay for $50, and yours is free.
This last idea is sufficiently intriguing that next time we’ll take a look at extending your own shop into the world of CNC. No, Im not kidding. You can buy a brand new CNC four-axis mill for less than $10,000. And while I know you’ve heard this before, that’s a lot less than the first-years depreciation on a new fishing boat.
Editor’s note: If you have specific questions for author Bob Fritz, or if you have certain projects you’d like us to cover, email us at [email protected] with Home Machinist in the subject line.

