Like most people, I spend a lot more time worrying about and taking care of my airplane’s engine than its wheels, brakes, and tires. In fact, I really don’t like working on the rolling parts much at all because they require me to bend over, something that is harder to do than it used to be—and I always get dirty. That said, brake, wheel, and tire problems can send you into the weeds (or worse) if they aren’t properly maintained, so let’s look at what it takes to maintain them well.
The easiest part of keeping them in good shape is to take a look at the tires and wheels during your preflight check. Be sure to watch the tires as you pull your airplane forward so you can see all the way around them. At this time, you should also be looking for any signs of leaking brake fluid. Any wear that goes below the grooves on a tire is cause for replacement, and any deep cuts or tire cord showing calls for immediate attention. Visible brake fluid on the ground next to a wheel is likewise cause to park the airplane and fix the problem before the next flight.
Wheel and bearing conditions are harder to evaluate on an ongoing basis, but they should be on your condition inspection checklist or any time you hear odd noises coming from the wheels while taxiing. Let’s look at each part or the rolling assembly in turn for maintenance and repair tasks.
Tires
It is not unusual for the main tires to last 3-400 hours on most planes and the nose tire to last twice that. Tailwheels, on the other hand, rarely enjoy such a long life. Especially on trikes, it is easy to get in the habit of simply ignoring the tires because of their relatively long life expectancies. This is risky, because one bad landing can ruin a good tire. Tailwheel or nosewheel shimmy can similarly wear out a tire before you know it. If you have a shimmy problem, do not let it go. It is not something that cures itself.
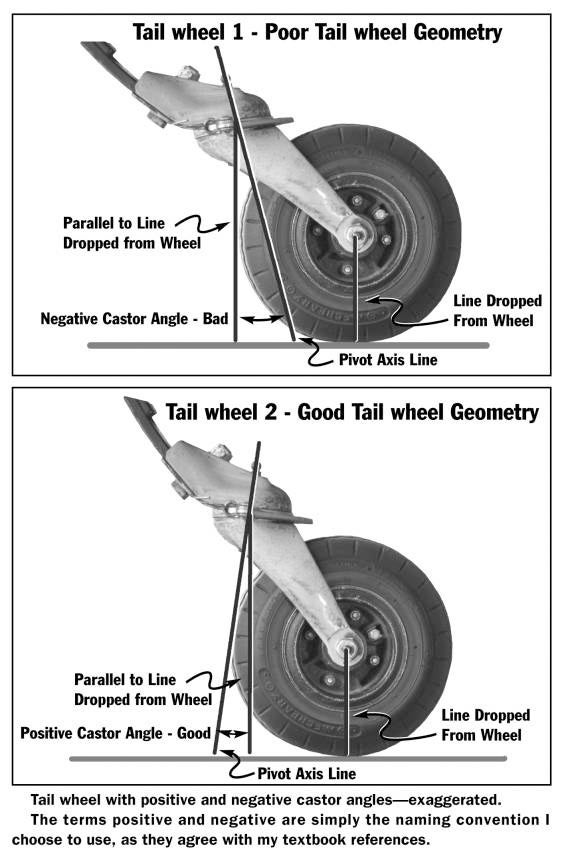
Tailwheel shimmy is usually caused by the angle of the king bolt being set wrong. The angle of the bolt or pin should be such that the top of the bolt is aft of the bottom of the bolt. This creates a positive caster angle.
Nosewheel shimmy is usually caused by the tension on the retaining nut being set too low. It should take about 15-20 pounds of force to get the nosewheel to turn when it is unweighted. See your assembly manual for specific recommendations for your aircraft. Another thing that leads to nosewheel shimmy is landing with too much weight on the nose. Always try to land on the mains first with the nose in the air. Checking the amount of force it takes to move your nosewheel should be on your condition inspection checklist. An inexpensive fish scale is the easiest way to do this. Severe nosewheel shimmy can not only eat up your tire but can cause major damage to your nosewheel pant. Don’t ask me how I know this.
Main tires, in a perfect world, wear out evenly after several years of reliable service. However, in the real world locking up brakes, running over objects, or less-than-perfect wheel alignment may cause premature wear. Some planes like to wear out the outside edges of the main tires first. GlaStar owners see this often. To get some extra life out of your tires you can simply flip the tires on the rims to put the fresh grooves that were once on the inside on the outside. Be sure to do this before the outer groove is completely gone.
When it comes time to replace a tire, you should also replace the tube, unless you have wheels that will allow for tubeless tires. I know tubes are expensive, but old tubes and old tires need to go together. Speaking of getting new tires, don’t be afraid to take a hard look at Desser recap tires. They are good tires at good prices. Many flight schools use them, so they are well-proven. They also have good deals on tubes.
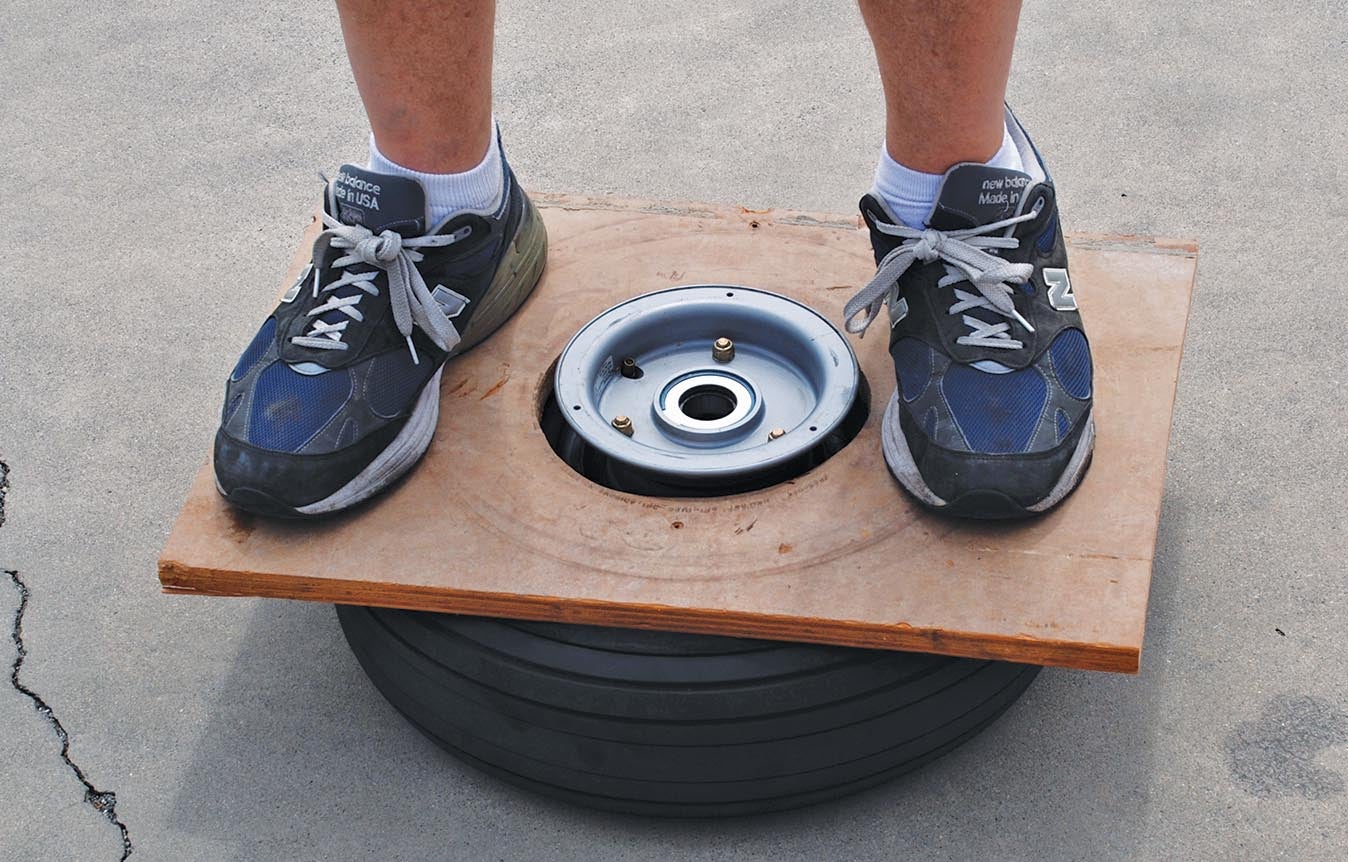
Breaking a tire loose from the wheel can be a chore, but I have a slick and inexpensive solution for you. Get a two-foot square piece of plywood at least ½-inch thick and cut a hole in the center that just clears the outer diameter of the wheel. Let all the air out of the tire by removing the valve stem, then place the wheel with the tire on it on the ground. Center the hole in the plywood over the wheel and then step on the plywood to break the tire bead loose. Steady yourself on something solid to be sure you don’t lose your balance. Turn the tire over and break the other side loose, then disassemble the wheel to remove the tire and tube. Don’t use tire irons to break the bead loose, because they can damage the wheel.
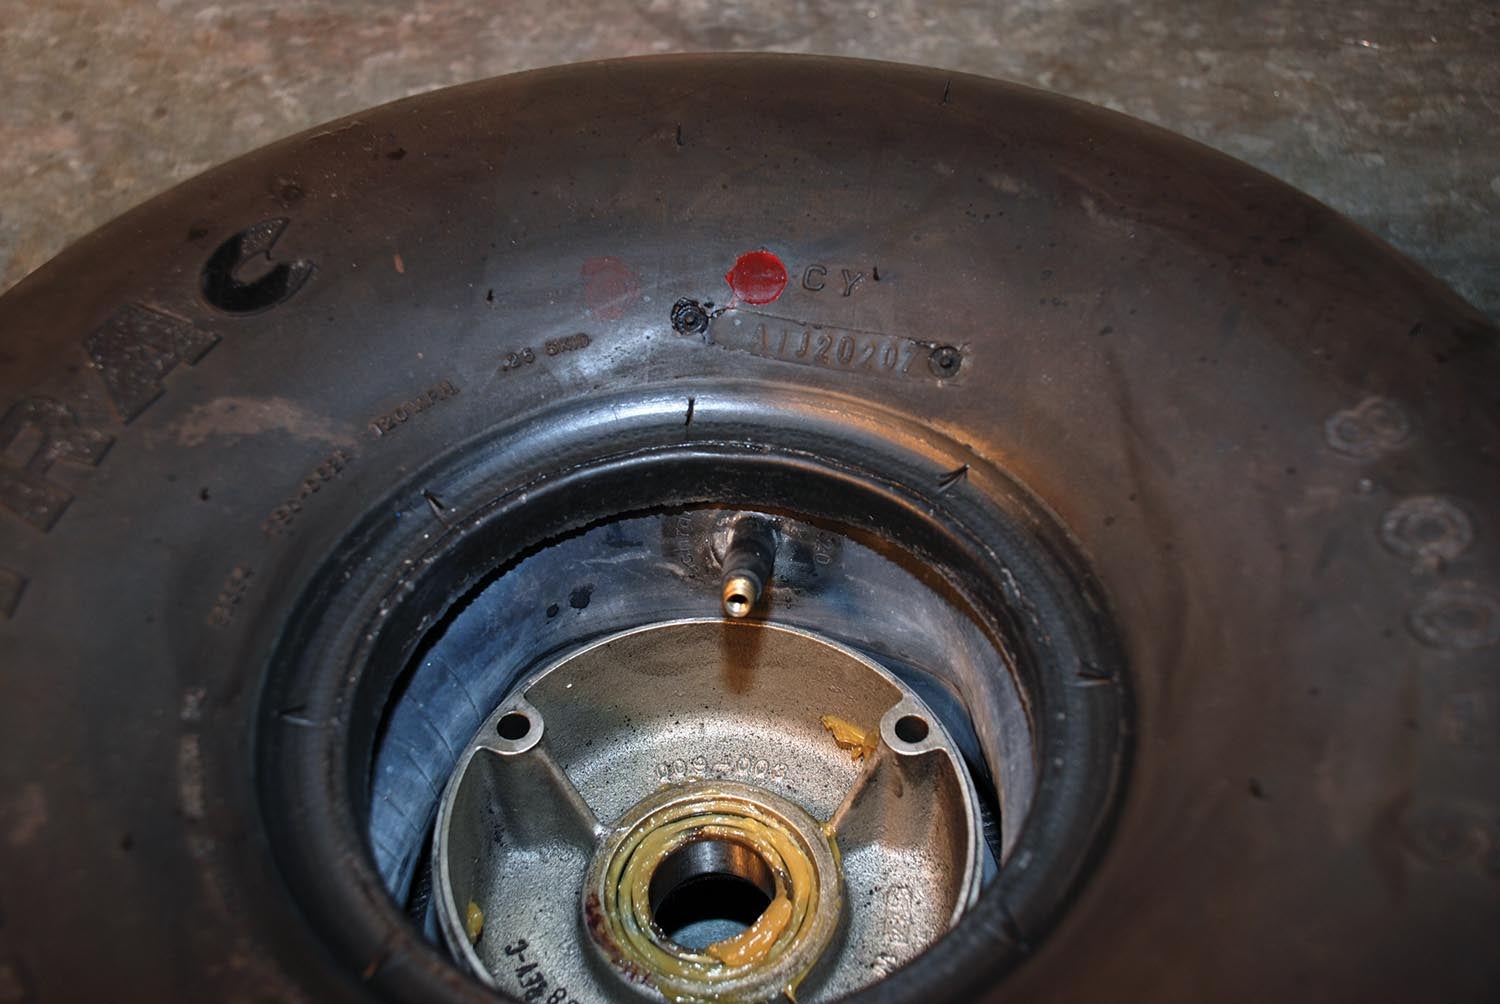
Be sure the inside of the new tire is completely clean and free of debris, then sprinkle some tire talc into the inside. Next place the tube inside the tire with the valve lined up with the red dot on the tire. Remove the valve stem from the new tube and inflate it to seat it into the tire. Next mount the tire onto the wheel and secure and torque the bolts. Lastly, insert the valve stem and inflate the tire to the proper pressure. Most people are running 40 to 45 psi in main and nose tires, but your situation may call for a different pressure. Don’t guess at the number. Find out from a reliable source what to use on your plane.
Wheels
It is easy to take wheels for granted, but a damaged wheel can be a real hazard. Whenever working on tires and brakes always give your wheels a good look. Wheels can corrode, so be sure to keep them dry and ensure the paint’s in good condition. Watch out for cracks or deep nicks on the rims, especially if you do a lot of off-airport work. A cut or nick can easily turn into a crack. A crack can cause a wheel failure, usually at a most inconvenient time—resulting in loss of control of the airplane during landing or some other mishap. A small effort will keep your wheels in good shape for a very long time. Whenever your wheel pants are off, it is a good time to give the wheels a quick check. If you don’t have wheel pants, that look should be part of your pre-flight inspection. Don’t forget the tailwheel. It can be damaged by a rough landing or just taxiing over rocky terrain.
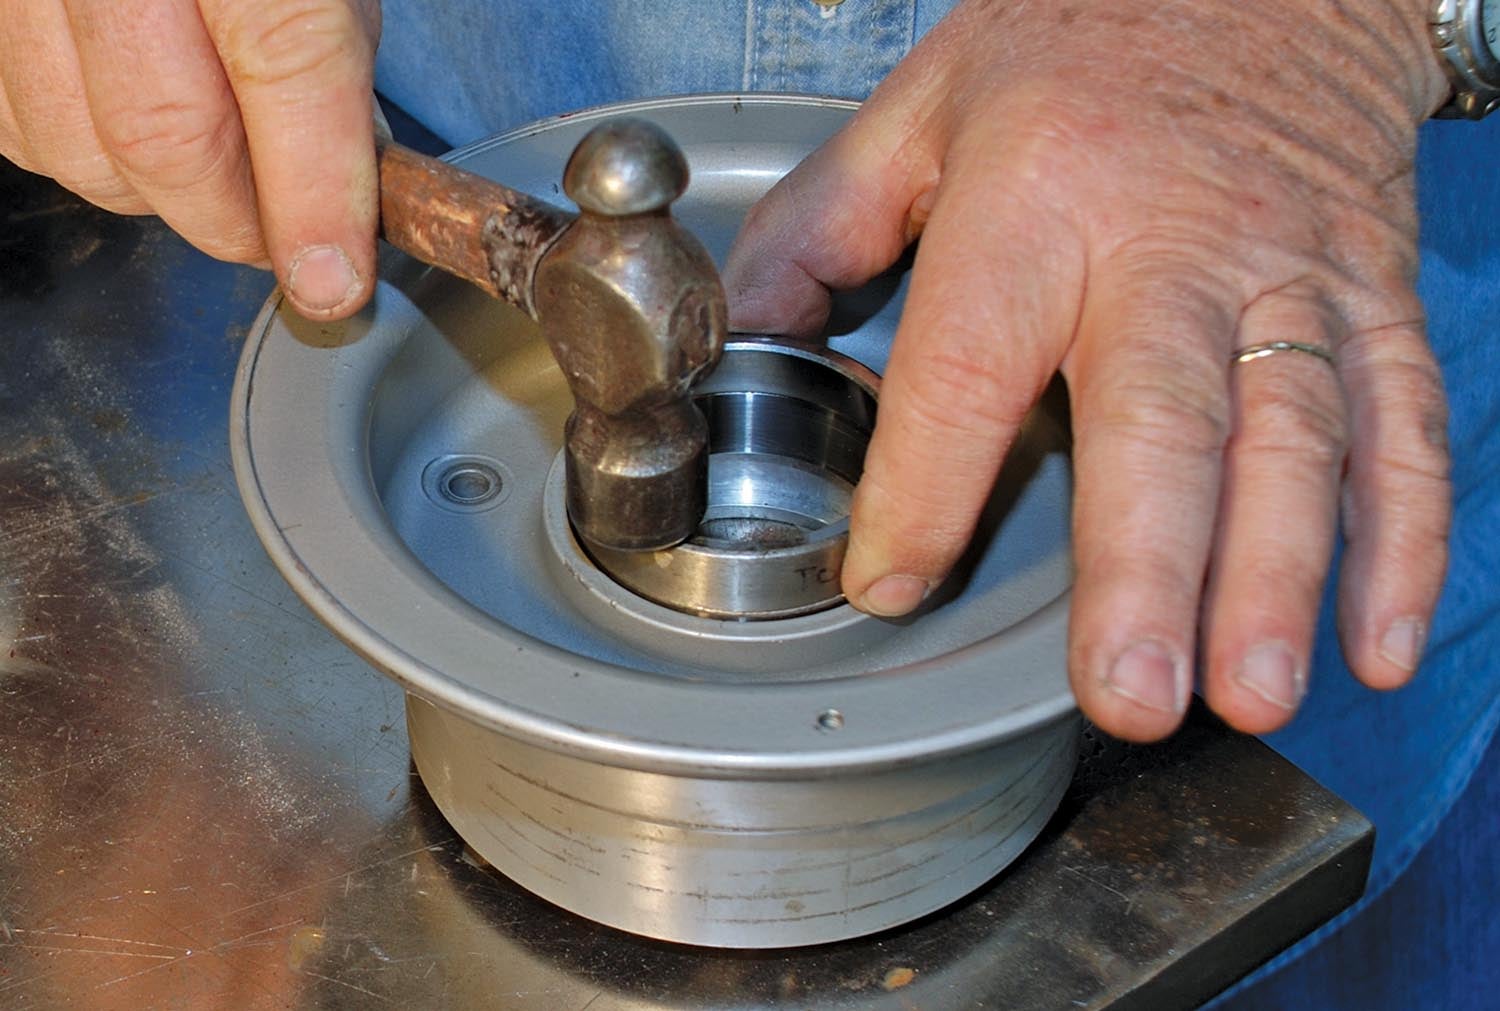
Of course, our favorite part of wheel maintenance is repacking the wheel bearings. If your airplane is only operated in dry climate and is always hangared, you may be tempted, with some justification, to not repack your wheel bearings at every yearly condition inspection. I will leave that to your judgment, but it should be noted that skipping it occasionally is not a great idea and skipping it all the time is a really bad idea. Moisture does find its way into wheel bearings, as do other contaminants, causing damage and eventual failure. Wear disposable gloves when you work on wheel bearings to protect your hands from solvents and to make cleanup easier.

Bearings that show any signs of rust or any damage to the bearing rollers or the races should be replaced. When replacing races, take care to avoid damage to the wheels. A hydraulic press is best for this work, but a punch can be used, if you are careful, to extract an old race. Flip the old race over and tap on it to drive in the new race if you don’t have a press.
Repack cleaned or new bearings with an appropriate grease. The grease that comes with new bearings is a preservative and not for use in your airplane. Aeroshell 6 is a good choice for most light and medium duty applications. Aeroshell 22 synthetic grease is a better choice for aircraft subject to harsh climates or hard use.
When you install a wheel after servicing the bearings, tighten the axle nut until it is snug and then back it off just enough to let the wheel turn freely without any looseness as you try to move it back and forth with your hands. Then secure the nut with a new cotter pin.
Brakes
Assuming there are no leaks or obvious failures of the brake system, our most common concern is brake pad wear. Unfortunately, the brake pads are usually hidden by the wheel pants. Because of this it is important to note the percent wear at each condition inspection and try to project when they are likely to wear out. Or a better strategy might be to replace any brake pads that are likely to wear out before the next condition inspection.
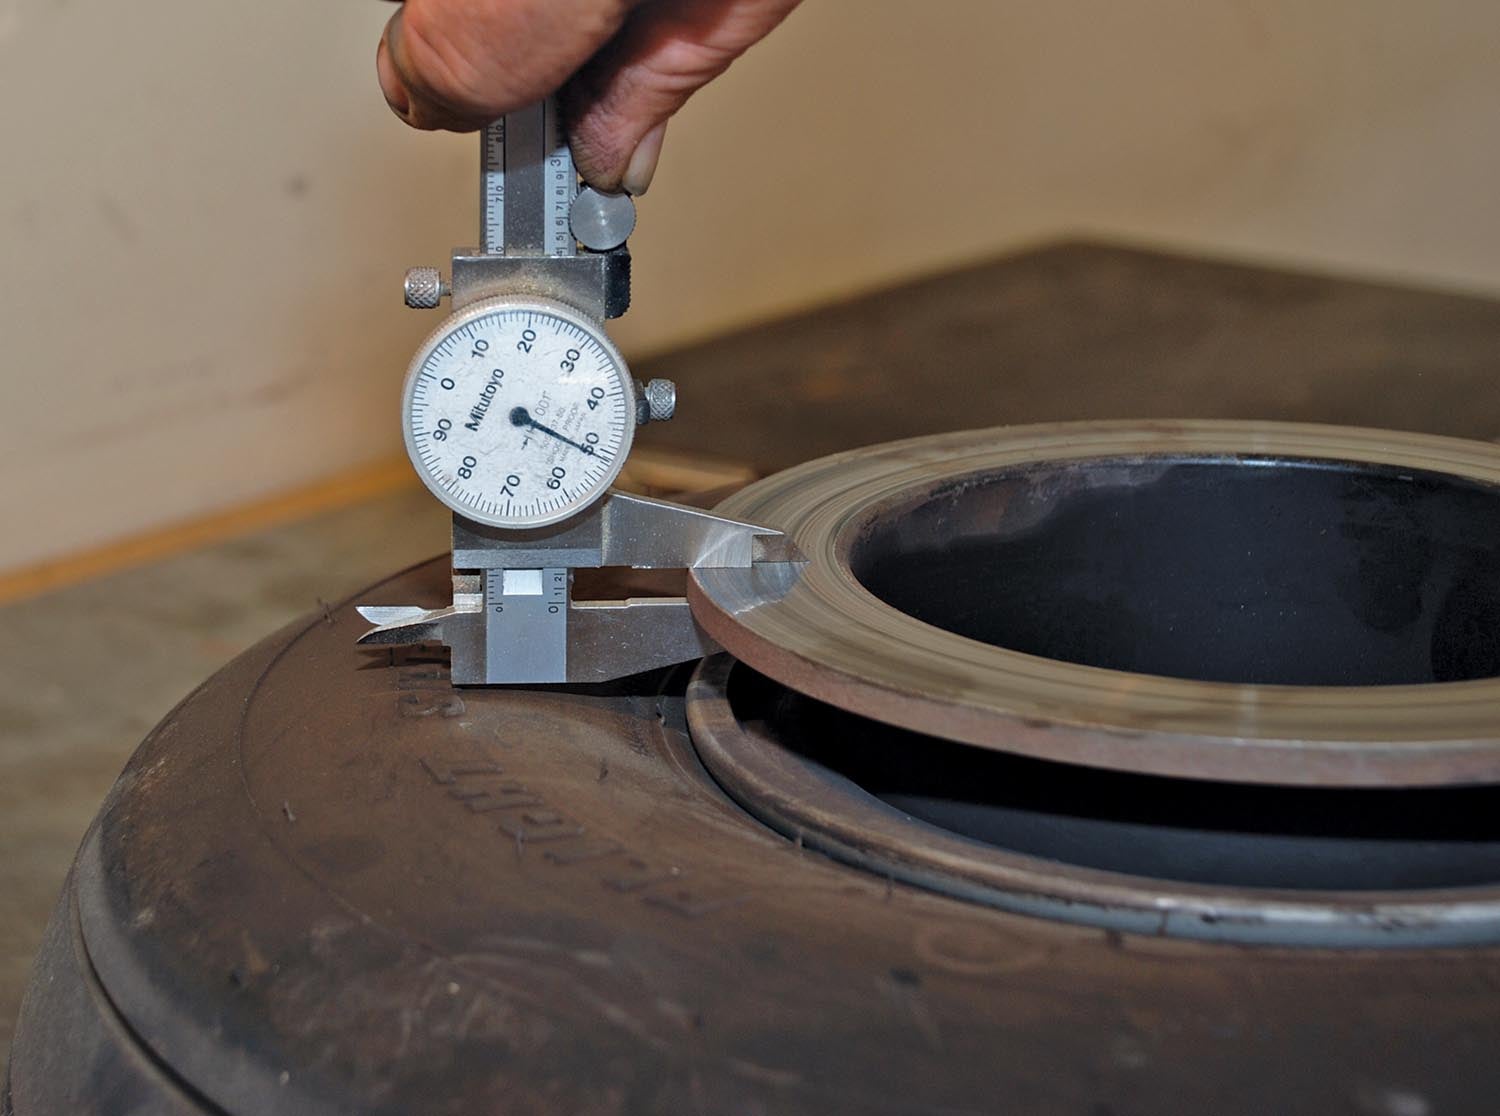
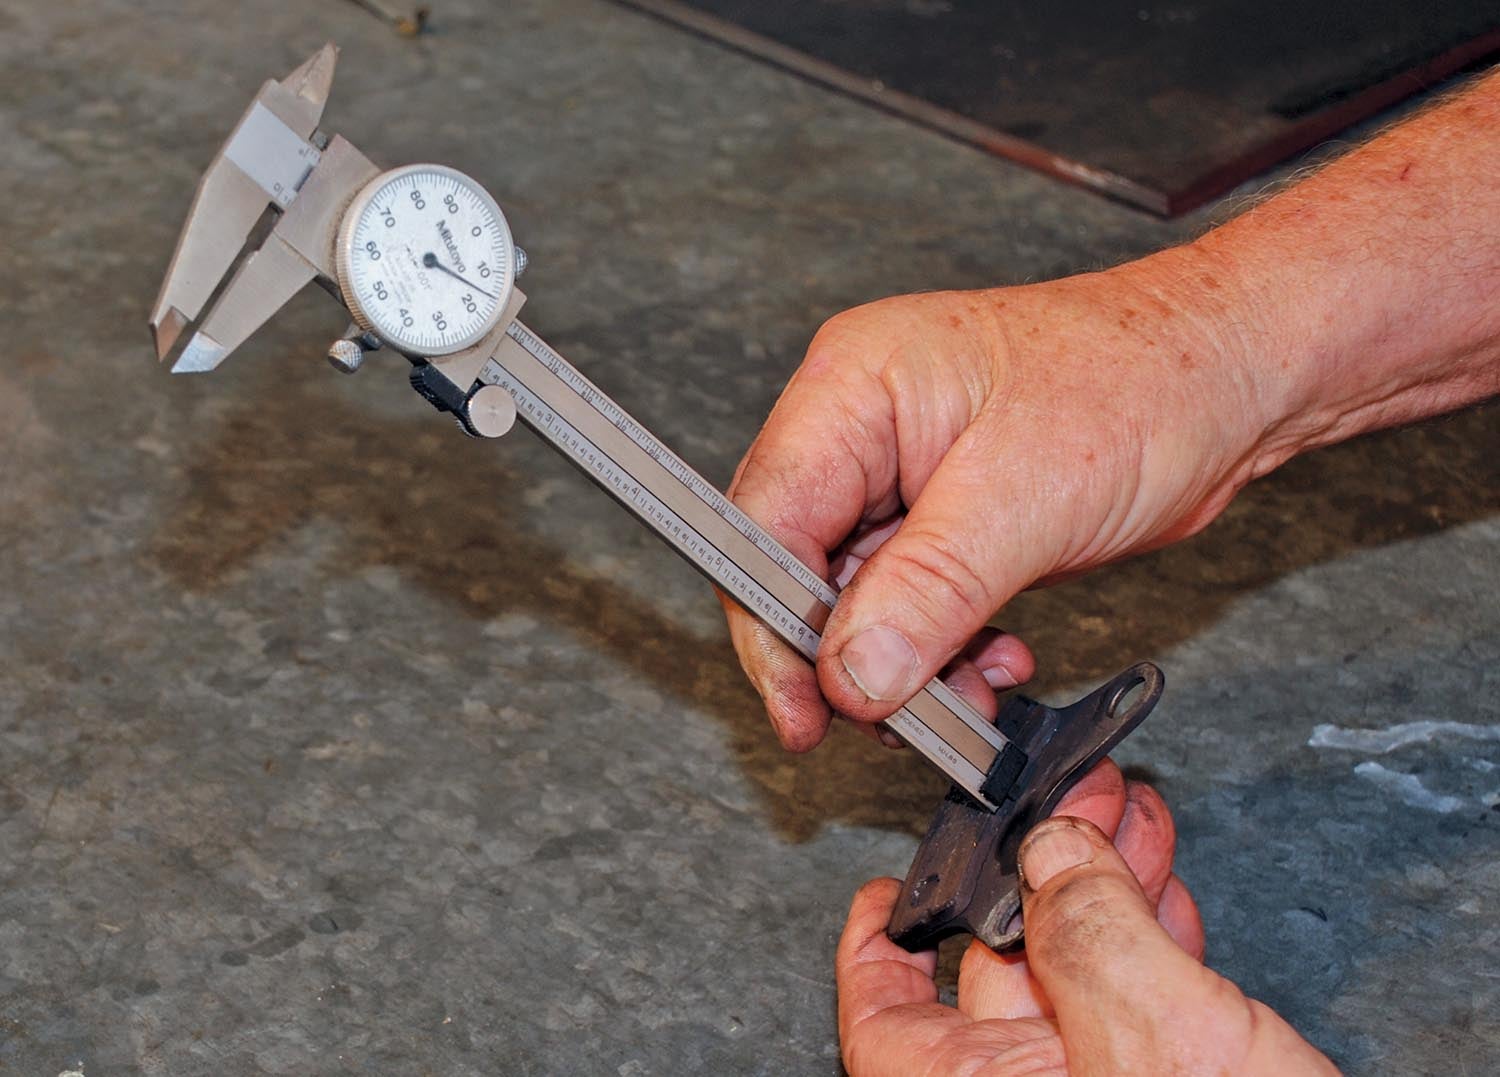
As your plane accumulates more hours, you will need to be concerned with rotor wear, too. Consult your wheel and brake manufacturer for the minimum rotor thickness, and check it with calipers or a micrometer when you do your condition inspection or whenever you work on your brakes. Besides thickness, the flatness of the rotor is a concern. Rotors that are warped or have deep scoring or ridges need to be replaced, as do rotors that have any point below the minimum required thickness. If you have access to a lathe, you may be able to clean up a worn rotor, but watch out for that minimum thickness. Putting new pads together with badly worn rotors is just a waste of money.
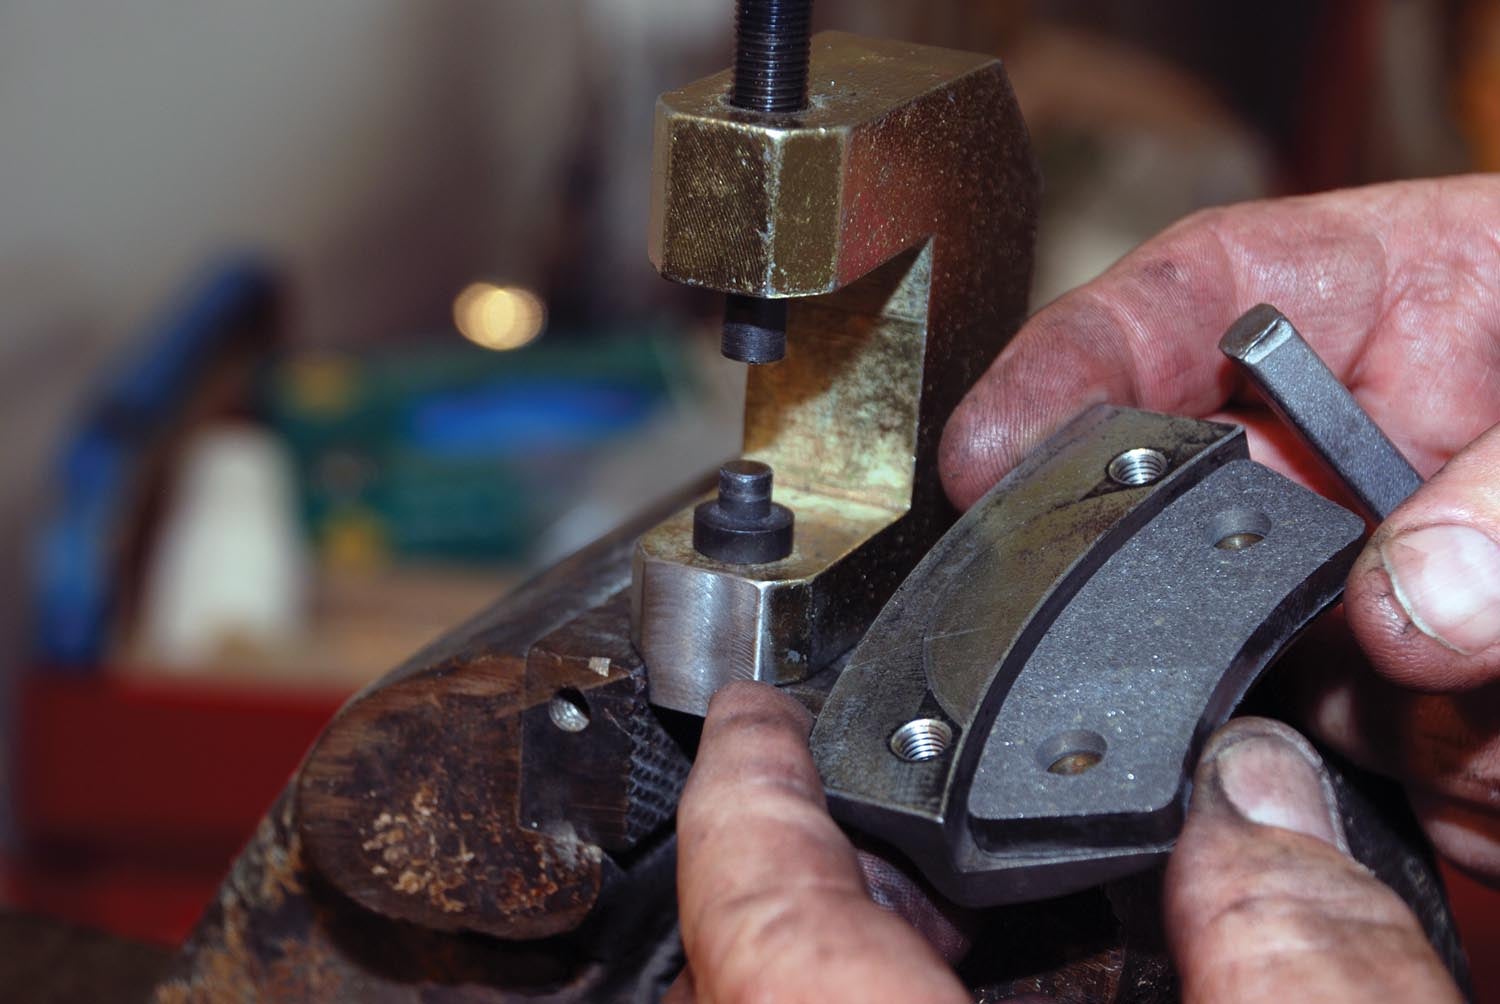
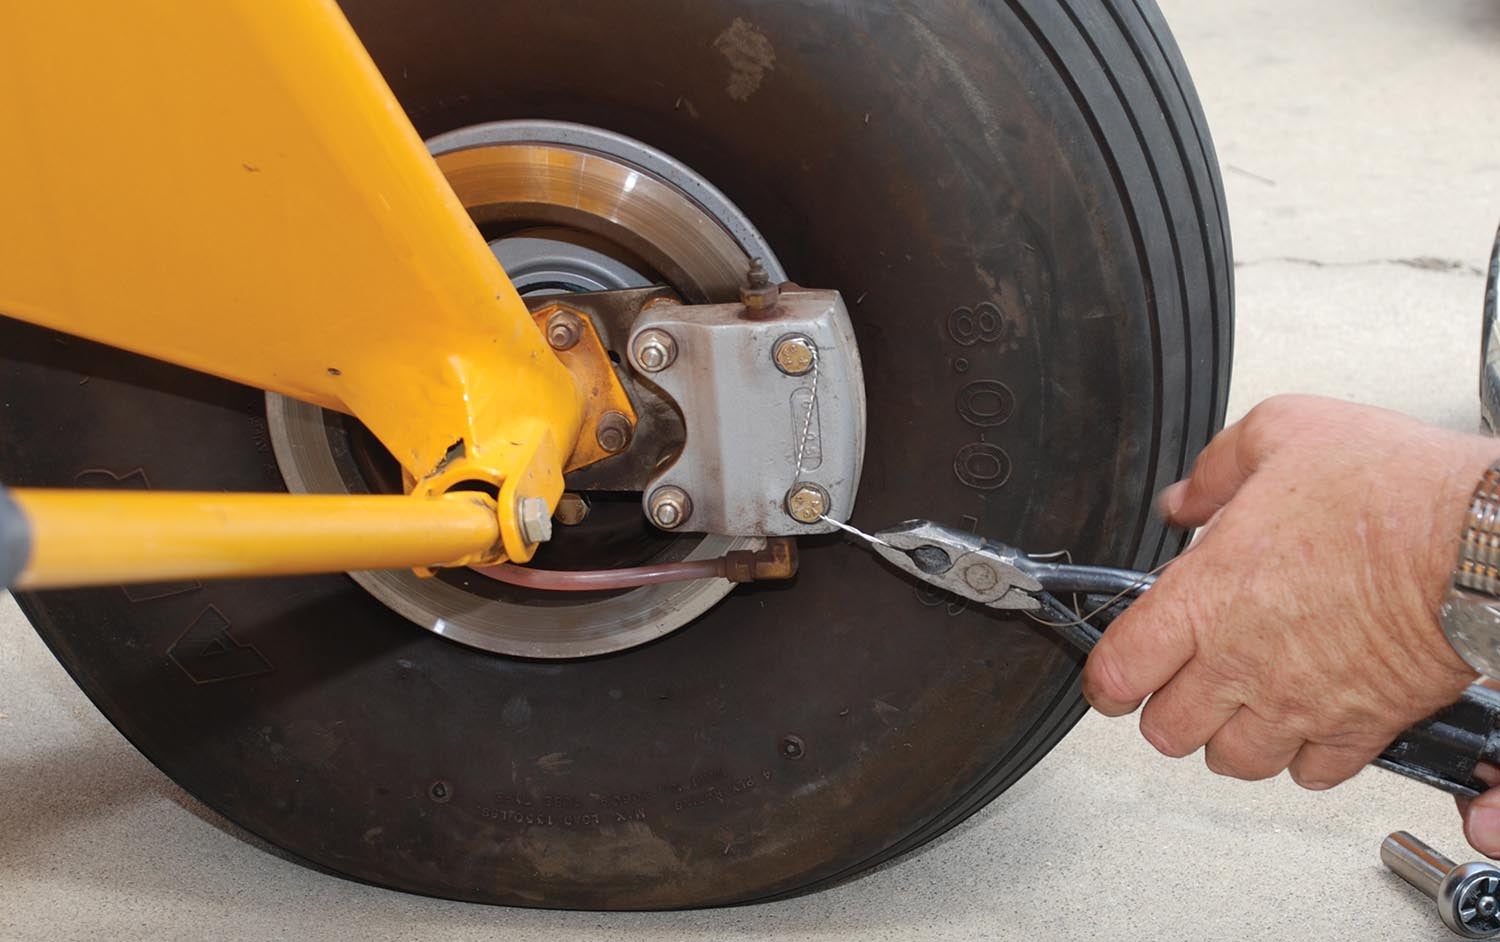
When you replace pads, it is best to use a brake rivet tool and not a rivet tool left over from building your plane. These tools are inexpensive and readily available wherever airplane brake parts are sold. Drill out the old rivets from the tail end and take off just enough material to allow a punch to push out the old rivet. Be careful not to drill into the brake caliper. Then use the rivet tool to squeeze new rivets into the new pads. It is pretty easy if you have the right tool. When you re-install the calipers, give the locating studs on the calipers a light coating of grease to allow them to move freely, but be careful not to get any excess grease on the pads or rotors. Lastly, don’t forget to safety wire the caliper bolts when you have put everything back together.
If you had to disconnect the calipers from the brake lines while working on your brakes, be sure to bleed them from the bottom (caliper) up by pumping fluid into the bleeder fitting. Always use MIL-H-5606A aviation hydraulic fluid in your brake system. Of course, if you have already put in something else, you should stick with what you have and not mix brake fluids.
All of this work is not something you want to do wearing nice clothes. It is unavoidably messy, but it is necessary at least annually. If you are one of those rare people that gets to fly their plane more than 100 hours per year, you should probably be looking at that 100-hour mark for brake inspection and service rather than the calendar.
![[Credit: Lisa Turner]](https://www.kitplanes.com/wp-content/uploads/2026/02/Fuel-Selector.jpg?w=218&h=150&crop=1 "Fuel Follies")


