
An affordable heads-up display (HUD) has been the Holy Grail of avionics equipment for the experimental world for a long time. As panel-mounted EFIS displays have gone from simple, low-res LCDs to massive touchscreens, every pilot who has had to glance up and down between windscreen and panel on an instrument approach has dreamed of having all of the necessary information for flight in their line of vision while looking out the windscreen. Sure, HUDs have been around in military and commercial aircraft for many years now—but the prices have been eye-watering and not particularly friendly to install and hook up.
And sure, several inexpensive HUD options have shown up at the major aviation shows in the last few years, but they have been devoid of useful information, hard to see in daylight, and not very satisfying when it comes to overall usefulness.
Enter the latest option from Grand Rapids Technologies (GRT), one of the first EFIS manufacturers in the experimental world. Selling a full line of EFIS options from simple to complex (including large touchscreens), GRT has pioneered many features along the way. A few years ago, Greg Toman, founder of the company, played around with an Android phone connected via Bluetooth to the EFIS screen. This wireless extra screen could then be mounted in the back seat of a tandem aircraft to give the GIB some flight data.
This year, Toman took things a step further, reaching into the consumer electronics bin one more time and coming up with the Hudly—a heads-up display designed for the automotive market. The Hudly consists of a small projector module and a glass combiner that mounts to the windshield and is capable of displaying speed and navigation data generated by—you guessed it—an Android phone. It can even connect into the car’s ODB-II data port to display faults and other system information. But forget about that—we’re talking airplanes here. The magic thing is that Android phone bit, which Toman had already figured out.

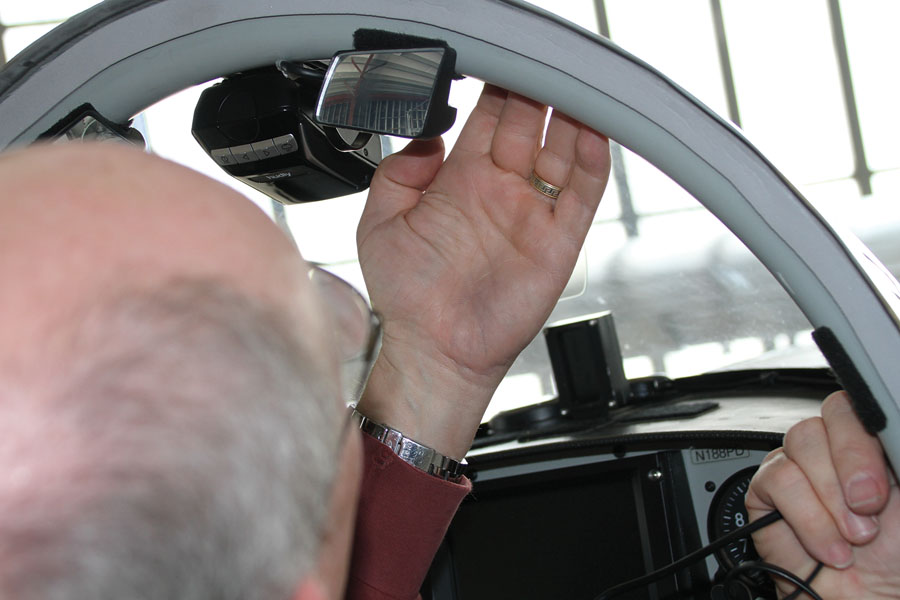
The Hudly projector installs with sticky tape or Velcro to the top of the windshield, next to the roll bar.

Hudly supplies a template to use to position the combiner lens relative to the projector.
Installing a Hudly in an airplane already equipped with a GRT EFIS is simple, and with an inexpensive Bluetooth dongle plugged into one of the display’s USB ports, you can wirelessly connect to either an inexpensive Android phone, or an even less expensive (about $50) stick PC—a PC shaped like a thumb drive, but maybe twice as large (which is still quite small). The price of the Hudly? We recently looked on their website, and you get the unit, combiner, and cables for $299. GRT charges $150 for the software, you buy the Android or stick PC, and for less than $500, you have a HUD!
Installation
We excitedly unpacked the small boxes that came in the mail and read the easy-to-follow instructions (which tell you to look at the video on their website, of course) before heading out to the hangar where our GRT-equipped RV-8 sat patiently. In the end, it took about as long to clean the windshield as it did to physically install the Hudly. Both the projector and the screen/combiner mount to the windshield using double-sticky tape, supplied in the kit. We actually substituted Velcro to mount the projector to add a little spacing and to account for the curvature of the windshield, but it amounted to the same thing—peel off the tape backing and stick it in place. The kit comes complete with a template that shows where the screen goes, relative to the projector, and in our case it all fit perfectly, even with a glareshield-mounted AoA indicator sticking up from the panel.

he combiner also attaches with clear double-sticky adhesive to the windshield.
With the RV-8 looking more and more like a modern fighter, we were ready to fire things up and see how they worked. GRT supplies a nice diagram in their install diagram of the wiring. The mini PC connects to the Hudly via an HDMI cable, the PC and the Hudly get power from a cigarette lighter plug, and when we powered up the airplane, we watched the magic as the Hudly booted up. It’s a full color display and very crisp. Since GRT had already set up the software on the mini PC, we simply waited until the pretty pictures passed by, and the HUD app appeared in color, showing simulated flight data. We powered up the EFIS and found the menu items for the Bluetooth adapter (which we had installed in the USB port) but couldn’t get the two units to talk with each other.

The installation before tucking away the wires. The Hudly is no more intrusive than the rearview mirrors and doesn’t significantly restrict the pilot’s view, even when flying formation.
Thinking about it, we realized that GRT had set everything up for us with the PC connected to their USB adapter, not the one in our airplane, so somehow, we were going to have to get it to look for the new adapter. Fortunately, this isn’t very hard; all you need is a USB mouse. You plug that into the “Host” port on the mini PC, and suddenly you get a cursor. A right click of the mouse button brings up a menu screen, and from there it was a short bit of trial and error to find the BT setup page. From there it was obvious, and when we went back to the HUD display, we were looking at data mirrored from the EFIS PFD. Perfect!

The combiner has a swivel attachment point, so it can be adjusted once it’s attached to the windshield.
Flying with the HUD
The first thing you realize when looking through the HUD image is that it is not just a simple digital airspeed and altitude display—the symbology and information is very similar to military and civilian jet HUDs I have used. The airspeed tape is on the left, the altitude on the right, and in the middle are pitch ladders, which roll with the horizon and are adjustable to match the real horizon. You can roll the airplane, and the horizon and pitch ladders go all the way around with you. The altimeter setting is under the altitude window, so it is easy to check when getting an AWOS report. There is a miniature representation of HSI information in the lower left quadrant—an arrow points to the next waypoint, and it is positioned left or right as a CDI on a rotating line of CDI dots. The upper left corner features the current navigation waypoint and the distance to go.
ables from the Hudly are tucked up out of sight between the windshield and roll bar—we held them there with little bits of Velcro.
Guidance is provided with a velocity vector circle, showing exactly where the aircraft is going (not just where it is pointed), and it is paired with a guidance circle, which shows where you need to point the velocity vector to make the airplane go to the destination. This is exactly the same symbology that we had in the Space Shuttle—if you want to feel like an astronaut—and it works very well. Just pitch and roll to capture the guidance symbol, and you’re on your way.
The HUD can also display the highway-in-the-sky boxes generated for approaches by the GRT EFIS and runway outlines that you can follow to the ground. Because the HUD field of view is not as wide as the view on an EFIS or out the window, the velocity vector can become display limited (off the edge of the display so to speak), and with a significant crab angle, so will the runway. This is a limitation common to most HUDs that are not specifically designed for a wide field of view.

This sample HUD image from the GRT user guide describes the various items that can be displayed to the pilot.
So much for symbology—how does it look? Well, quite good actually! I was worried before the first flight because sitting in our darkened hangar, with the airplane pointed out toward a clear sky, it seemed a bit dim. But once we got out into daylight and into the air, the HUD was visible at all times. It almost seemed more readable when pointed toward the sun. The only time it was hard to read was when I was looking through the HUD directly into the low sun—but I couldn’t look in that direction long or I would have been burning my retinas anyway. So it scores high points for sunlight readability.
The other optical thing you need to know is that the Hudly is not focused at infinity, like a high-end HUD would be. It is focused somewhere near the nose of the airplane, or maybe a little beyond. So while you can look through it at the distant horizon, you have to focus either on the HUD symbols or infinity—but not both. The good news, however, is that it takes very little time and effort to refocus your eyes between the two, and depending on your age and optical flexibility, you might be able to focus on both so fast that you don’t know the difference. I was able to read and interpret changing airspeed numbers while focusing on a distant cloud, so it’s just not much of a problem. It is also far quicker to just refocus than it is to look down to the panel and find the number you want to read on an EFIS screen, then look back up.
The installation manual (we had a preliminary version) supplied by GRT indicated that they had some problems with vibration of the combiner glass, which hangs from a single attach point on the windscreen. They solved this with a thin aluminum support fastened to the glareshield and touching the edges of the combiner glass. We anticipated needing this but were pleasantly surprised to find that the glass hardly moved at all, and it stayed readable at almost all engine rpm settings. There were just one or two rpm settings in the lower end of the power band that generated a little vibration. Our engine/prop is dynamically balanced to very tight tolerances, and this probably makes the difference.

This image from the user manual shows how Runway Overrun/Low Approach Protection (ROLAP) looks on the HUD.
Advanced Features
Another feature incorporated in the GRT HUD is a new project of Toman’s: Runway Overrun/Low Approach Protection (ROLAP). By telling the HUD software a few performance features of the airplane (stall speed, landing configuration glide angle, and rollout distance), the software can calculate a “runway required display,” showing a graphic interpretation of where you will be on the runway at touchdown and indicating if you will have enough runway remaining to safely come to a stop after touchdown. In addition, it will monitor approach angle and alert if you are below the normal glide path for the aircraft—in other words, a low approach.
After rollout, the display will even tell you how much runway you have used—an interesting number that pilots rarely see. I have noticed already that the more I see it, the more I am storing this distance in my head, and this can be quite useful when looking at going into shorter runways.
Developing ROLAP is a good example of why Toman likes to use the Android (PC) computer interface with his EFIS; it is easy to do development projects like this without affecting primary EFIS software. A similar approach is often used in very high level, high-risk aerospace flight environments, where modifying highly reliable and costly flight control software is discouraged, but trying new things is valued. Building an interface that uses data from the highly reliable device without affecting it is a great way to play with new ideas and pilot aids, and the GRT HUD is a great example of that process.
Into the Future
A heads-up display is a useful addition to any aircraft operation where going back and forth from outside view to the panel is necessary and can lead to time delays and confusion. No, in most cases, you don’t need one, but it can make certain tasks easier and more intuitive. As we write this, technology is advancing, and Hudly is developing a wireless unit of their own, one that presumably incorporates the mini PC in one package, so it connects directly with the EFIS (via Bluetooth) and eliminates the nest of wiring and adapters in the cockpit. This would be nice, and we’ll see if it happens.
In the meantime, the GRT HUD is a great step into the world of affordable heads-up displays for the experimental world. We predict that more of these types of units will become available in the near future because once someone figures it out, others will follow. A rising tide floats all boats—or in this case, rising air supports all aircraft—and we look forward to a bright future where panels become secondary, and pilots can simply look out the window.
![[Credit: JetStream Rider]](https://www.kitplanes.com/wp-content/uploads/2026/04/AdobeStock_345999332.jpg?w=218&h=150&crop=1 "2026 Avionics and Lights Buyer’s Guide")
![[Credit: Radiant Technology]](https://www.kitplanes.com/wp-content/uploads/2026/04/550095_5165745cc27748a598699799d796fd94mv2.jpg?w=218&h=150&crop=1 "Radiant Technology Unveils SafeGyro")
![[Credit: Dynon]](https://www.kitplanes.com/wp-content/uploads/2026/04/EMS-stand-alone_HDX.png?w=218&h=150&crop=1 "Dynon Unveils Scalable Engine Monitoring for Kitbuilders")


