
About every 500 hours, your magnetos need to be inspected and repaired as needed (IRAN) to keep them performing well. Some of this work you can do yourself, but some of what may be needed is beyond most owners’ ability. We’ll start with a discussion of Slick mags, the most common.
Aircraft Spruce sells overhauled magnetos on an exchange basis with work performed by Kelly Aerospace or Champion (Slick), or you can go to an independent shop such as Aero Accessories in Torrance, California, for a more economical solution. Aircraft Spruce also has the special tools you will need to work on your Slick magneto, but they can be hard to find if you don’t have the part numbers.
The question always arises: Do I have to do this work on my magnetos every 500 hours? For Experimentals, the answer is no, but if you don’t, you will likely notice a deterioration of your ignition system that cleaning your spark plugs won’t cure. Before that happens, it is time to do some work on your magnetos.
Reading the Data Tag
Each Slick magneto has a data tag with important information. The make, model number, rotation and lag are all shown. The first two digits of the serial number are the year it was made. The third and fourth digits are the week it was made in that year. The model number tells you if the magneto has an impulse coupling or not. For example, a 4370 mag does not have an impulse coupling. A 4373 has 25° of lag, making it well-suited for a Lycoming O-360-A1A engine. The lag is also listed on the data plate. This value should match the ignition timing shown on the engine data plate. The rotation is always “left” with the engines Experimental builders typically use.

Do It Yourself
Champion says a 500-hour magneto service should include these items:
- Replace contact points
- Replace impulse coupling spring
- Replace oil seal
- Replace carbon brush
- Replace capacitor
- Replace rotor assembly
- Recharge (re-magnetize) rotor
- Inspect gears and block
- Test coil
- Check bearings
- Check applicable ADs and service bulletins
Of these items, you can do all of them yourself except test the capacitor and re-magnetize the rotor. Champion sells a kit that includes these replacement items but does not include the gasket that goes between the mag and the engine case. The kit costs $350.
For this work, you will need these items:
- T-118 installation pin
- T-150 E-gap tool
- L-1363G Champion 4300/6300 Series Magneto Maintenance and Overhaul Manual
- Champion service bulletins S1-15A, SB1-19 and others that may apply
Whenever you work on your magnetos, it would be wise to search for all service bulletins and ADs because some parts will need to be replaced if your magneto is affected.

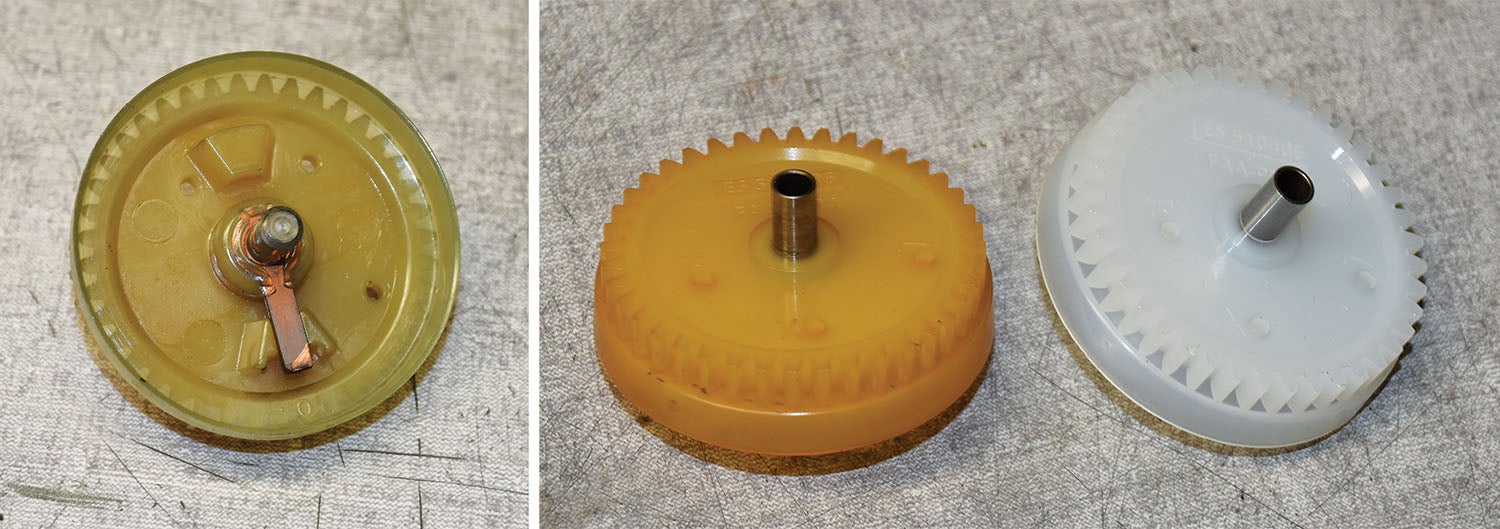
One of the things you are looking for includes any looseness of the shaft in the bearings. The bearings will need to be replaced if this is the case, and it requires special tools to do it. Since you will most likely replace the contact points, you will not need to be overly concerned with signs of arcing or pitting of the point faces, but this is obviously not something you would let go unaddressed. You will need to check the rotor to make sure the contact arm is not copper—the arm and the gear to which it is attached need to be replaced with the new Monel arm and gear. All gears need to be checked for missing or damaged teeth or discoloration due to excessive heat cycles. And any cracking or chipping of the block—the part that receives the spark plug wires—is cause to replace this part.
All of this is doable by most airplane builders, but it is a good idea to get some experienced help the first time you try it. If worse comes to worst, you can put the parts in a box and exchange them for an overhauled magneto. (Please also refer to previous KITPLANES® articles in the November 2013 and April 2020 issues. These go into more detail about the tasks of replacing parts and setting internal and external timing.)
I have very little experience with Bendix mags (a design now owned and built by Continental Aerospace Technologies), so I will refrain from going into a lot of detail about inspecting and overhauling them. Many older mechanics have worked on these mags, so you should not have too much trouble finding an experienced hand to help you through the process.
500-Hour Inspection
Your magnetos, either Slick or Bendix, should be removed and inspected every 500 hours. Experimental owners can usually stretch this out a bit, but ignition-system performance will begin to deteriorate if the mags aren’t serviced. This is a good time to replace any wearing parts such as the contact points and check over everything else for condition, function, and any required service bulletins.
If you are not comfortable doing this work, there are independent shops such as the previously mentioned Aero Accessories that will service a 4300 series Slick magneto for you for about $350 plus shipping. They will even pick up your mag for no charge if you fly into Van Nuys Airport (KVNY). If parts beyond normal service items need to be replaced, there will be an additional charge. In the case of Aero Accessories, they do not include a new condenser but rather check the condition of yours and replace it as needed for an extra charge. This service is your best bargain if your mag is in good shape and not subject to any service bulletins. Aero Accessories will even re-magnetize your rotors as part of the deal, something you just can’t do yourself. Always realize that a 500-hour service can turn into an overhaul if parts are worn beyond service limits.
For DIYers, you can duplicate most of what a shop would do for about $30 in tools and a $350 parts kit. Unfortunately, if you really want to tear into a Slick magneto to change bearings and other more complicated tasks, you will need about $1000 of special tools and still will not be able to re-magnetize the rotor.
Overhaul
At engine overhaul or about every third or fourth 500-hour inspection, you should overhaul your magnetos. This process includes all of the 500-hour tasks plus replacing the bearings, the capacitor and distributor gear. The rotor should be re-magnetized at the point, and any service bulletins should be addressed. This is where the $1000 worth of tools come in, so having an approved shop do it for you looks like a pretty good idea.
Kelly Aerospace will sell you an overhauled 4300-series magneto for $792. Champion wants $969 for the same thing, although there are rumors that overhauled Champions are actually new, something I cannot verify. Aero Accessories will perform an overhaul for $595, but they will charge extra for parts that are not standard replacement items. Thus, if you have a really old mag in rough shape, you may be better off paying Kelly or Champion a fixed price for one of their magnetos.
There are so many different models of Bendix magnetos around that it is pretty hard to pin down a price to overhaul your magneto, but in general they are priced comparably to Slick parts. Aircraft Spruce has prices in their catalog for some of the more common types or you can always call an independent shop for a quote.
Removal and Installation
Removing your magneto is not too difficult. You will need a screwdriver to remove the cap that holds the spark plug wires and a ½-inch socket and extension to remove the two nuts that hold the magneto in place. Be sure to remove the P-lead and ground wire, and take extra care as you work around an ungrounded magneto during the removal process.
With all the wires removed and the retainer nuts off, the magneto should come out fairly easily. Sometimes, the mag sticks to the case so you may have to give it a nudge or even a judicious tap with a hammer to pop it loose. Then it should fall out. Be careful to keep track of the small hardware as you remove things. You will need it later. Place a rag over the open hole in the case to prevent debris from falling in. You do not need to remove the gears or impulse coupler if you are sending your magneto to an independent shop that is actually going to work on your magneto, but you will want to remove the gear if you are exchanging your mag for an overhauled unit through someone like Aircraft Spruce. Don’t lose the gears; they are expensive.
If you need to remove a gear, it is really nice to have an impact wrench. If you don’t, you can clamp the gear in a vise with soft jaws and use a socket and ratchet to remove the gear. Of course, you will want to remove the cotter pin first. If you leave the nut partly threaded, you can tap on the nut with a hammer to pop the gear loose. Be sure to hit the nut squarely to avoid damaging anything.

Once you have a serviceable magneto back in your shop, it is time to reinstall it. Turn the engine over until it is in the number one firing position (not top center). The data tag for your engine will tell you how many degrees before top center your firing position is. This is typically 20 to 25° before TDC. Next, you need to set the magneto to the #1 cylinder firing position. With a Slick mag, this is done by sliding a locating pin (T-118) into a hole in the rotor. You will have to feel your way into this while rotating the magneto. When the pin goes in up to the stop, you are set. Most Lycoming engines use left rotating mags, which you can verify by looking at the data plate, so put the pin in the hole marked “L.”

Before you install the magneto, be sure the old gasket has been removed from the case. Clean it off and remove any residue if necessary. Then install a new gasket on the mag using a little grease to hold it in place. Do not use gasket sealer. Install the retainer nuts and clamps finger tight. Use your magneto timing light (buzz box) to set the timing. I recommend you do this with the top plugs removed to prevent inadvertent firing. Be sure to check the timing again after you tighten the nuts. On the mag with the impulse coupling, be sure to turn the engine past the firing position until you hear the impulse coupler click. Then set the timing. Don’t forget to pull the pin out of your Slick magneto before attempting to adjust the timing.
If you have a Bendix magneto, you will need to look in the timing window and turn the mag until the red tooth on the distributor gear is in the window. Then install it as you would a Slick magneto.
With the timing set, you can reinstall the cap and spark plug wires, but before you do, it is a good idea to inspect the wires and replace them if they are not in good shape. This is also a good time to remove all of the plugs, clean them and gap them. This way, your whole ignition system is in great shape going forward.
![[Credit: Lisa Turner]](https://www.kitplanes.com/wp-content/uploads/2026/02/Fuel-Selector.jpg?w=218&h=150&crop=1 "Fuel Follies")


The older L-1363F manual does NOT list the parts replacement that you list for the 500-hour inspection. My older manual list inspections and tests without parts replacement if they past inspect and test. The above article lists some of the parts used at overhaul for 500-hour inspection.
While these articles are focused for experimentals, many of us spam can drivers read them to improve our knowledge. I am unaware of any requirement for Part 91 operated certificated Part 23 aircraft that requires a Magneto IRAN or OH at 500 hours. It does seem a good practice though.
I find lots of links to download the L-1363F but none to the G version. Anybody have one?
Here is the 2021 L-1363J:
https://www.championaerospace.com/pdfs/techdocs/F1100/L-1363J_corrected%2020210420.pdf
Comments are closed.