Because most amateur builders use Lycoming or similar engines equipped with Marvel-Schebler carburetors, we will focus on them for this article. Rotax owners must accept my apology for leaving them and their Bing carburetors for another day. They don’t have a lot in common besides both being called a carburetor.
Marvel-Schebler carburetors have been delivering fuel to aircraft engines for a very long time. Although they’re almost the only game in town today, the brand actually had some competition back in aviation’s early years. They aren’t fancy, but they get the job done. Little is asked of the owner in return for years of usually trouble-free service, but little is not the same as nothing. Let’s look at some carburetor basics and what it takes to keep them happy.
How They Work
The carburetor needs clean fuel in sufficient volume to meet the fuel flow requirements of the engine. Typically, this is about half a pound of fuel for every horsepower per hour. Thus, a 180-hp engine running at 75% power (120 hp) will need about 60 pounds (10 gallons) of fuel per hour if the engine does not require excess fuel for cooling. Some installations will tolerate running leaner in cruise. For takeoff, that number would increase to 15 gph, which means you need a safety margin of 25% to 50%, depending on the fuel system. Bottom line: The fuel system has to be capable of providing more volume than the carburetor requires at maximum power.
Fuel can be delivered by means of gravity flow from a high-wing design or via a low pressure (4–6 psi) mechanical pump. Typically, high-wing designs won’t have an electric boost pump, though there’s no reason why they couldn’t, while low-wing installations are best served with a backup to the mechanical, engine-driven pump. The important thing is to be sure there is sufficient flow. Pressure is not much of a concern if the flow is there—for many Lycoming applications, the minimum pressure is just 0.5 psi. For a review of fuel system testing to ensure proper flow please see my article, “Firewall Forward: Fuel Systems,” in the October 2012 issue of KITPLANES®.
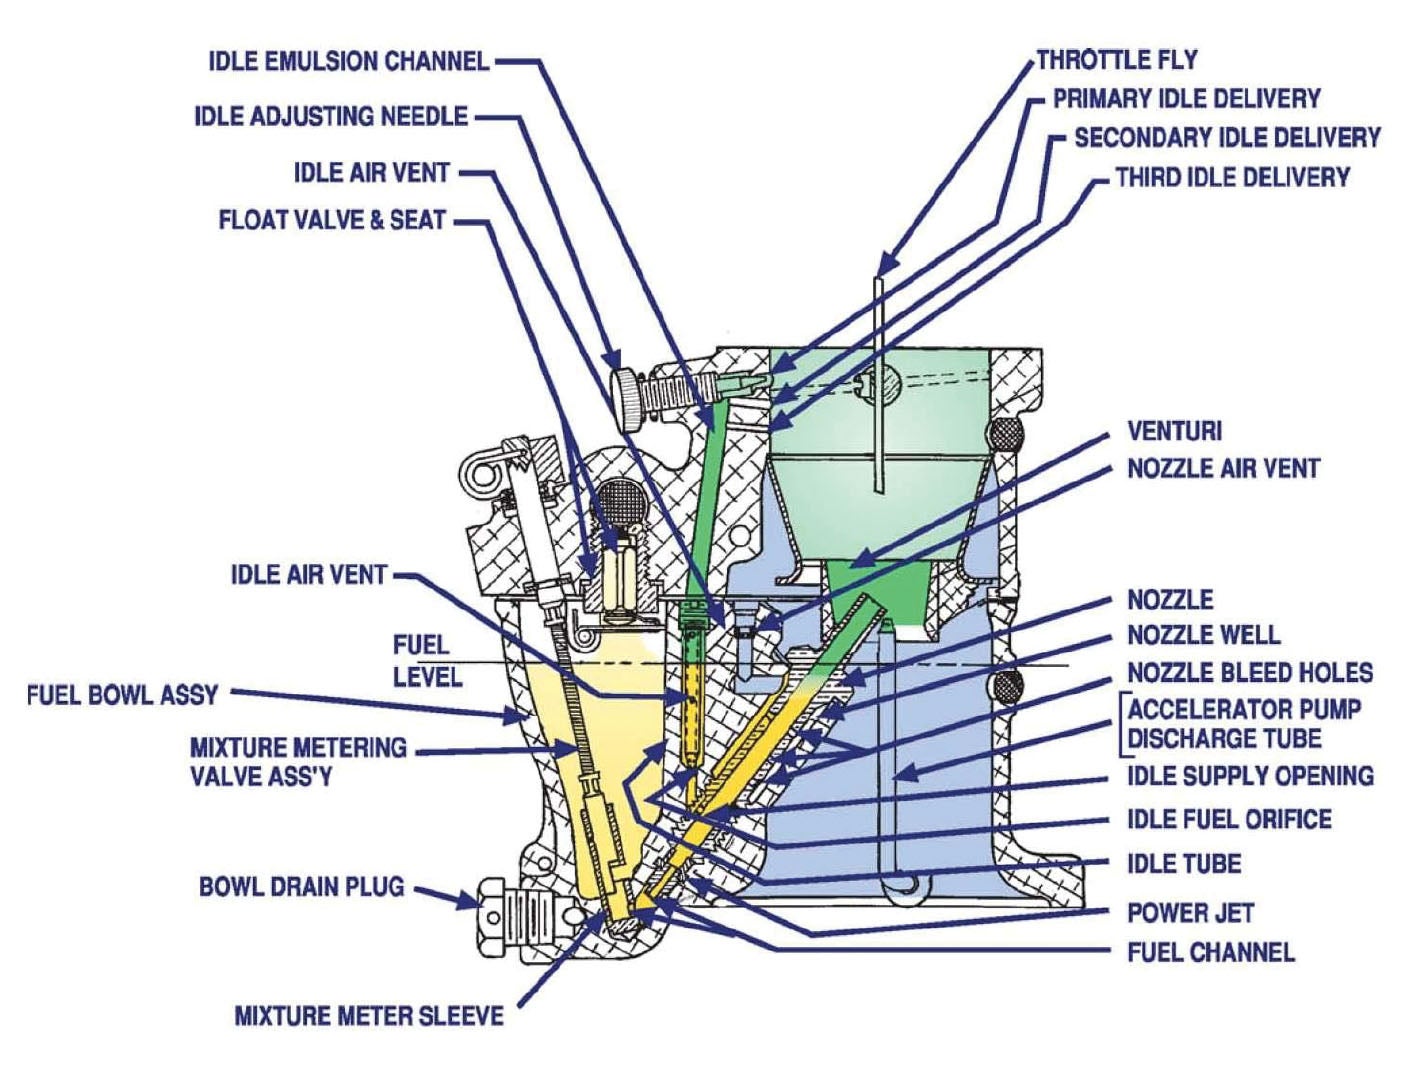
Once fuel has entered the carburetor it goes to the float bowl waiting to be drawn into the engine. Floats attached to a needle valve let fuel in as it is needed and prevent it from flowing when it is not. Fuel is then drawn out of the float bowl by the low-pressure air in the carburetor venturi as it passes through. The flow of air is controlled by a butterfly valve in the carburetor that is connected to the airplane’s throttle control. A separate circuit controls fuel flow during idle. A mixture control adjusts fuel flow manually to achieve the best fuel/air ratio for a given power setting and altitude. Simple, as it should be.
The pilot can control two things: the throttle opening and the fuel flow at any given throttle opening (mixture). Two other things can be controlled with access to the engine compartment: idle mixture and idle speed.
Controls
The main concerns for the controls are free and correct movement and full travel from wide open to completely shut. It is vitally important that the mixture control arm on the carburetor rests against the stop in the shutoff position. Otherwise, the mixture control will not shut off the engine when pulled out. Similarly, the mixture control arm must open fully against the stop when the control is in the wide-open position. If it is not, the full-power mixture may be too lean.
The throttle must also have full travel to ensure that full power can be delivered when the throttle is wide open. When it is closed, if it does not rest against the idle adjustment screw you will not have control over the idle speed. This all seems pretty basic, but you would be surprised how often planes do not have complete travel of the mixture and throttle controls. I often see this when inspecting RV-8s. Any troubleshooting of potential carburetor problems should start with this basic evaluation of the control travel.
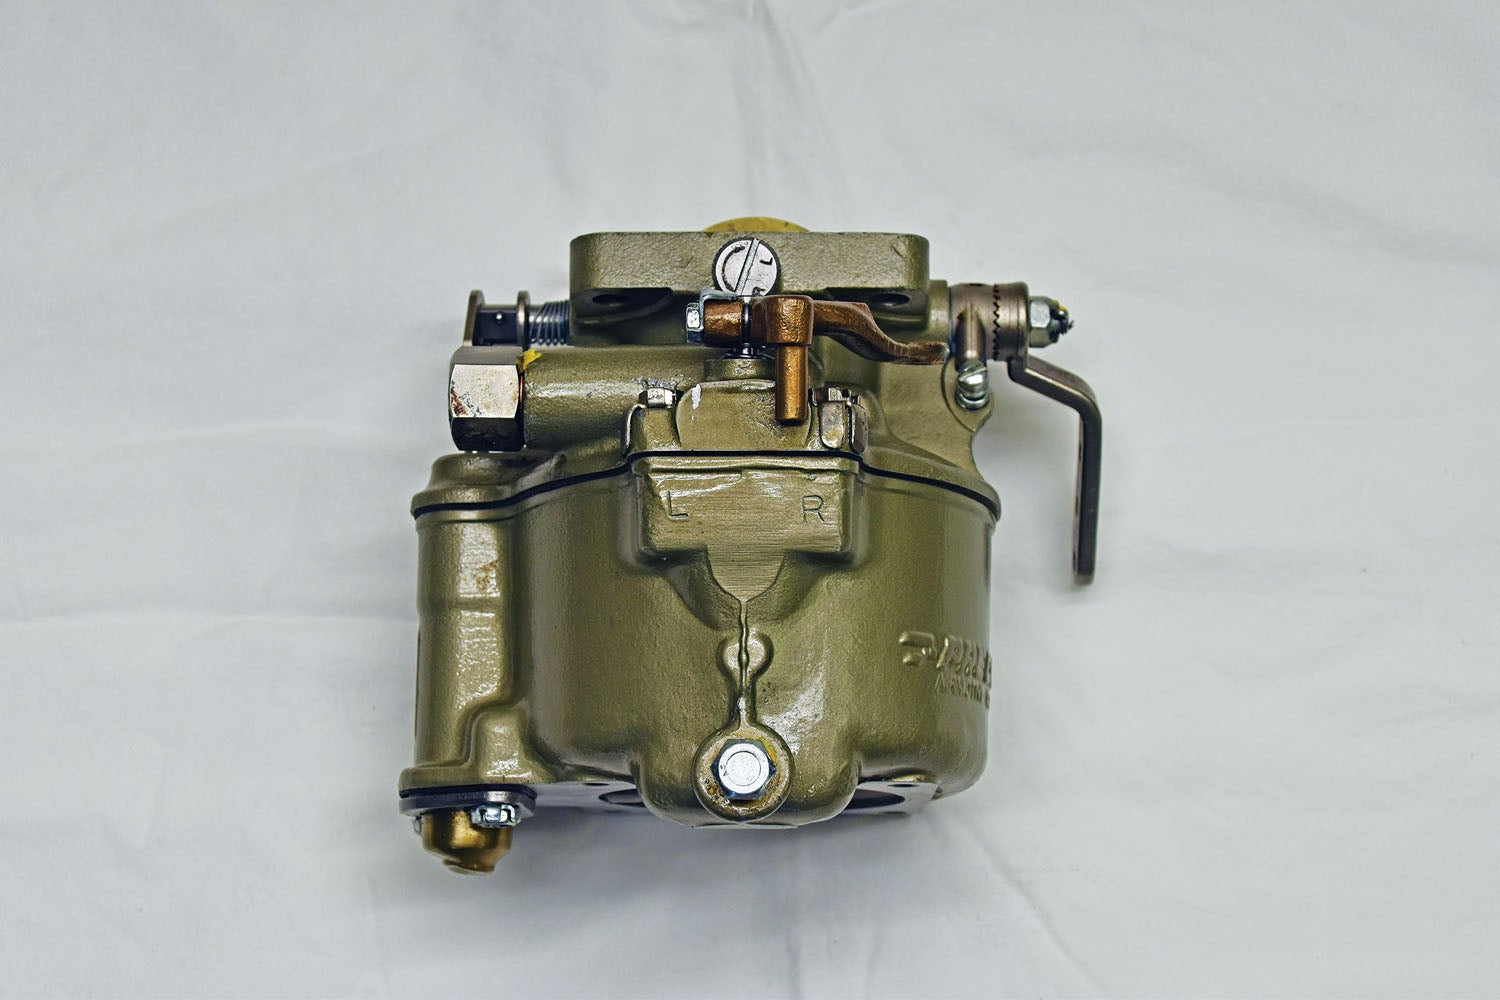
The idle mixture control is something an Experimental owner can easily adjust with access to the engine compartment. This adjustment controls the mixture when the engine is idling with the throttle closed or nearly closed. To check that the idle mixture is set correctly, watch for a slight rpm rise when you shut the engine off with the mixture control. You should see a rise of 25 to 50 rpm just before the engine shuts off. If the rise is less than that, the idle mixture is too lean. If it is more than that, it is too rich. Adjust the idle mixture by turning in or out on the idle mixture screw. In will make the mixture leaner and out will make it richer. Make small adjustments of about one-half turn or less at a time. See the photo above for the location of the idle mixture screw and note that the direction you need to turn the screw is marked on it.
The other adjustment you can make is to the idle rpm. With the mixture rich and a warm engine, idle should be at 650 to 750 rpm. My preference is toward the low end of that range, but it is crucial that the idle is high enough to be sure that the engine will not stop running with the throttle closed and carburetor heat applied. Needless to say, the throttle control arm must rest against the idle adjustment screw when the throttle is in the closed position. Otherwise you will not have control over idle rpm.
Routine Maintenance
Routine carburetor maintenance mostly does not actually involve the carburetor. It consists of keeping the air filter clean, the airbox in good shape (many are prone to cracking) and the fuel filter clean. If you do that regularly and keep your fuel clean and free of water, you have covered most of the maintenance needed. Whenever you have the cowl off, it’s a good idea to check for any signs of fuel leakage. These need to be corrected immediately if found.
Also check the airbox for soundness and secure attachment to the carburetor. Over time it can crack or come loose and allow unfiltered air into the engine. The screws that attach the airbox to the carburetor should be safety wired to prevent the airbox from coming detached from the carburetor. By the way, Marvel-Schebler recommends that you use copper wire instead of stainless steel safety wire on the carburetor. That said, my Precision Airmotive (same as a Marvel-Schebler model) carburetor came from Lycoming with stainless steel safety wire. I’ll leave the choice to you.
Heavy Maintenance
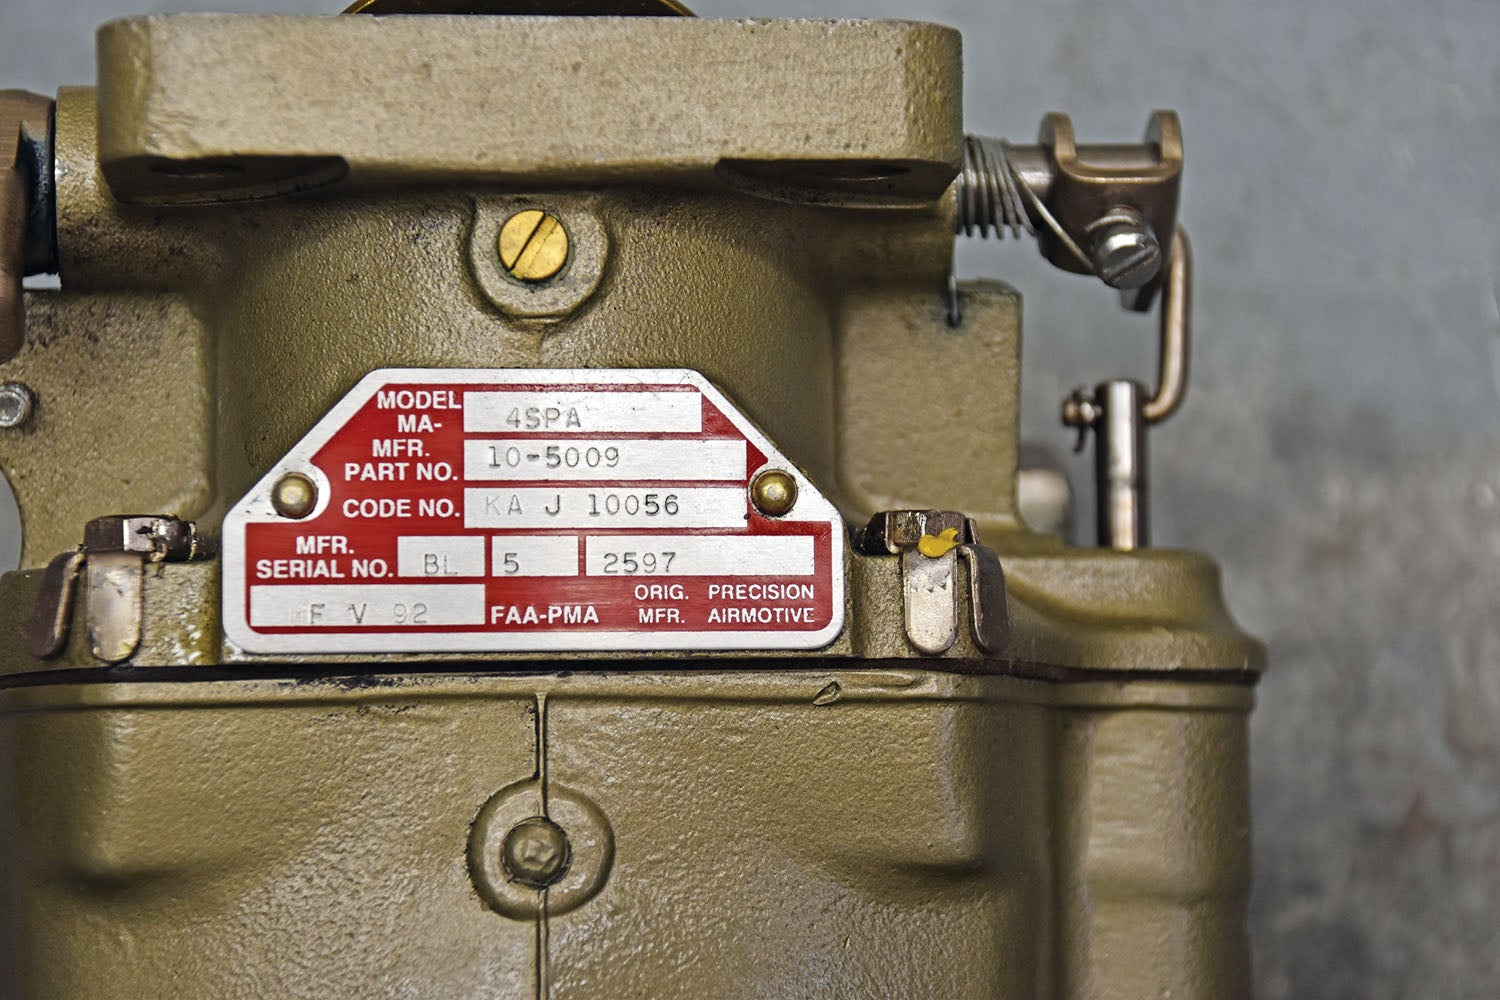
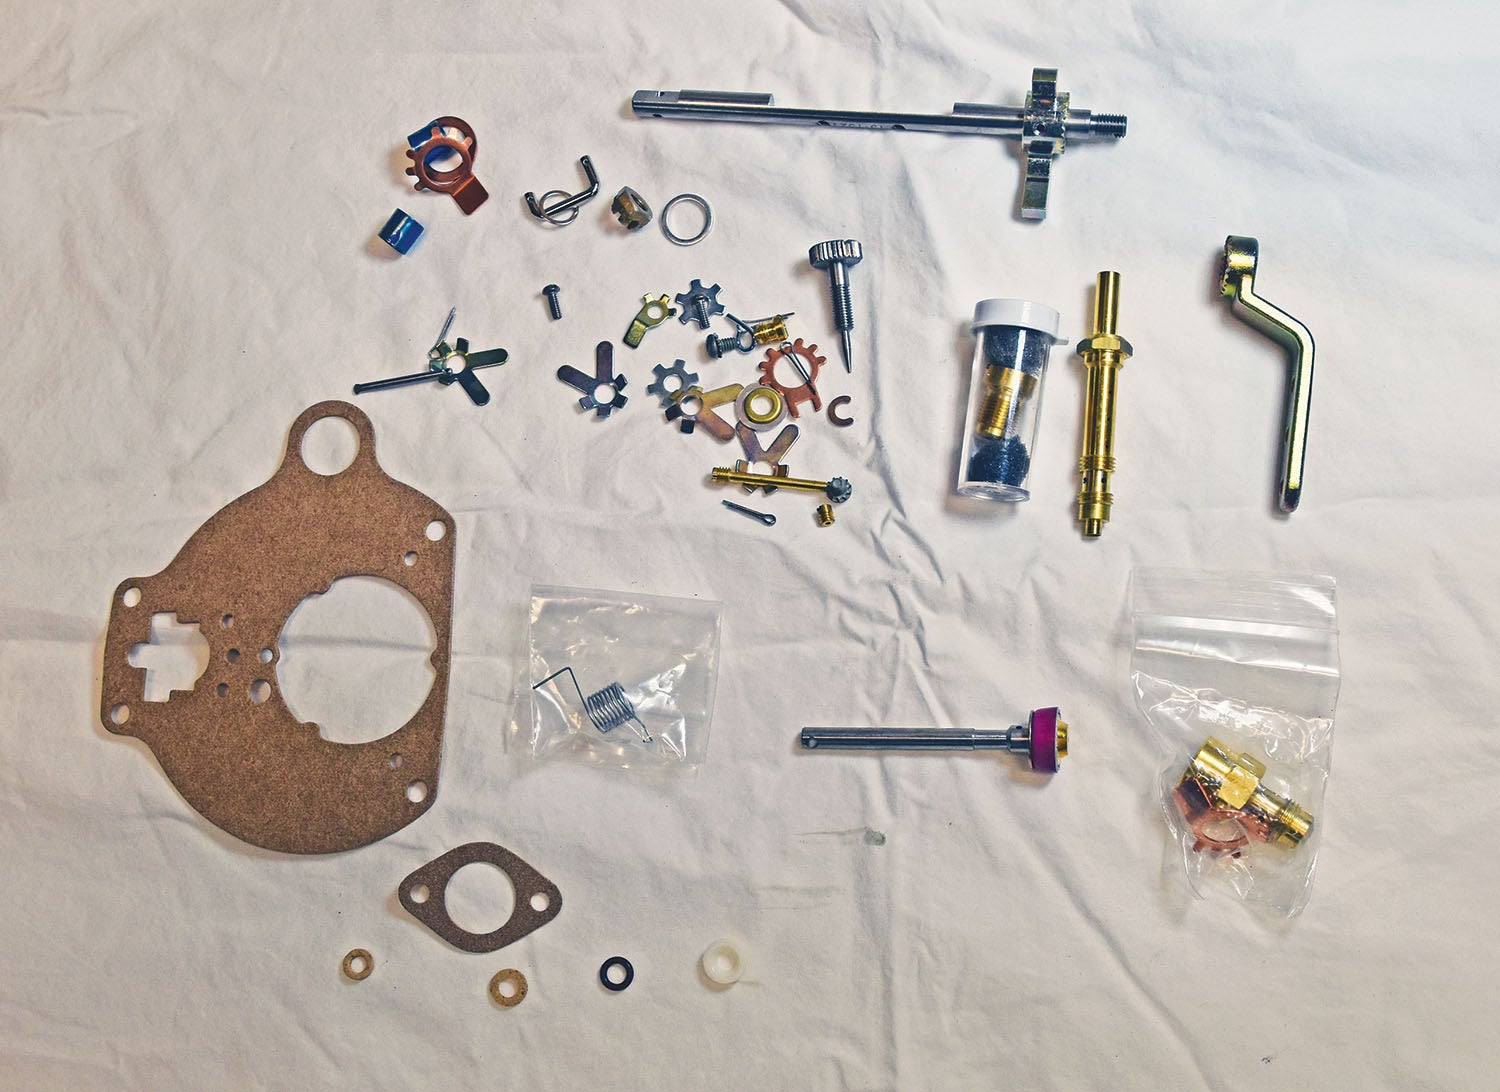
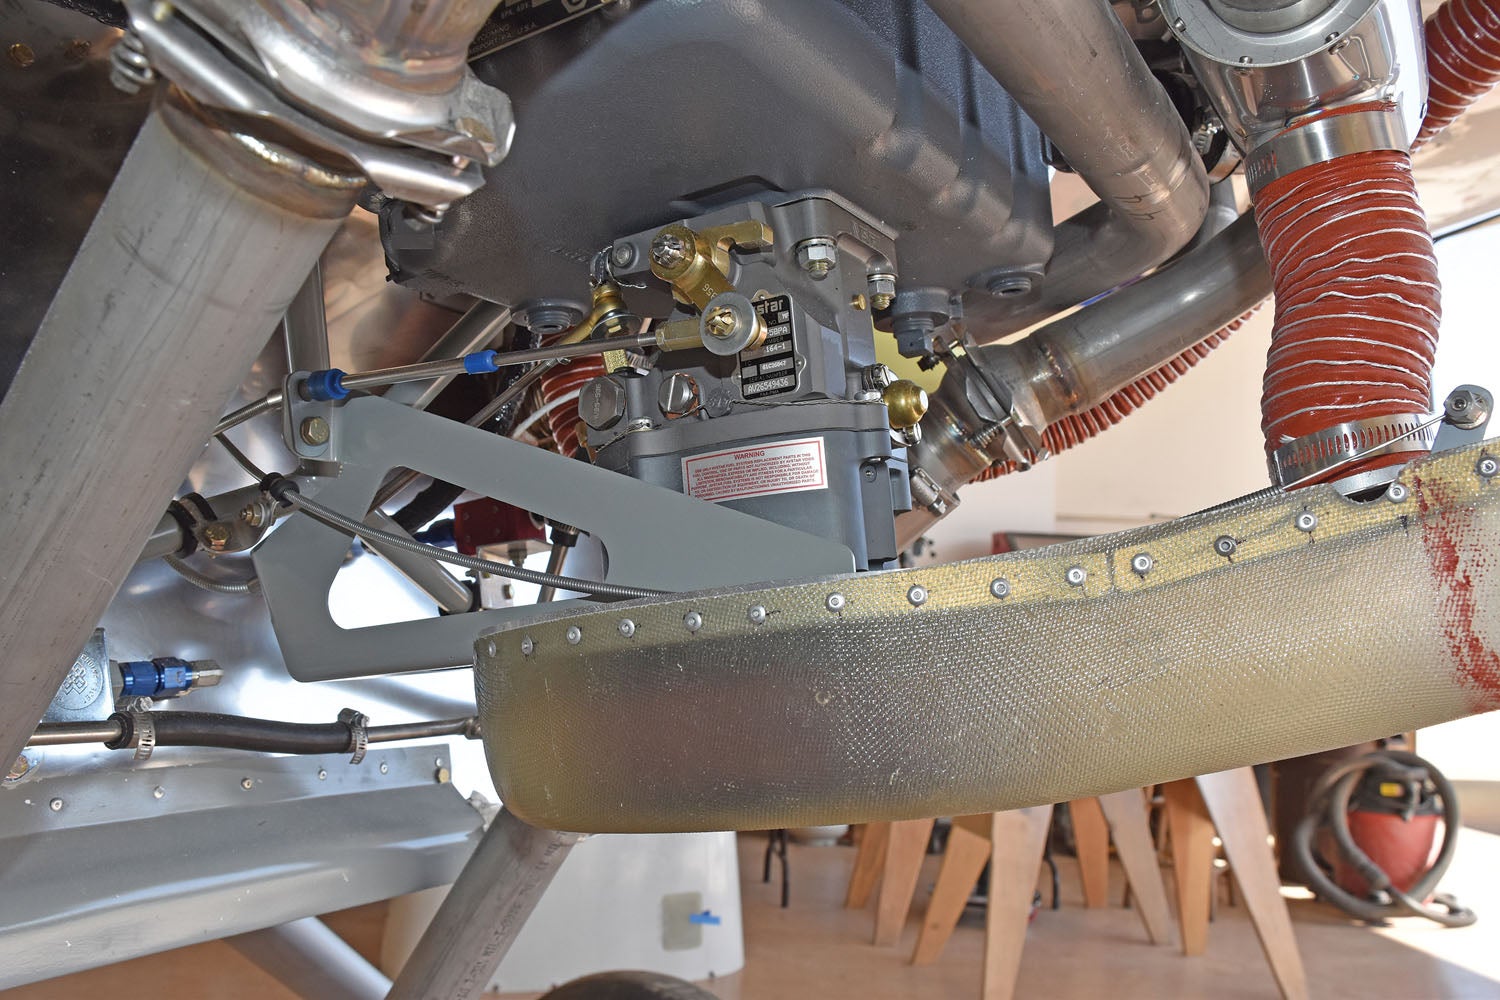
Over time, the parts inside the carburetor can wear out and the parts of some older models can fail internally. At that point, some heavy maintenance may be needed. I define heavy maintenance as any work that requires the carburetor to come apart. Many owners are not comfortable performing this kind of work. For them, an overhaul by the factory or a competent shop may be the best answer. An overhaul for a carburetor such as the one shown in this article, the Marvel-Schebler MA-4SPA, runs around $800. That may sound like a lot of money, but a new one runs about $2000. Marvel-Schebler recommends that its carburetors be overhauled at engine overhaul, typically every 2000 hours or 10 years.
With newer operating limitations for Experimental/Amateur-Built aircraft, you are obliged to adhere to this limit, though many currently flying homebuilts are not under this version of the ops limits. Still, it is no secret that there are many 30- and 40-year-old carburetors out there that have never been apart. That is a testimony to the durability of the carburetor, not the good judgement of the owner.
Any owner who wishes to tackle the overhaul or major repair process can purchase an overhaul kit from Marvel-Schebler. This is not brain surgery by any means, but if you are unfamiliar with this kind of work it would pay to get some assistance from someone who has done this before. After all, the carburetor is a pretty important part of your engine. Very complete kits are available in the $400-500 range and include just about every internal part that could wear out or fail, except for the floats. You can also buy individual parts from Marvel-Schebler through its website.
A key maintenance item is the throttle shaft. Over time it and the bushings it rides in will wear out. This allows air to leak into the carburetor, leaning out the mixture. At full or near-full throttle, this can usually be compensated for by adjusting the mixture, but at idle it can present problems—rough idling and hesitation as the throttle is opened. A separate throttle shaft and bushing kit is available if you choose not to overhaul the carburetor completely.
It is possible for the old-style hollow brass floats to develop a leak and fill with fuel. If this happens, they will sink and allow too much fuel into the float bowl, causing the engine to run very rich or even flood out completely. Since 2006, an unsinkable epoxy float has been available and is recommended. These can be purchased separately and come with retrofit instructions.
Service Bulletins
There have been dozens of service bulletins issued on Marvel-Schebler carburetors, some by Marvel-Schebler and many more by Precision Airmotive, the company that made Marvel-Schebler carburetors for years. Certainly many, if not most, will not apply to your particular carburetor. Still, it would be wise to look over the list of service bulletins and make sure yours has been properly maintained. The easiest way to do this it to have your carburetor overhauled by a factory-authorized service center. That way there is no doubt that you are up to date on all the relevant service bulletins and ADs. Of course, if you bought a new engine you have no worries in that regard. Same for exchanging your carb for a factory-overhauled unit; it will be brought to the latest spec.
The big service issues that affect older carburetors are older floats that should now be replaced with the epoxy floats, worn throttle shafts and bushings, and those few remaining carburetors that still need one-piece venturis.
Airworthiness Directives
Marvel-Schebler carburetors have been subject to six airworthiness directives over the years. The most familiar one is probably 63-22-03 dealing with the venturi assembly. This AD directs the owner to inspect the carburetor to see if it has a one-piece venturi, and if it does not, to replace the venturi with a one-piece unit. You know the AD numbering system, so you also know that directive dates from 1963. There shouldn’t be many of those older venturis still in circulation.
Another old AD, 69-24-03, directs the mechanic to drain the carburetor float bowl and look for thread lubricants. Only approved thread lubricants are to be used during carburetor assembly. AD 72-06-05 R2 calls for the inspection and possible replacement of throttle arms on some carburetors. AD 77-13-16 applies to only certain engines installed in Aero Commander 112TC and 112TCA airplanes. AD 79-08-06 calls for the replacement of certain HAJ-6 carburetors. These are horizontal intake or side-draft carburetors. I have never seen one of these carburetors except at the Lycoming engine school. And, finally, AD 88-02-04 warns of loose metering sleeves on carbs fitted to Lycoming O-235 engines.
All of these ADs are old enough that they should not be a concern anymore, but just because Marvel-Schebler says its carburetors should be overhauled every 10 years does not mean that this actually happens. If you are going to use an older engine in your airplane project, it is a good idea to make sure the carburetor has all of the current ADs and service bulletins completed.
This is when Experimental builders start saying, “We don’t have to comply with service bulletins and ADs.” That is true to a point, but not entirely. When you complete your application for an airworthiness certificate (Form 8130-6) you attest that all relevant ADs have been complied with. Your operating limitations, at least if they have been issued in the last few years, also bind you to manufacturers’ life limits for all parts that have life limits, such as your carburetor. Last and certainly not least, your safety should be of paramount concern, making it pretty hard to ignore service bulletins and ADs that will have an impact on that safety.
Neglect is the biggest enemy of your carburetor. Take care of it and it will take care of you.
![[Credit: Wikimedia Commons]](https://www.kitplanes.com/wp-content/uploads/2026/07/4_rutan_a_longez.jpg_preview.jpg?w=218&h=150&crop=1 "Rutan Symposium Turns to the Coming Canard Maintenance Crisis")
![The week ahead: a KC-135 tanker passes over the grounds at EAA AirVenture Oshkosh, where Phillips 66 will set up at tents #430 and #431. [Credit: USDA Forest Service]](https://www.kitplanes.com/wp-content/uploads/2026/07/Screenshot-2026-07-22-at-10.01.04-AM.jpg?w=218&h=150&crop=1 "Phillips 66 Sets Course for Oshkosh With Specials, Seminars—and Popsicles")
![[Credit: Lisa Turner]](https://www.kitplanes.com/wp-content/uploads/2026/02/Fuel-Selector.jpg?w=218&h=150&crop=1 "Fuel Follies")


![The author flying his Sinson 108-2 Voyager in the skies above British Columbia, Canada. [Credit: Mike Davenport]](https://www.kitplanes.com/wp-content/uploads/2026/03/CF-EZB-over-water-D.-Cardy-photo.jpg?w=324&h=160&crop=1 "A 30-Year Love Affair With My Stinson")


Hi Dave:
Great article on carburetors! Is there a way I can ask you a few questions about this very informative and well written document?
Sincerely,
John Kozal
C-172 Model M (1976)
Michigan
Can I ask a question about the MA4-SPA carburetor here or in private? Looks like all the AME I took the carb to, couldn’t figure it out.
Ask away. Not sure if I’ll have the answer but let’s see
Lycoming 0320 160 hp engine runs great at all settings but backfires at idle. I have sprayed starting fluid at all 4 intake pipes and hoses at idle and no change in sound or rpm. I Enrichened the idle mixture one turn CCW and no difference. How much is too much to adjust the idle mixture? It has been 2,000 hours since the carb was overhauled. Usually it does not backfire with a cold start. I can take off and fly 3 hours, land and park for an hour or so. Crank the engine to go and get fuel and it backfires at idle. I will recheck the 25 rise on shutdown. How many turns rich is the limit?? Thank you.
Comments are closed.