 Oil is the lifeblood of the engine. Like blood in the human body, it circulates through various internal passages within the engine and externally in places like hoses. In our engines, oil functions to lubricate opposing surfaces, helps prevent corrosion and helps absorb and then radiate some of the heat liberated by the combustion process.
Most of our airplane engines are set up to keep the oil at a relatively stable temperature, usually from around 180 to 200° Fahrenheit. Much lower than that, and while it still performs its primary functions, it won’t rid itself of the water byproduct of combustion, which can lead to internal corrosion. Much higher than that, and the oil and its additives might begin to break down. Lycoming says the redline oil temperature for my IO-540-D is 240°.
An external oil cooler typically helps reject heat. Because our airplanes fly through widely varying outside air temperatures, they naturally require a way of regulating the oil flow through the cooler, so the oil stays in the Goldilocks zone—not too hot, not too cold. Some airplanes have manual controls that vary or restrict the flow of air across the oil cooler to accomplish this (think cowl flaps), but the majority of us flying Lycoming, Continental or Franklin engines rely on a temperature-sensitive device called a vernatherm or “thermostatic oil cooler bypass valve.” The vernatherm is a
natural culprit to consider when dealing with oil temperature problems. Note that oil temperature problems are usually of the “too high” variety.
Operation
You’re probably already familiar with the mechanism that makes the vernatherm work. The thermostat in your car’s cooling system does the same thing much the same way: It’s a temperature-actuated spring-loaded valve in the coolant flow. A spring extends to open the valve as the coolant/antifreeze heats up, thereby allowing a graduated flow of fluid to the radiator permitting the coolant to reject the heat it has absorbed and then reenter the engine to start the process all over again. The size of the valve’s opening is proportional to the temperature of the coolant exiting the engine water jackets, to an upper limit corresponding to when the thermostat is at its maximum opening or flow. An early auto mechanic lesson most of learned underneath the shade tree was to replace the thermostat when the car was overheating. The vernatherm in our airplane engine regulates the flow of oil in our engines in a way similar to the car thermostat but with critical differences.
Where the thermostat in the car allowed the passage of fluid by opening up a larger pathway for the coolant to the radiator, the vernatherm does sort of the opposite. In our engines, the cold or retracted position of the vernatherm allows oil to flow past the vernatherm and through an opening in the center of a beveled seat, which leads back into the engine for circulation. As the oil heats up around the vernatherm, the device gradually extends the beveled end, pushing it against the seat, which closes off the flow of oil through the hole in the center of the seat. This has the effect of forcing the oil through the alternate oil passage in the accessory case and through the oil-cooler circuit. The action of the vernatherm is gradual with increasing temperature, thus automatically regulating the oil through the cooler. The vernatherm is calibrated to maintain a certain temperature range of the oil. The Goldilocks zone.
Unlike the car thermostat, which gradually opens up more and more with increasing heat, the vernatherm seals off the cold oil passage as it heats up. At a certain high temperature, the vernatherm is fully extended and completely sealing off the cold oil passage and forcing all the oil through the oil cooler circuit. Note that the extension of the device with heat is not caused by the spring depicted in the photos. The spring only serves to hold the end tight against the seat when it is fully extended.
When troubleshooting high oil temperature, there are a number of things to check first before blaming the vernatherm. First, verify that the oil cooler is hot to the touch after a flight, confirming that oil is circulating through the cooler. If not, then go directly to the vernatherm. If oil is properly circulating through the oil cooler, make sure your oil sender is reading accurately. Consider simply replacing yours as the sender is not expensive. Also, you can test the oil sender by rigging it up to a known temperature source like a pot of boiling water and then verifying that the gauge on the panel shows the expected temperature.
You will also want to check the flow of air across the oil cooler. The science of aerodynamics, boundary layer airflow, duct shape and so on is outside the scope of this article, but suffice it to say that if air isn’t flowing across the cooler, then it isn’t going to cool the oil.
Removal and Inspection
The vernatherm is the next thing to check. As you know, every engine has at least one part whose placement was determined to exact maximum frustration from the mechanic to the sadistic delight of the engine designer. On my Lycoming IO-540-D, the vernatherm is that part. On some engines with remote mount oil filter adapters, the vernatherm is much easier to access. On Lycoming engines with an oil filter on the accessory case, the vernatherm is mounted vertically and threaded up into a fitting below the oil filter. On Lycoming engines with an oil screen and no oil filter, it is screwed in horizontally in the same area. On Continental engines, there is more variation depending on case design. Continental oil coolers are typically attached directly to the engine, and the vernatherm is mounted in the oil cooler or directly in line with it. Lycoming Service Instruction #1255A gives guidance on updated parts and oil seals along with installation instructions for Lycoming engines.
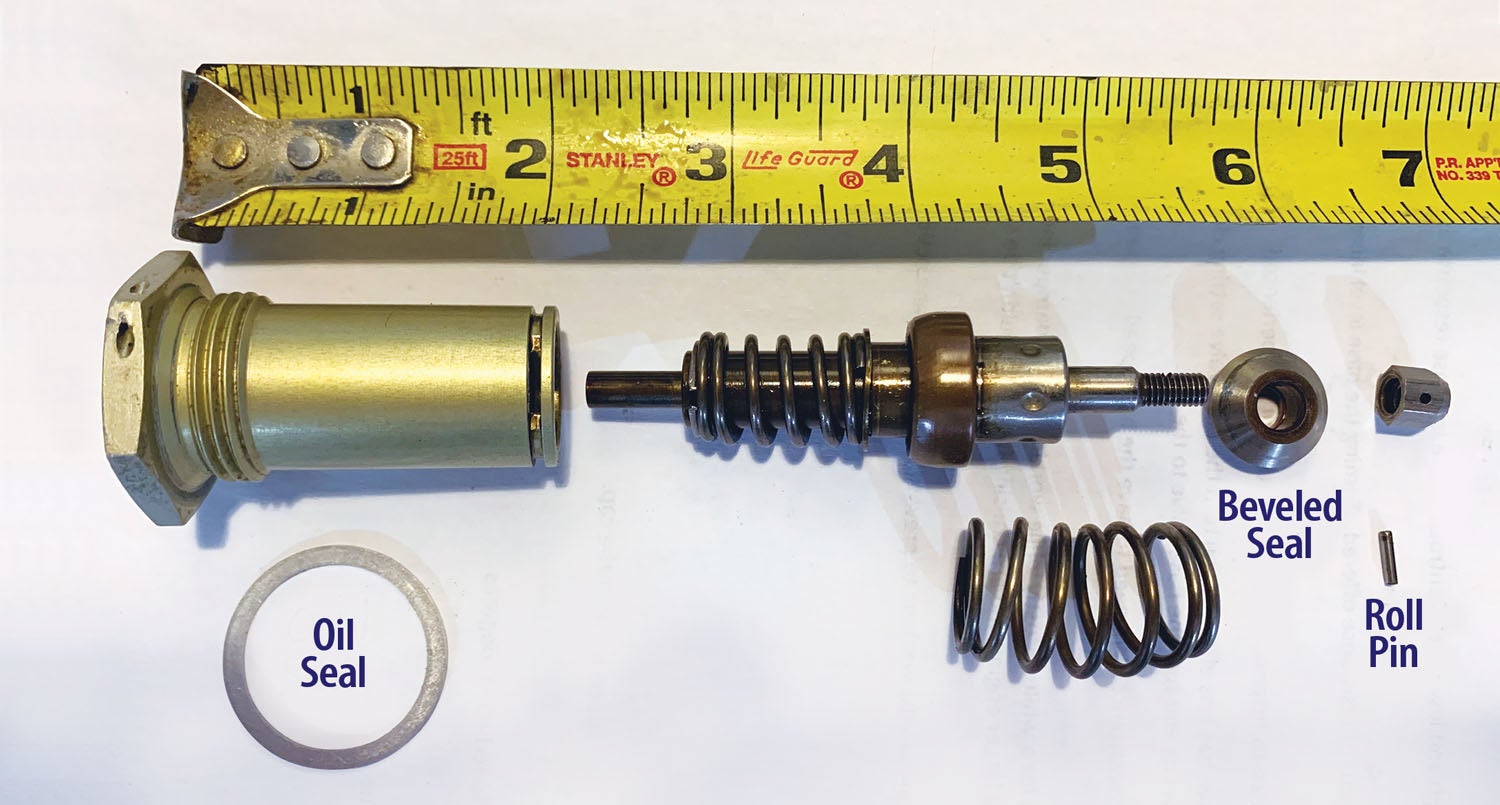
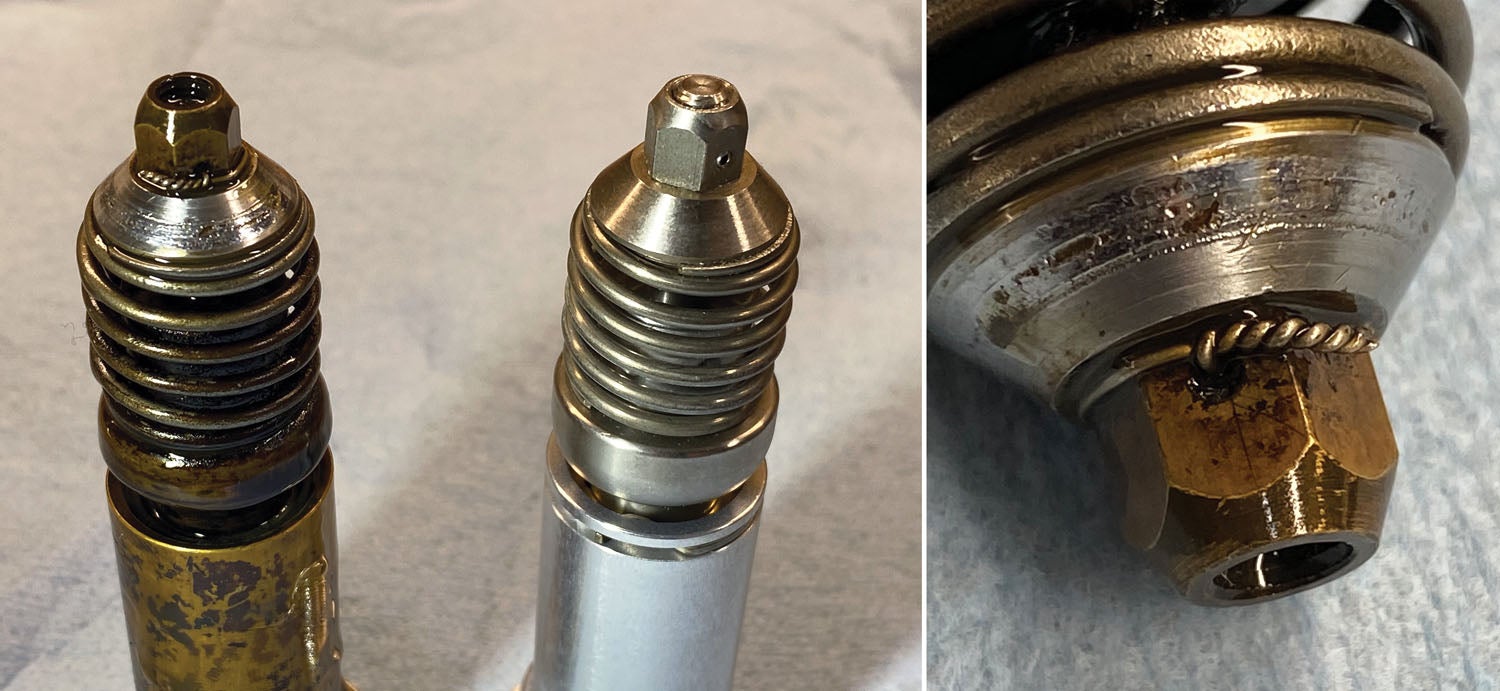
Once removed, look over the beveled head/plunger end. It should be smooth and not scored or otherwise marred. After a short period of use, there should be a faint outline of the seat concentrically around the beveled end. This faint mark indicates the vernatherm is making good contact/seal against the seat. Note the threaded portion at the head of the vernatherm. This screws into the fitting on the accessory case. Use a new oil seal here when reinstalling it. The beveled plunger end is pushed against the seat up in the accessory case as the oil heats it up. Note that the beveled end fitting is threaded onto the rod at the center of the device, and the spring pushes directly up against its underside. The beveled end fitting is locked against unthreading via a roll pin visible in the photos accompanying this article. You can compress the spring by firmly pushing against the beveled end, but the spring cannot be extended without unscrewing the beveled fitting from the threaded shaft.

Look over the device to see if it is clean and to ensure no contamination or sludge is impeding its operation. A final check of the vernatherm is to put it in hot water to verify its function. Practically speaking, if you immerse it in near-boiling water, it should extend to its fullest. The meticulous among us could try a series of different calibrated temperatures of water from, say, 170° on up to boiling, but it’s enough that it extends when it’s at 180° or so. On my Lycoming, the difference in length from cold to hot is approximately one-half inch. I believe on Continental applications, the difference in length from cold to hot is less than a quarter inch.
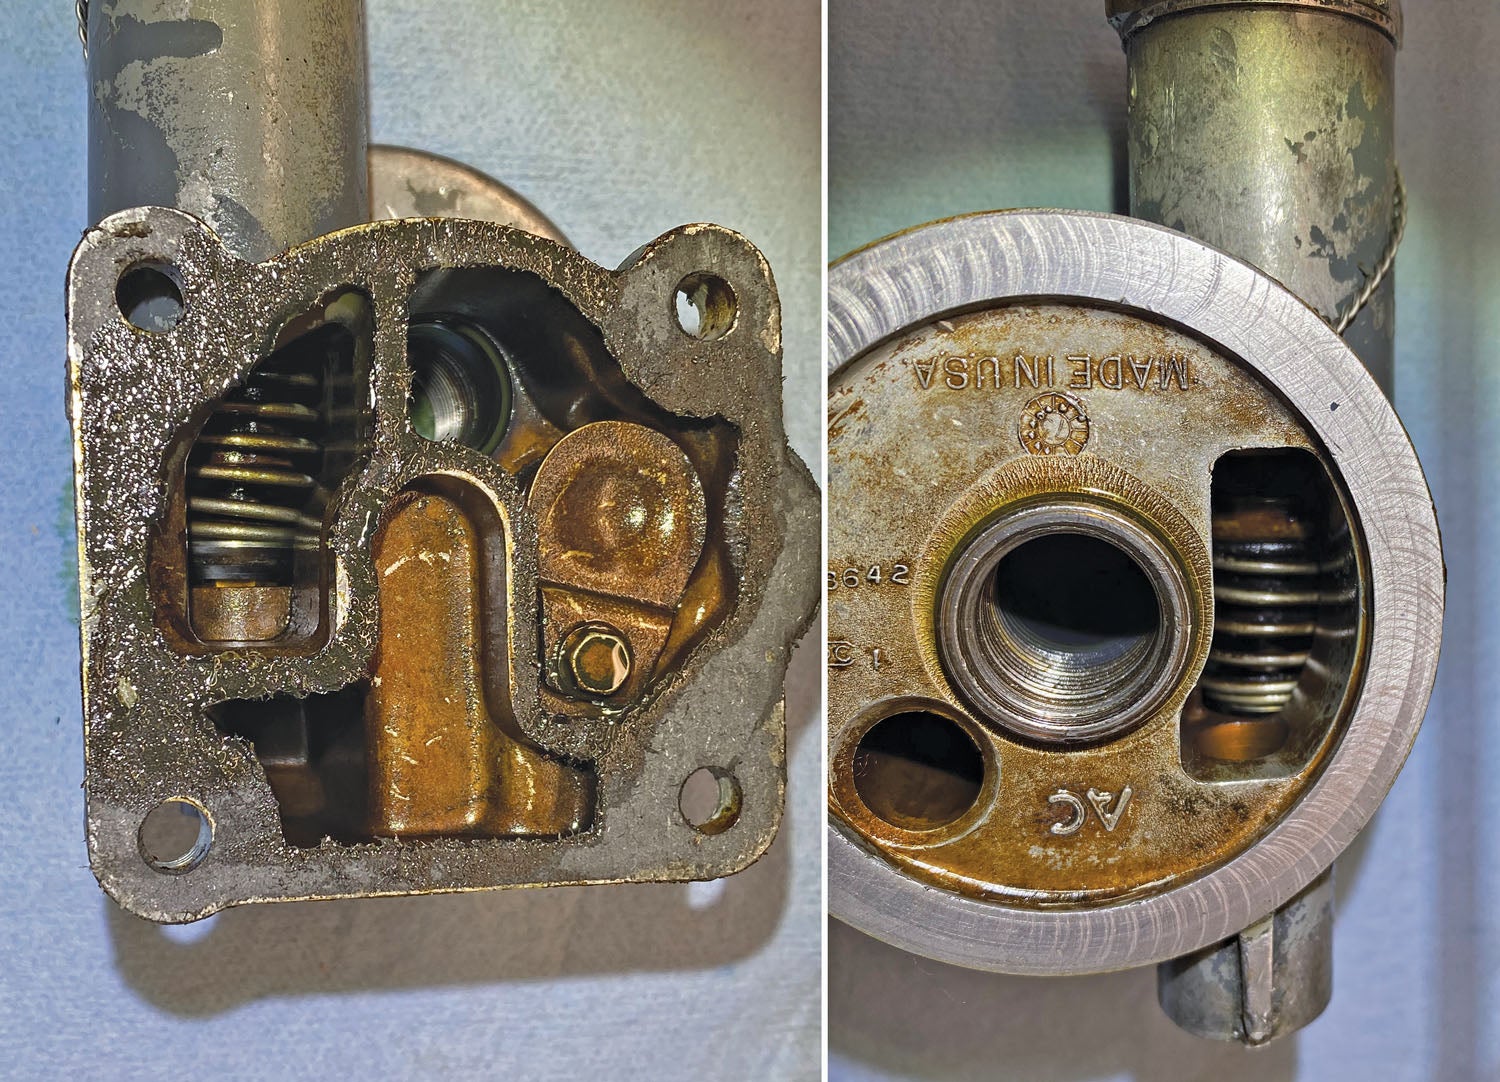
Take a close look at the seat to verify it is smooth and free of nicks, scuffs or debris and for signs of bypass or failure. In applications such as mine, this is easier done with a scope than the eyeball, not least because it might drip a little bit of oil.
Kludges and Random Fixes
My experience is that the vernatherm either works or it doesn’t. I have heard anecdotes from other builders that using the same vernatherm reinstalled in a new remote mount oil filter bypass solved their oil temperature problem. This could be due to the vernatherm now sealing better with a different seat in the remote kit adapter, or just the additional oil plumbing to the remote mount filter allowed greater heat rejection. I have also heard that one builder replaced the vernatherm with a new one twice before solving his problem for no discernible reason. I am also aware of at least one person who solved their oil temperature problem by disassembling the vernatherm and installing a washer or spacer under the spring to increase the spring pressure holding the end into the seat. If you go this route, start with a very thin spacer, like the size of a thin AN washer. You could also theoretically unscrew the beveled end a half or full turn and reinstall a roll pin, slightly lengthening the device. I am also aware of one case where the roll pin dislodged, allowing the beveled end to begin to unscrew, but the failure forced an earlier seal onto the seat and most of the oil into the cooler, so no actual harm ensued except for the oil not getting hot enough on cold days and the roll pin hopefully dropping harmlessly into the sump(!). Bear in mind that the assembly is cleverly designed so that there isn’t enough clearance for the beveled end to completely dislodge and fall out of line with the seat or get loose and start rattling around in your engine.
To be clear, I do not recommend the above surgical solutions to the vernatherm. In any case, it’s probably not necessary to disassemble and attempt some kind of repair to the vernatherm. In most cases, if the vernatherm isn’t working, simply replacing it solves the oil temperature problem.
Do As I Say, Not As I Do
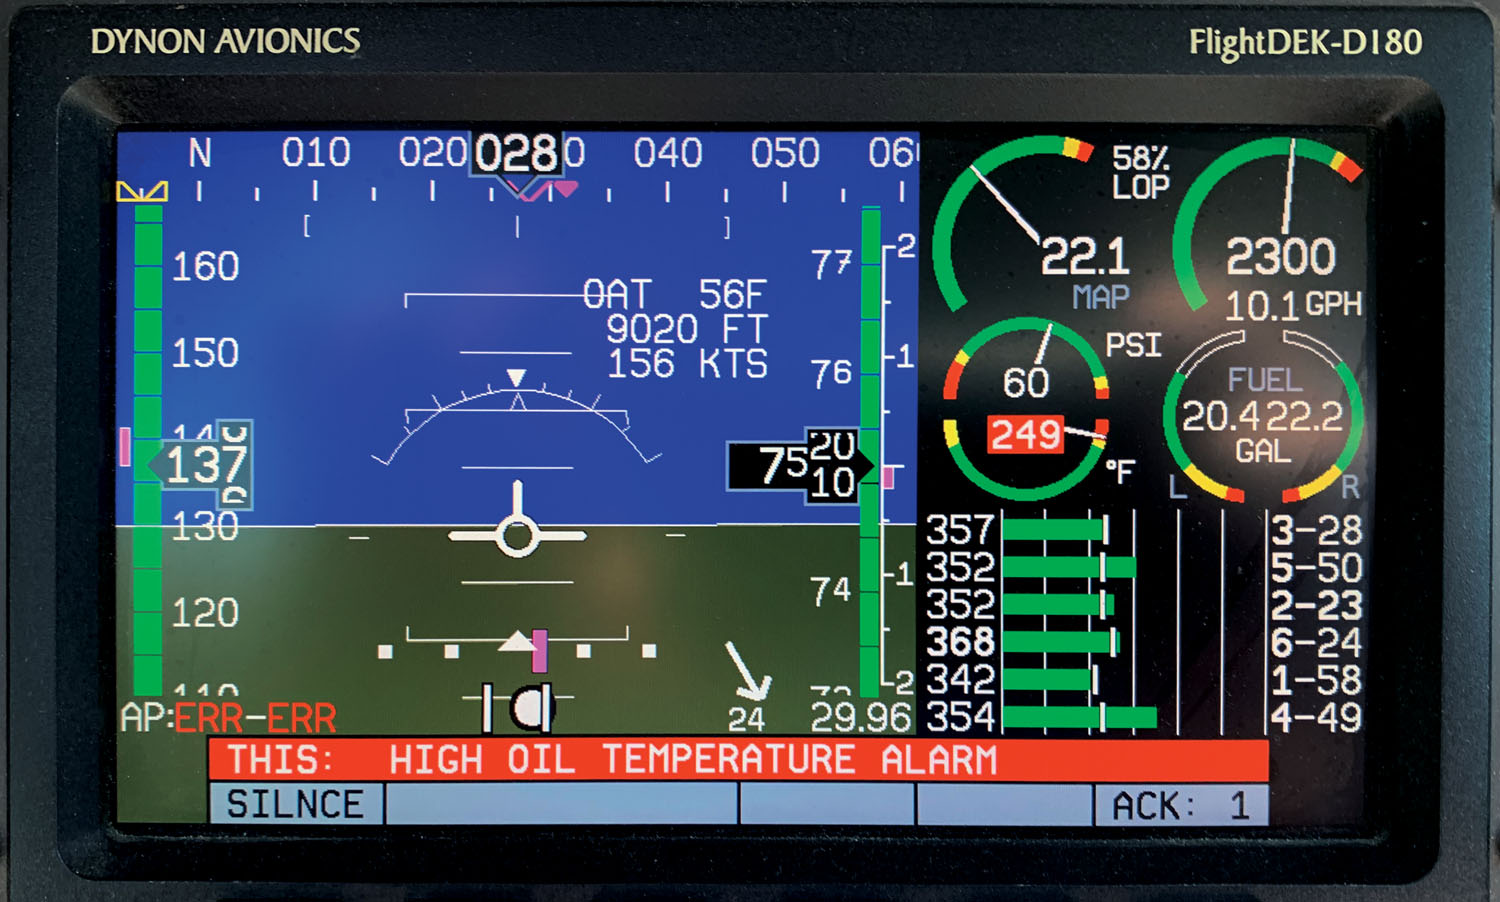
I emphasize that it is vital that you verify that the oil temperature sender and its gauge are accurate and working correctly and that the oil is flowing through the cooler before futzing with the vernatherm. On my Velocity, I have an older Dynon EFIS that digitally displays the oil temperature. I have consistently high oil temperatures in flight. For seven years and 400 hours, I saw oil temperatures in cruise of 225 to 235°. And this plane has two oil coolers. I did attempt to verify the accuracy of the oil temperature sender by testing it in boiling water before diving deeper into troubleshooting. I swapped out the vernatherm for a new one. Still too high. For years I tried increasingly creative (and time-consuming) ways to fix the problem, including several radical alterations to the airflow across the oil cooler and a few different oil cooler locations with all the downtime and fiberglass havoc that involved. I also came perilously close to irritating my on-field A&P and friend with incessant questions and complaints. No joy.
On one flight, I had to use pitot heat. Not for the first time, mind you, but it was a rare occurrence. I flipped the switch, and the digital display of oil temperature jumped 15° and then dropped 15° when I turned off the pitot heat. Later testing showed that when I shut off the avionics switch, the oil temperature magically dropped 15° only to jump up 15° when I switched it back on. Obviously, I have some stray electrons to corral to solve my oil temp “problem.” For now, I choose to fly the bejeezus out of my airplane on fair weather days, troubleshoot electrons on other days and always send my oil in for analysis at oil changes. My vernatherm works just fine, thank you very much. In short, the simplest solution is probably the correct one and remember always to fix the cheapest thing first.
Postscript
In the process of reviewing this article, the editor suggested looking at a somewhat well known issue with Dynon oil-temperature probes for Lycomings—that they can be error prone where there is potentially a great deal of difference between the engine ground and the instrument ground. The change in readings with and without pitot heat suggested an electrical/indication issue that I thought could be wiring.
On his suggestion, I tried substituting the Dynon sensor (model 100409-001) with GRT FT-LC-01 sensor; both mount in the traditional probe well on Lycomings. Legacy Dynon engine monitors can read this probe with a simple setup change.
Miraculously, by changing the probe, my oil temps fell by 25° with no other changes. Other builders report similar experience, and note that the GRT two-wire probe seems to work more smoothly, with less of the “needle wiggle” often seen with the Dynon probe. And even after Dynon “re-characterized” the probe in 2006 to help reduce high-indicated oil temps, there seems to be some electrical sensitivity present.
Of course, the question could be: Which is more accurate? Was the Dynon right and I do have high temps, or is the GRT closer to right and I’ve been chasing ghosts all along? Well, this is why we test. One thing I know: It wasn’t the vernatherm.
![[Credit: Wikimedia Commons]](https://www.kitplanes.com/wp-content/uploads/2026/07/4_rutan_a_longez.jpg_preview.jpg?w=218&h=150&crop=1 "Rutan Symposium Turns to the Coming Canard Maintenance Crisis")
![[Credit: Lisa Turner]](https://www.kitplanes.com/wp-content/uploads/2026/02/Fuel-Selector.jpg?w=218&h=150&crop=1 "Fuel Follies")


“As the oil heats up around the vernatherm, the device gradually extends the beveled end, pushing it against the seat, ”
I don’t believe this is gradual as the vernatherm expands over a short temperature range when it gets close to 85*C. It happens rather quickly.
Hi Cliff, I’ve been having high oil temp issues for years in my RV-7A , Lycoming IO-360, and tested everything, (probe, guage, wiring, baffling, cooler etc.) I replaced the vernatherm twice, but kept getting inconsistent temps from 200 all the way up to 245, and ambient temps were not a factor. Finally my A&P looked closely at the vernatherm seat in the housing. BINGO. The seat edge was not smooth (very slight) , but the beveled Vern plunger showed the wear ring did not go completely around he plunger end. Im pretty sure this would cause my variable temps. I’m getting the seat in the housing refinished and putting in another new Vern. I hope to know this coming week. I’ll let you know. But thanks for the article. Got me looking in the right place.
Bob C
Hi Jeremy
love the articles and very interested in the velocity you built. I use Syrek-Mee Aviation Old Bridge Airport – 3N6 for our maintenance so I am at old bridge every now and then. Would love to meet you and get an idea on the velocity and if its right for what I want to do. It seems to tick all the boxes but as you can imagine the internet has it all over the place on it and nothing like speaking with someone that knows what they are doing.
Here is my email:
aviationbuilder75@gmail.com
Thanks
Gene
Thank you Jeremy for this interesting article,
I wonder if a failure of the vernatherm can cause unstable low oil pressure?
I just finished an upgrade of the Airwolf remote oil filter and I now have problem with unstable oil pressure
and Temperature. I cleaned all the whole system and even went back to the screen without any results.
Wonder if you can help me with your opinion.
Warm regards from Ecuador
Comments are closed.