You can do two things that will extend your engine’s life more than any others: Fly your airplane regularly and change your oil as specified by your engine’s manufacturer. You can do other things to help or hurt your engine, to be sure, but if you made two big piles, one with engines killed by infrequent flight and lack of oil changes and the other with engines destroyed by all other causes, it wouldn’t even be close. So go fly! And change your oil every four months or 50 hours if you have an oil filter, and every 25 hours if you don’t.
Step-by-Step Oil Change
Changing your oil is a fairly simple process, but like anything else there are better and worse ways to do it. Here are the necessary steps for a Lycoming engine:
1. Warm the engine up to operating temperature. (There’s that “go fly” thing again.)
2. Drain the engine oil into an appropriate container, one that you can use to recycle the oil.
3. Retrieve a small sample of oil from the stream of draining oil to send in for oil analysis. (Don’t do this at the very beginning or end of the process, aim for somewhere in the middle so you don’t get the first bit of sediment near the drain plug, nor the last.)
4. Give the engine a chance to completely drain before you shut off the quick-drain or reinsert the drain plug.

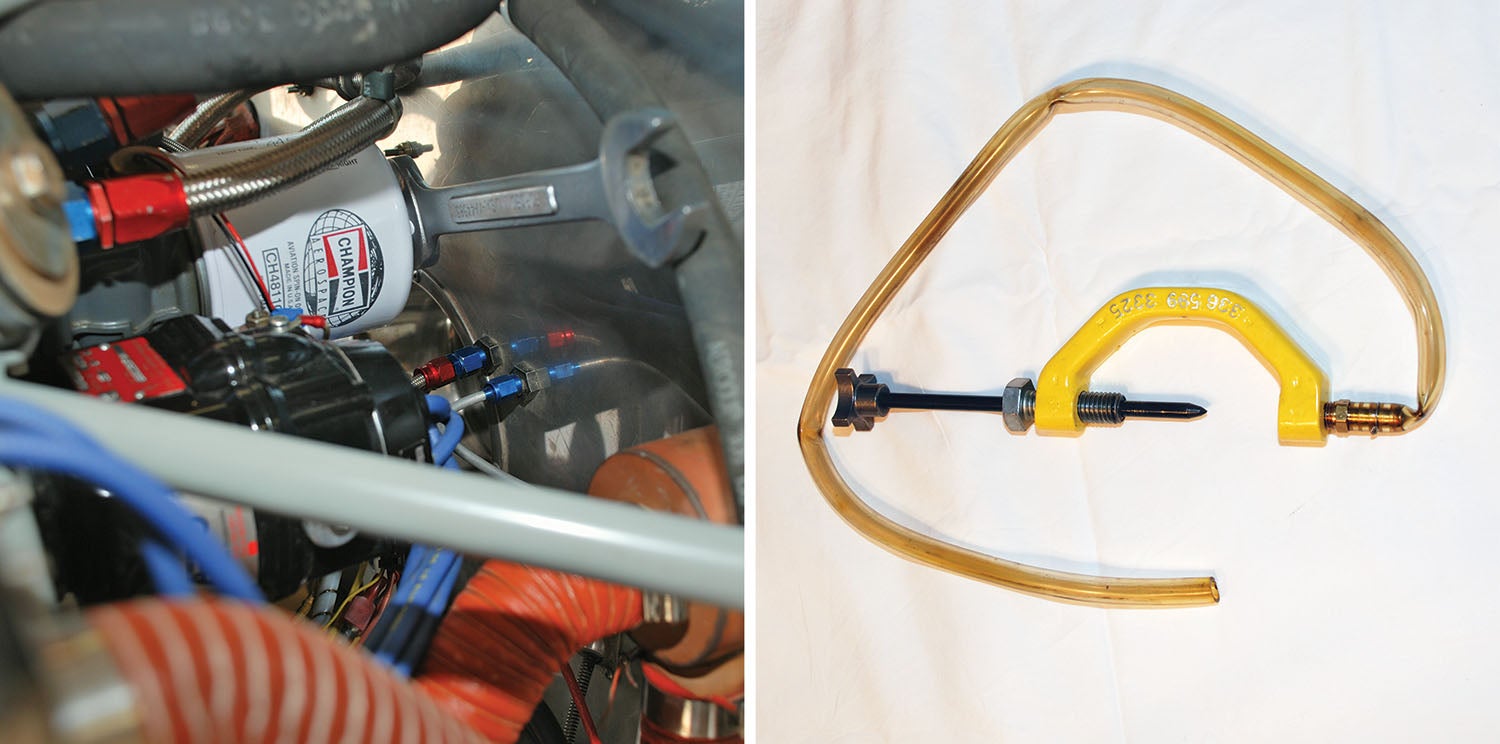
5. If you don’t have a quick-drain valve on your engine sump, now is a good time to install one. They run about $100 for a Lycoming engine or $42 for a Rotax, and they are definitely worth it.
6. Remove the oil filter and save it for examination later. Begin by loosening the filter with an oil-filter wrench or a 1-inch combination wrench. In some cases, large water-pump pliers may be needed to break the filter loose. Once the filter is loose enough to turn by hand, place a plastic bag around it to catch oil draining from the filter. Be sure to have a few rags or paper towels handy to deal with the inevitable mess. (If your engine does not have an oil filter, you should consider adding one. Your wallet will suffer to the tune of $300 to $400, but a new engine is so much more.)
7. Drain any remaining oil from the filter and take it over to your workbench to cut open and examine its contents. Oil-filter cutters begin at around $80. Airwolf makes a pretty good one for about $100. This is a “must-have” tool for any Experimental airplane owner.
8. Secure the oil filter in a vise and use the cutter to remove the bottom—the part that goes next to the engine—from the filter can. Set the can bottom aside and remove the filter media, being careful not to contaminate it with any foreign material such as filter can cutting remnants.
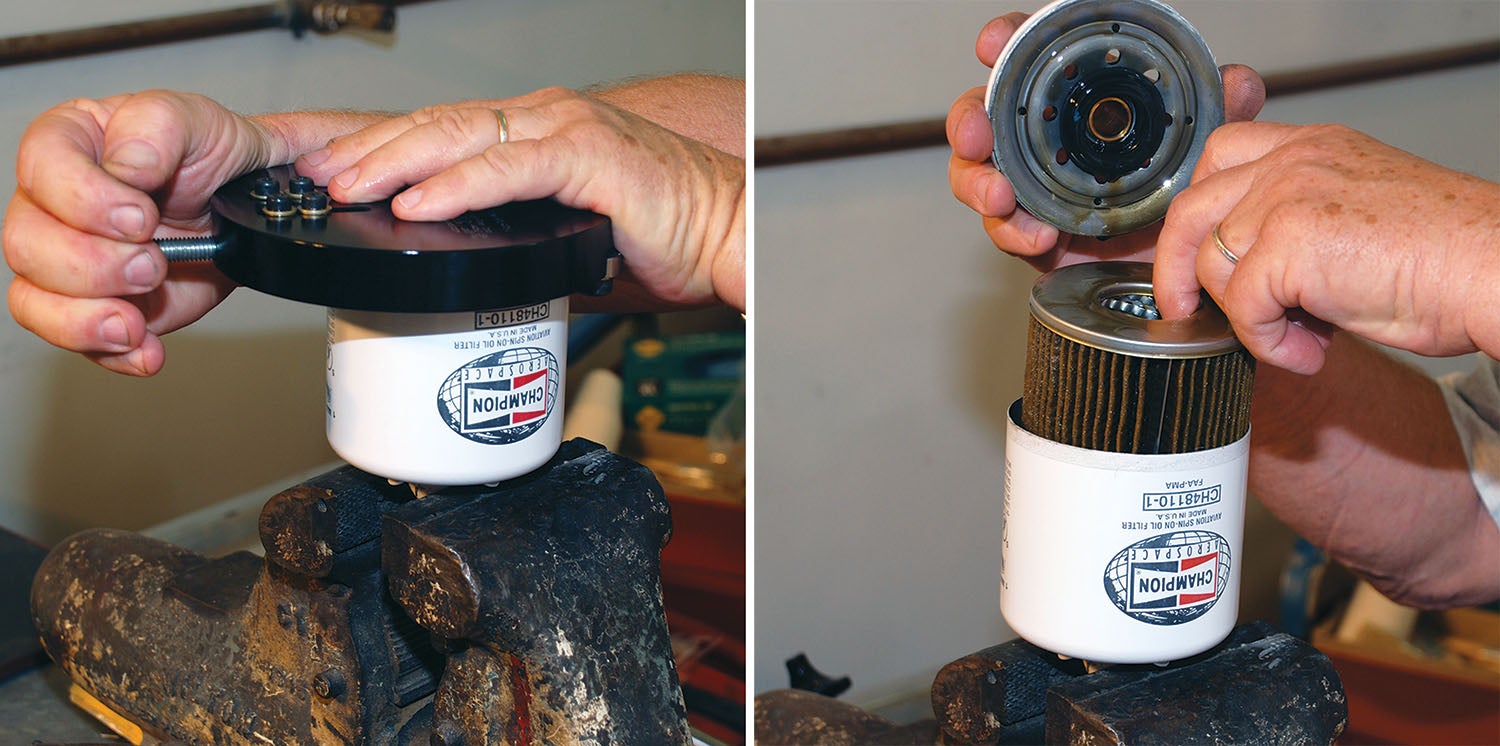
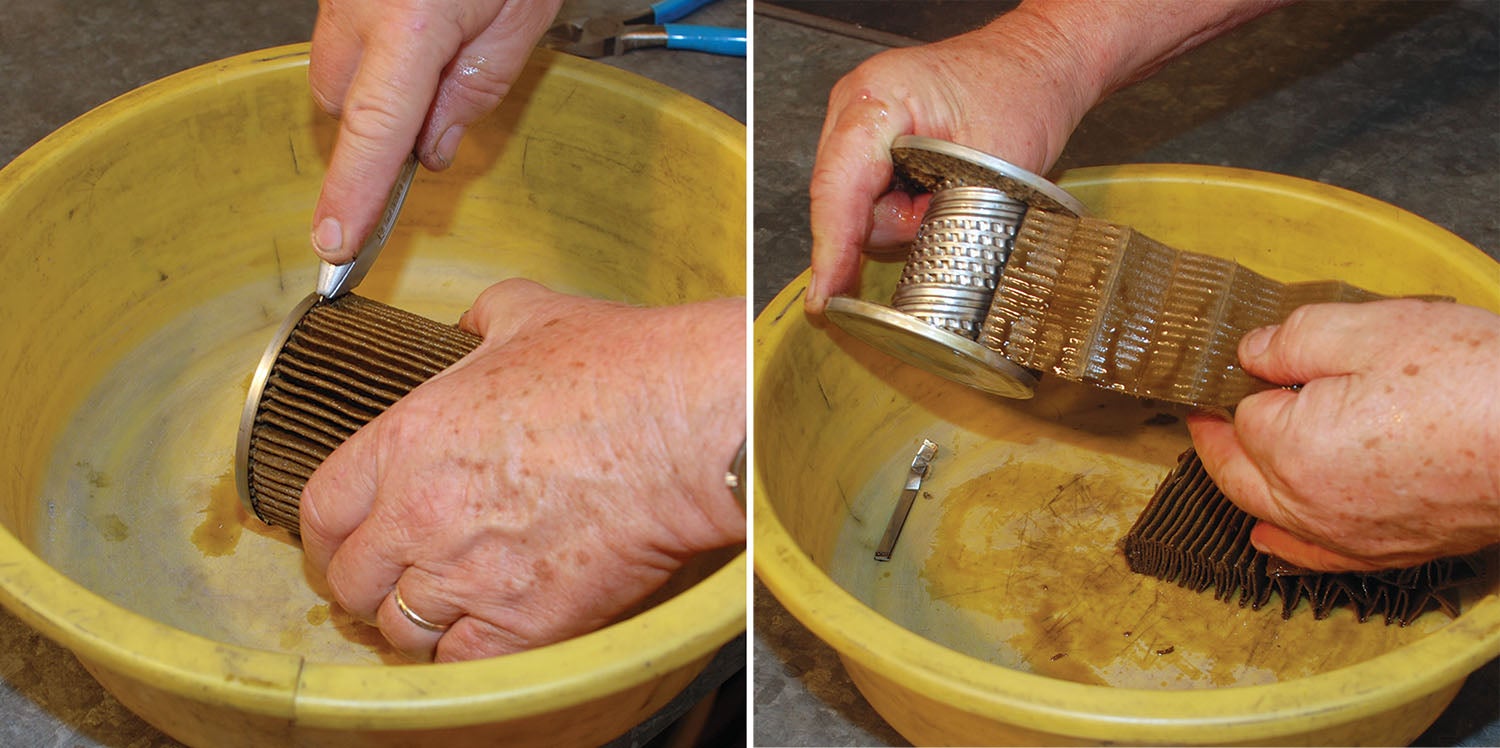
9. Place the media in a clean pan or tray and cut the media (folded paper) loose from the core. Use some side-cutting pliers to remove the metal clip that holds the paper media together, and then use a filter media cutter or just a utility knife to separate the media from its metal end plates. A serrated steak knife that lost its way from the kitchen also works.
10. Once the media is cut loose, open up the folds and look for trapped particles. You should expect to see a few and hope not to see a lot.
11. If there is anything more than a small amount of metal found in the filter media, you should also remove the sump screen and look for larger metal pieces. Lycoming recommends that you inspect the sump screen at every oil change, but at a minimum you should check it once a year no matter what or whenever any significant metal is found in the filter.

12. Assuming there are no unpleasant surprises in your oil filter or sump screen, write your tail number, tach time and date on a new oil filter with an indelible marker and install it on the engine. Place some grease, such as Dow Corning DC-4, on the threads and tighten the filter to 17 foot-pounds. Then safety-wire it to keep it secure. Don’t forget to replace and safety wire the sump screen, too, if you removed it.
13. Refill the crankcase with aviation oil approved for your engine and operating conditions. Usually, a quart below the maximum is plenty. It’s very common for traditional aviation engines to send the top quart out through the breather in short order.
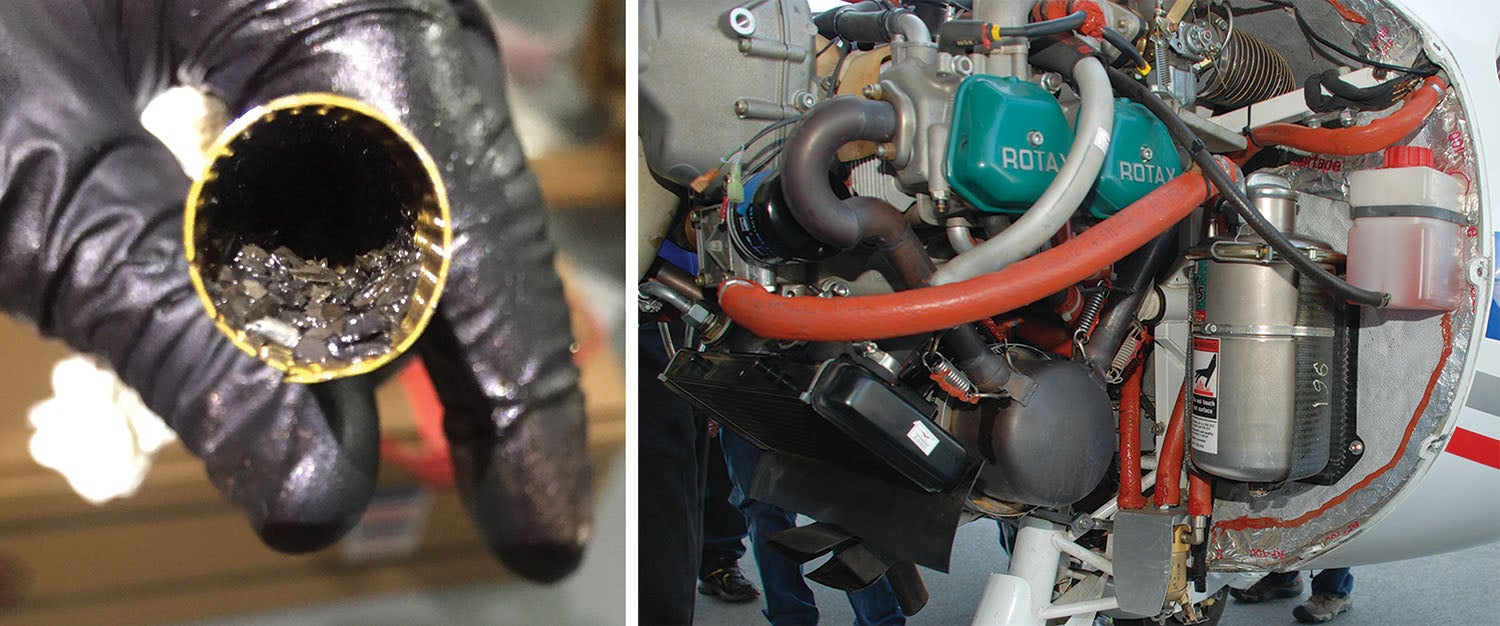
Hidden “Treasures” in Your Oil Filter
When you cut your filter open, there are four types of particles that you may find. Black particles that can be broken up are carbon particles. They are common and of no great concern—especially with an engine that burns a lot of oil—unless they are excessive. Excessive means more than a quarter teaspoon or about enough to cover your thumbnail. Expect to find a few of these in most filters.
Copper-colored particles are brass or bronze, most commonly from valve guides, but in some cases from wrist-pin plugs. Excessive valve-guide wear is troubling, so more than a tiny bit of gold material in the filter should prompt you to look for the source.
Silver or gray particles that stick to a magnet are steel. Likely sources of magnetic material include lifter faces and camshaft lobes, oil pump gears and piston rings. The more of this material you find, the less happy you will be, but a small amount is no reason to hit the panic button. However, any large pieces that exceed the size of a broken pencil lead are cause for concern and should move you to remove the sump screen and look for bigger chunks. Unfortunately, the most likely source of ferrous metal in your filter is a failing cam and/or lifters.
Silver or gray particles that are not magnetic are most likely aluminum but could also be bearing material. Shiny aluminum particles are common and not particularly troubling in small quantities. These are often shed off the aluminum wrist pin plugs found on most Lycoming engines, though pistons can also shed them. Dull gray flakes can be bearing material, a troubling sign to be sure, but one that should also be showing up as lower oil pressure and possibly elevated oil temperature.
The key to your level of concern is the quantity and the change in amount from the last oil change. A sudden increase in the amount of material in your filter is a sign of trouble, as is any large quantity. Any pieces larger than a broken pencil lead also point to more severe problems that need immediate attention.

New engines or freshly overhauled ones will initially make more metal as they break in. This is normal. Once an engine breaks in, and certainly after 100 hours, you should expect to see very little metal in the filter. However, very little metal is not the same as none. Do not panic the first time you see a tiny flake of aluminum in your oil filter. As an engine develops problems, more metal will likely appear again long before a catastrophic failure. Pay attention to the early warning signs and keep yourself safe. If you have any doubts, contact a good mechanic or call your engine manufacturer’s technical support staff. They can help you decide when to take further action to track down the source of metal in your filter.
Lycoming has a more detailed description of what you should do when you find a small amount of metal in your oil filter. It’s somewhat hidden in Service Instruction 1492D dealing with piston pin plug wear. It is worth reading the whole thing, but this is a quick summary. They make recommendations based on the size and quantity of metal (magnetic or non-magnetic) found in the oil filter. They define small as 1/16-inch diameter or less.
This is a quick survey of what you might find in your oil filter. It should not be regarded as the last word on oil filter analysis but rather serve as a starting point for learning about this process. Every aircraft engine has its own unique set of operating history and conditions that must be considered in addition to whatever information an oil filter examination might reveal. In all cases where there is any doubt, seek out expert help to evaluate your situation before further flight or any major teardown is considered.

Oil Analysis
Oil analysis is another essential tool for monitoring the health of your engine. Take a sample from mid-stream when you drain your oil, being careful not to let any foreign material fall into the sample jar. Always use a clean jar as provided by the oil analysis lab. Oil analysis works best over time, where you can note trends and changes. A single oil analysis is not all that useful unless there is a large problem that is probably already obvious from material in your filter and/or sump screen. Set up a file system to track your results over time, and try to stick with the same lab for greater consistency. Lycoming Service Letter SL 171 goes into greater detail on oil analysis.
What to Do About Junk in the Filter
| Number of Particles | Present Action | Next Action |
|---|---|---|
| 1-9 small particles of any type | Change oil, inspect and replace filter and go fly | Change oil, inspect and replace filter as scheduled after 4 months or 50 hours |
| 10-20 small non-magnetic, 10 or fewer magnetic | Change oil, inspect and replace filter and go fly | Change oil, inspect and replace filter after 25 hours |
| 20-40 small particles of any type | Change oil, inspect and replace filter and go fly | Change oil, inspect and replace filter after 10 hours |
| 40-60 small particles | Change oil and filter, ground run for 20-30 minutes, inspect and replace filter again | If filter is clean, fly 1 to 2 hours and inspect oil filter again |
| Any particles larger than 1/16 inch | Ground aircraft and investigate | Repair as needed |
| Non-magnetic 1/16-inch copper colored particles | If less than one-quarter teaspoon change oil, inspect and replace filter and go fly. If one-quarter teaspoon or more ground aircraft and investigate | Change oil, inspect and replace filter after 25 hours or repair as needed |
| One-quarter teaspoon or more of any type particles | Ground aircraft and investigate | Repair as needed |
What Oil Should I Use?
Aircraft engines have very specific lubrication needs that are not well served by oils not specifically designed for aircraft. After that, the answer depends on the operating conditions you will be likely to encounter, especially temperature. Phillips recommends their X/C 20W-50 oil for all standard conditions except when dealing with Lycoming 76-series engines (O-320-H2AD, etc). AeroShell recommends their multi-viscosity 15W-50 oil for all standard uses but also sells single-grade 100W for use above 60° F. The 100W oil has the benefit of being less expensive and is fully compatible with the 15W-50 oil. By the way, it is fine to use AeroShell 100W in the summer and then switch to 15W-50 in the winter. You can save a bit of money and be no worse off for it.
Rotax Engines
Rotax engines will need a different approach to oil changes due to their dry-sump design, in which the oil is stored in a remote tank rather than the engine’s crankcase, and other design differences. Rotax engines prefer to run on unleaded gasoline but will also run on 100LL avgas. Unfortunately, you must change the oil twice as often if you run avgas 30% of the time or more. This means that the standard 50-hour oil change interval gets shortened to 25 hours with avgas. Here is the oil change process for the Rotax 912 series and 914 engines:
1. Warm the engine up to operating temperature and remove the cap from the oil tank.
2. Be sure the ignition system is off.
3. Turn the engine over by hand in its normal direction of rotation. As you do, listen for the telltale “burp” as the last of the oil is pumped from the crankcase into the oil tank.
4. Remove the drain screw from the bottom of the oil tank and drain the oil into a proper container, taking a mid-stream sample for oil analysis. Do not move the prop or break any oil lines loose while the oil tank is empty. If you do, you will likely need to go through a much more involved priming process as described in the Rotax maintenance manual.
5. After all of the oil has drained from the tank, replace the drain screw with a new washer, torque it to 18 foot-pounds and safety-wire it in place. Refill the tank with the prescribed amount (about 3 quarts) of approved oil. Note that this will not be standard aviation oil but oil specially formulated for the Rotax engine such as AeroShell Oil Sport Plus 4. This oil is designed to work with the Rotax gear reduction units and clutches. Many Rotax owners use high-quality motorcycle oils instead of the AeroShell product, but it is vitally important that any oil used has an additive to handle the loads of the gear reduction drive in the Rotax engine. The main point is that standard aviation oils such as AeroShell 15W-50 or Phillips 20W-50 are not acceptable in Rotax engines.
6. Remove and save the oil filter for later inspection and replace it with an approved part. You will need a strap-type oil filter wrench to do this properly. Lycoming oil filter wrenches will not work.
7. Install a new oil filter by first lightly oiling the gasket and then screwing the filter on until it is solidly seated. Then add three-quarters of a turn to achieve its final tightness.
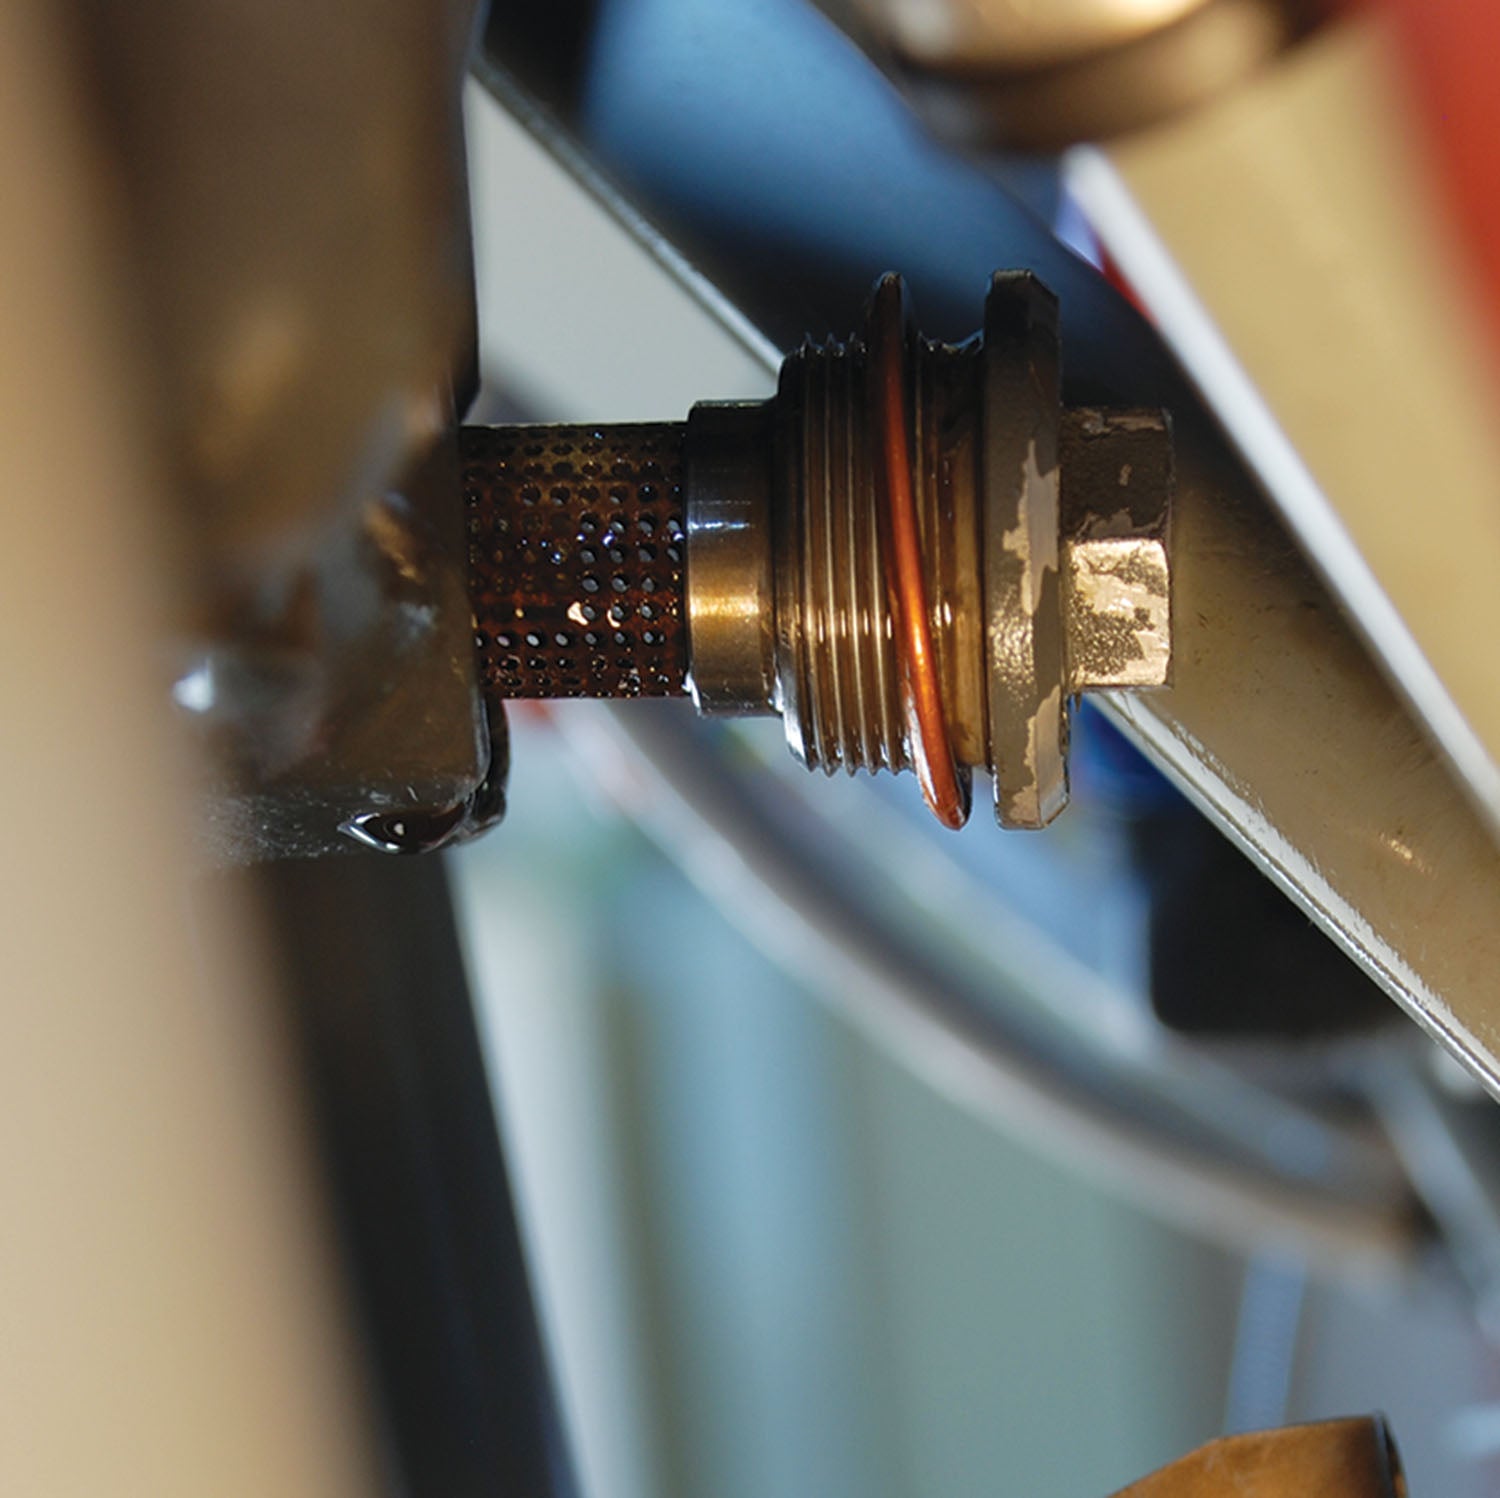
8. Remove the magnetic plug on the engine crankcase below cylinder Number 2 and look for metal filings. There should be few to none present. This metal most likely comes from the gears in the propeller drive. An excessive amount of metal on the magnetic plug is cause for repair or overhaul before further flight.
9. Oil filter inspection with a Rotax is similar to that for a Lycoming, but as a general rule you should expect to see much less metal in the filter due to differences in the designs of these engines. After break-in, there should be almost no metal present in the filter. The quarter teaspoon that Lycoming finds acceptable would be cause for an immediate teardown of a Rotax engine. Again you are looking for total quantity and, more importantly, any change in amount or type from the last oil change. If in doubt, seek qualified help to assist in your evaluation of your filter material.

10. With the new oil and filter now in place, turn the engine over by hand for at least 20 turns to ensure that you have purged all the air from the oil system. This can be done with the starter motor if your ignition system is set up so that you can activate the starter with the ignition system off. Do not start the engine until you are sure oil is circulating properly. If you have inadvertently opened up the oil system during the oil change process, please refer to the oil system priming procedure in the Rotax maintenance manual before attempting to start the engine.
With any engine, the first time you start it up under power after an oil change you should check for leaks and be sure you quickly establish safe oil pressure. Leaks and low oil pressure are problems you need to find while you are still on the ground. If everything looks good, close up the cowl and go fly.
Photos: Dave Prizio and courtesy of Rotax
![[Credit: Lisa Turner]](https://www.kitplanes.com/wp-content/uploads/2026/02/Fuel-Selector.jpg?w=218&h=150&crop=1 "Fuel Follies")


Interesting to see motorcycle oils recommended for the Rotax engnes .
With production motorcycles pushing out in excess of 200 hp out of 1000 cc engines spinning up to 15000rpm reliably , they require oil of the highest specification and quality , so I am not surprised at Rotax’s recommendation .
You can do one other thing regarding oil changes and include this in the PreFlight inspections and this is for those of us that have experimental airplanes maybe with certified engines but an off-site oil filter that is not safety wired.
From personal experience, make sure your oil is preheated thoroughly up to a reasonable temperature during cold days and nights. Make sure the oil filter is snug. I’ve commented on here before but I will repeat it… Not too long ago I was getting ready to take the active runway and I noticed my oil pressure had dropped to zero. Caution being the better part of valor a taxi back to find the oil filter gasket had blown on my off-site oil filter. The oil filter was also loose as in being able to turn it with my hand to remove it. Well there are not this was caused by excessive oil pressure from a less than thorough preheat or whether the oil filter had just loosened some due to cold weather or whether it had not been sufficiently secured in the first place I do not know but again it’s worth repeating.. make sure you had preheated your oil during cold weather operations and to make sure for those of us that do not have certified airplanes and may not have an oil filter that is safety wired on,, that that part of the heart of the airplane is snug.
I am an aviator with some experience and this was the first for me. I still shudder to think with what could have been the outcome had that happened a minute later or less. I have had several engines fail or partially fail plus had one in flight fire and everything worked out correctly but this still makes me queasy if I think of what could have been the outcome shortly after takeoff and this had happened.
When you say fly your airplane regularly, how many days or weeks would you consider maximum between flights? Thanks Lyle Mead
What Mr. Jaffas experienced is precisely the situation that I experienced, but when I was airborne. Oil filter backed off while in flight leading to a forced landing and off-field recovery in the middle of January. No damage to the aircraft (ski equiped) but the engine was sacrificed (ran it until it seized) to make a suitable forced landing area. The engine gave me approximately another minute of useful thrust before calling it a day and quit. The manufacturer of the engine had no maintenance requirement for safety wiring of the oil filter (similar to Rotax), but I do indeed safety wire it now!
Comments are closed.