 Builders of old are hard to startle when it comes to problems with their flying machines. Since they generally started with a set of plans that were no better than sketches and bought their raw materials in board feet and lengths of tubing, there are virtually no fabrication tasks with which they are not familiar. Modern builders, on the other hand, are used to having many of the fabrication tasks that require special skills, such as welding, done for them by a kit manufacturer. They take a beautifully welded engine mount out of the box, remove the bubble wrap and bolt it firmly to the fuselage, then check off “engine mount—assembled” in the manual. So what happens when they suddenly find a problem with the mount years after assembly?
Well, the first thing is they go through the seven stages of grief—grief for their airplane that they think might now by nothing but dead weight. A pile of useless parts. A huge liability that, at the very least, they will have to find a way to dispose of. Yes, shock, denial, bargaining, guilt, anger, depression and (finally) acceptance flash through the owner’s mind.
“What? A crack? No way, it can’t be—that’s just flaking paint…isn’t it?
“Well, its not a big crack—can’t I continue to fly it awhile, then fix it?
“How could I have let such a thing happen…it must have been that one landing.
“Damn it! No, I think this thing was badly designed!
“Oh man…I have no idea how to fix this, and even if I did, I am going to have to start by pulling the engine…and the prop…and draining all the oil…and taking off the wheels and…
“Will someone turn out the lights when they leave? I’m headed to the bar!”
Finally, however, you come to the conclusion that your expensive airplane really just needs—at the very, very worst—a new motor mount and that can just be bolted on.
“What? A couple thousand bucks!”
That would have sounded like a lot before you built this thing. But the truth is, you know these have cracked before and people get them fixed, so once you get it off, it’s just a matter of finding the right person to fix it and then bolting it back on. And if you removed it, you can put it back—and hey, you’ve even done that before!
The new light of acceptance finally dawns, you roll up your sleeves and pull out the tools. There’s work to be done.
The RV-6 Motor Mount
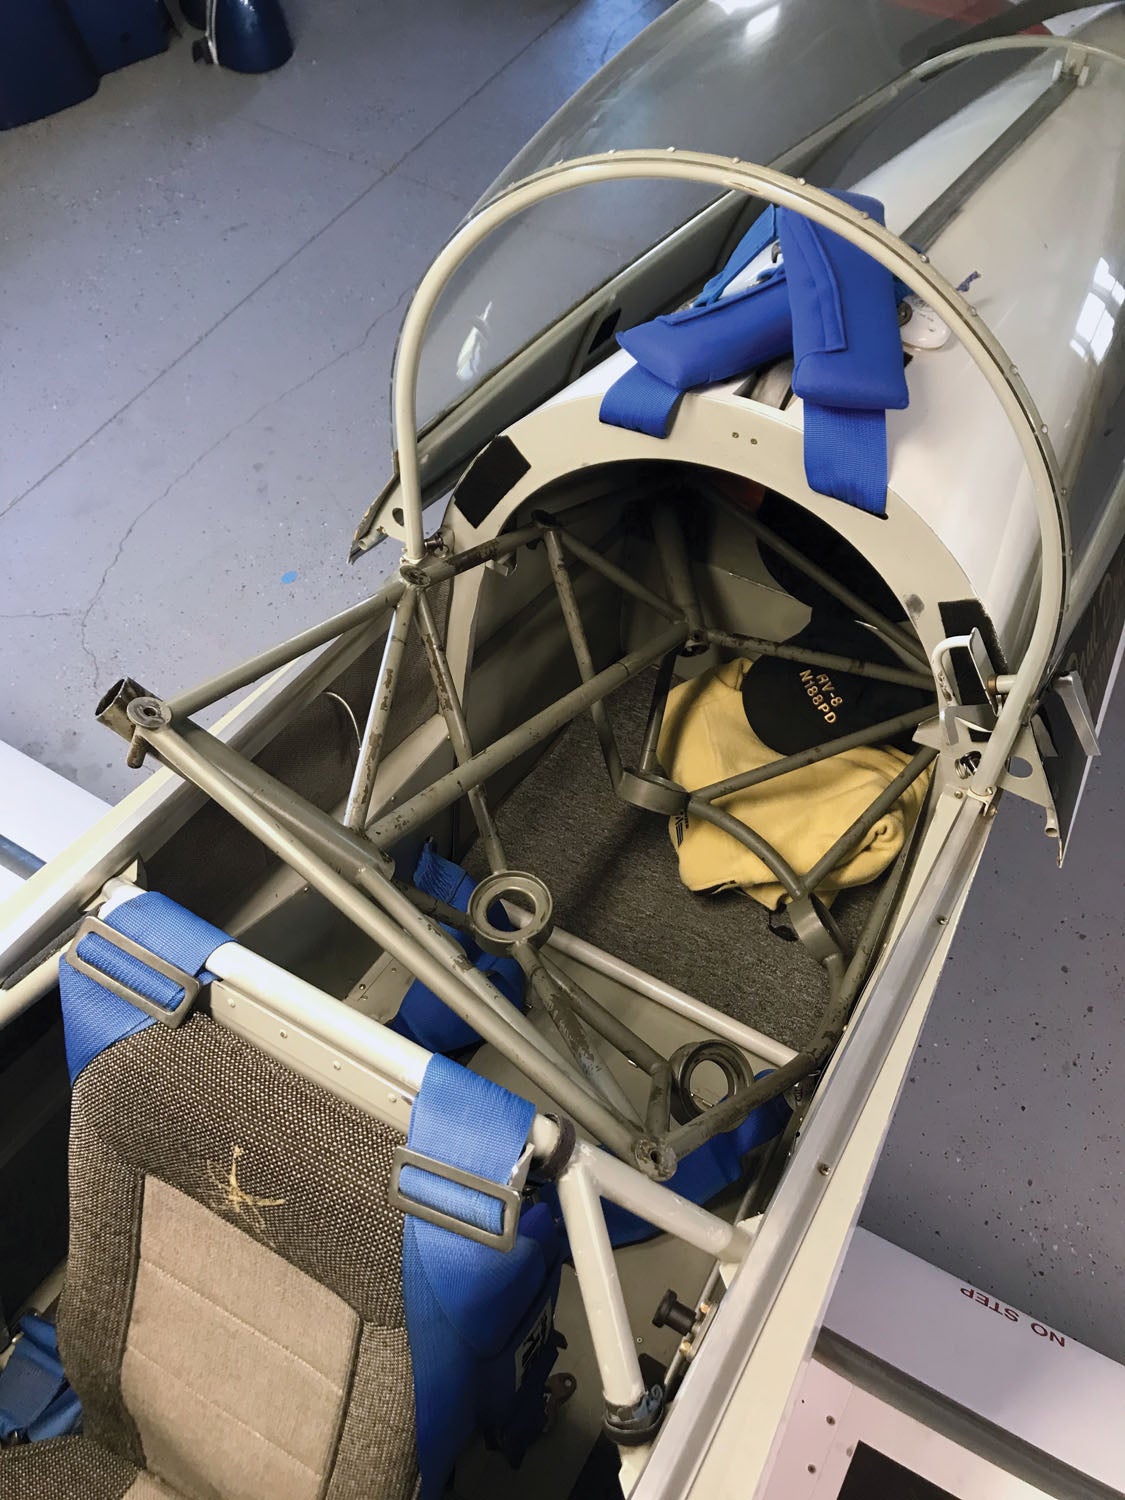
Like most of the RV line of taildraggers, the RV-6 features a motor mount that also serves as the anchor point for the main gear legs. This is a very common design solution that simplifies overall structure and puts all the heavy loads in a substantial welded structure. The exception to this rule (in the RV world) is the RV-8, which features a more complex set of structural aluminum towers to mount the gear about a foot behind the firewall. It’s a solution to a CG challenge, basically, but it’s unique to that model, so let’s concentrate on the RV-6, the first side-by-side two seater to come out of the prolific Oregon design factory known as Van’s Aircraft.
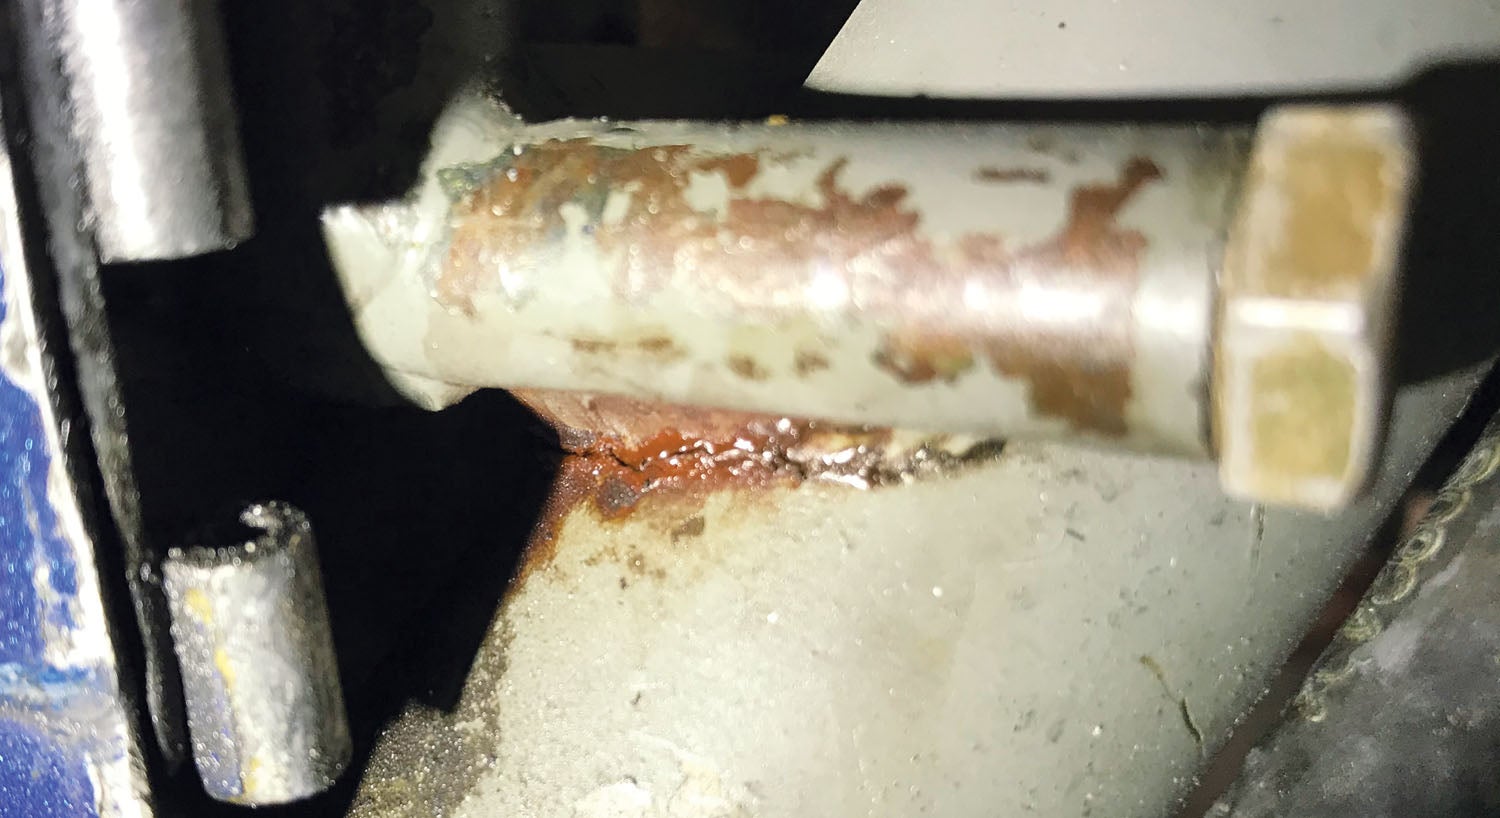
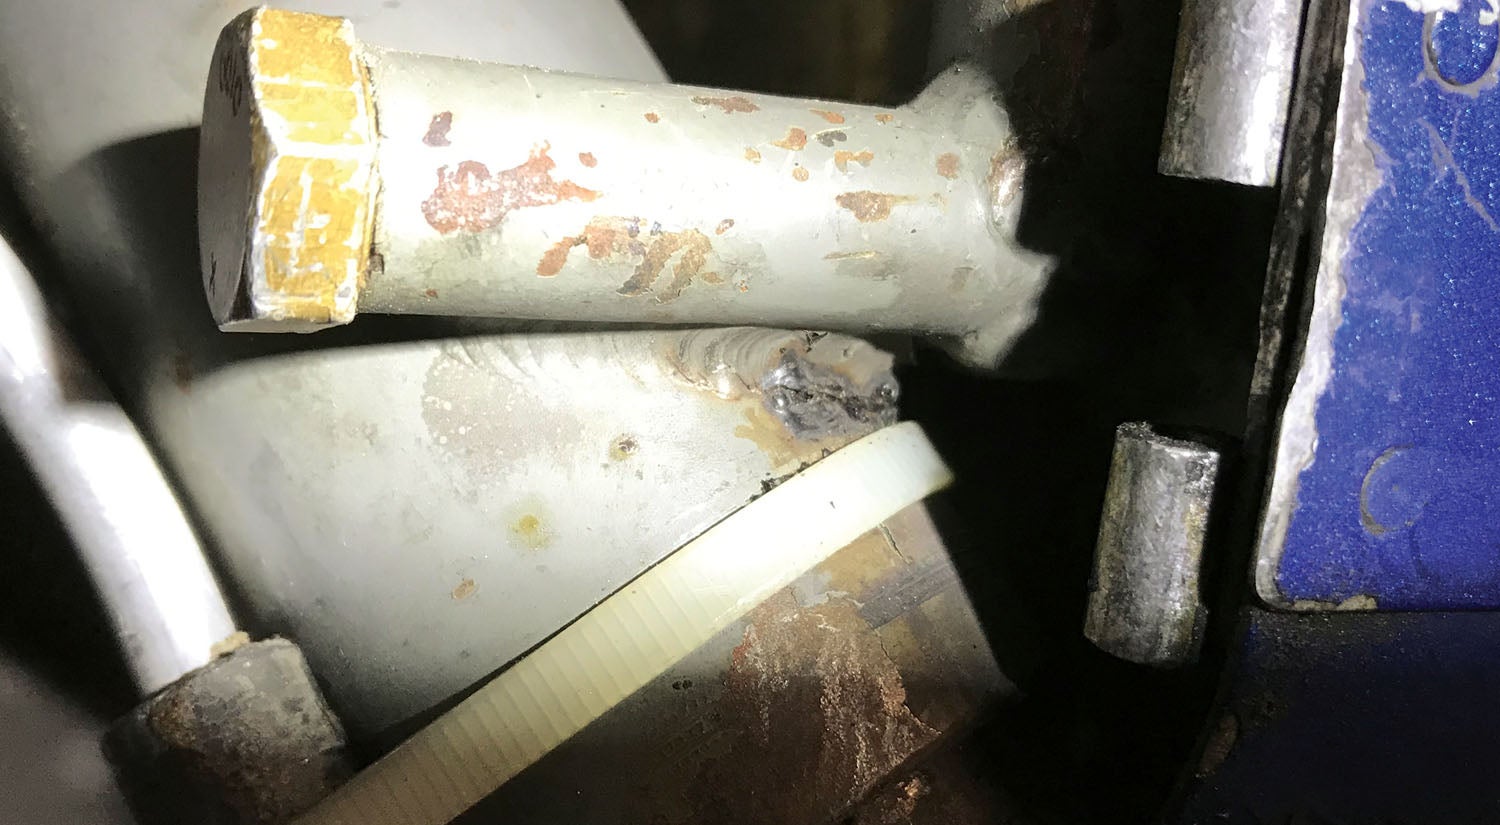
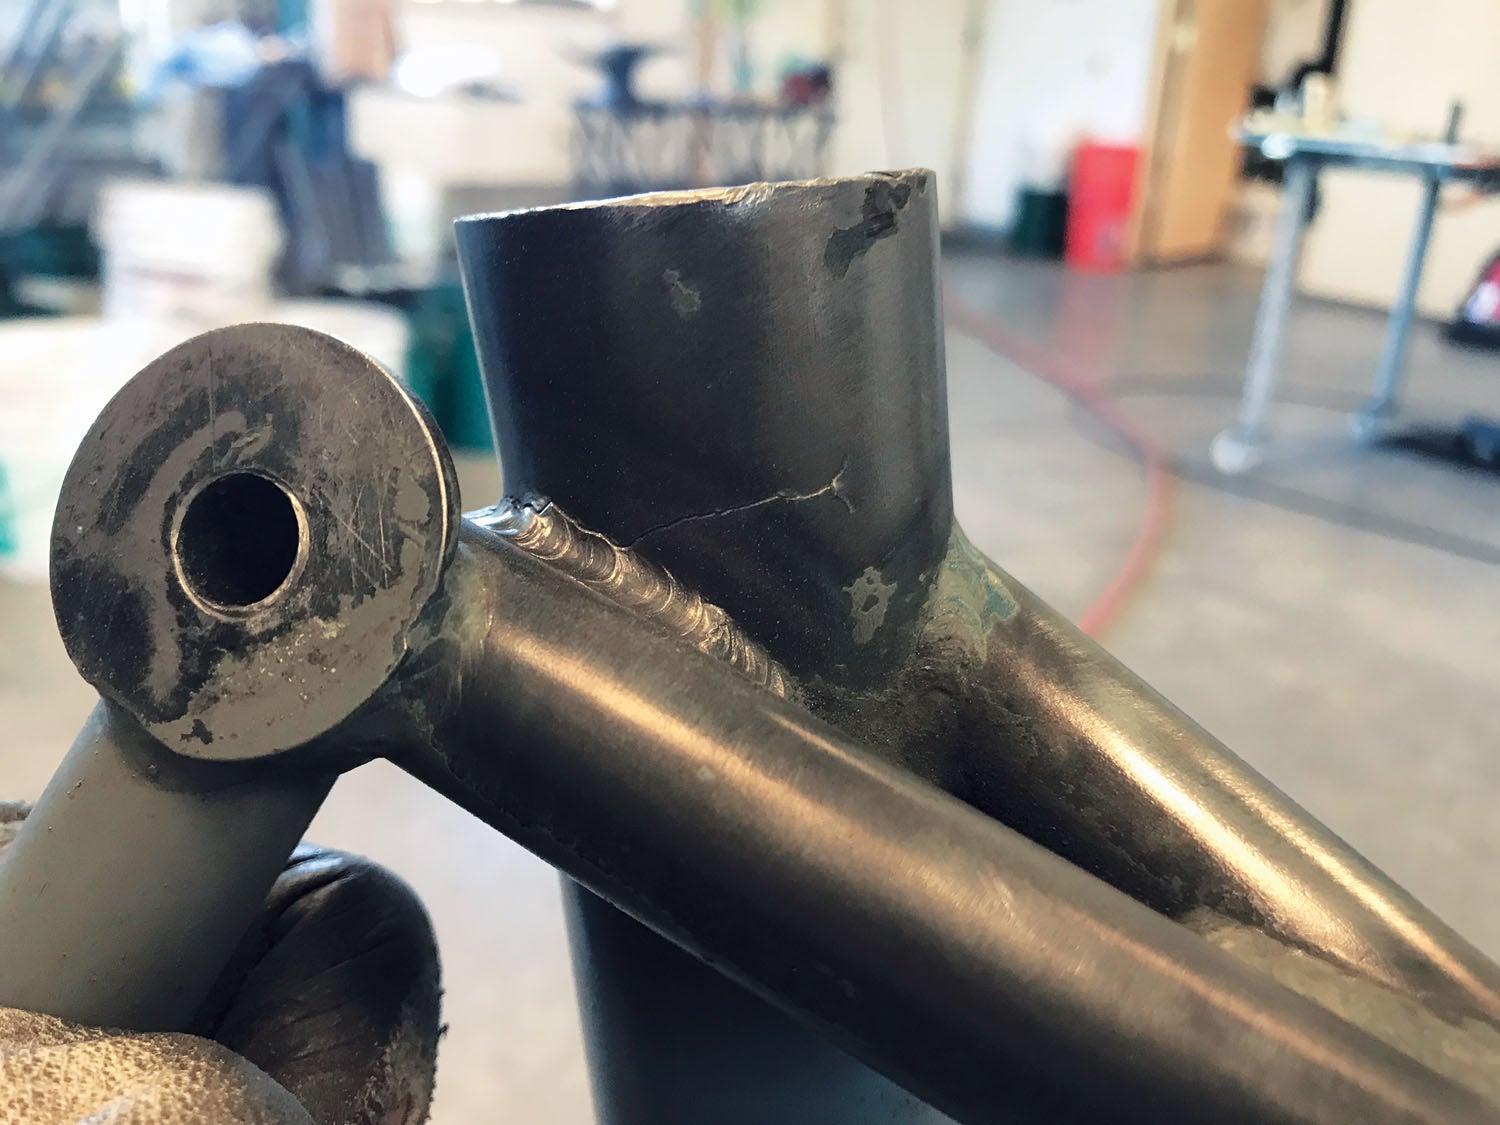
The RV-6 is currently the most popular homebuilt flying, if you score by the number that have been completed. In other words, there are more RV-6s flying than any other single design out there. A large number of those are tricycle-gear “A” models, of course, but the taildragging -6 can be found everywhere. They have logged hundreds of thousands of landings in the more than 35 years they have been flying, and quite a few have suffered cracks in the lower weld area where the motor mount tubes and gear leg mounting tubes come together and meet the firewall. It’s not uncommon for a new design to show a weakness in its early years, and the RV-6 was no exception—this being one of the examples.
these are actually RV-7 parts.
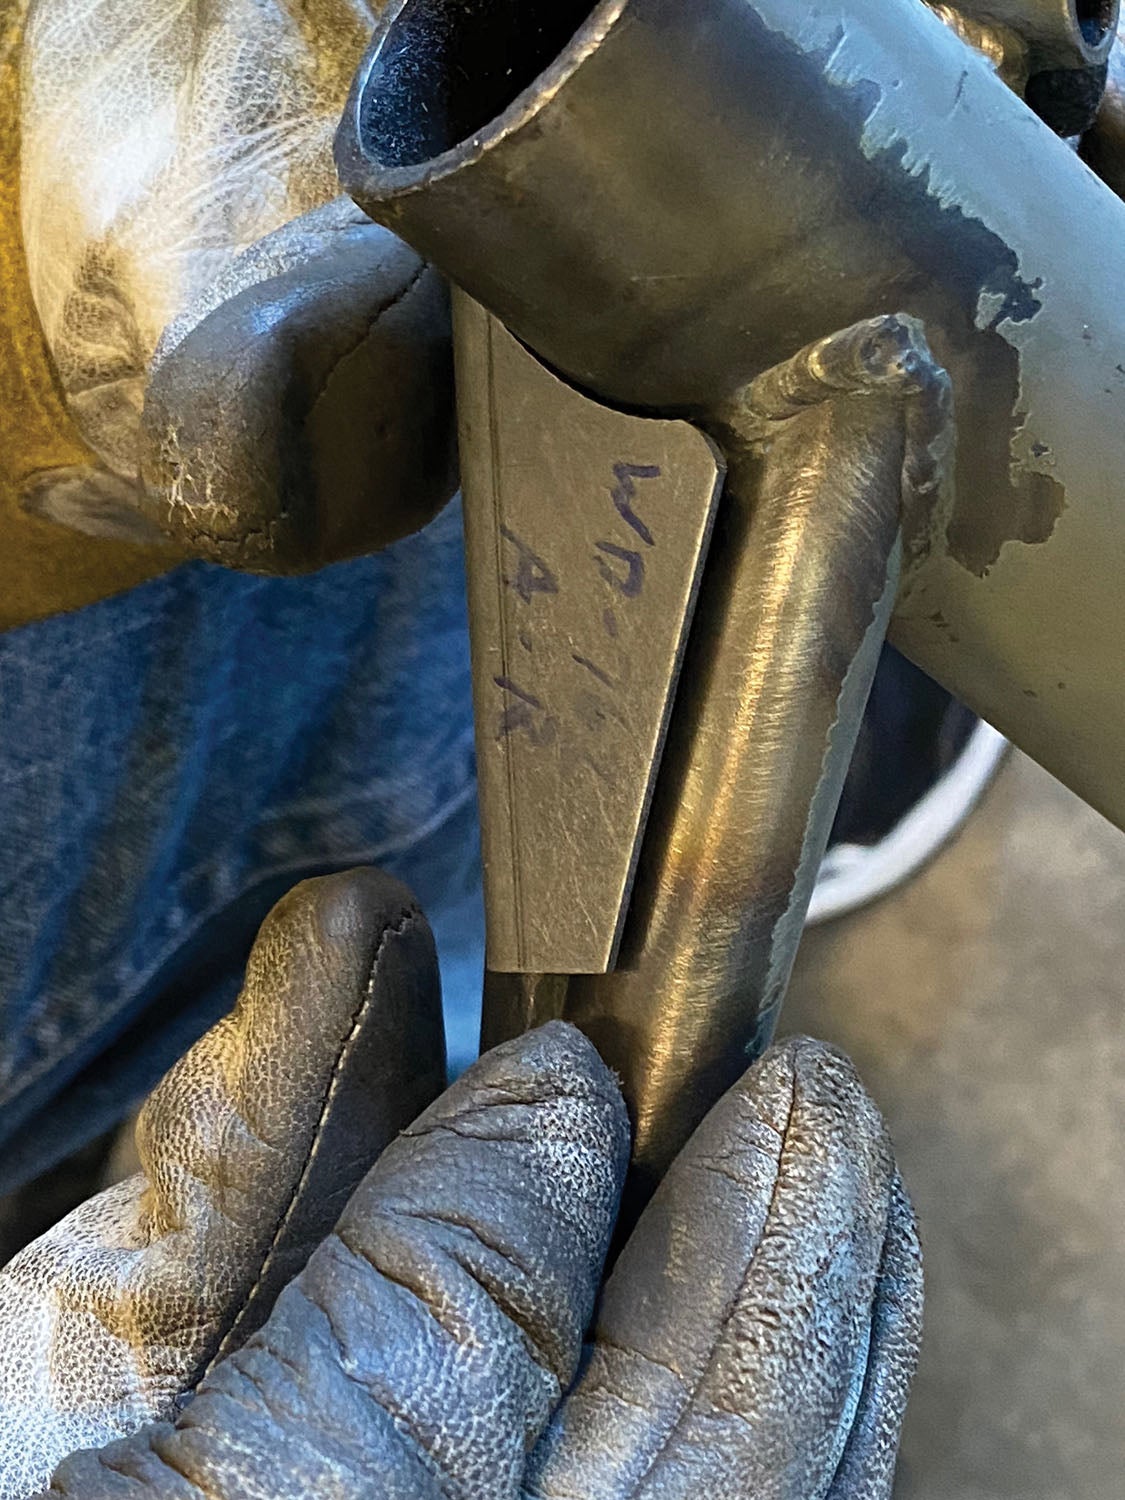
A fix was developed using additional welded gussets when the RV-7 came along, and these gussets have been used to reinforce RV-6 mounts ever since. When one needs to be repaired (and they don’t all develop cracks), the gussets are usually added and the problem is solved. Many builders still working on RV-6s have added the gussets proactively as it is a well-accepted fact that they work, so why not put them on and avoid cracks later on? So there is a mixed fleet of original no-gusset airplanes with no cracks, original airplanes with cracks that have been fixed (with or without gussets) and airplanes whose mounts were reinforced with gussets before they ever flew. We haven’t heard of any gusseted mounts that have cracked or ones that have cracked after being properly repaired; the fix seems to be a good one.
Case in Point
Our RV-6 came to the family via my wife. She and I met at a fly-in when she arrived in her RV-6 and I in my RV-8. The airplane is special in more ways than it brought us together—it is RV-6 kit Number 4—the fourth one out of the factory, built by longtime (and probably the highest time) RV pilot and transition training instructor Mike Seager. Seager built the airplane at home in northern Oregon and first flew it in 1990, logging almost 850 hours, both for his own flying and for transition training, in just two years. Eventually, Van’s recognized the value of what he was doing and offered to supply him with factory aircraft so that he didn’t need to subject his own machine to the rigors of pilots learning how to fly (and land) these sporty machines, and he and the airplane parted company.
The plane saw three other owners between Seager and my wife, and it suffered at least one landing accident that required a gear replacement—and, we assume, a new engine mount, because (as we’ll find later in the story) it was not the same as was remembered by the welder we used for the most recent repair, a man who had done a repair for Seager many years before. The airframe now has about 3400 hours on it and is still in excellent condition overall. But things do wear out, bringing us to the latest annual condition inspection and the discovery of a crack on each side of the lower engine mount welds. It wasn’t a case of needing a dye penetrant inspection either—it was blatantly obvious that we had cracks that needed fixing.
In the early days of RV-6 production, Van’s Aircraft used a welding shop for its steel parts that hired a 21-year-old welder by the name of Russ McCutcheon. Today, Russ owns his own shop, based just north of Portland in the Vancouver, Washington, suburb of Ridgefield. There, McCutcheon still fabricates many of the weldments that you’ll find in the RV kits, including engine mounts for the RV-4, elevator arms, roll bars, canopy frames and the like. While we probably could have found a local aircraft welder to fix our little problem, a call to McCutcheon proved that he knew exactly the issue and how to fix it—and he invited me to bring the mount up so that he could do the work while I waited. Fortunately, I had another RV that could carry the mount (barely), so at least the uncertainty of the actual fix was taken care of.
Taking it all Apart
Of course, in order to take the engine mount off, the first thing that had to be removed was the engine. The carbureted O-360 with a constant-speed Hartzell is pretty standard on these airplanes and presented no unknowns—just a couple of afternoons’ worth of work. When I do significant disassembly on an aircraft, I like to remove fasteners, then loosely put them back in the holes from which they came, so as not to lose track of them. If I can’t do that, I have a supply of Ziploc bags and a Sharpie marker to organize and keep track of where each piece of hardware goes; it makes reassembly much easier and quicker.
Pulling the engine was really a matter of disconnecting the controls, the plumbing and electrical, then removing the exhaust (to allow access to the lower engine mount bolts) and finally slinging the engine onto the hoist and removing the bolts. Since the plan was simply to leave the engine on the hoist while the mount was gone, we left the prop in place on the engine—one less thing to do. Of course, that was before we decided to do a complete engine overhaul (see sidebar “While We’re in There…”), but it was a good idea at the time. Never disassemble what is working; you can only mess it up. Likewise, we left the baffles in place as well as the carb, airbox and accessory case appliances.
Once the engine was off, we needed to remove the mount—but that also meant the landing gear was going to have to come off—which means we needed an alternate method of supporting the airframe. Of course, we could lift the airplane with jacks, but I didn’t want to leave it on tall, spindly hydraulic jacks for more than a short time, so a support box was built from scrap lumber and mounted on dollies so that the airframe could be moved around the hangar sans wheels and powerplant. Measurements were carefully made as to the necessary height—but we also forgot about the belly antennas that would be in the way. Fortunately, the cabin floor was accessible and the antennas quickly removed.
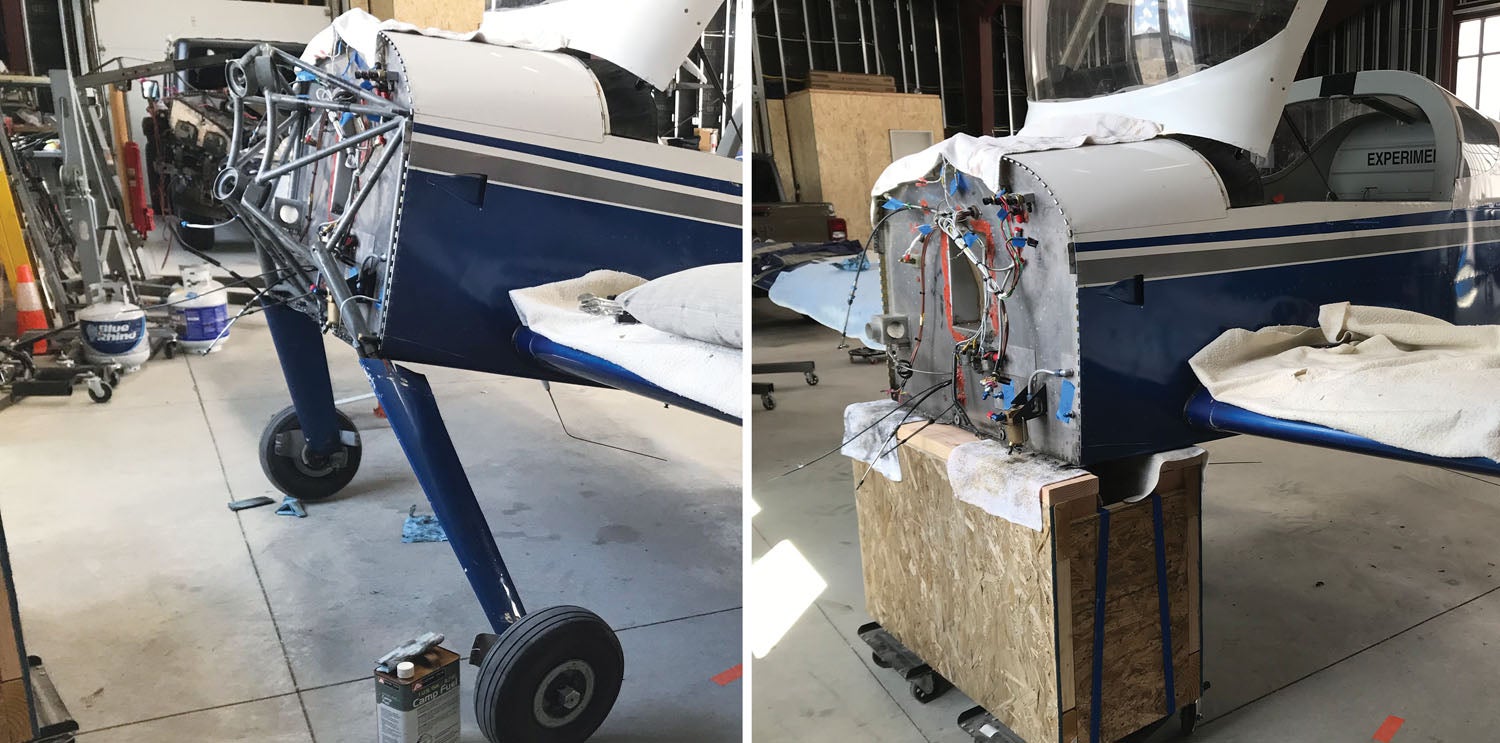
With the airplane on jacks, we pulled the six bolts that attached the mount to the firewall and pulled the mount and gear off as a single unit. Now that sentence was quick to write, but the process actually took a couple of hours, with one person inside, lying down under the panel, pulling cotter pins and castle nuts, while another was backing up the bolts on the outside. Tedious, but with patience quite straightforward. Once the mount and gear were off, the assembly was wonderfully portable since it rolled around on the tires themselves. The good fortune stayed with us when we pulled the two bolts that hold the gear legs to the mount, and the gear legs pulled out easily—they had been nicely greased many years ago and there was no corrosion.
Finally, we had the bare engine mount lying on the floor, ready for transport. A little time spent with degreaser made it transportable without getting the back seat area and baggage compartment of our RV-8 messy, and all we needed was a good-weather day to fly the 400 miles to Portland.
The Repair
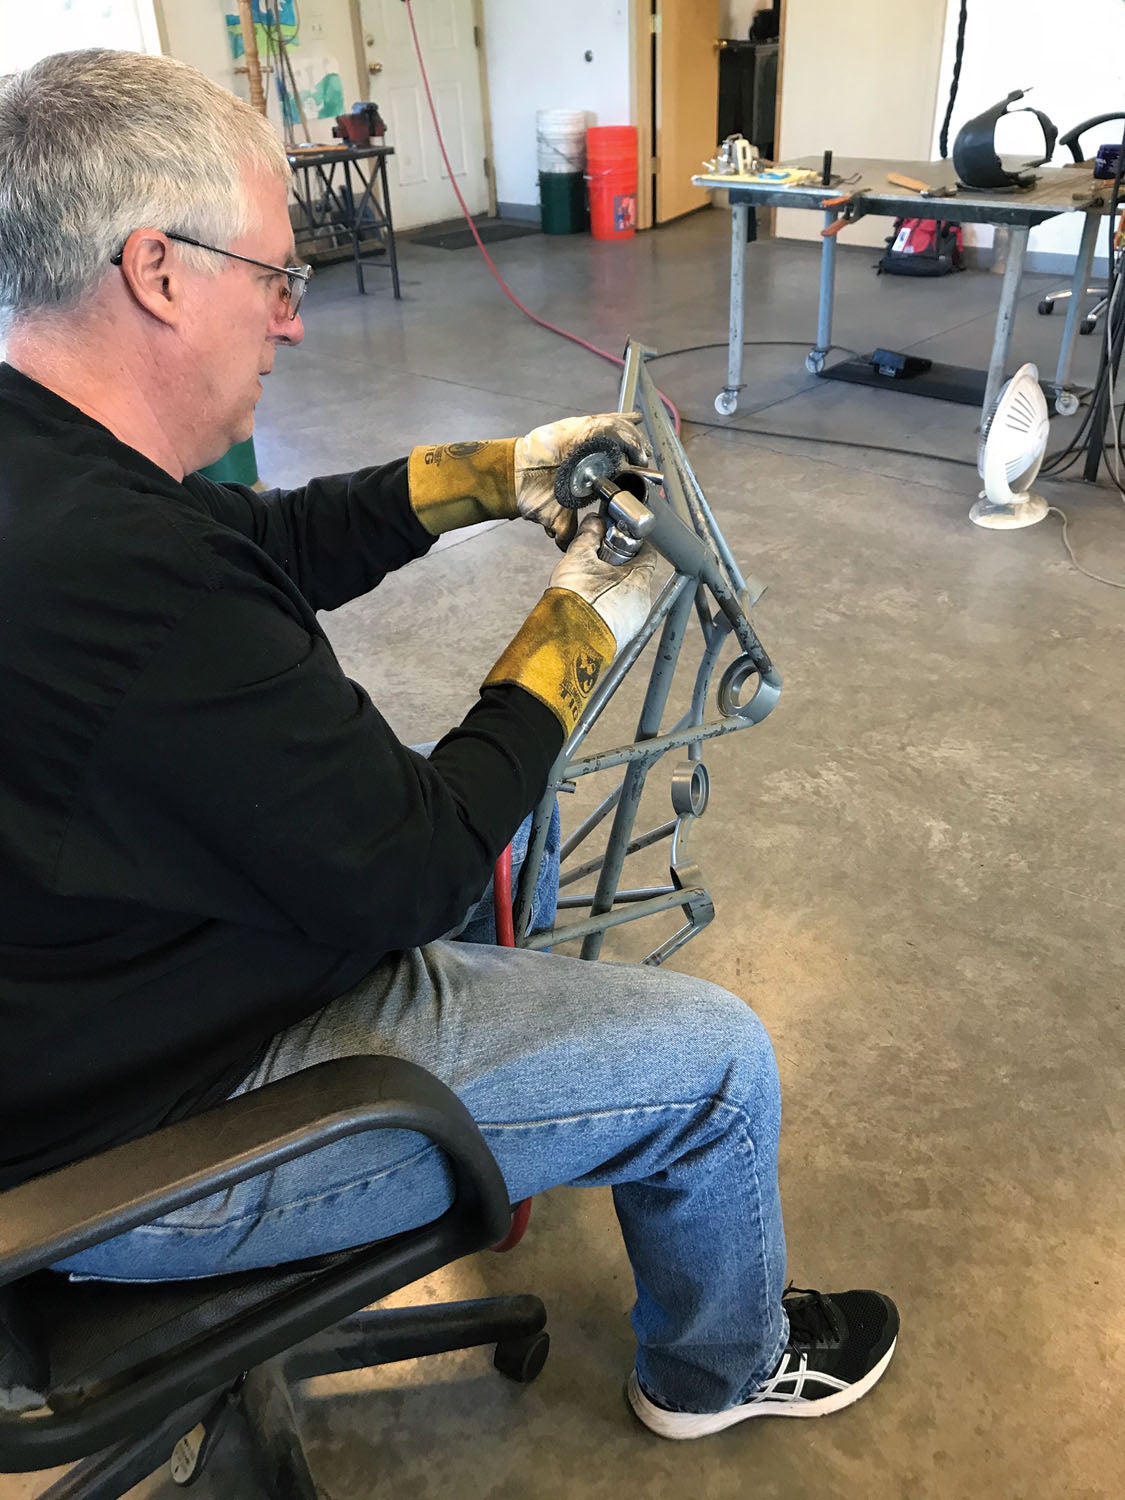
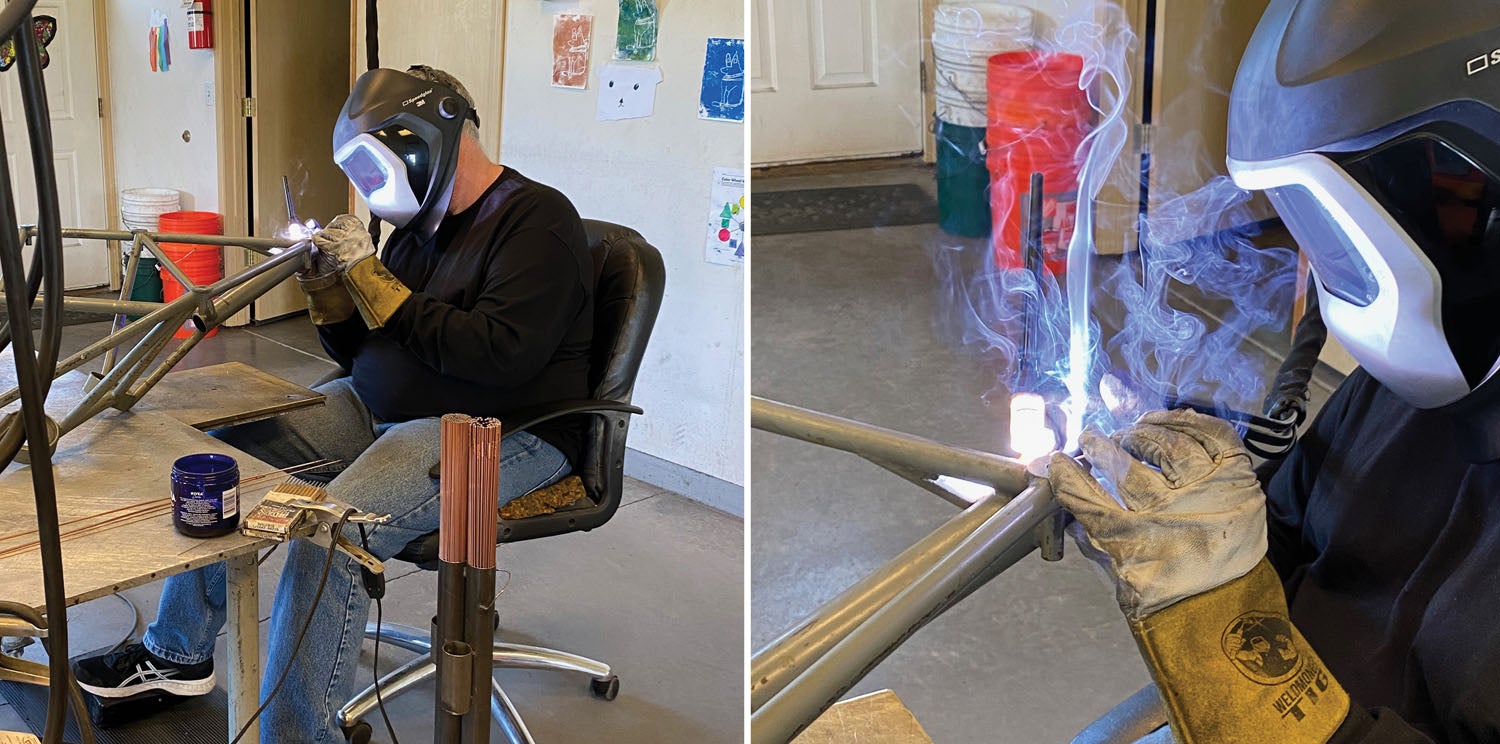
Considering that removing the mount took the better part of a day for two people, the repair itself was almost anticlimactic (which is sort of the point). Russ met us at his local airport, and we made our way to his shop with the engine mount tossed in the back of his SUV. Once in the shop, he took a wire wheel to the parts of the mount where he was going to weld, then put on the helmet and fixed the cracks. Next he carefully tweaked the premade gussets he had obtained from Van’s until they fit perfectly, then donned the helmet again for another 10 minutes of careful welding. And that was that. Of course, Russ is an experienced welder who works on this stuff every day—and his work reflects that. For those of us who have demonstrated nothing more than the ability to make a puddle of metal with a welding rig, the repair seems daunting. But that is why we have experts available to us in just about every facet of airplane construction.
It was interesting using the same welder who had worked on the airplane previously, but we’re still mystified by the fact that once he saw the mount, Russ said that this was not the same one he had reinforced before. Logbooks in Experimental aviation can be a hit-and-miss proposition, but putting together the clues we do have, it appears that it was changed when the second owner had an off-runway excursion.
The rest of the story is the reverse of how we got to the weld—except that while we had the engine, prop and mount off, we made the decision to overhaul the engine, have the prop gone through at a prop shop, and replace the aged Slicks with electronic ignition—so the first flights with the new mount will have to wait. But that is another story…
The lesson here is that, like so much in aircraft building and maintenance, the actual fabrication or repair can take very little time, while the prep work can consume quite a bit. The other lesson is that while a crack in a major structure might initially seem like a death sentence for your favorite flying machine, the truth is that anything can be fixed—with enough effort. Anything can be fixed, even if you have to jack up the airworthiness certificate and build an airplane around it. That, of course, is the worst imaginable case. But it does put a simple repair to a motor mount in perspective.

Photos: Tom Wilson, Paul Dye, Louise Hose, and Marc Cook.
![[Credit: Wikimedia Commons]](https://www.kitplanes.com/wp-content/uploads/2026/07/4_rutan_a_longez.jpg_preview.jpg?w=218&h=150&crop=1 "Rutan Symposium Turns to the Coming Canard Maintenance Crisis")
![[Credit: Lisa Turner]](https://www.kitplanes.com/wp-content/uploads/2026/02/Fuel-Selector.jpg?w=218&h=150&crop=1 "Fuel Follies")


I finally know the person who built the engine mount for my RV8
Comments are closed.