 Let me guess. You have a beautiful Sikaflexed canopy and those pesky aluminum skirts aren’t even close to fitting. Now you’re thinking about a one-piece fiberglass skirt. What? Are you nuts? Fiberglass canopy skirt? One piece? OMG! Yes, it can be done. It’s actually easy. My canopy was a tad proud at the rear. Too much junk in the trunk, I guess. That meant those aluminum skirt pieces were not going to conform to the shape without an English wheel and skills I do not possess. Fiberglass, however, will conform to any shape. In fact, that’s the beauty. So, here’s how I did it. Let’s start with the basics.
Fiberglass 1.0
I’m no expert. Didn’t stay in a Holiday Inn, either. In fact, everything I’ve learned came from people much smarter than me. Let me give credit to Dan Horton first. The man has forgotten more about fiberglass than I will learn in a lifetime. Next is my mentor, Dave Paule. He is also brilliant and taught me the basics.
Dave shared his epoxy formula with me many moons ago, and I took the liberty of transforming it into a spreadsheet. It’s available for download on my blog, My RV-7A Home Page. Look under Favorite Links for Epoxy and Paint Calculator. It also calculates paint quantity for several different primers and paints. No link is posted here because the spreadsheet is updated often. It’s very handy for estimating quantities for epoxy and hardener.
A canopy skirt will require fiberglass cloth and epoxy. A gallon of epoxy and a quart of hardener are plenty. One quart of hardener to a gallon of epoxy is the standard ratio. I mix by weight (5:1), but feel free to buy the pumps and mix by volume.
Four yards of fiberglass cloth is a good starting point. Don’t bother with rolled cloth for shipping; it unfolds just fine. Roll it up on a pool noodle or section of 2-inch PVC. It’s much easier to work with off a roll. Buy two rolls of 4-inch peel ply. The stuff goes fast. If you know someone covering a plane with fabric, snag any scraps you can. It’s the same stuff.
Speaking of stuff, refer to the sidebar for a list of things you’ll need. The part numbers shown are from Aircraft Spruce, but some items are available elsewhere. Look for them locally if you want to save shipping.
One item you won’t want to skip is a respirator. Don’t work with fiberglass, micro, Cab-O-Sil or flocked cotton without it. Basically, use it all the time. Pretty much everything will get airborne—and it’s all bad for your lungs.
Let’s Get Started
There are lots of fiberglass and carbon fiber fabric choices. That’s another article by someone smarter than me. Eight-harness E-glass is good cloth for most uses. You could use carbon fiber if you like, but there are issues with carbon fibers and aluminum, so be careful. If it’s just aesthetic, consider carbon fiber only for the final outer layer. There isn’t much need for the structural gain of a carbon fiber canopy skirt.
I found gallon jugs in the recycle station. Dumpster diving! Wash, rinse and thoroughly dry the gallon jugs. Use them to store microballoons, flocked cotton and Cab-O-Sil. Label accordingly. Nothing wrong with plastic bags, but if a bag gets a hole, you’ll understand the reason for gallon jugs.
The 10-pack of black electrical tape from Harbor Freight is hard to beat. It’s fine for this sort of work and if you need a fine line, just cut the roll in half on the band saw. Yep. I’m cheap.
Eat Jell-O, pudding and yogurt or feed it to the rug rats. Wash and dry the cups. They make great mixing cups. Yeah, plastic cups are fine too, but where’s the fun in that?
Fill the storage bottles and label accordingly. Epoxy, hardener, vinegar and alcohol all work nicely in the storage bottles. Condiment bottles work but they don’t last long. I prefer measuring by squeezing out epoxy and hardener from the squeeze bottle into a cup on a scale. Weigh the epoxy, tare, then weigh the hardener (20%). Hang the roll of peel ply using the toilet paper holder. Hang it from a hook over the work area. You don’t want to be messing with it when your hands are covered in epoxy.
Perfect Form
The form or mold is most important. Fiberglass conforms to every nook and cranny, so make the form perfect and save a lot of work later. Almost anything will work from foam to clay. Once the form is satisfactory, apply clear packing tape then two coats of wax. Wax should be buffed just like the car. Add two coats of PVA release film, allowing the material to dry between coats. I actually made several parts without wax or PVA, and the layup popped right off the clear packing tape. Your choice. Wax, at the least, is recommended.
Basic layups are easy. Fiberglass layups are about .010 inch thick per layer. I recommend making a four-layer 12×12-inch flat piece to practice. You can use it later anyway; pieces cut out of the flat layup are great for elevator tip caps.
Cut 4-mil plastic two inches bigger than the layup. Cut fiberglass an inch or two bigger as well. For the practice piece, just cut four pieces 12×12 inches. On the skirt, you want a nice layup from edge to edge when done, so always measure two inches past the cut lines. Use the rotary cutter over the mat to cut the fabric. Multiple layers can be saturated if you like, but I prefer to add layers individually and often in different directions. Layup is strongest when each layer is offset 45° from the previous layer.
Lay the fiberglass on top of the plastic. Mix the epoxy. See the Epoxy and Paint Calculator. Stir for 2 minutes then pour on the layup. Do not leave the batch of epoxy in the cup. It will exotherm and get smoking hot. If that happens, drop it in a bucket of water and mix another batch. It’s no good. Spread the epoxy evenly to the edges with a credit card until the entire fabric is translucent. Squeegee excess epoxy off to the side and save it to the mixing cup. If you really want to be OCD, lay another piece of plastic over the layup and squeegee the sandwich. I use peel ply anyway, so excess epoxy gets absorbed. Use the rotary cutter if you want to cut a nice clean edge, eliminating all those little stringy things. It’s totally unnecessary and a waste of plastic, but it works. I just trim them off with scissors.
Flox, Micro and Cab-O-Sil
Flox is a structural material made from chopped-up cotton fibers. It’s mixed with epoxy into a thick paste, which can be used to fill areas where structural integrity is required but are not conducive to a layup of cloth. Corners, seams, joints, etc. are areas where it really shines. Split a component and fill the gap with floxed epoxy and a layer of fiberglass inside. The repair is just as strong as before.
I also use floxed epoxy to bond two parts like an elevator tip cap into the tip. A fillet of floxed epoxy holds the tip cap and provides a little extra material for sanding the corner radius. It is very hard, so be careful where it’s used because it will sand slower than the surrounding fiberglass layup. The result is an uneven area. I usually encapsulate it between fiberglass layers to prevent uneven sanding of the final layup. The bond is structural and strong.
Micro is tiny glass balls. It’s primarily used to build and fill. Mix it thick like peanut butter and spread into scratches or pinholes. It is not structural and sands very easy.
Cab-O-Sil is a thickening agent. Mix with epoxy, micro or flox. It thickens so the epoxy doesn’t run. It doesn’t affect structural properties.

Fabricating the Canopy Skirt
OK, we know everything we need to know about fiberglass, right? Let’s make a real airplane part. The process is basically the same for any layup. The form is the most important. Any work done on the form saves twice the work later. Take some time to get it right.
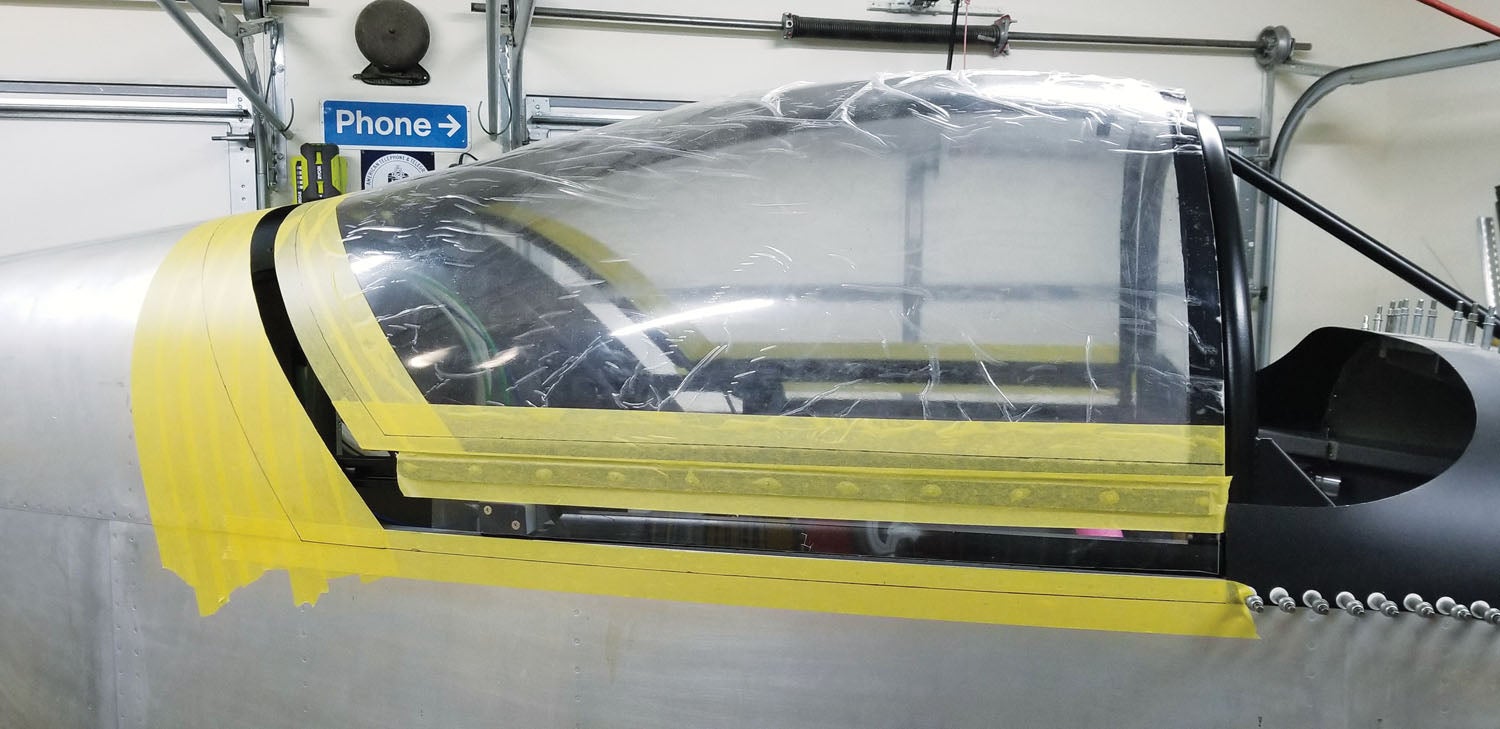
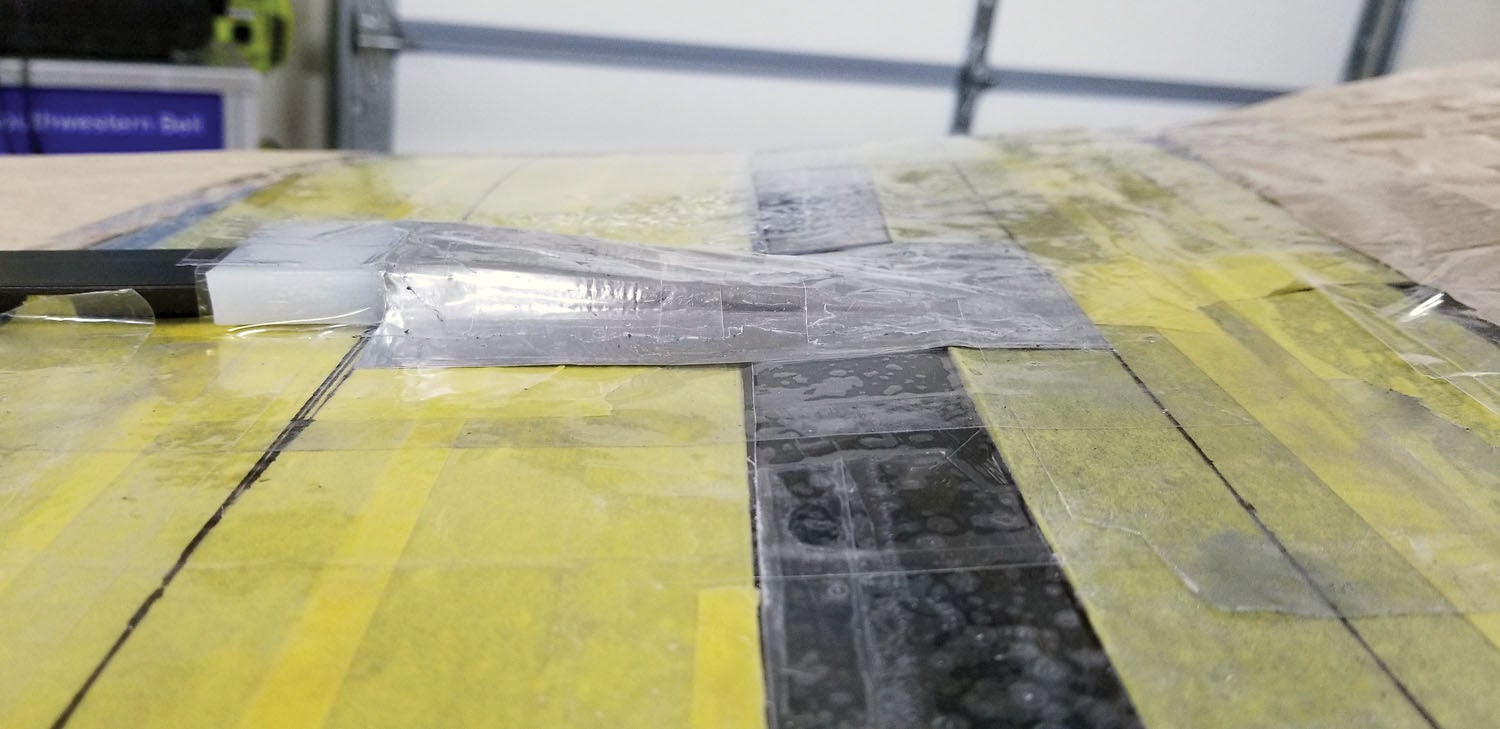
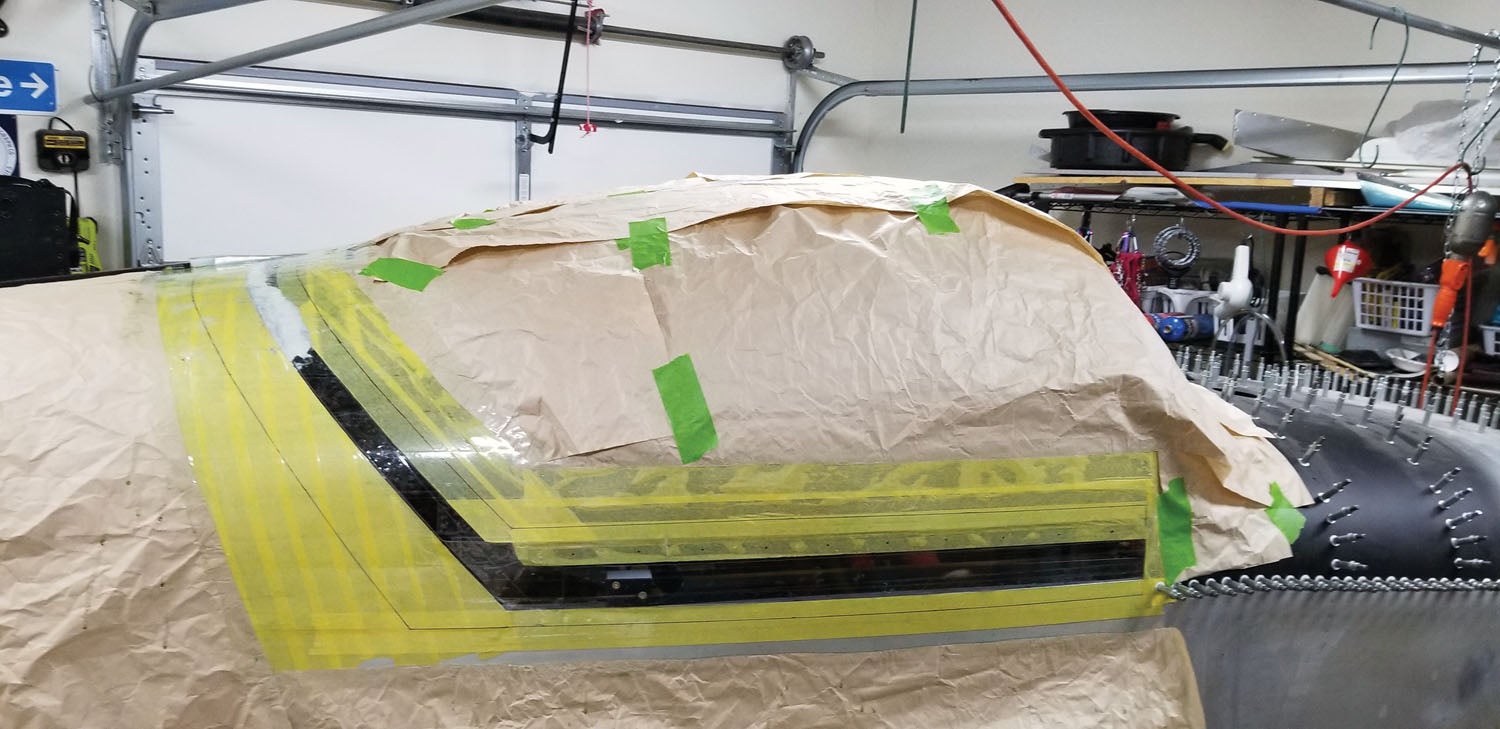
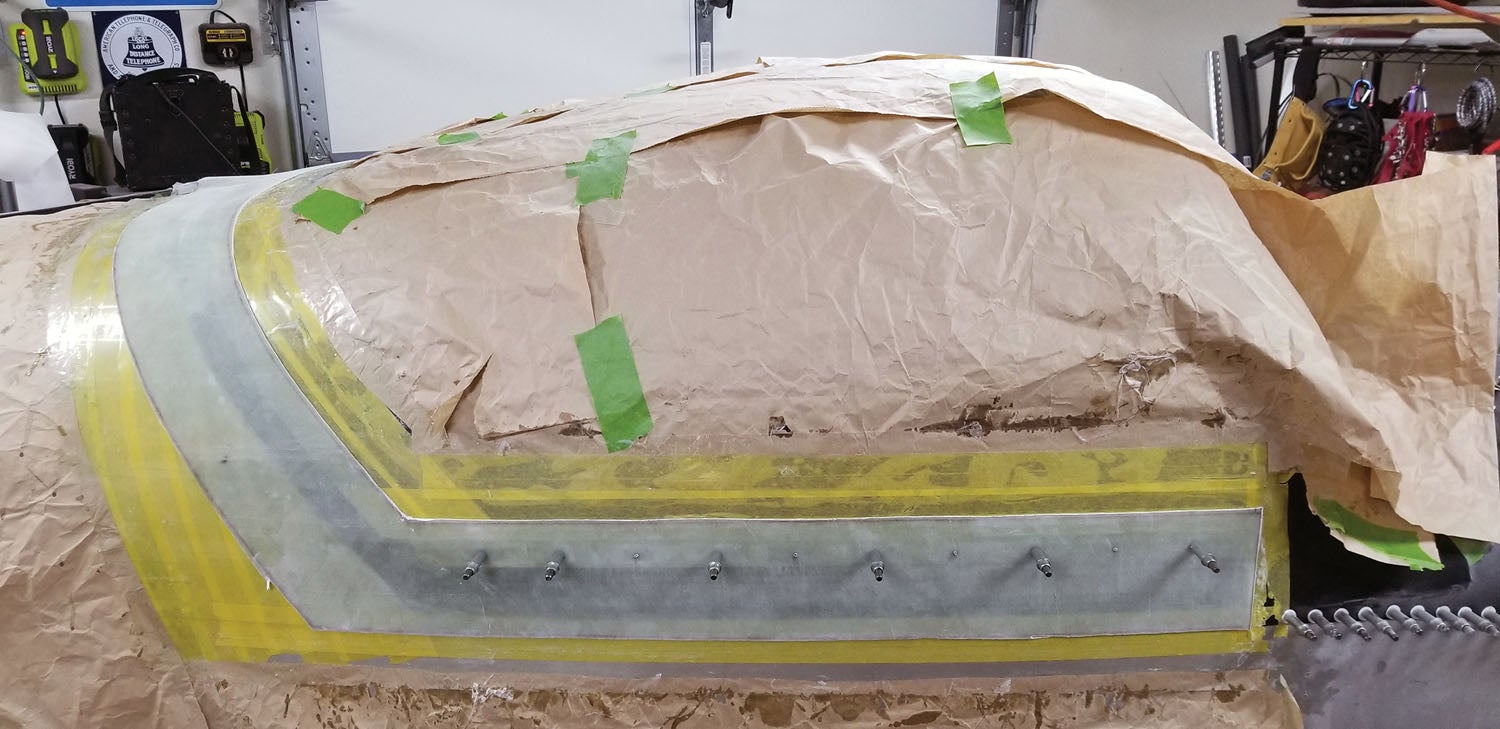
First protect that beautiful canopy and airplane. Save yourself some headaches and tape off with FrogTape Yellow Delicate Surface Painter’s Tape. It doesn’t leave residue behind like other tape. It’s thin so it won’t affect the layup, and it will keep epoxy off your precious airplane. Plus you can draw lines on it, and they really stand out. Tape carefully and mask with leftover Van’s packing paper. Mask everywhere—even the floor. Mask the dog if he’s in the shop. Epoxy gets everywhere. If you don’t want to clean it up later, mask it. Wife is optional. Make all markings on the yellow tape before the clear is applied. You’ll easily see them through the fiberglass. Very handy.
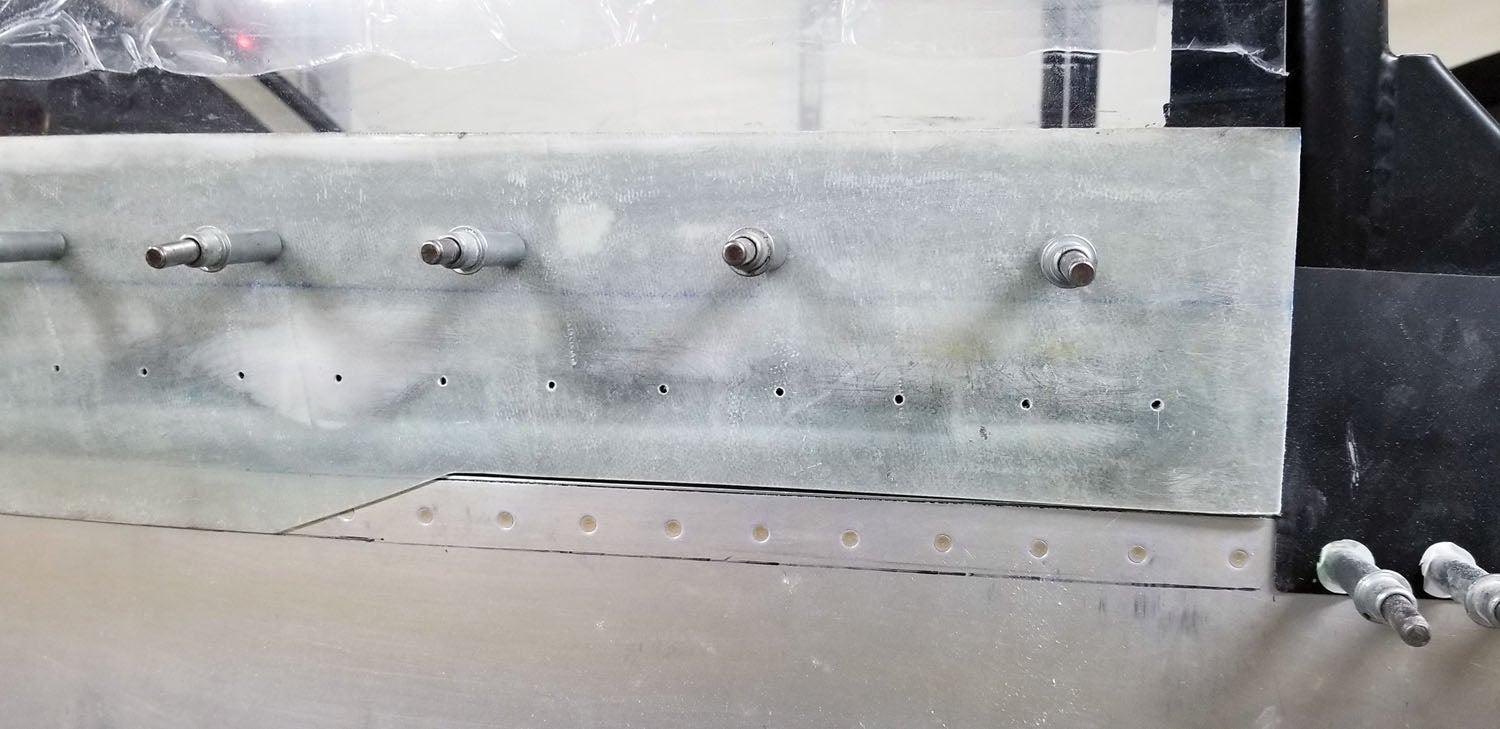
Those aluminum skirt pieces are useful for match drilling. I drilled the frame, aluminum skirt and inside skirt brace to the frame earlier, per Van’s plans. During the canopy bonding stage, I only used half the holes to rivet the C-759 Inside Canopy Skirt to the WD-640 Canopy Frame. The second set of holes can be seen in photos. They were used to bond the skirt. The bottom row of holes are for the C-691 Canopy Skirt Brace. No need for them. You will match drill the C-691 to the skirt later. The finished skirt will be bonded in place with Sikaflex using Clecoes to hold it. The holes get filled before applying finish paint.
Cleco the aluminum skirts in place. Draw the edge lines for the skirt on the yellow tape. Use the Van’s aluminum pieces as a measurement for the aft sides. When you remove the aluminum skirts, mark the holes with a Sharpie; it makes it easier to find the holes later.
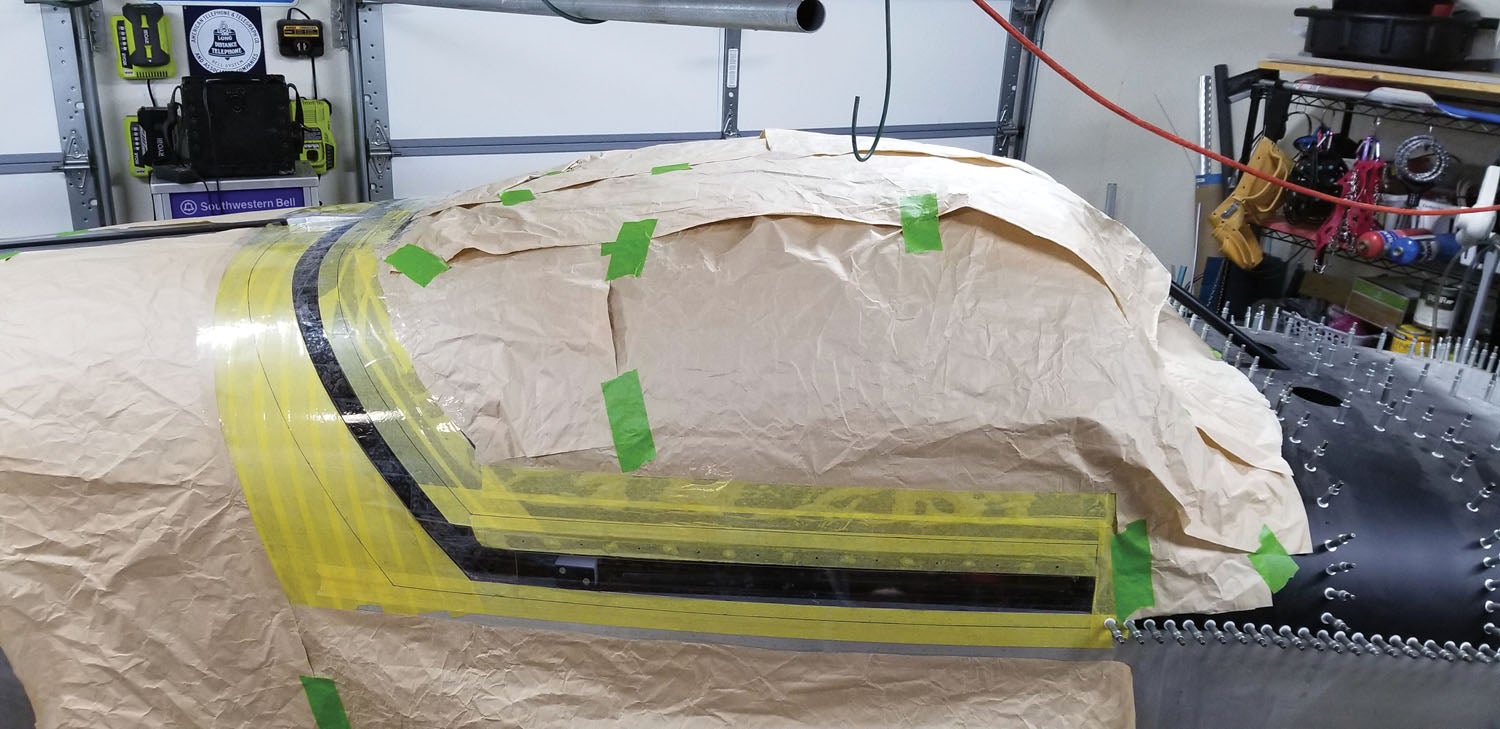
Tape off everywhere else with blue painter’s tape and leftover packing paper. Trust me—epoxy resin and waste is going to drip everywhere, so take the time to cover the plane now and save yourself some work later.
Those pieces of Plexiglas you cut off the aft end of the canopy earlier are exactly the shape of the aft end of the canopy and perfect for filling the gap. I cut strips off the width of the gap and taped them in place. The other areas were blocked with sections of acrylic from an old busted poster frame. The clear acrylic is pretty thin, yet strong enough to span a small gap. Tape it in place too. The goal here is to lay down a flat smooth surface that is even with both the canopy and the airframe.
The one-piece layup won’t require the Van’s doghouse. Make a form to duplicate the doghouse and tape it in place. The form pictured is actually an aluminum can. I used the Van’s doghouse to shape it. Make the form using the inside of the Van’s doghouse because your fiberglass will be formed over it. If you use the outside of the Van’s doghouse, it will be too big.
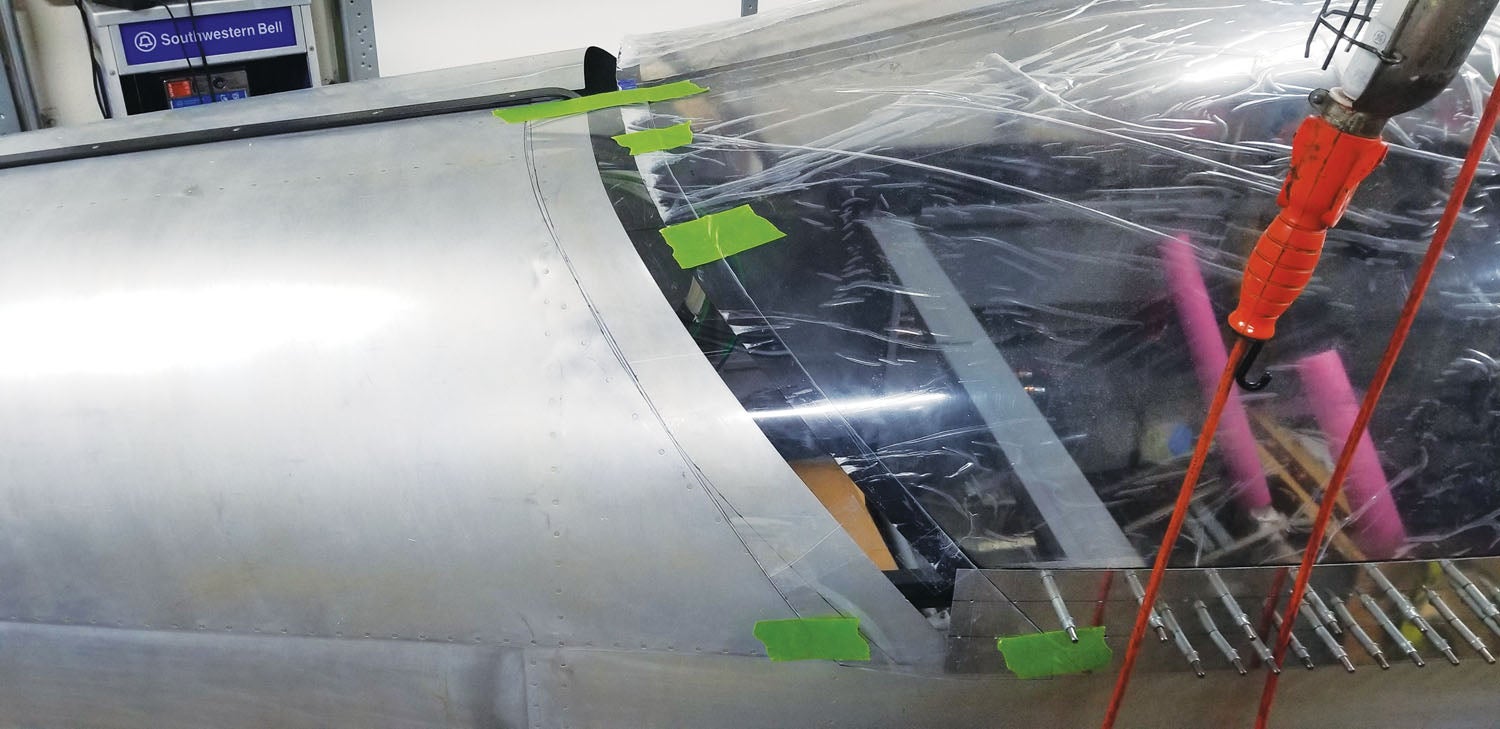
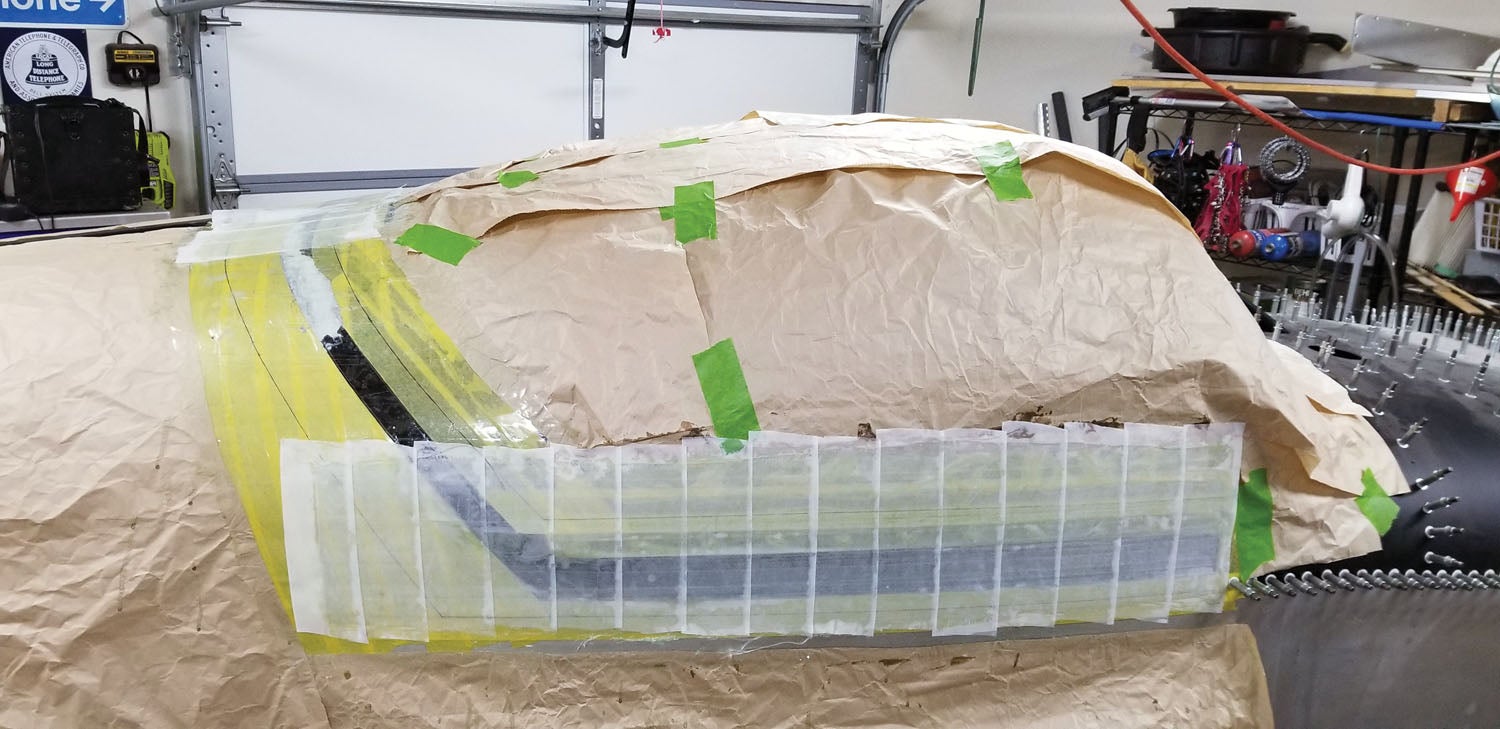
Tape over anywhere the fiberglass layup will be applied with 3M Heavy Duty Shipping Packaging Tape. Tape outside the line several inches. The layup won’t stick to it. Close your eyes and run a hand over the area. If you feel dips, fill them. Modeling clay works pretty well. Soften it by warming it in your hands. Lay it in place. Form the clay pretty close, then skim with a straightedge. Apply more clear packing tape.
You should be ready. Some say the fiberglass won’t stick to the plastic tape and there’s no need for a release agent. Feel free to try it. It doesn’t stick, but the layup comes off much easier with a release agent. I used carnauba wax and PVA. Two coats of wax, dried and buffed, followed by two coats of PVA. I’ve made other parts with no release agent and some with wax. PVA is optional, but I recommend at least wax. After the layup comes off, be sure to clean it thoroughly with a wax remover before applying any epoxy, primer or paint. The wax will prevent proper adhesion.
Time for Fiberglass
Pick your poison: multiple layers applied individually or several at once. There’s no need to do this all at once. Feel free to lay up a layer each day. I applied each layer individually with seams in different places. Five layers seems to be a sweet spot for the skirt. Not too stiff and not too flimsy.
Don’t try to cut one piece of fabric to go all the way around. It’s like herding cats. It’s much easier to use sections. Cut what you need for a session then lay out a section on plastic. Mix the epoxy and saturate the layup. Lift the layup and put it in place. Squeegee it in final position. Peel the plastic carefully. Cut sections of peel ply and use the excess epoxy to fully saturate using the squeegee or an old credit card.
Save the cup as a control to verify the epoxy has fully set. If you need more layups and work fast, the original plastic is still good until the first epoxy starts to set. Cure time for epoxy is temperature dependent. It will eventually set up in cold temps, but it sets much better in a warm area. There’s a temp curve on the label. I use our heater furnace room as much as possible. Twenty-four hours for West System 206 yields a nice fully set component.
Use the vinegar to clean up tools, but keep it away from the airplane. I have no idea why it works, but it cleans up epoxy on tools just as good as solvents and it’s cheap.
Make notes on the paper mask so you know where the ends of layers are located from the previous day. You want the ends staggered so the layup doesn’t get too thick in those areas. It also makes the layup stronger if they are staggered.
Use peel ply over the last layer before quitting, and make sure it’s fully saturated. Peel ply absorbs the excess epoxy. It will peel right off after fully curing. Peel ply leaves the surface fractured and prepared for the next layer. You don’t want air pockets. Use a credit card or stiff brush to massage those air pockets out from under the peel ply.
Make sure each layer of fiberglass applied extends past the lines by 1 inch in every direction so you have extra layup to cut away later. The lines and hole locations should be visible. When the layer cures, copy the markings to the outside layer. They will be very useful later.
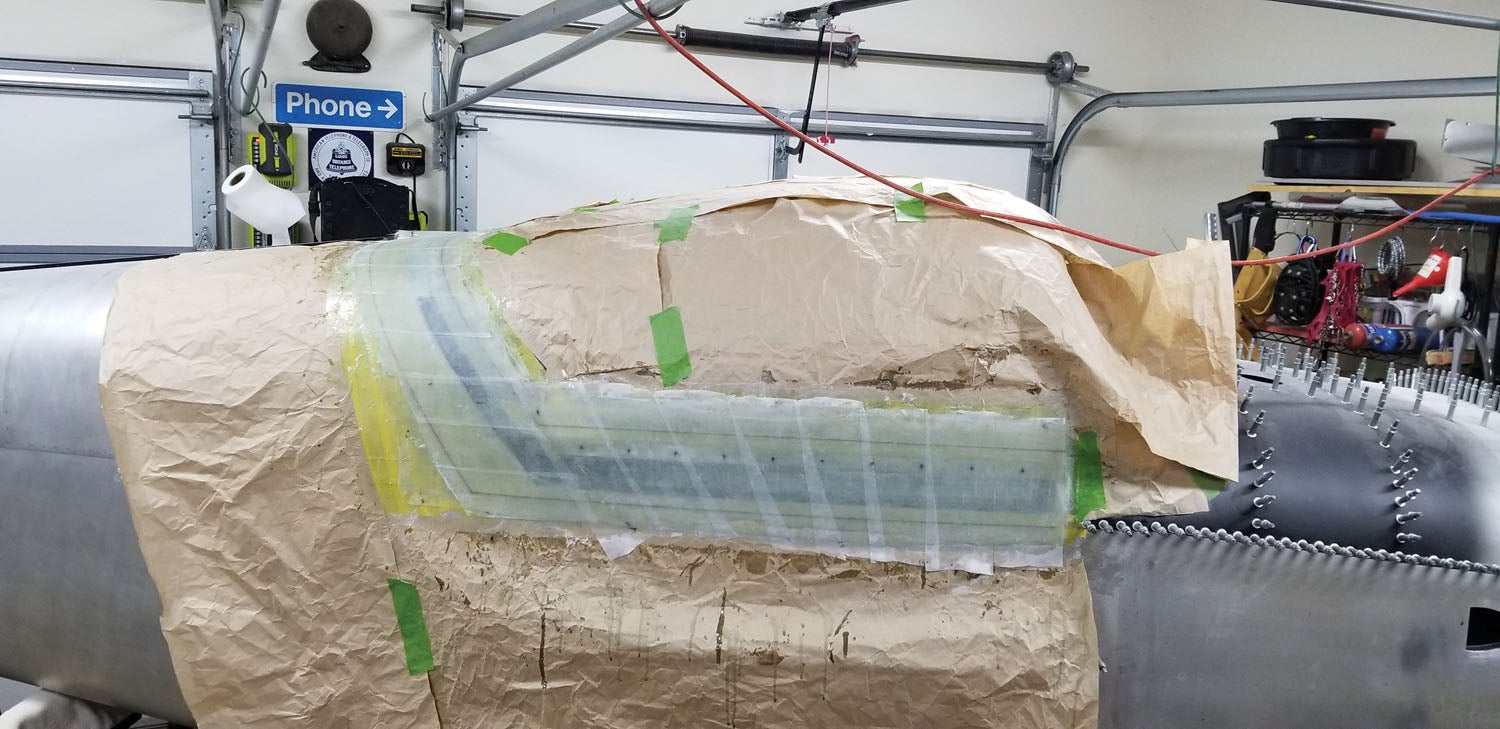
Return after the epoxy has set and peel off the peel ply. If you notice dips or low spots, fix them in between layers. Mix some flox with epoxy. Peanut butter consistency is pretty good. Apply it in dips and low spots. Apply the next layer of the layup right over it. Squeegee with the peel ply in place until the surface is flat. Basically, you’re spreading the flox underneath to fill low spots. The result will be very strong and won’t cause problems sanding later. Keep applying layers every session until it’s uniformly five layers thick. Pay particular attention to the doghouse area. Stagger the seams as much as possible.
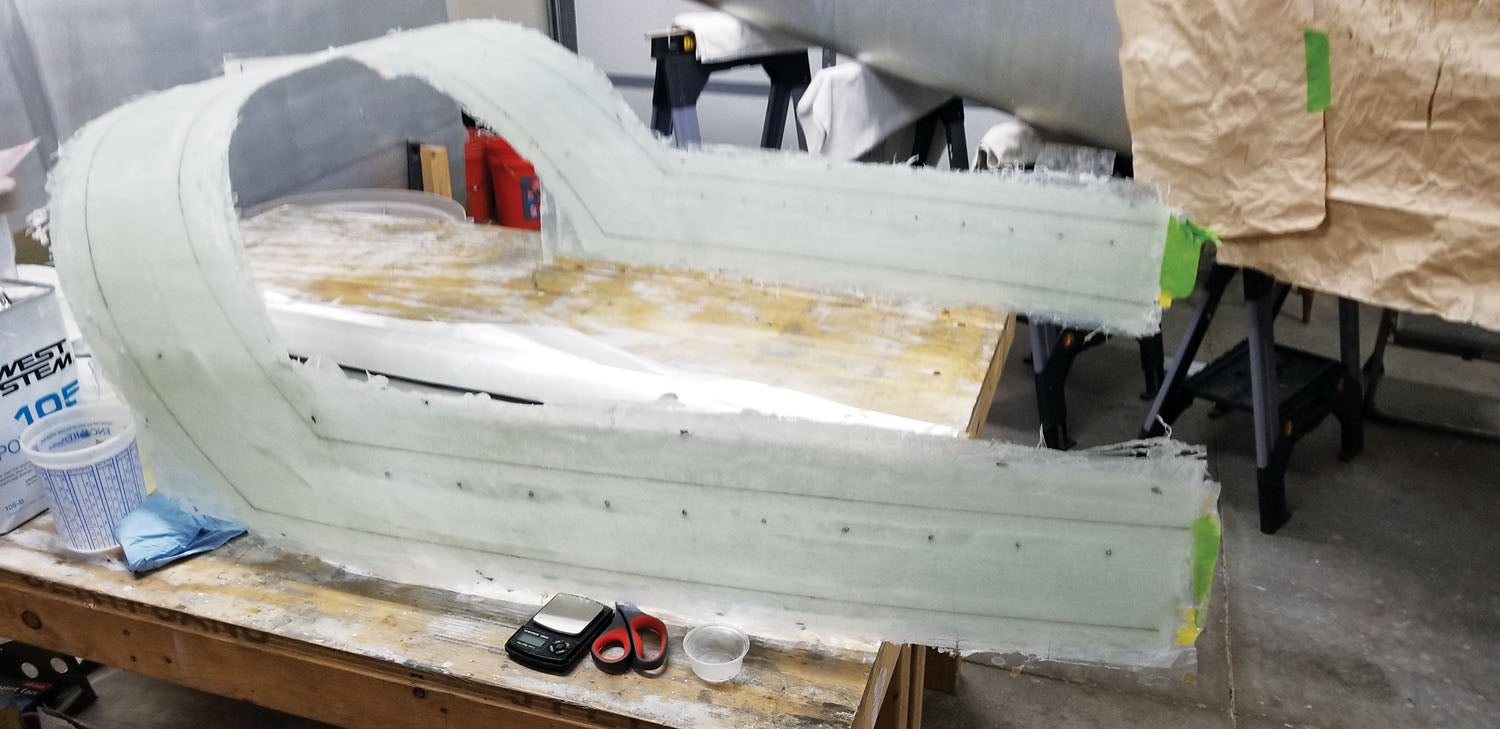
After the last layer has cured, transfer all the markings to the surface layer. Slide a spackling spreader underneath and work the layup loose. It should pop right off. Sit back and be proud because next we cut the final shape.
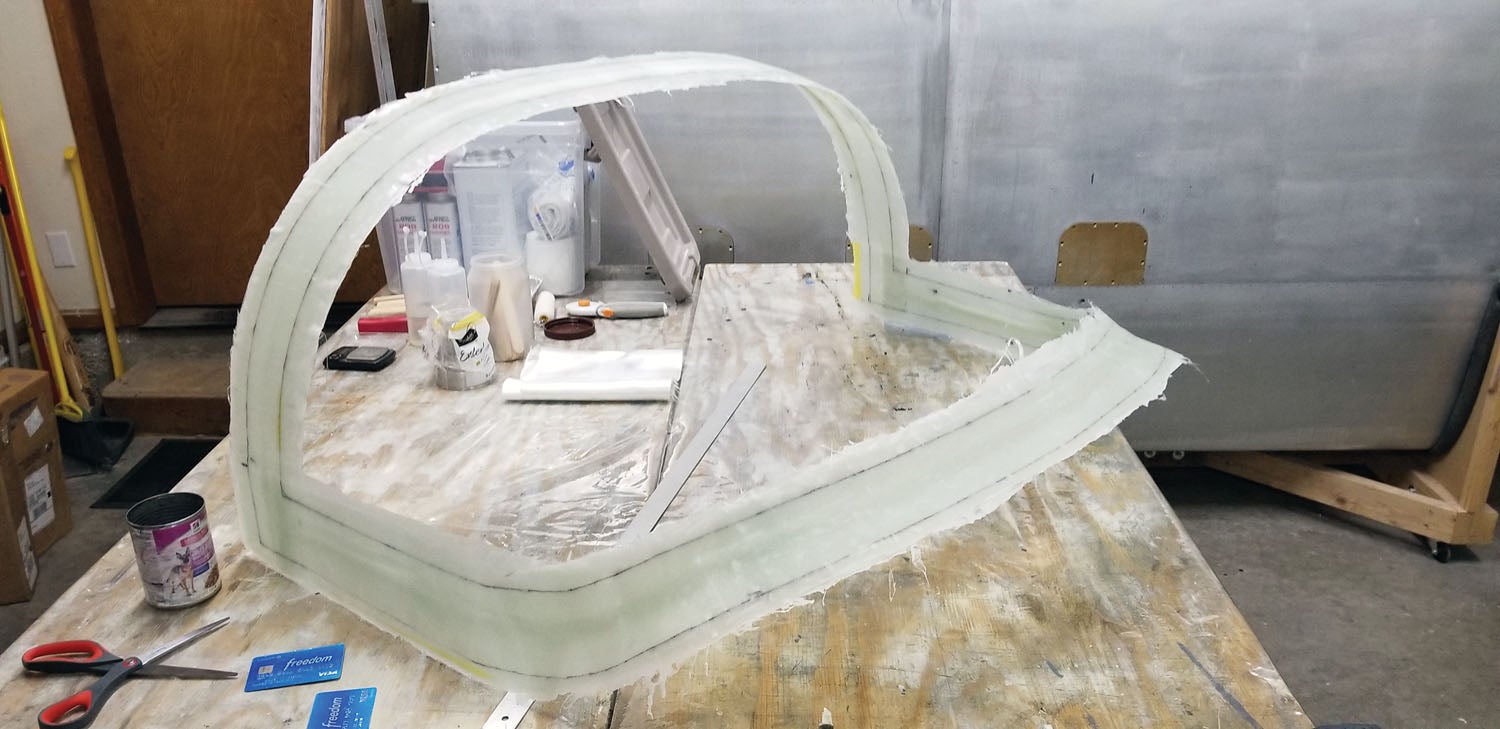
Cutting Outside the Line
The Dremel Saw-Max is awesome, but be careful. It’s a beast and difficult to control. If you’re not comfortable with it, use an angle grinder, Dremel or die grinder with a cutoff wheel. Cut outside the line at least 1/8 inch. A 120-grit flap disc on an angle grinder (4-1/2 inch, aluminum oxide, Type 27) works great for finishing off the cut. Gently sand off excess material to just outside the line. Finish off with 80-grit on a sanding board or Vixen file. Leave the lines for now. Better to have it and not need it than need it and not have it. Notice all the transferred markings are easily visible.
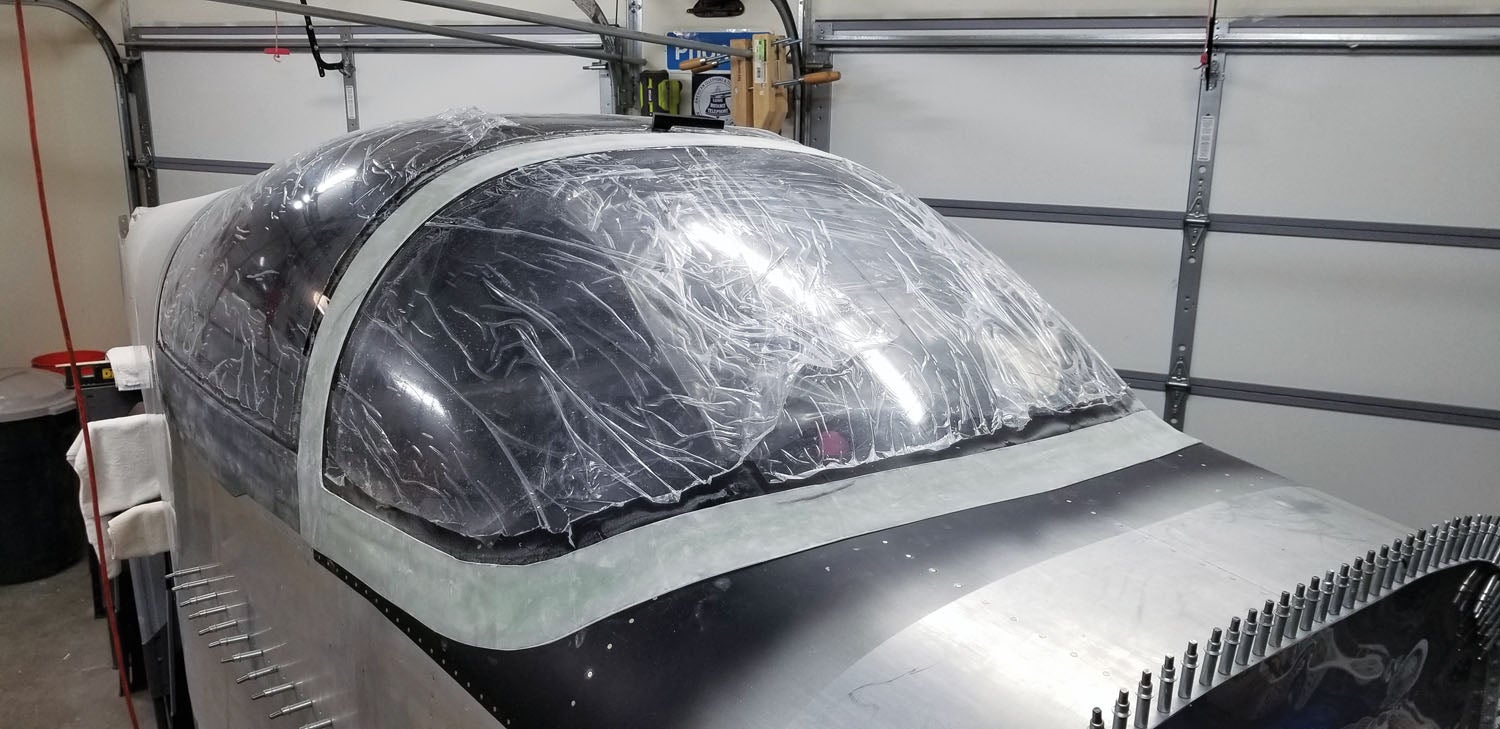
Drill the first hole on the top row of holes on the forward end matching the canopy frame. Cleco the skirt in place, making sure it’s exactly where it belongs. It should sit flush to the skin and canopy frame. Cleco on the aluminum skirt templates and use them to locate and drill the remaining holes. Drill the others gently. The drill bit will match drill into the canopy frame hole. Cleco as you drill. If you’re happy with the results, remove all the tape and paper. We need to open the canopy.
The C-691 Canopy Skirt Brace is tricky. The tabs tend to be flexed inboard. That’s a good thing because it pulls the skirt inboard when it’s assembled. The skirt is still translucent. Get one person on the inside holding the skirt brace tab against the skirt and shining a light. The hole is visible on the outside. Drill a hole and Cleco. Repeat until all are done. These holes will be used to Sikaflex the brace to the skirt. Be careful sliding the canopy. Clecos may hit the frame inside.
Before the sacrificial helper gets out, have them trace the bow and other contact areas on the inside of the skirt. You need to know the areas to be bonded.
At this point, the canopy skirt layup is complete. You can apply the same basic procedure to the windshield fairing. The difference is the windshield fairing has no holes, so it may be completely finished before bonding in place. Make absolutely sure to apply some release tape between the canopy and the roll bar. My canopy almost got sealed shut!
In the next installment, we’ll learn how to finish these parts and make them look pretty!


I built a one piece skirt for my 2007 build, an RV9A. I do believe I was one of the first to do it, and post it to the Vans blog. You can see it by googling N614RV. It worked wonderfully, and was pretty easy. Mine never leaked a drop of water, and it was absolutely draft free in flight. It fit so well it was a bit tricky to open. After final fitting, trimming, and finishing, I installed a strip of 1 inch Velcro tape, the fuzzy side, to the underside of the skirt where it contacted the fuse. Improved opening and closing, and protected the paint on the fuse. Home Depot has the Velcro. Really worked well, and quite inexpensive.
Thanks for the tip
Comments are closed.