You may have heard the proclamation: “If it isn’t leaking oil, it’s because there isn’t any in it,” or “All that oil on the outside of the engine is needed to help it slide through the air.”
While there could be a bit of truth in the first statement, a smell of hot oil or drips on the hangar floor might be good indications that some attention is required.
In many cases, leaks are mostly just annoyances. Oil can seep past gaskets, threads or fittings without any significant implications for safety of flight. However, sometimes leaks can be coming from something more serious, like a crack in the crankcase or a cylinder barrel, and a newly developed leak can be a warning of a more serious impending issue.
Sometimes, the source of the leak will be obvious. A gusher starting from the nose of the engine and coating everything behind it is pretty good evidence of a blown prop seal, but only if there isn’t a front-mounted governor with a bad gasket. In most other cases, finding the actual source of a leak can be a challenge. Normally, you would expect oil to flow downward and backward, but in flight, there is a lot of air moving around under the cowling. Some of that air can move in unexpected directions and oil can be blown forward, backward, up or down. This means that by the time the cowl is removed, the dripping item may or may not actually be the guilty party.
Such was the case for me. My airplane has always had a little bit of oil spray on the inside of the cowl, but the last time the cowl came off, the fine mist had become a coating. It was time to get serious.
Step 1: Clean the Engine
The first step in tracking down a leak is to start with a completely clean engine. All of the oil that has been blown around should be removed. This can be done with an engine-cleaning siphon wand (see supplies sidebar) and some mineral spirits.
However, before spraying down the engine, use some plastic shopping or freezer bags to cover any sensitive electronics that you don’t want to get wet. This includes the alternator and backup alternator. Electronic ignition coils should be fine. Magnetos and other rear accessories should be OK, so long as they are sealed.
It’s also a good idea to cover the windshield with a drop sheet. Nothing should be sprayed in this area and mineral spirits are fairly benign, but it would be a really bad day if solvent overspray damaged the windshield.
Use low-pressure air with the cleaning wand (around 20–30 psi). The idea is to apply a thorough coating, but not to atomize the mineral spirits. Do this in a well-ventilated area, wear rubber gloves and protective glasses and consider a mask—mineral spirits are not as aggressive as some solvents, but this is still not a mist that would be healthy to breathe or get in the eyes.
Whatever drips off the engine is going to leave a mess on the floor. A large oil drip pan will work well, but a cheaper alternative is to put a sheet of polyethylene down on the floor and cover it with absorbent doggie “pee-pads.” These disposable pads can be purchased from a pet store and typically come with enough pads for you and all your airplane-owning friends. They will absorb the liquid mess, and when done can simply be rolled up and placed in the trash. They can also be taped in place to protect the windshield.
Depending on how much other dirt is mixed in with the oil, it might be necessary to do a light washing first, then let it soak a while before a more thorough second pass.
The siphon gun does a pretty good job, but sometimes it will pull the mineral spirits up the hose but not actually eject anything. If this happens, raise the can of mineral spirits above the gun and the spirits should start to flow. Once they start, it’s possible to lower the can and keep the spray going.
Mineral spirits will not evaporate as quickly as some solvents, but they do evaporate. Wipe up any residual with paper towels. After a few minutes, it should be ready for the next step. Some people like to rinse the engine with water afterward, but I didn’t bother—I just let the spirits evaporate. If rinsing with water, you will need to wait a while longer for the water to evaporate.
Step 2: Check Your Work
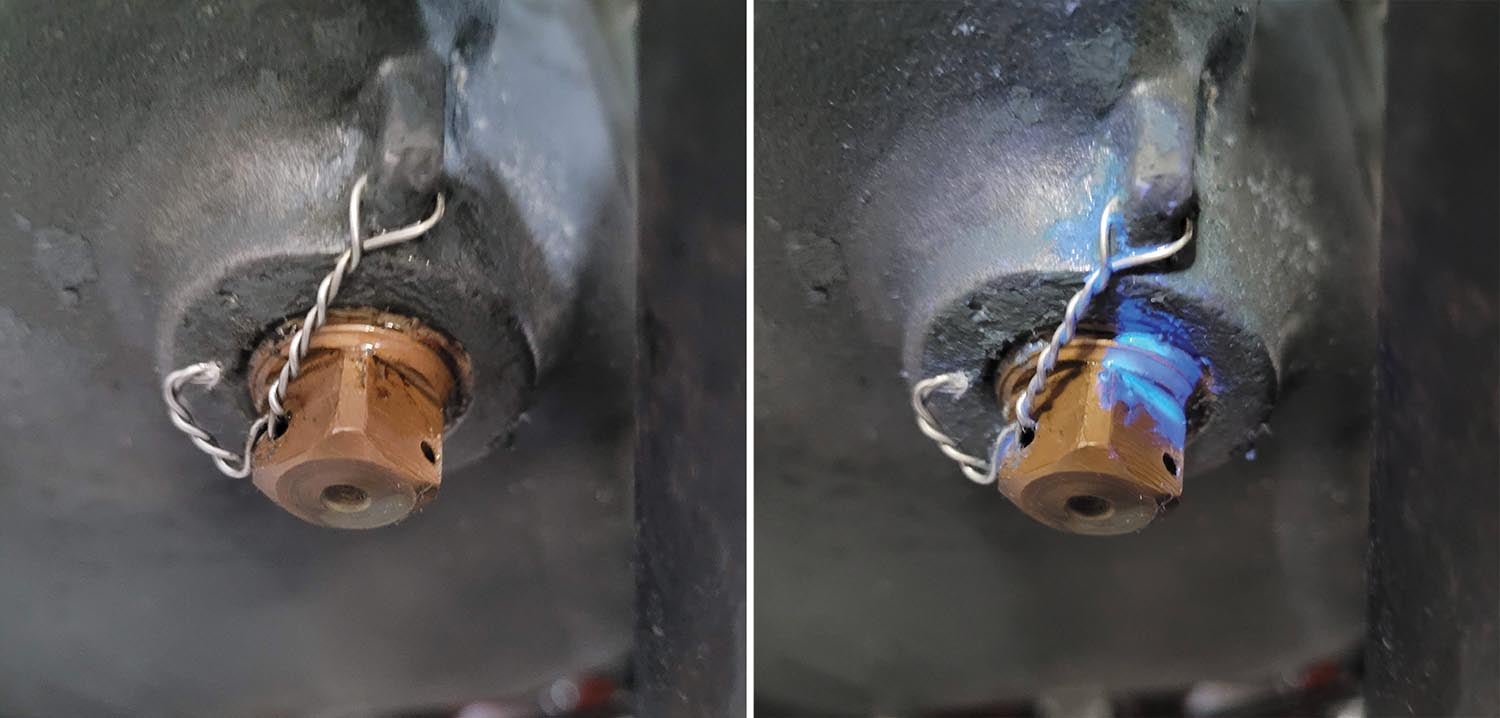
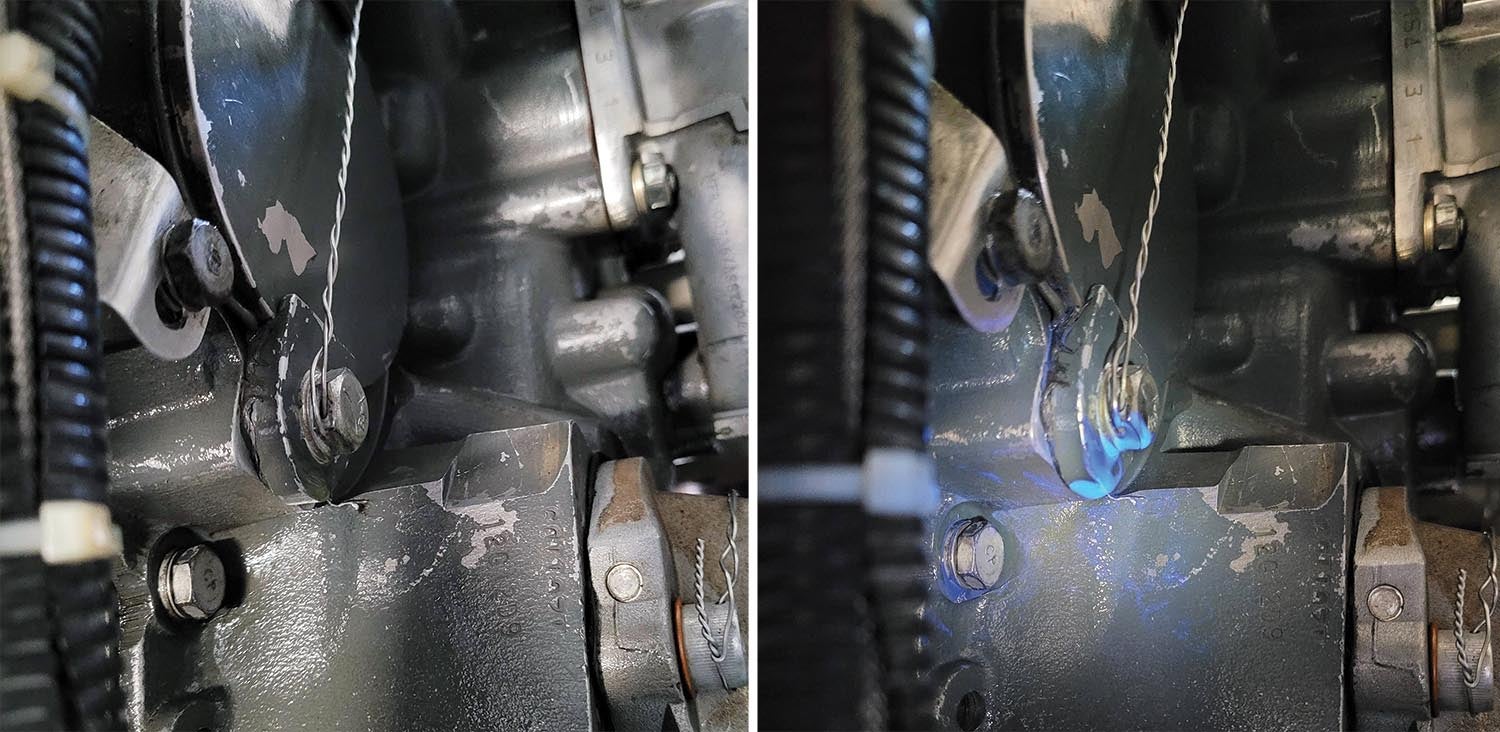
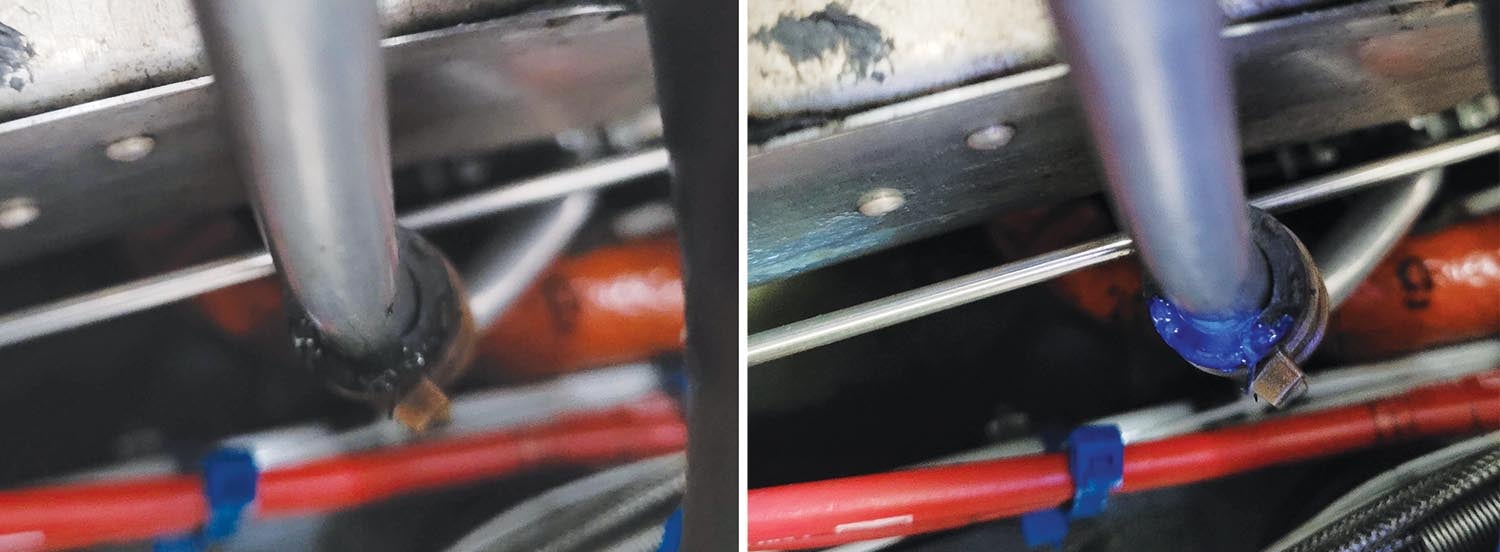
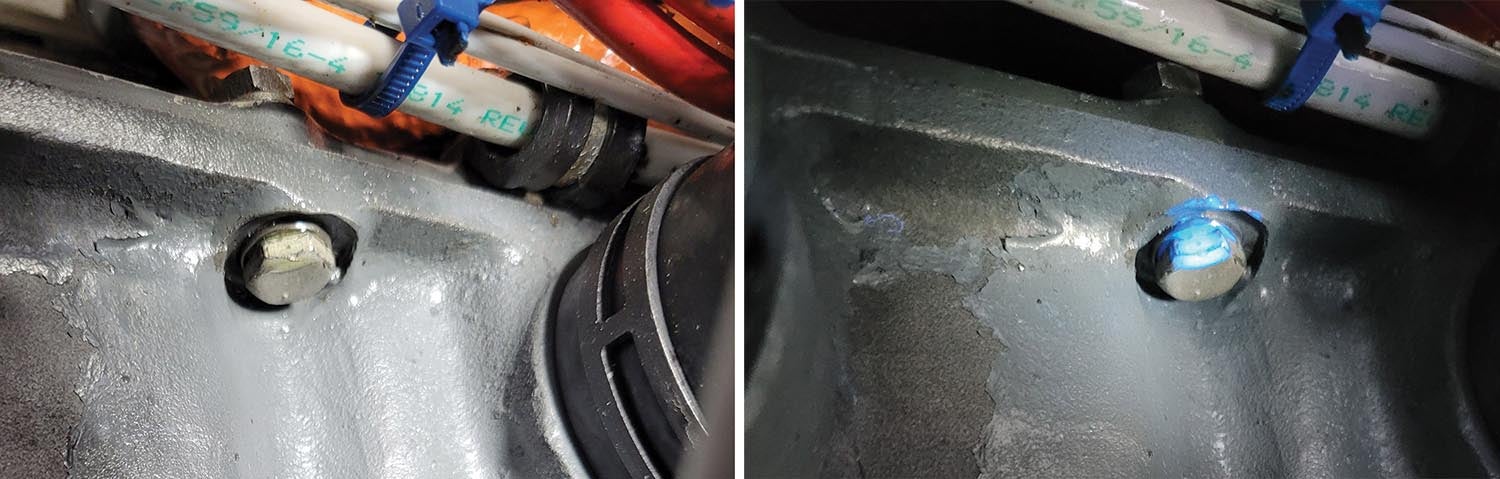
It might seem like the engine has been thoroughly cleaned, but the way to know for sure is to close the hangar door, turn off the lights and switch on an ultraviolet (UV) flashlight. I used a pee-light (used to find pet urine), purchased from the same place as the pee-pads, but Harbor Freight also has one that should work. Keep a supply of spare batteries on hand. The light needs to be as bright as possible, so frequent battery changes may be necessary. So long as the hangar doesn’t have large windows, the closed hangar door should make things dark enough for the UV light to work, especially if it’s not a bright, sunny day.
This is where the magic happens. Motor oil fluoresces a purple color when placed under a black light. If any spots have been missed, they will show up under the UV. Use a rag to wipe them off or, if necessary, spot treat with contact cleaner. Contact cleaner is nice because it comes in a spray can with a straw, can be directed at small targets and evaporates quickly. Some areas might clean well with contact cleaner sprayed on the rag, rather than sprayed on the target site.
Once the engine is thoroughly clean and inspected, it’s time to start making a mess again.
Step 3: Run the Engine
Running the engine is necessary to pressure up the oil system and generate new evidence of leaks, but at the same time, it’s important not to run the engine for too long or at a high power setting, which may create enough of a leak to blow it around the engine compartment and obscure the actual source.
For the first run, probably 2–3 minutes at idle is enough. Shut down, push the plane back in the hangar, close the door and break out the UV flashlight. Thoroughly inspect the engine for any purple color. Sentry Seal and the edge of some gaskets will fluoresce purple as well, but you can ignore those. Here are some of the likely culprits:
• Mounting bolts on the accessory case or oil pan that penetrate through into an oil-bathed area of the engine. Not all bolts go into a sealed boss. Some of them actually thread through into the slippery side of the engine. This includes some of the through-bolts, including those holding the cylinders.
• Prop seal.
• Gaskets under accessories (magneto, vacuum pump, governor, etc.).
• Oil drain-back tubes (the tubes that connect from the top of the cylinder heads to the oil pan). Note that on some engines, there is a rubber connector between the aluminum line from the cylinder head to the nipple on the oil pan. These rubber connectors get hard with age and are a prime source of leaks. On my engine, three out of six were found to be leaking.
• Valve cover gaskets. There are two kinds of gaskets typically in use: cork and silicone. The silicone gaskets last longer, seal better and are well worth the extra cost, in my opinion. However, they must be installed against clean surfaces and torqued according to the manufacturer’s specification. Overtightening the valve covers will cause these gaskets to leak.
Step 4: Take Notes
Make notes on everywhere you see purple. Clean up all the evidence with a rag (the engine shouldn’t be too hot yet) and then repeat Step 3.
Don’t try to fix any leaks yet. Some of the evidence found in Step 3 could have been missed during the cleaning in Step 1 or may have migrated from some other hidden location with the running of the engine. Unless the leak is really obvious, it is a better idea to do a second engine run first. This brings everything up to a higher operating temperature. Parts expand as they get warm and thin oil leaks better than thick oil. This is the reason for taking notes at the beginning of this step. If you see purple in the same places again after the second run, it is good evidence that you have found the source of the leak. However, beware: It is very possible that there is more than one leak and the chances are pretty good at this point that they have not yet all been found.
Step 5: Fix the Leaks
After the second engine run (also of only 2–3 minutes), check again for purple and compare to the notes in Step 4. If it shows up in the same place, that is good evidence that the leak source has been found and should be fixed. If the purple does not show up again, then either the leak is slow and another engine run is warranted or it was simply old oil that got missed on the first cleaning and/or migrated from somewhere else.
It’s a good idea to inspect the engine thoroughly as soon as the door is closed on the hangar, then wait for it to cool down enough to avoid potential burns while working on it, then check again for leaks before actually starting the fixes. This allows for oil to pool a bit and for leaks to accumulate more evidence that might not have shown up on the first look.
The method of fixing the leak depends on the source:
• Accessory flange: If the leak appears along the flange of an accessory, check to see that the mounting bolts are torqued correctly. If they are already tight, then the accessory should be removed, faces cleaned and gasket replaced.
• Drain tubes: If the leak appears at the edge of the rubber hose and the hose clamps are tight, then the hose should be replaced.
• Bolts: Sometimes the leak will appear on a bolt head or nut. Assuming it hasn’t dripped from somewhere else, this is evidence that oil is pushing past the threads. This may be correctable by removing the bolt (or the nut from a stud), applying thread sealant and then replacing and retorquing. Do only one bolt/nut at a time, sealing and replacing each one before moving to the next. This keeps pressure on the gaskets/seals and reduces the chance that a new leak past the gasket might be introduced.
Step 6: Rinse and Repeat
Repeat Steps 3 and 5, taking appropriate notes. Several runs through these steps may be needed to find all the leaks that will show up. If a couple of runs have been completed and no leaks are showing up, then perform an extended ground run, allowing the engine oil to get up to normal operating temperature. Spend a minute or two at high rpm (close to cruise if possible), then shut down. If no purple is found after this step, declare victory, put the cowling back on and go fly with your new, leak-free engine!
Supplies
- Engine cleaning wand, Harbor Freight, Part Number 68290, $10
- Mineral spirits, one gallon, hardware store, $15
- Pee-pads, 28×34 inches, 21 count, www.chewy.com, Part Number 227441, $12
- UV flashlight, Harbor Freight, Part Number 63931, $9
- CRC Lectra-Motive Electric Parts Cleaner, AutoZone, Part Number 05718, $10
—D.F.
![[Credit: Wikimedia Commons]](https://www.kitplanes.com/wp-content/uploads/2026/07/4_rutan_a_longez.jpg_preview.jpg?w=218&h=150&crop=1 "Rutan Symposium Turns to the Coming Canard Maintenance Crisis")
![[Credit: Lisa Turner]](https://www.kitplanes.com/wp-content/uploads/2026/02/Fuel-Selector.jpg?w=218&h=150&crop=1 "Fuel Follies")


