The Industrial Revolution over 200 hundred years ago enabled many new innovations. One was the invention of wire rope. No longer would bridges, mines, ships and construction cranes have to depend on bracing made of plant-based material. Wire ropes were stronger for the size, didn’t stretch, didn’t rot when exposed to sun and water and required far less hand labor to fabricate.
Their lack of stretch and much greater stiffness had a drawback: There needed to be some way to adjust the length of a bracing cable—and thus turnbuckles came into play.
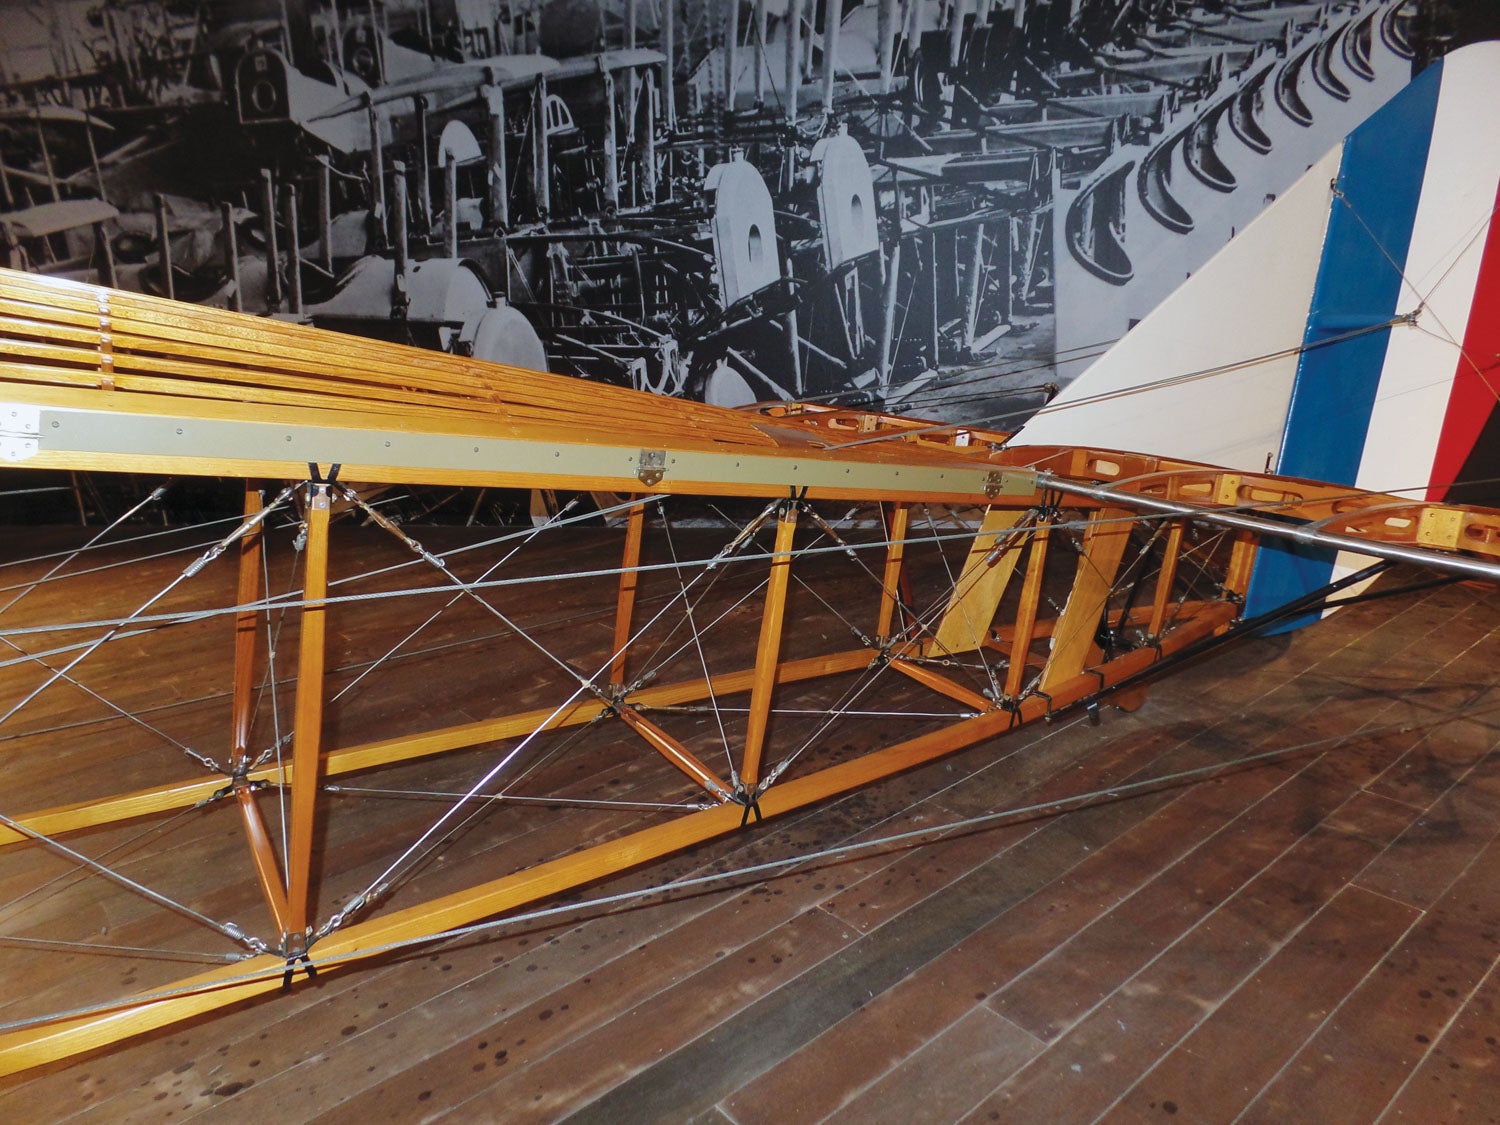
Turnbuckles played a key role in early aviation, featured not only in the external wing bracing but in the internal areas of the aircraft as well. They started crude, of course, but over the years they got better and more standardized.
And in 1942, the turnbuckle reached the absolute pinnacle of design.
Well, that’s the way most home-builders seem to feel. We still use the AN130, AN135 and AN140 turnbuckle assemblies (and their individual components) for which the Army-Navy joint committee issued the specifications over 80 years ago. Yet the design of the simple aviation turnbuckle was improved over the years. The specifications for some components have dates of 2002 or later. These are 21st century turnbuckles—and a lot of folks don’t use them.
Let’s take a look.
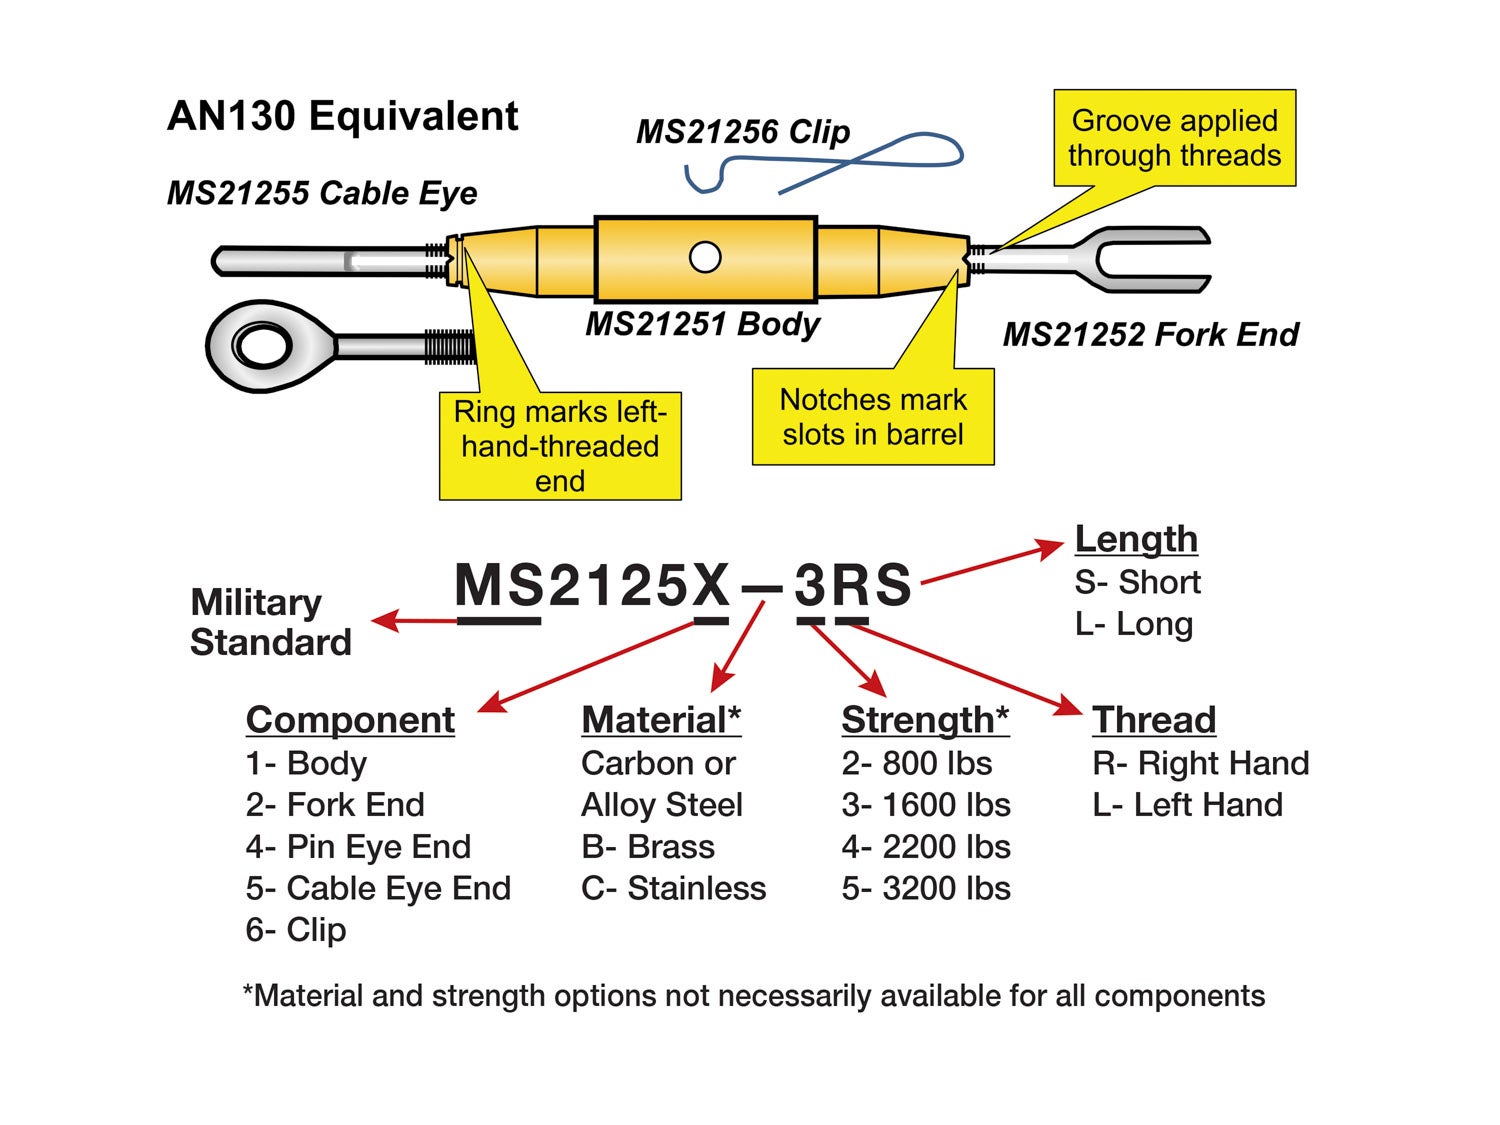
Meet the MS2125X Series Turnbuckles
The new turnbuckles from the Military Standards (MS) system use a simple base designation (MS2125X) with the final digit identifying the specific components. (There’s also the MS21260 turnbuckle end, which is designed to have the cable swaged to it.) For instance, instead of an AN155 barrel, we have the MS21251 (the specification refers to it as a “body”). Instead of AN161 fork ends, the MS series lists MS21252.
The new system stinks in one particular way: It doesn’t have a specific MS identifier for turnbuckle assemblies. One can buy an AN130-16S turnbuckle, which comes with a compatible barrel (AN151), fork end (AN161) and cable eye end (AN170).
No such luck with the new turnbuckles. You’d have to know to buy an MS21251 body, a MS21252 fork end and an MS21255 cable eye end. You’ll have to make sure the ends have compatible threads with the body and ensure that either the fork end or the cable eye end (but not both) have a left-hand thread.
The suffix (the characters after the basic MS number) that describe the individual characteristics are similar to that of the AN variety, with one key exception: the listing for the minimum breaking strength. The “16” on an AN-130-16S turnbuckle meant it was rated at 1600 pounds. In contrast, the strength for an MS unit is coded. For instance, a fork end might be an MS21252-3RS. The “3” indicates the unit was rated at 1600 pounds. Here are the code runs:
2: 800 pounds
3: 1600 pounds
4: 2200 pounds
5: 3200 pounds
Why Use Them?
Well, what’s the deal? More work when ordering, more potential for getting it wrong—why bother with the MS turnbuckles?
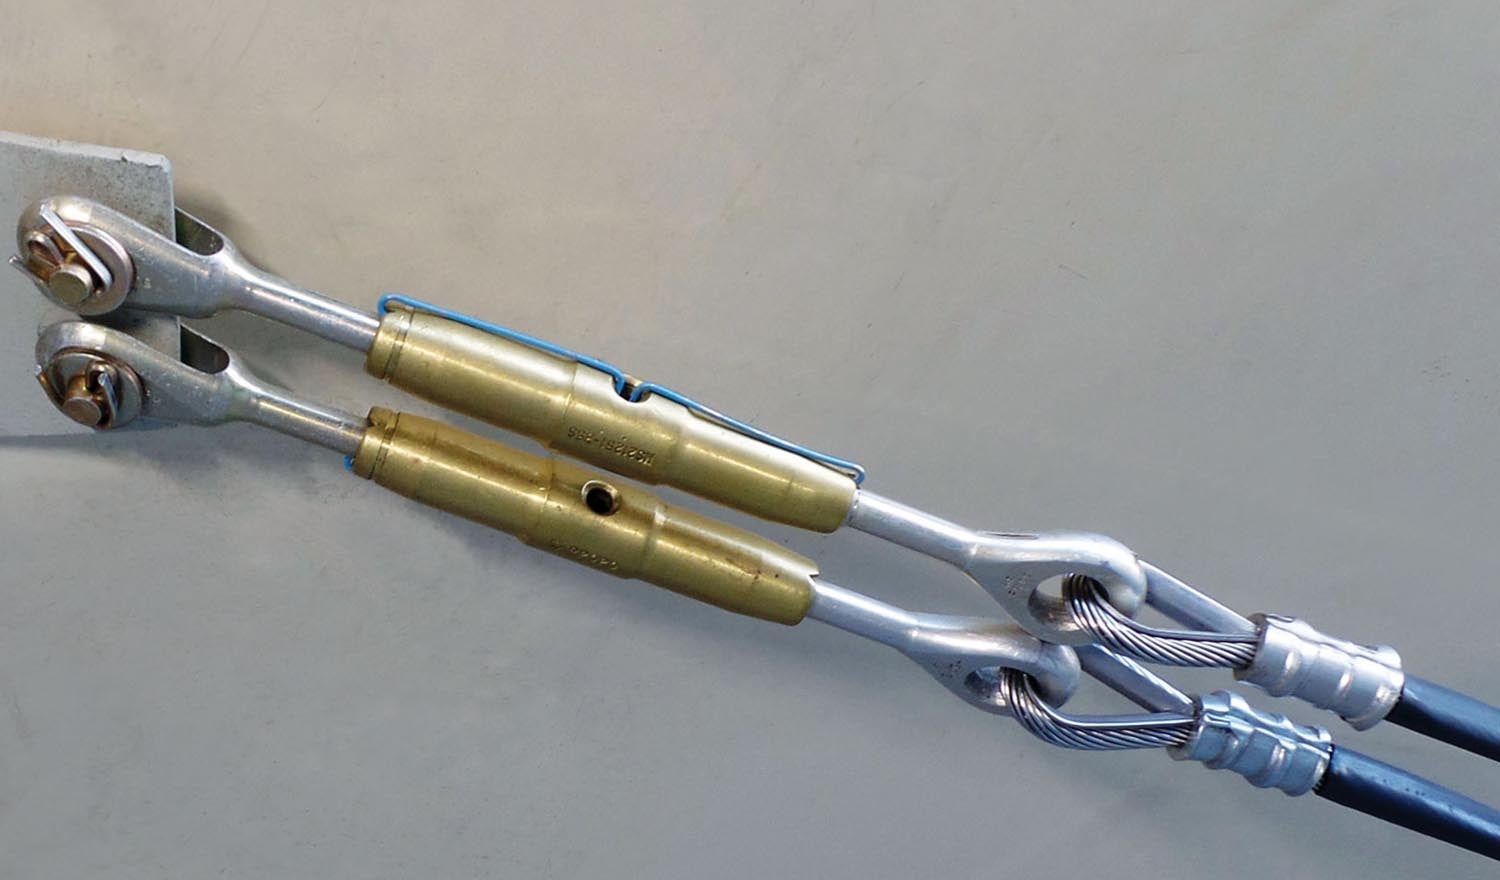
A key advantage boils down to one component: The MS21256 clip. The MS turnbuckles can be locked with a pair of these small wires instead of safety wire. MS21256-1 for short turnbuckles, MS21256-2 for long ones.
Maybe it doesn’t make a difference to you. But I recently decided to replace eight bracing cables on my Fly Baby, which meant I was facing installing and safety-wiring eight turnbuckles, plus additional effort when I had to remove safety wiring to tweak the wing rigging and rewire them.
I hate safety-wiring turnbuckles. I wasn’t born with tool-steel fingertips and tungsten sinews. I hate having to keep track of which way to wrap each element and keep the system tight. And, of course, having to do it twice to achieve the recommended double-wrap. Even after so many years, my wraps look ugly.
So I decided to give the MS series a try.
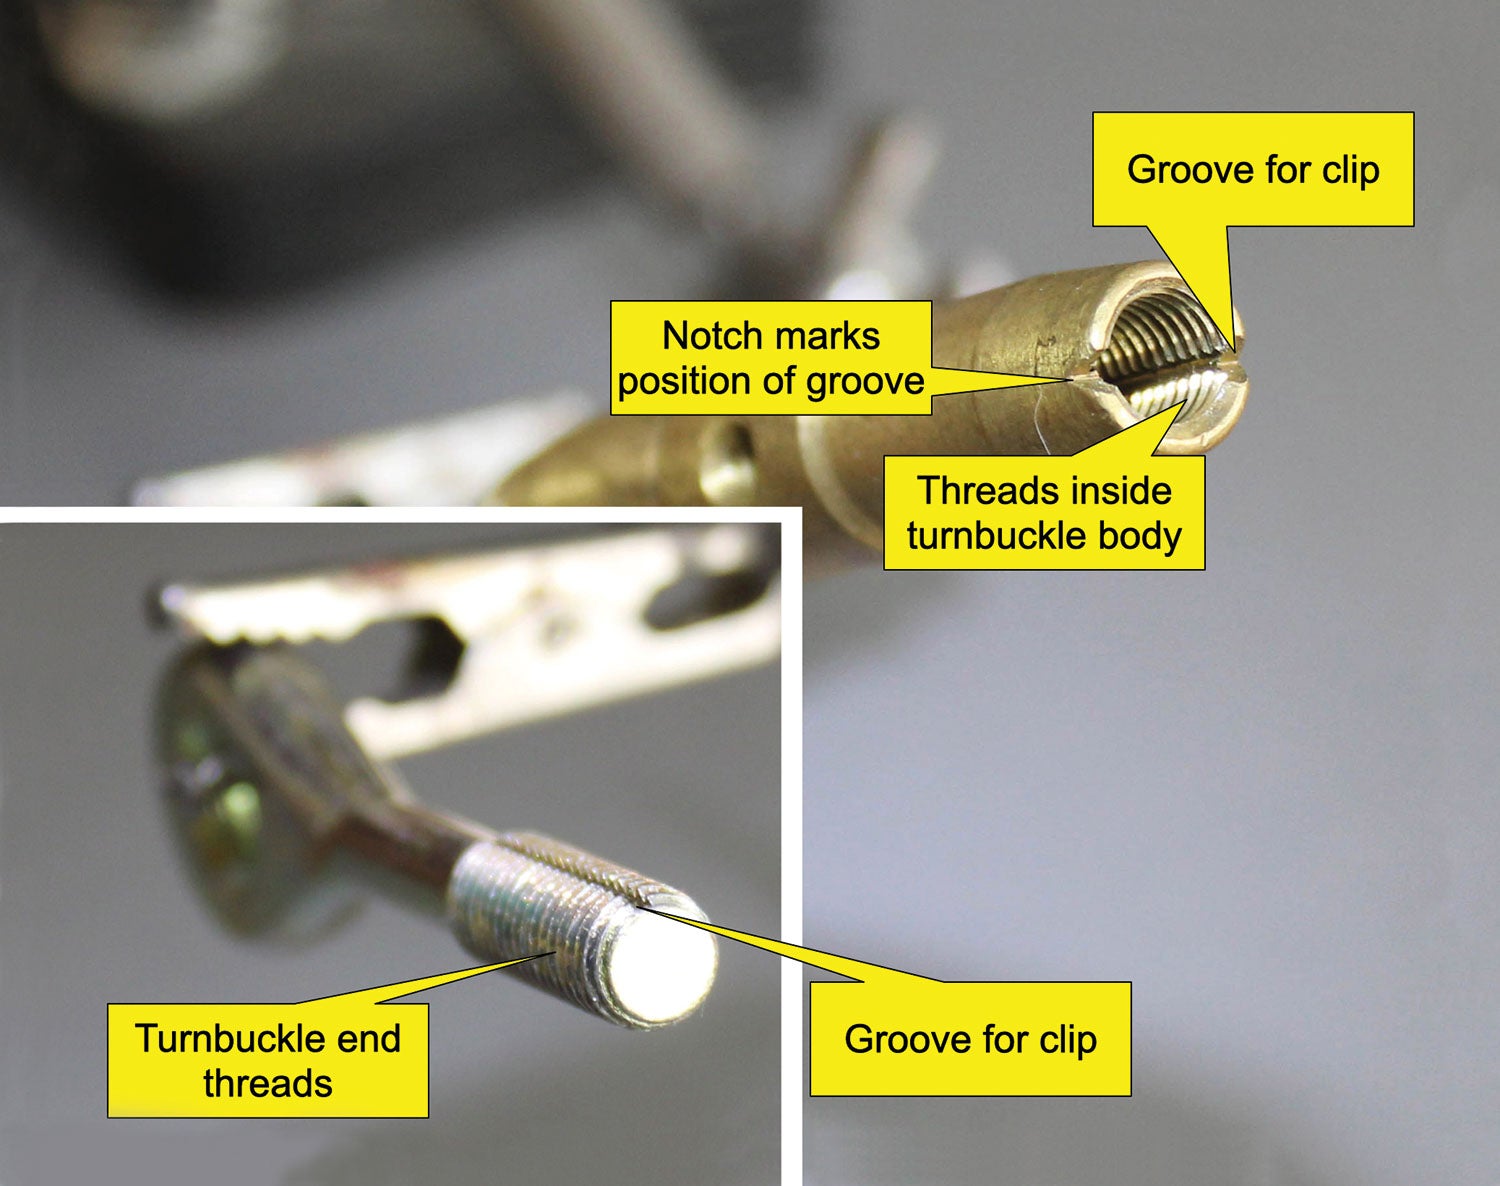
The internal threads on the ends of the bodies have a groove cut through one side (for 800-pound-rated bodies) or both sides (1600-pound on up). The end pieces have a corresponding slot cut through one side of their external threads.
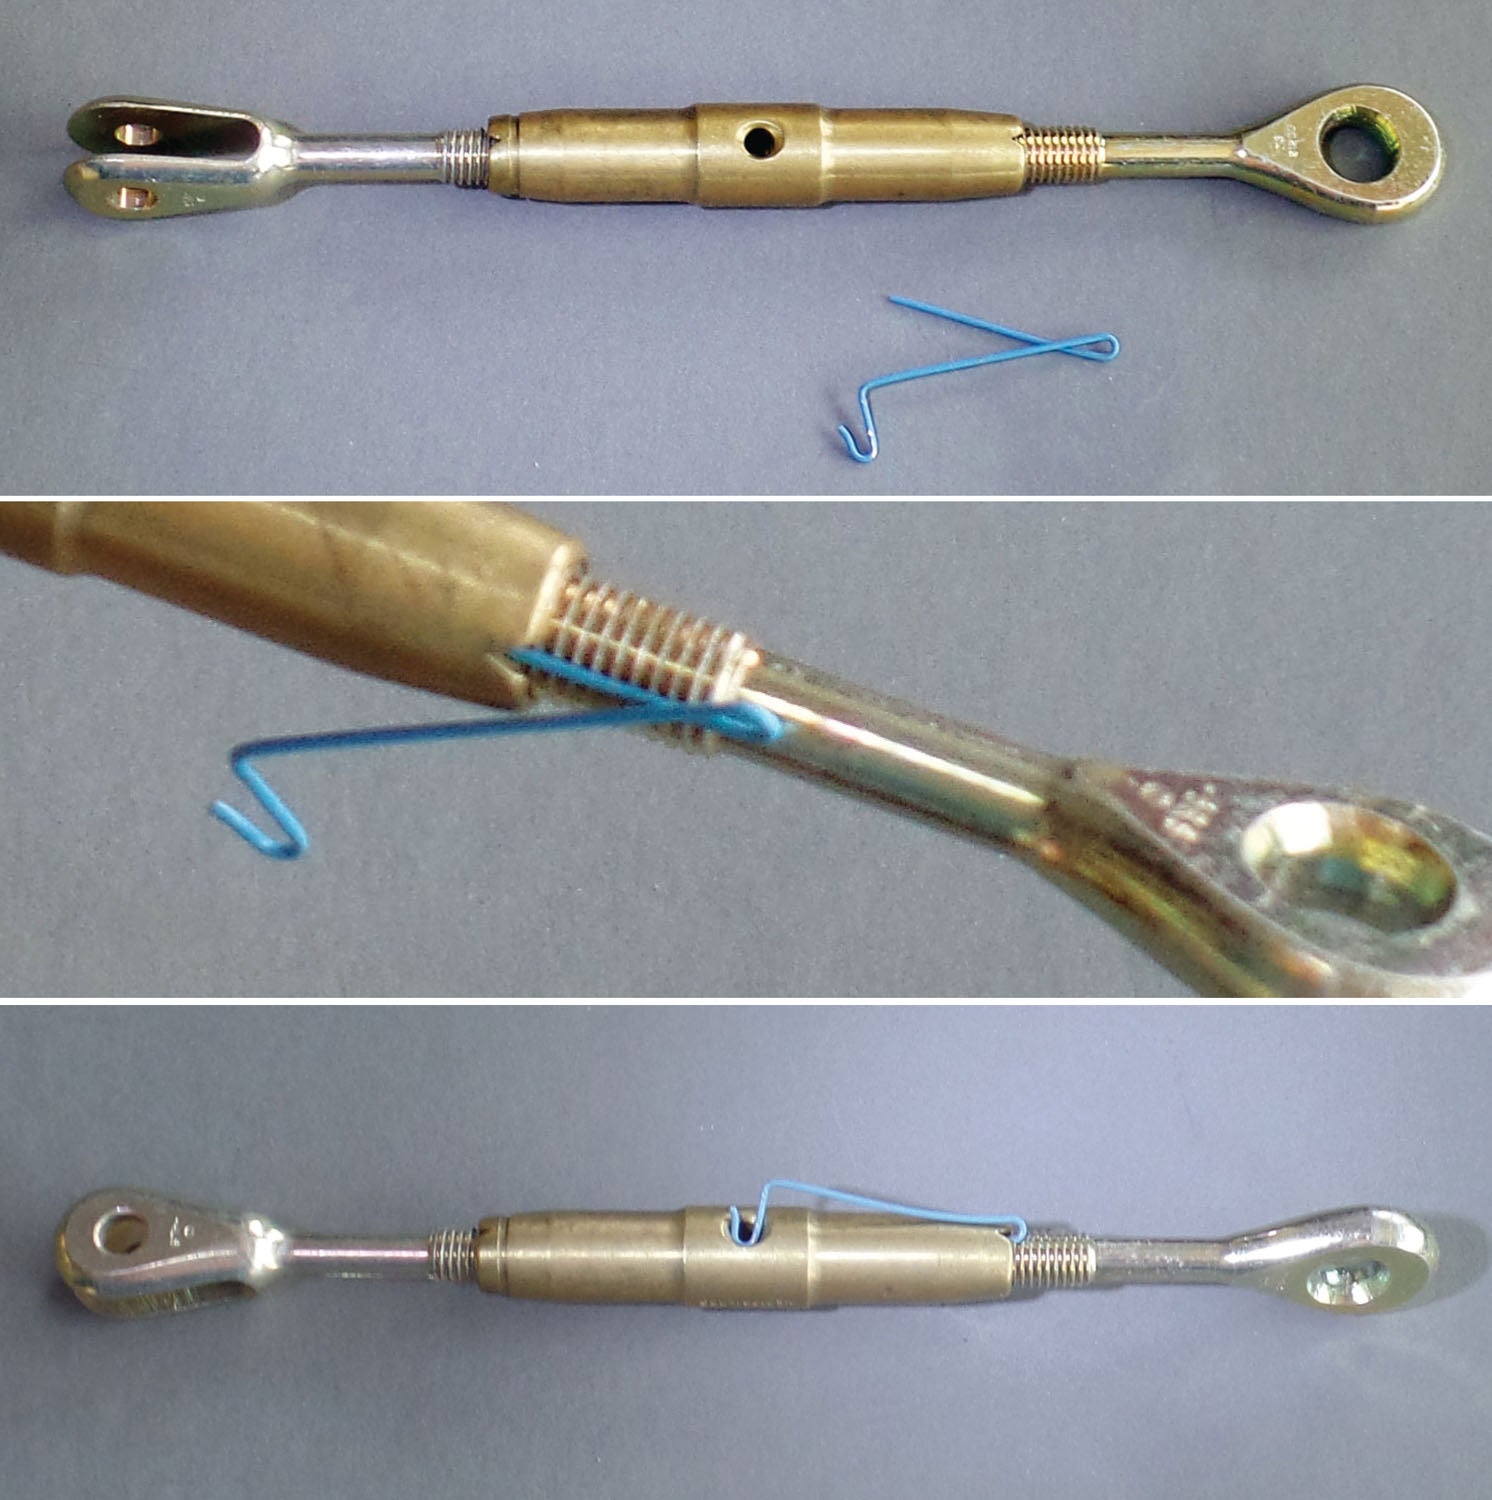
The clip is installed by lining up the notch in the body with the axis of the groove in the turnbuckle end, then sliding the clip all the way in. The U-shaped end of the clip is inserted into the center hole until it clicks into place.
User Experience
First suggestion: Sit in a comfortable chair with good light and get some practice. The groove in the body and slot in the threads on the end have to be precisely aligned to get the clip to slide in. Practice with the ends fully screwed into the body, with no threads showing. This does a pretty good job of hiding the slot in the end. There’s a polished area aligned with the slot to help the user line up the unit. This may or may not be very visible, depending on how far from the turnbuckle you need to work. Add a bit of felt-tip ink to the area to help get it aligned.
Line up the “V” on the end of the body with the slot on the turnbuckle end. Place the loose end of the clip (the end without the “U”) along the shaft of the turnbuckle end and slide it into the small “V” on the end of the body. It needs to lie flat along the shaft of the turnbuckle end. Don’t worry about where the other end is going.
If it doesn’t immediately slide in, turn the turnbuckle end very slightly left or right and try again. When it does start sliding in, you’re all set: Push it all the way in, then take the “U” end of the clip and push it into the turnbuckle center hole until it “clicks.”
Then do the other end. Both clips can be inserted in the same side of the center hole if needed.
I’ll be honest: Adding the 16 clips to eight turnbuckles on my Fly Baby took 90 minutes. Even with my clumsy wiring technique, conventional safety wiring would probably have taken no more than a half-hour.
The advantage came a few days later, when I discovered slight wing heaviness after a test flight. Pop the “U” clip out of the hole with a flat-blade screwdriver, remove and discard the clip (don’t re-use!), adjust the turnbuckle and insert a new clip. In my case the first one took just a few seconds to install. Other ones took longer, but marking the slot axis on the turnbuckle end would have shortened the job.
The nice thing was how beautiful the installation looks afterward. My regular safety wiring looks like it had been done by a drunken python (and causes muttering by my A&P during the condition inspection) but the clip-type turnbuckles are very clean.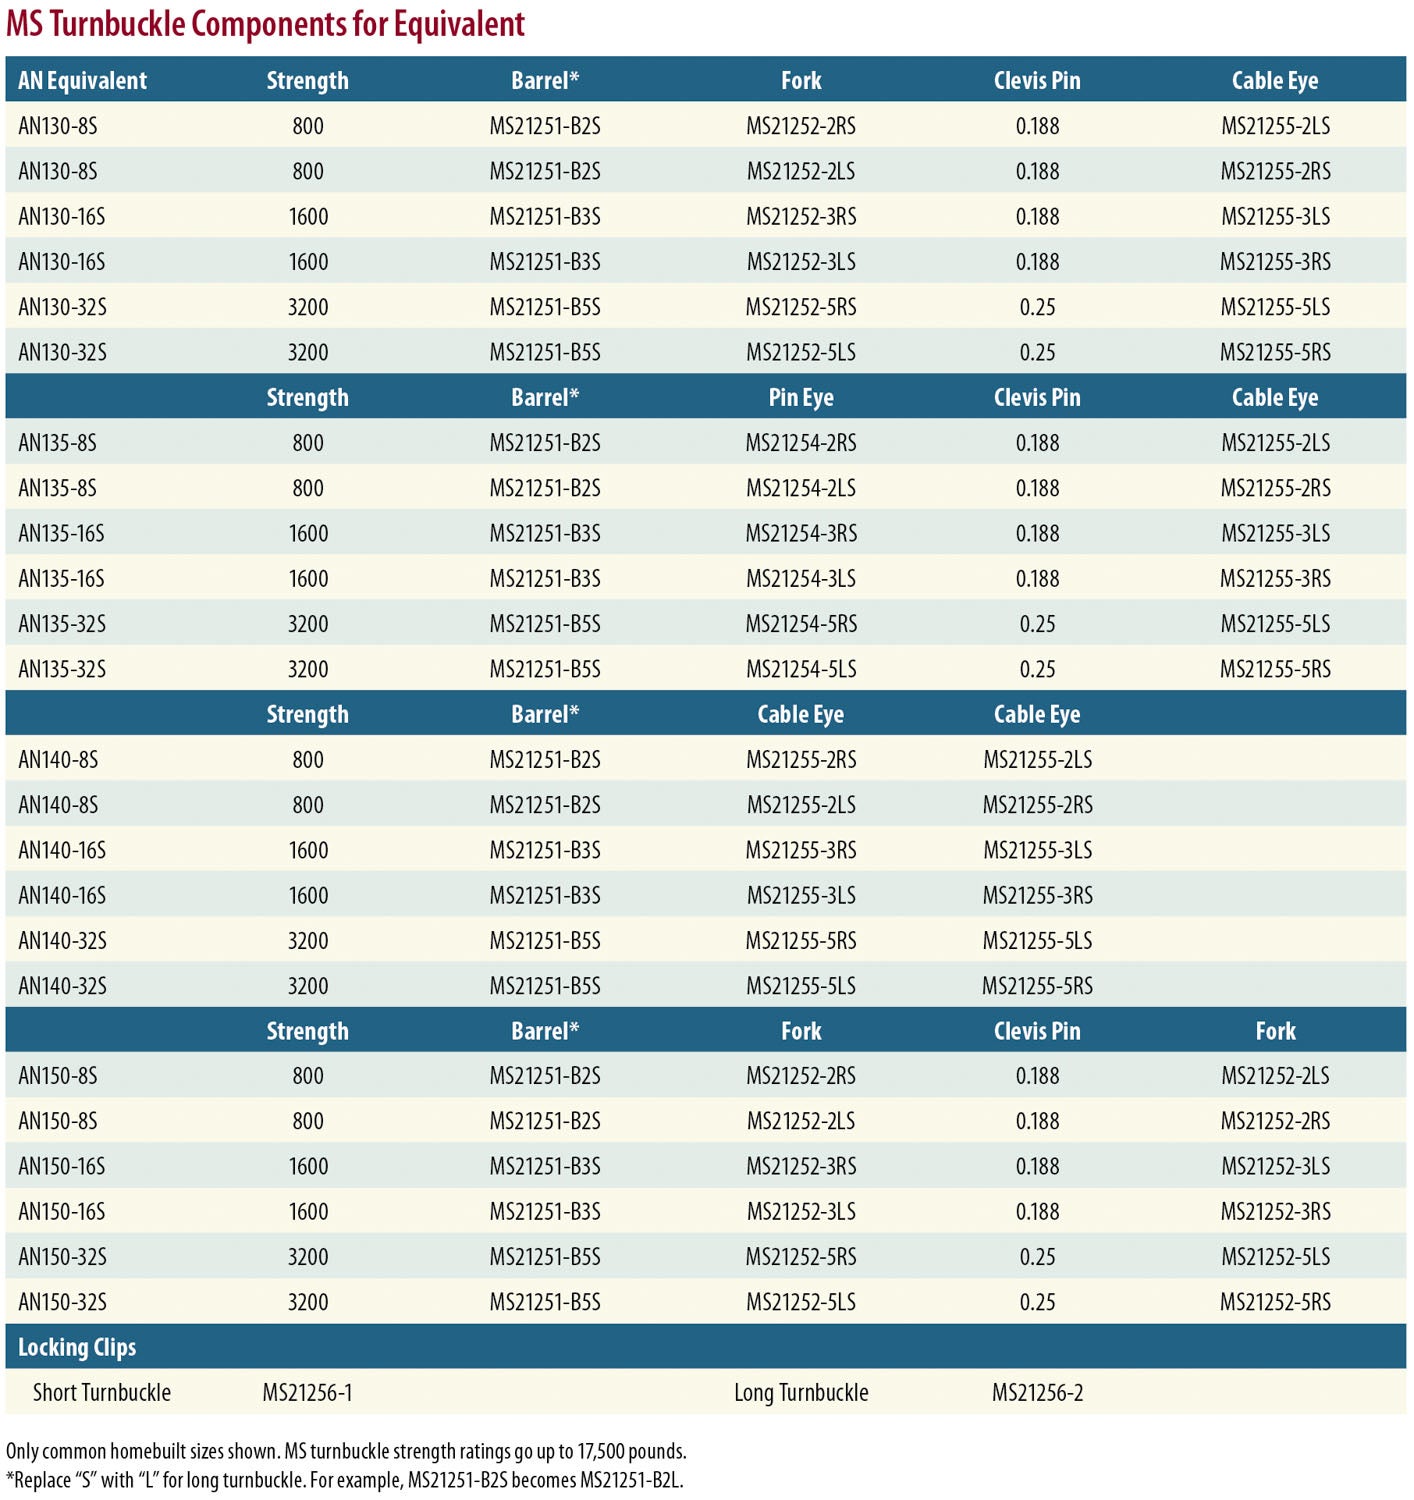
Downsides
There will be some folks aghast about the clips not being reusable. You can’t reuse the safety wire on an AN turnbuckle either, but the MS clips cost 25 cents each! There are folks out there who won’t blink at a $10,000 avionics purchase but will begrudge spending 50 cents for a pair of clips.
Because there are just two grooves in the body, the turnbuckle can only be secured with the ends at the 0° or 180° position. If you’re the kind of person who judges turnbuckle tautness by 10° increments, you won’t be able to use the clips.
This can have a drawback where two cables are closely parallel: The cable eye ends may actually interfere with each other. In this case, do a conventional safety wiring on one or both to “clock” the ends so they don’t touch. It’s also more difficult to insert the clips between the turnbuckles, so plan the ends so their grooves are outboard of each other.
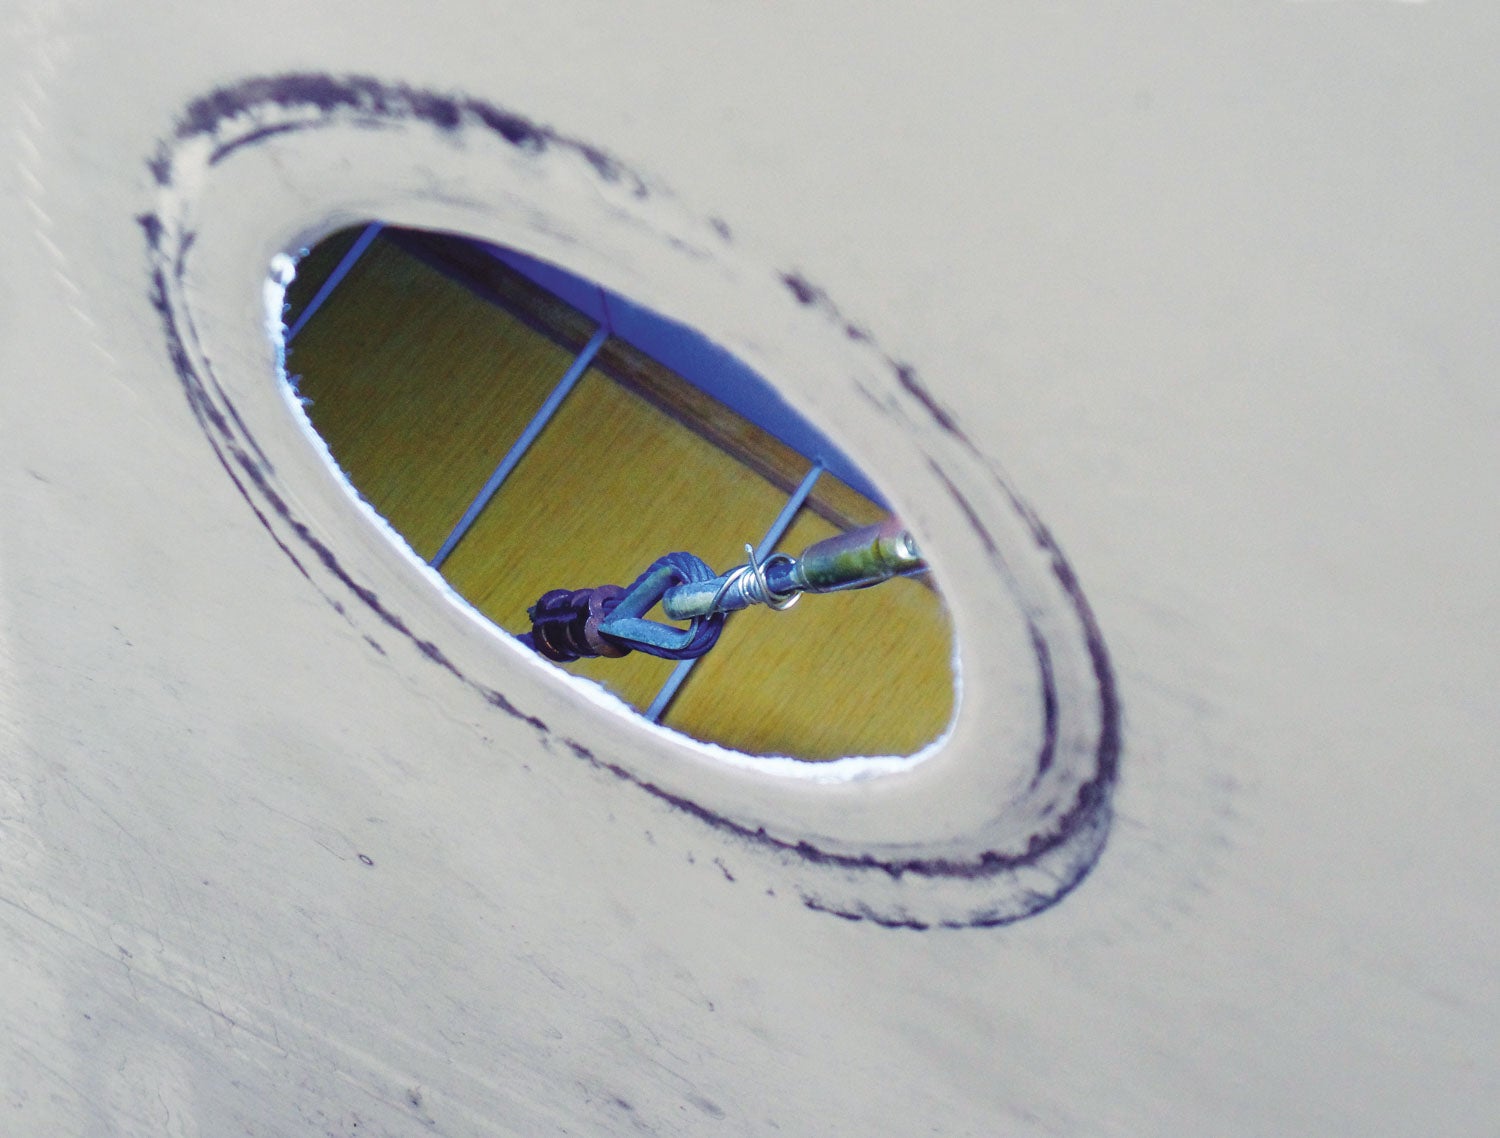
Finally, because the components have to be adjusted just so for the clip to slide in, these turnbuckles may not be the best for areas with limited access. I have turnbuckles inside my wing on the other sides of access holes that I can barely get my hand through. I’d hate to be trying to set a fiddly position of the turnbuckle in order to slide the clip into it when I can’t clearly see the unit itself.
The Bottom Line
In my case, hating safety wiring as I do, the MS turnbuckles were a good choice. Others may differ. An online search for “MS turnbuckle clip” uncovers several videos that show how to install the clips.
Going to be stubborn and still insist on AN turnbuckles? Their prices are hitting the roof. Two prominent homebuilt-supply sources list AN130-16S turnbuckle assemblies at around $50—up from $35 just two years ago. The cost of a 1600-pound MS-series body, cable eye and fork end totals about half what the AN variety is going for.
Hate the clips? Fine—you can safety wire the MS turnbuckles in the conventional way if you wish. But buy a few dozen clips. With practice, you might change your mind.


Before the clip version came out, turn buckles were safety wired. I’m sure Air mechanics know this but maybe kit builders do not. Learn it. Clips can break, and safety wire will always be around.
Comments are closed.