Here are a few of those “hints and kinks” that wouldn’t make up a full article individually, but three of them together might just do it. I answer my email one at a time, but when I get at least two email questions on the same subject, I bring them here for all to peruse. Here are this month’s winners:
- Matching headphone impedances and driving a speaker with a headphone output.
- Further explanation of the “intermediate connector” concept, sometimes called the “Karmic Connector” (KITPLANES Aircraft Radio interMediate Connector).
- LED and laser drivers.
Headphones and Speakers
In the beginning was brother Bell (Alex, late of Nova Scotia). In the hurly-burly of getting the world’s telephone system up and running, a lot of standards were set by SEWAG (Scientific Educated Wild A$$ Guess). Among these were the impedances of the earpieces and microphones of the first phone systems. Ma Bell said that earpieces would be electromagnets and have a 300Ω impedance, and microphones would be a sack of carbon with a 150Ω impedance.
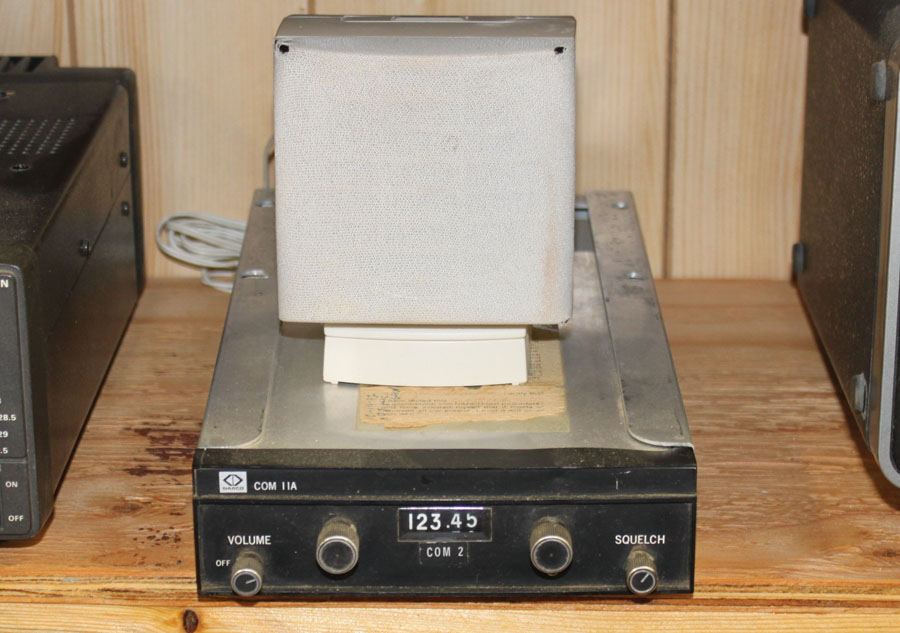
The setup at RST labs for speaker audio from a headphone output. The white box on top of the radio is a computer external speaker set. Use the one with the power supply plug input.
Airplane radios, just starting to come into vogue during the telephone heyday of the 1920s, saw literally millions of earpieces and microphones being built for the telephone industry, and we latched onto these parts for aircraft headphone and microphone use. No reason to reinvent the wheel, and besides, producing millions of telephone parts brought the price down to pennies.
Aircraft radios of the day couldn’t produce much audio power, so we ran our headsets with the earphone parts in series; two in series gave us 600Ω headsets. Radios of the day were designed to drive 600Ω earphones.
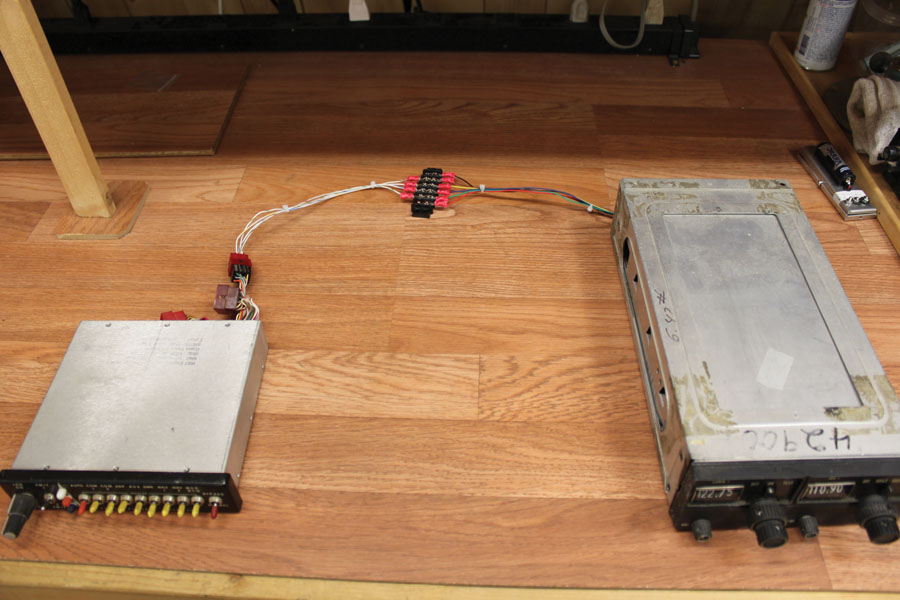
A com radio and an audio panel with the Karmic connector between them. Note that to change the radio to a different type requires only half a dozen crimp connectors to be replaced.
In the mid-1950s we started thinking about this, especially with the proliferation of bouncy, vibrating rotary-wing aircraft. Headsets wired in series were breaking quite regularly, and since the earphones were in series, when one earphone broke a wire, both earphones went dead. Sort of like the old Christmas lights that when one bulb burned out, the whole string went dead.
We gradually went away from 600Ω headphones with two 300Ω earphones in series to 150Ω in parallel, and we started designing our radios to drive that 150Ω load. We actually started designing the radios to drive up to six 150Ω headsets in parallel to take care of the fleet that was starting to produce 6-place aircraft. That means that we were designing to drive 25Ω loads.
So, writes a reader(s), how do I drive my hangar speaker from my junker hangar radio phone’s output? A few options:
- Drive it directly from the headphone output. The mismatch between something intended to drive 25Ω worth of headsets and 8Ω of speaker isn’t all that great. You may not have enough volume, as the phone’s output is intended to drive something about an inch away from your ear. It is also true with this procedure that the phone’s amplifier in the radio wasn’t designed to drive this heavy of a load and may overheat and fail.
- Use a separate speaker amplifier like I described in my column in the August 2016 issue.
- Use a cheap computer speaker amplifier. I see these things by the dozens at most thrift stores. At most you will have to buy one, and they are less than $10 online from a dozen sources.
The Karmic Connector
This one may not be exactly an email to me, but on the Pilots of America avionics newsgroup (https://www.pilotsofamerica.com/community), there is much grousing about having to spend $2,000 in avionics shop labor time to install a simple audio panel or replace a simple com radio.
The original Karmic connector concept was outlined in KITPLANES from late 1998 to early 1999. This update is a refinement of those articles with experience gained in the last 18 years.
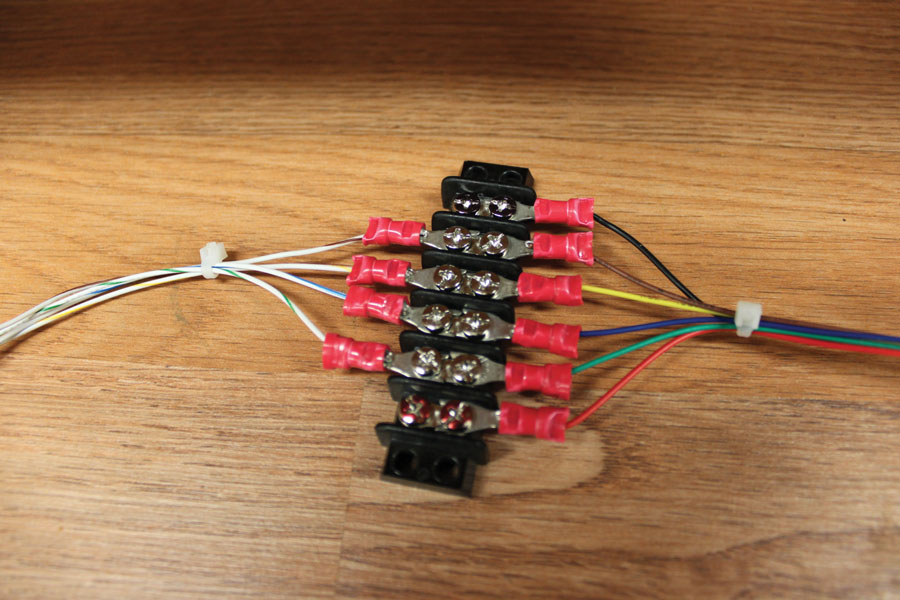
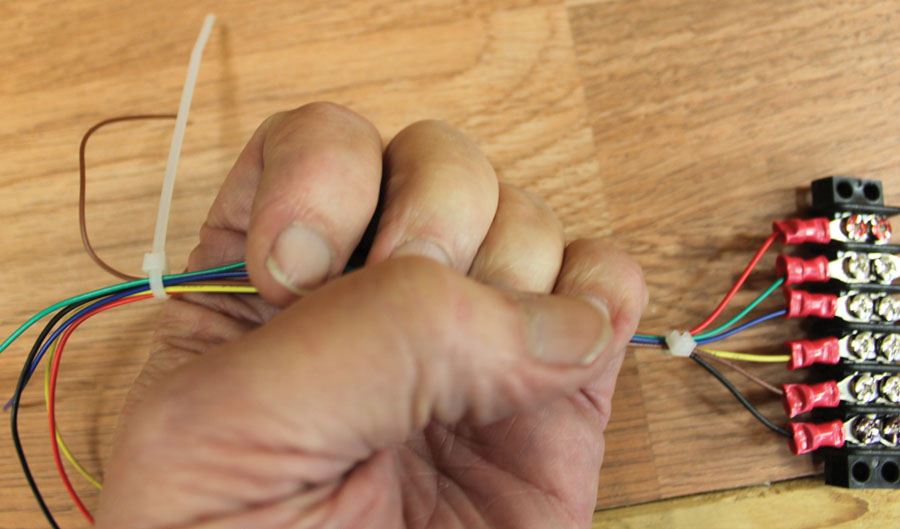
Closeup of the Karmic connector. Note that the + supply goes to the screws that have been colored red with a Sharpie, and the airframe ground goes to the screws that have been painted black.
The classic way of installing avionics that interact with one another (like an audio panel to every other radio in the stack) is to hardwire the supplied radio connectors to the other radio connectors with wire. When (not if) the old radios are upgraded, two things can happen, both of them bad. Either the wires to and from the old radio are clipped and spliced to the new radio (ugly and unreliable) or the entire radio stack is rewired (horribly expensive and wasteful of time).
The Karmic connector obviates that procedure by providing an easily modified terminal block type of connector in between each radio and the rest of the avionics in the stack. Every wire from every radio goes to a terminal block first and then interconnects are made between block connectors with crimp terminals if necessary.
One good thing that may not be obvious at first glance is that troubleshooting an avionics problem is made quite simple. Normally, we either use the “jam the test probe into the connector hole” technique or use the “sharp pointed pin into the wire” method of attaching test equipment to a radio input or output. Now we have those wires coming out to small screws on the terminal block and probing with a meter becomes quite simple.

The only wires from the #1 com into the audio panel. Replacing the audio panel is a little more difficult, but nowhere near as difficult as it would be if it was hardwired into the airplane.
A last thought…all this Karmic stuff is worthless unless it is documented. Each and every radio needs complete schematic diagrams showing where and to what block it is connected, along with labeling which connector pin on the radio is connected to which pin on the terminal block. Yes, I know you want to fly your pretty new airplane, but you will use language not generally reserved for polite company when it comes time to fix the airplane without any diagrams.
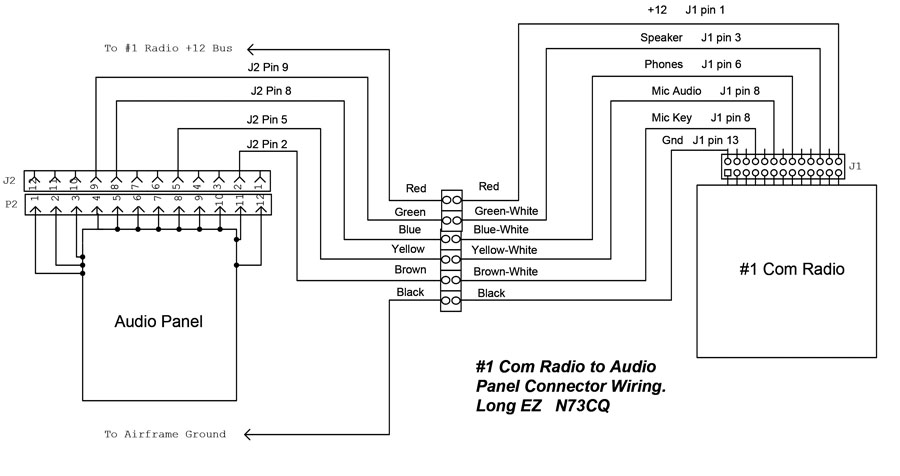
A proper schematic for the connection between #1 com and the audio panel. Troubleshooting is a lot easier when the installation is fully documented.
LED Drivers
Hoo, boy. I wish I had a nickel for every time I’ve been asked, “What voltage do I use to drive my LED lights?” I’ll say it one more time—LEDs are current devices. We’ve been so accustomed over the last 100 years of aviation to use incandescent voltage driven lamps that it is difficult to switch over to these current-driven LED lights.
The cheapest and easiest thing to use to drive currents of up to an amp and a half is the venerable old LM317. The LM317 and a single resistor are all you need for a current source for your high-power LEDs. Lower currents up to about 50 milliamperes? A simple single resistor makes an adequate current source, although the regulation is pretty poor.
Here is the math for these two methods of lighting LEDs, both with a 12- and 24-volt system.
For the low-current LED, let’s presume a current of 25 milliamperes (0.025 amps), a worst-case high voltage of 13.8 volts, and neglect the small voltage drop across the LED. The series resistor needs to have a value of 13.8 / 0.025, which is 552 ohms. The next highest common value is 560 ohms with a power rating of 13.8 * 0.025 watts, which is 0.345 watts, and the next highest common value is a half-watt resistor. These same two calculations for a 24-volt system with a highest voltage of 27.6 volts gives a 1200Ω (1.2kΩ) 1-watt resistor.
The calculation for the high-current LED (let’s assume 850 mA, or 0.85 amps) is much easier, as the resistor value and wattage is identical for either supply voltage. The resistor value is 1.25/0.85 or 1.47Ω; the next higher value is 1.5Ω, and the wattage is (0.85)2 * 1.5Ω or 1.08 watts. A 2-watt resistor will be required. What is not so easy to determine is the power being dissipated by the LM317. I like to have an absolute maximum of boiling water, 100C, (which in engineer-speak is spit-sizzle hot) for my integrated circuits, so let’s see what we will have to do.
For an ambient temperature of 30C (86F) and with a data sheet that says the IC will heat up 40C per watt, that gives us a margin of 4.25 watts for the bare IC. With a 13.8-volt supply, I calculate (long equation) that the voltage across the IC will be about 10 volts. That means that the IC is dissipating 8.3 watts, far in excess of our 4.25-watt margin. The answer? Heat sinking. The method of knowing how much heat sink? For me, it is bolt it to a piece of aluminum somewhere around the light and measure it. Not enough heat sink? Find a larger piece of aluminum in the vicinity. With a 24-volt supply it is much worse, and a very large heat sink will be necessary.
So far the year is off to a good start, and it looks like it is going to get better. See you next month. Until then, stay tuned.

![]()
Jim Weir is the chief avioniker at RST Engineering. He answers avionics questions in the Internet newsgroup www.pilotsofamerica.com-Maintenance. His technical advisor, Cyndi Weir, got her Masters degree in English and Journalism and keeps Jim on the straight and narrow. Check out their web site at www.rst-engr.com/kitplanes for previous articles and supplements.










Hello Jim,
In your article about the LED driver you stated the following:
“The calculation for the high-current LED (let’s assume 850 mA, or 0.85 amps) is much easier, as the resistor value and wattage is identical for either supply voltage. The resistor value is 1.25/0.85 or 1.47Ω; the next higher value is 1.5Ω, and the wattage is….”
Nowhere in the article does it mention anything about where the 1.25 Volt value comes from .
Would you care to enlighten me please?
Joachim
Good question…do you see the wire that connects to the “adj” pin on the LM317? That provides feedback to the LM317 which adjusts output voltage so that the drop across the resistor is always 1.25v. That is what allows you to control the current by selecting the appropriately sized resistor for that known voltage drop. Output of the LM317 will be the 1.25v across the resistor plus the voltage drop across the LED…somewhere between 1.2 and 3.0v….it depends on the color of the LED.