Time to stop messing around. Time to fish or cut bait. Time to…oh, you know all the rest of that stuff. Me? I’m getting ready to fish.
Let’s put the solar panel up on the roof of the hangar and start the HOG process for real. But first, there are some real considerations we have to take into account before we lift that solar array up onto the roof.
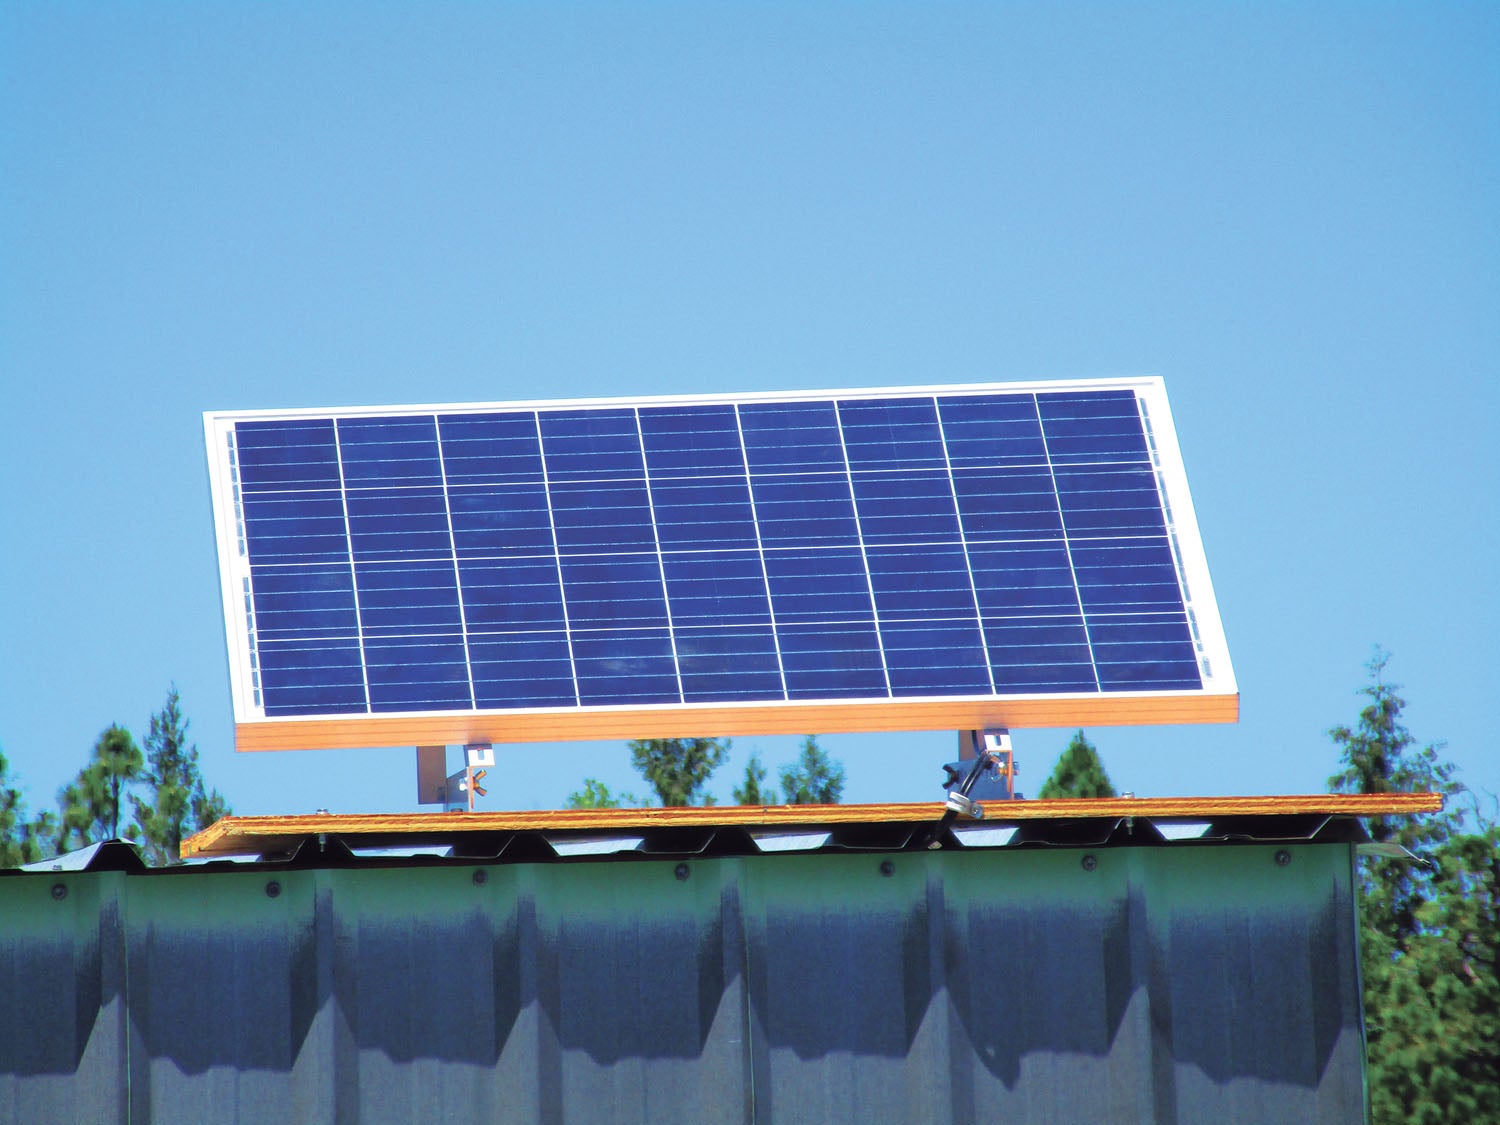
First, we need to consider what hangar roof to put the solar array onto. In our case we had three choices: center main roof, west wing or east wing. The center roof is tall—16 feet high. Sure, it gets 100% sun all day long. But its height means if I’m going to maintain or work with the array (like changing the pitch angle twice or four times a year), I’ll need to climb a very long ladder. When I was 20, maybe. At nearly 80, probably not. The east and west wings are only about 7 feet high. I can reach them without a ladder, and the way our hangars are teed into one another, the east wing gets a lot more afternoon sunlight (the really big energy producer).

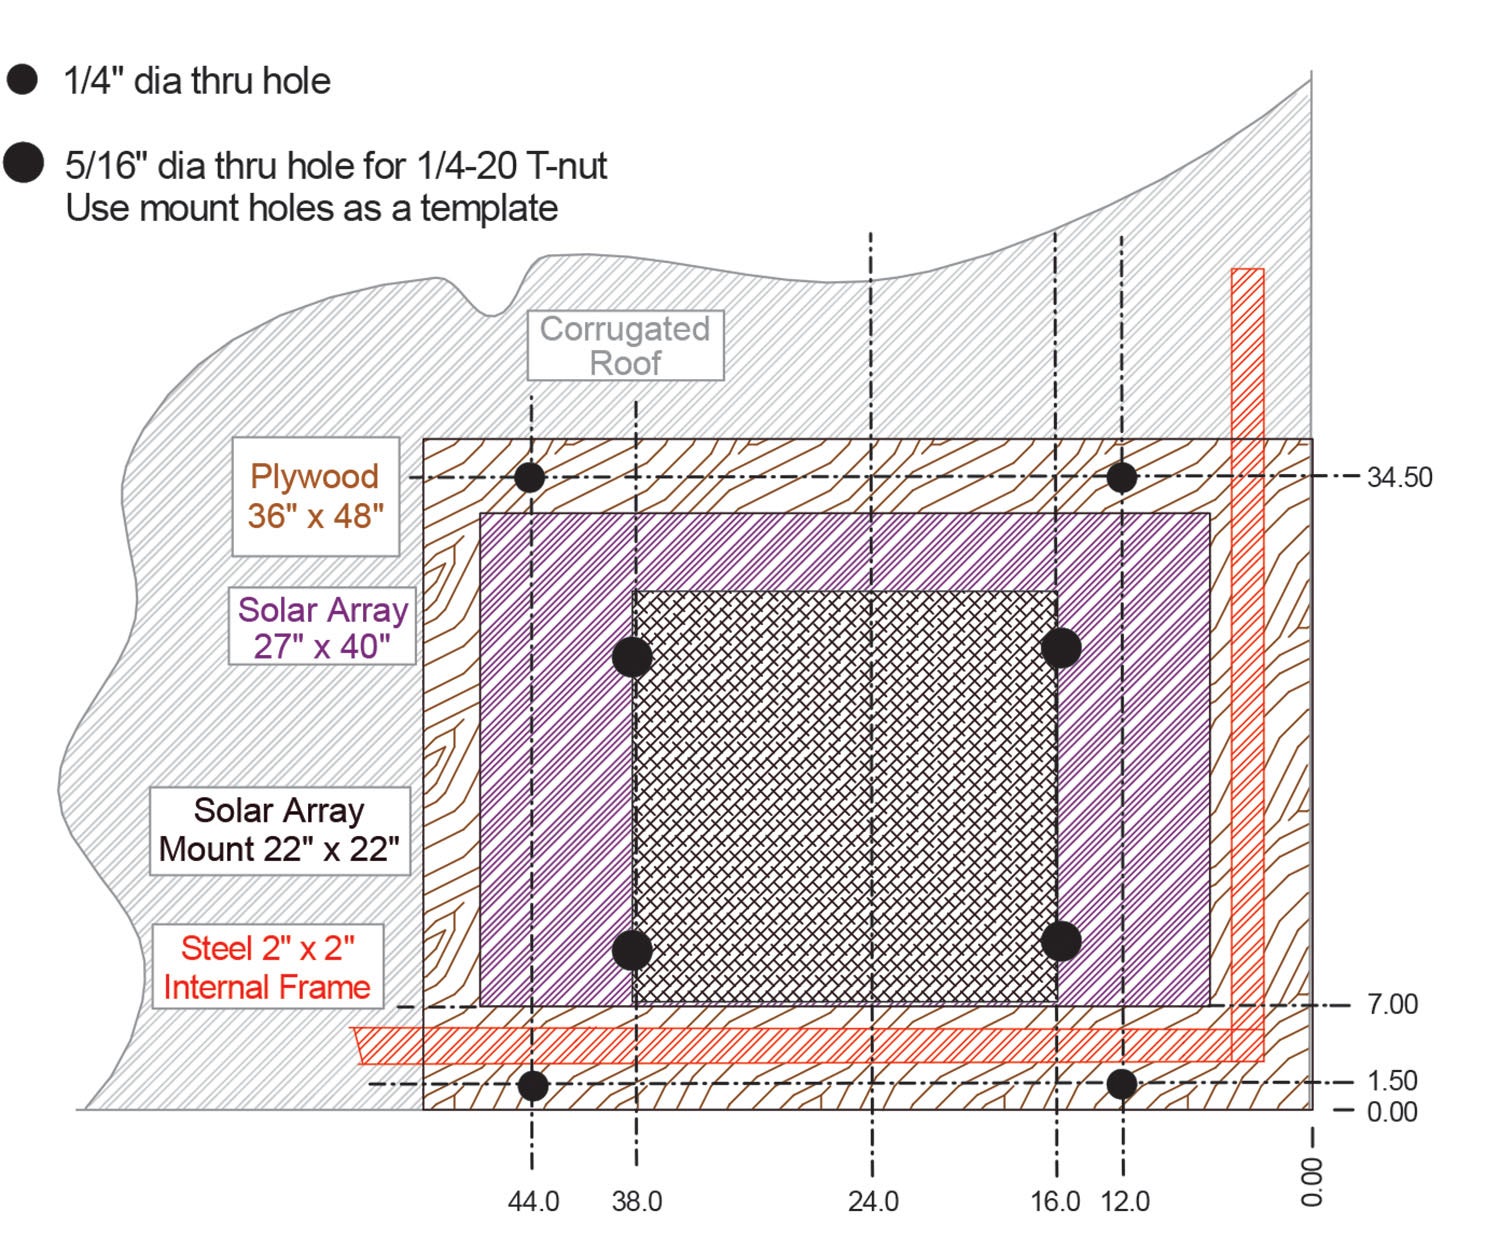
Then, how big is the solar array? Or at least, how big is the mount? I chose Windy Nation (www.windynation.com/solar) for their combination of a 100-watt solar panel, aluminum mount, 100-watt solar controller and 100-amp-hour battery to complement our system. There are dozens of other companies offering this sort of combination, but Windy Nation was great to work with.
The aluminum mount was 22×22 inches to support the array, but a quick calculation of wind loading on a corrugated roof showed that at least a 36×48-inch plywood support structure would provide adequate strength in any expected wind condition. This is for a south-facing solar panel in a part of the world where strong winter storms come from the south. If your part of the world isn’t like this, any decent civil engineering equations website (or building contractor) can do the “eyeball” calculation in a couple of minutes. (It’s sometimes called a TLAR analysis—that looks about right.)

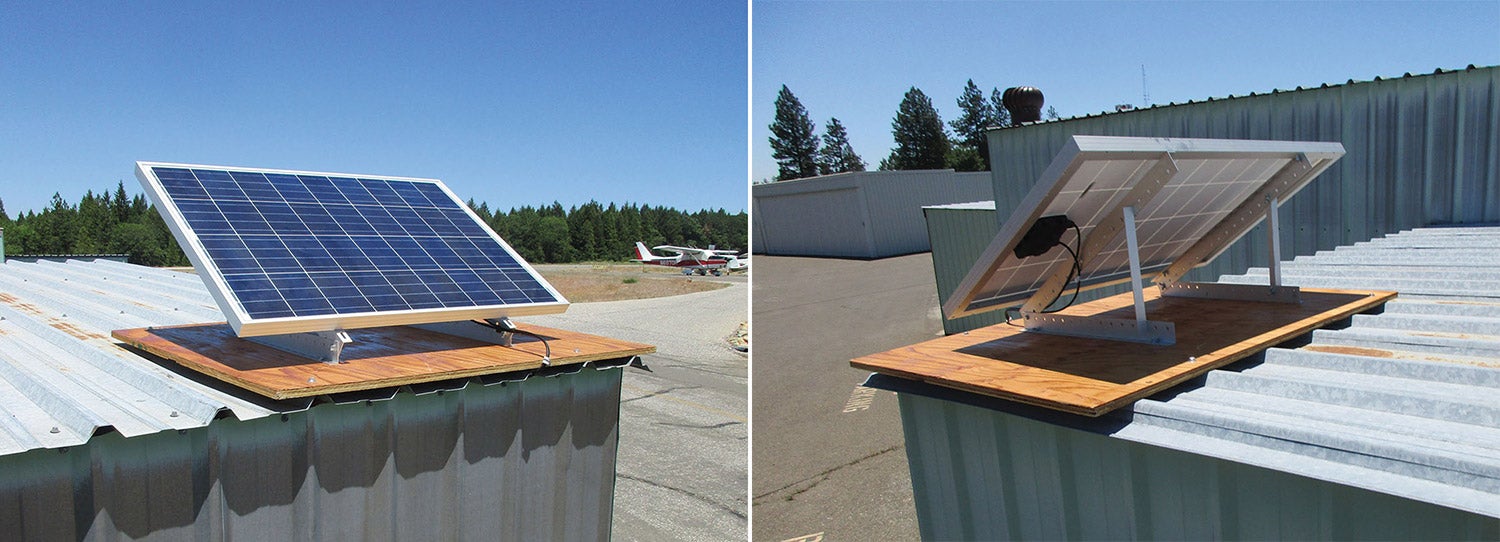
To ensure adequate support, we placed the solar array mount over the southeast corner of the hangar structure. This moved the weight off the hangar roof plywood and directly onto the steel 2×2-inch hangar frame members in that corner of the roof.
Sizing the System
Let’s take it from the top. To size the system, we have our choice of continuing this conversation in watt-hours or amp-hours. The conversion is rather simple: In a 12-volt system, one amp-hour is 12 watt-hours. We could standardize on either one, but to keep the conversation simple, let’s use amp-hours, knowing that we can switch back and forth between the two when necessary.

So, let’s begin with the “starter system” of a 100-watt solar panel, a 20-amp charge controller and a 100-amp-hour battery. This package will cost about $400. During the “average” part of the year, the panel will be putting out 100 watts between 11 a.m. and 4 p.m. every day, for a total of about 500 watt-hours. According to our conversion above, that’s about 40 amp-hours, which means that if we are in continuous use of our system, we can only use 40 amp-hours a day in order to keep the battery up.
This starter system should allow us to run one 2-amp LED light fixture (equivalent to a single dual-bulb 4-foot fluorescent fixture) for 20 hours, but if we want to work all night with four fixtures, we can only run it for 5 hours. Hmm. All of a sudden we are presented with a balancing act. With “commercial” power from the power line, we think nothing of throwing a switch and lighting the place up like Times Square or the Vegas Strip. Now we have to be a little more selective about what electrical “stuff” we actually have to have. A 200-watt system will cost you roughly double the 100-watt system at $800. Four-hundred-watt system? Double it again. Plus the additional load to your hangar roof. Let your wallet, your conscience and the load on your hangar roof be your guide.
Putting It All Together
Let’s start with the 3×4-foot plywood mounting base. Half-inch plywood marginally would have worked but Ed, my contractor consultant (I take care of his Mooney, he takes care of my construction projects), recommended 5/8-inch five-ply material. I had a 4×4-foot scrap of ¾-inch five-ply material in the shop from a former project, so with lumber approximately three times the price it was last year this time, guess what we used. Way overkill, but zero extra cost.
This plywood is going to be out in pretty nasty weather for a goodly number of years. Ed recommended thinned spar varnish overall with specific attention paid to the edges and mounting holes drilled into the plywood. I did four coats of a 4:1 ratio of paint thinner to varnish. Why the dilution? You want that varnish to get way down into the wood, and the thinner helps it do that. Four coats—top, bottom, holes, and edges—with a dry time of four hours between coats at the 98° F temps around here this spring. Then a final wet coat of straight 100% varnish with a 24-hour dry, and away we go.
Conventional engineering said we could use 10-24 or 10-32 hardware to mount the plywood to the steel roof, but there is a whole lot more variety of 1/4-20 hardware, and the cost difference is in the pennies—and a lot easier to wrench.
I used metal T-nuts to fasten the aluminum array mount to the plywood. The T-nuts were glued to the bottom of the plywood and held in place for 24 hours before the installation. A typical fastening arrangement (bolt, lock washer, flat washer, roof, flat washer, stop nut) was used to hold the plywood to the corrugated steel roof.
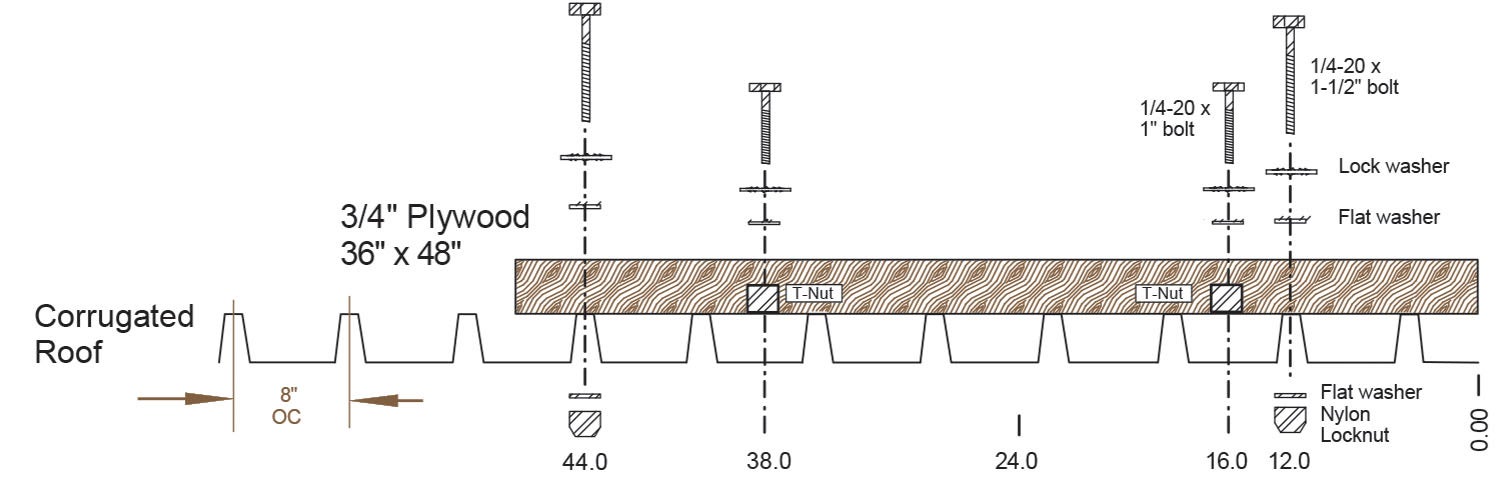
Figure 2 shows the “hills” and “valleys” of the roof and the correct fastening arrangement. Note that the plywood is fastened to the hill spots on the roof and the T-nuts are located above the valleys. You need the strength of the hills to hold the plywood in place. There’s very little support provided by the valleys, which is why it’s so important that the T-nuts are attached to the plywood. Avoid using extra-long bolts to attach the array mount directly to the roof.
Finally, please remember that the edges of the steel corrugated roofing are perfectly wonderful knife blades, and the wires coming from the solar array are only covered in thin plastic. Use weatherproof clamps to keep the wires away from those sharp metal edges.
I’ve got a few things in the back of my mind to talk about, a lot more on HOG, and a few thoughts on how to efficiently wire your aircraft, both for power and for coaxial cable. Until then, stay tuned…


