 In 2016, the Experimental Aircraft Association created the Founder’s Innovation Prize, a five-year competition to encourage the development of safety enhancements in aviation, particularly those that would help reduce loss-of-control accidents. In 2018, one of the entries was Jack Hohner’s haptic (touch) feedback stick grip that gives the pilot angle of attack (AoA) information through tactile sensations rather than merely visual or aural cues. Haptic feedback is being used in smartwatches and other personal devices, but it is also being used successfully in a number of high-tech industries, including aerospace.
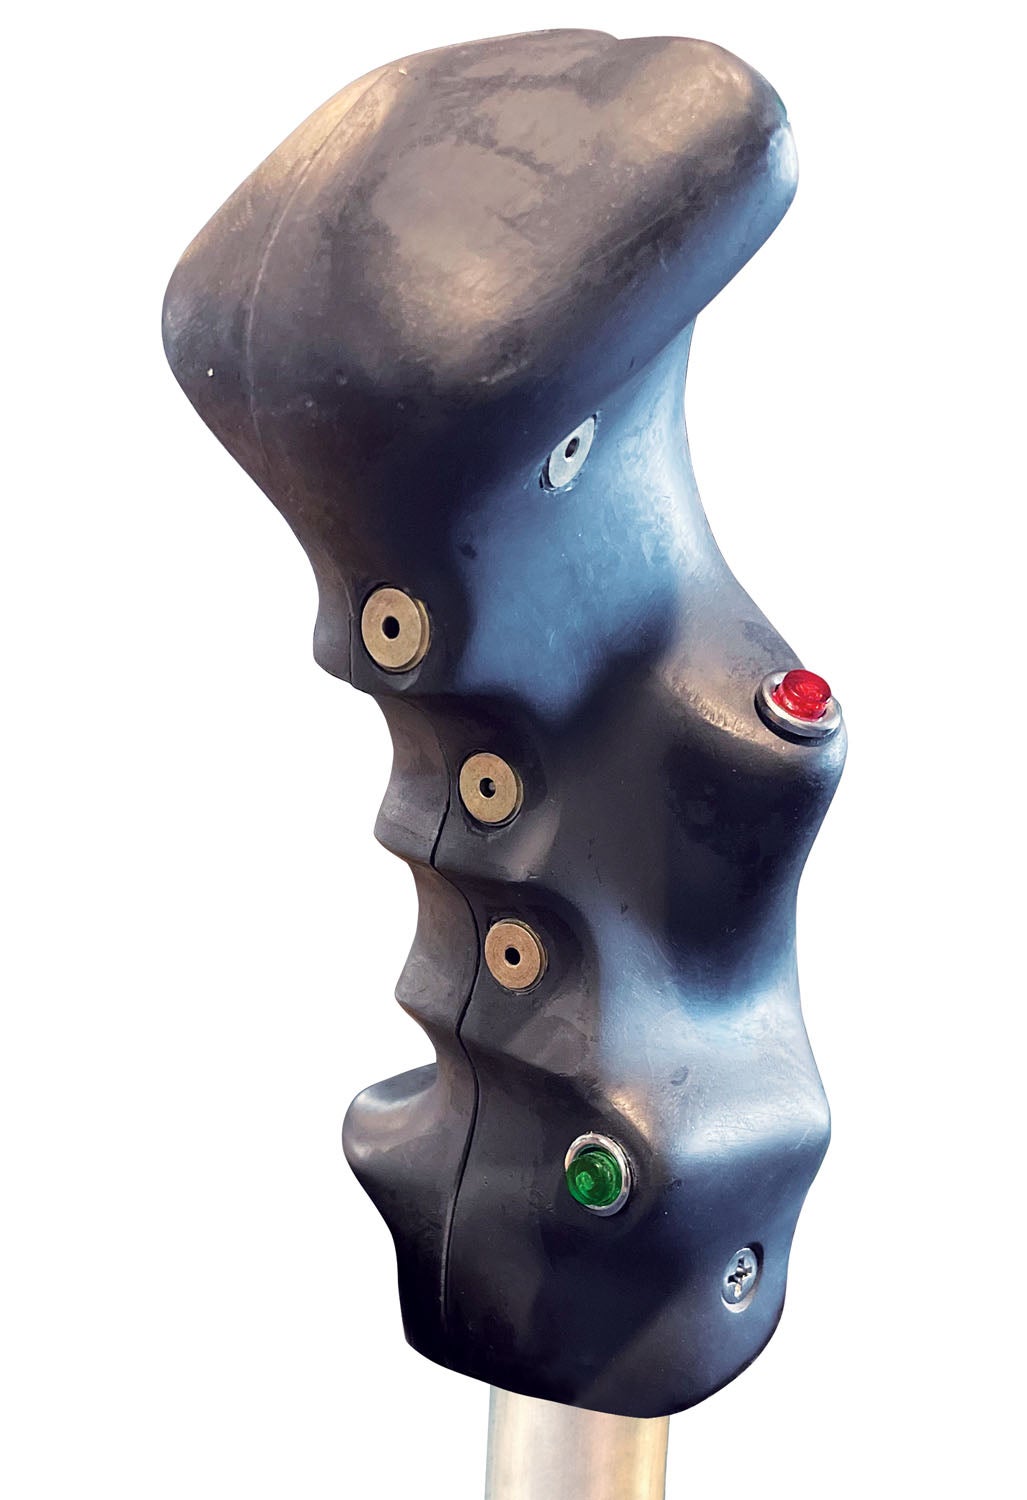
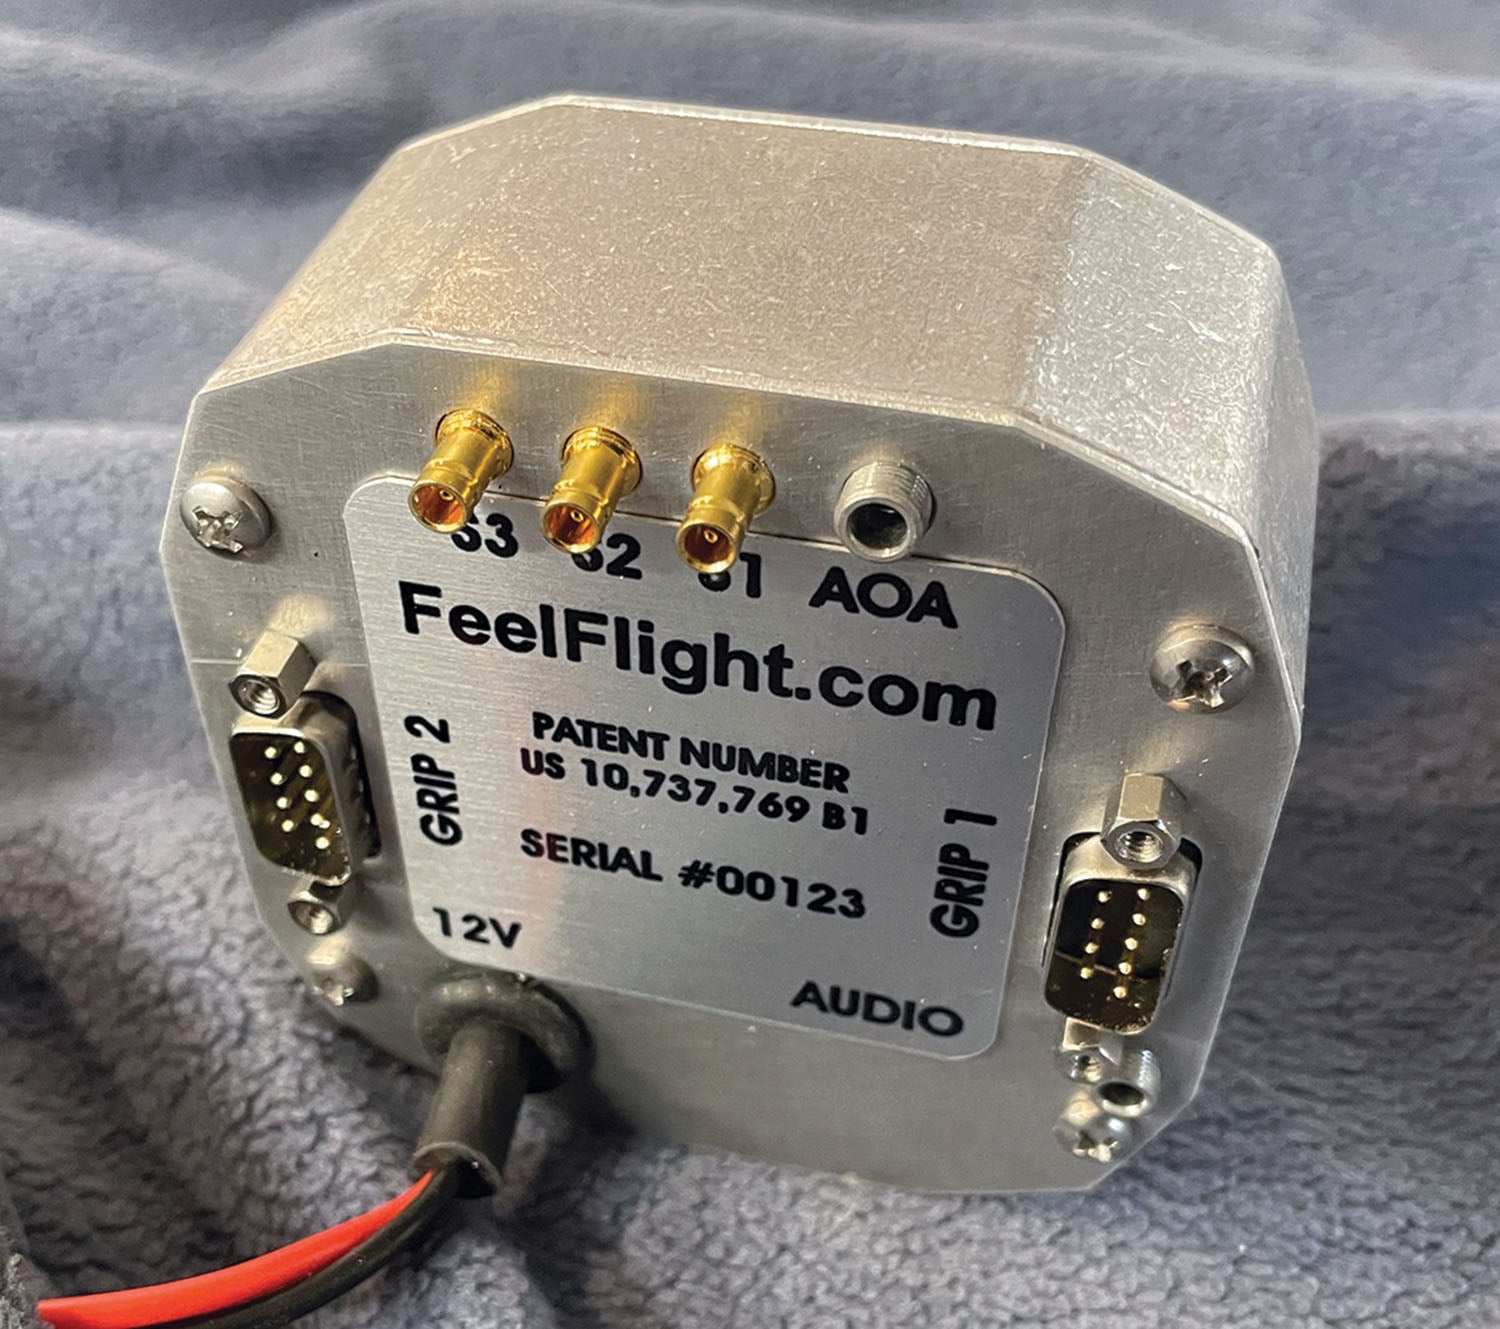
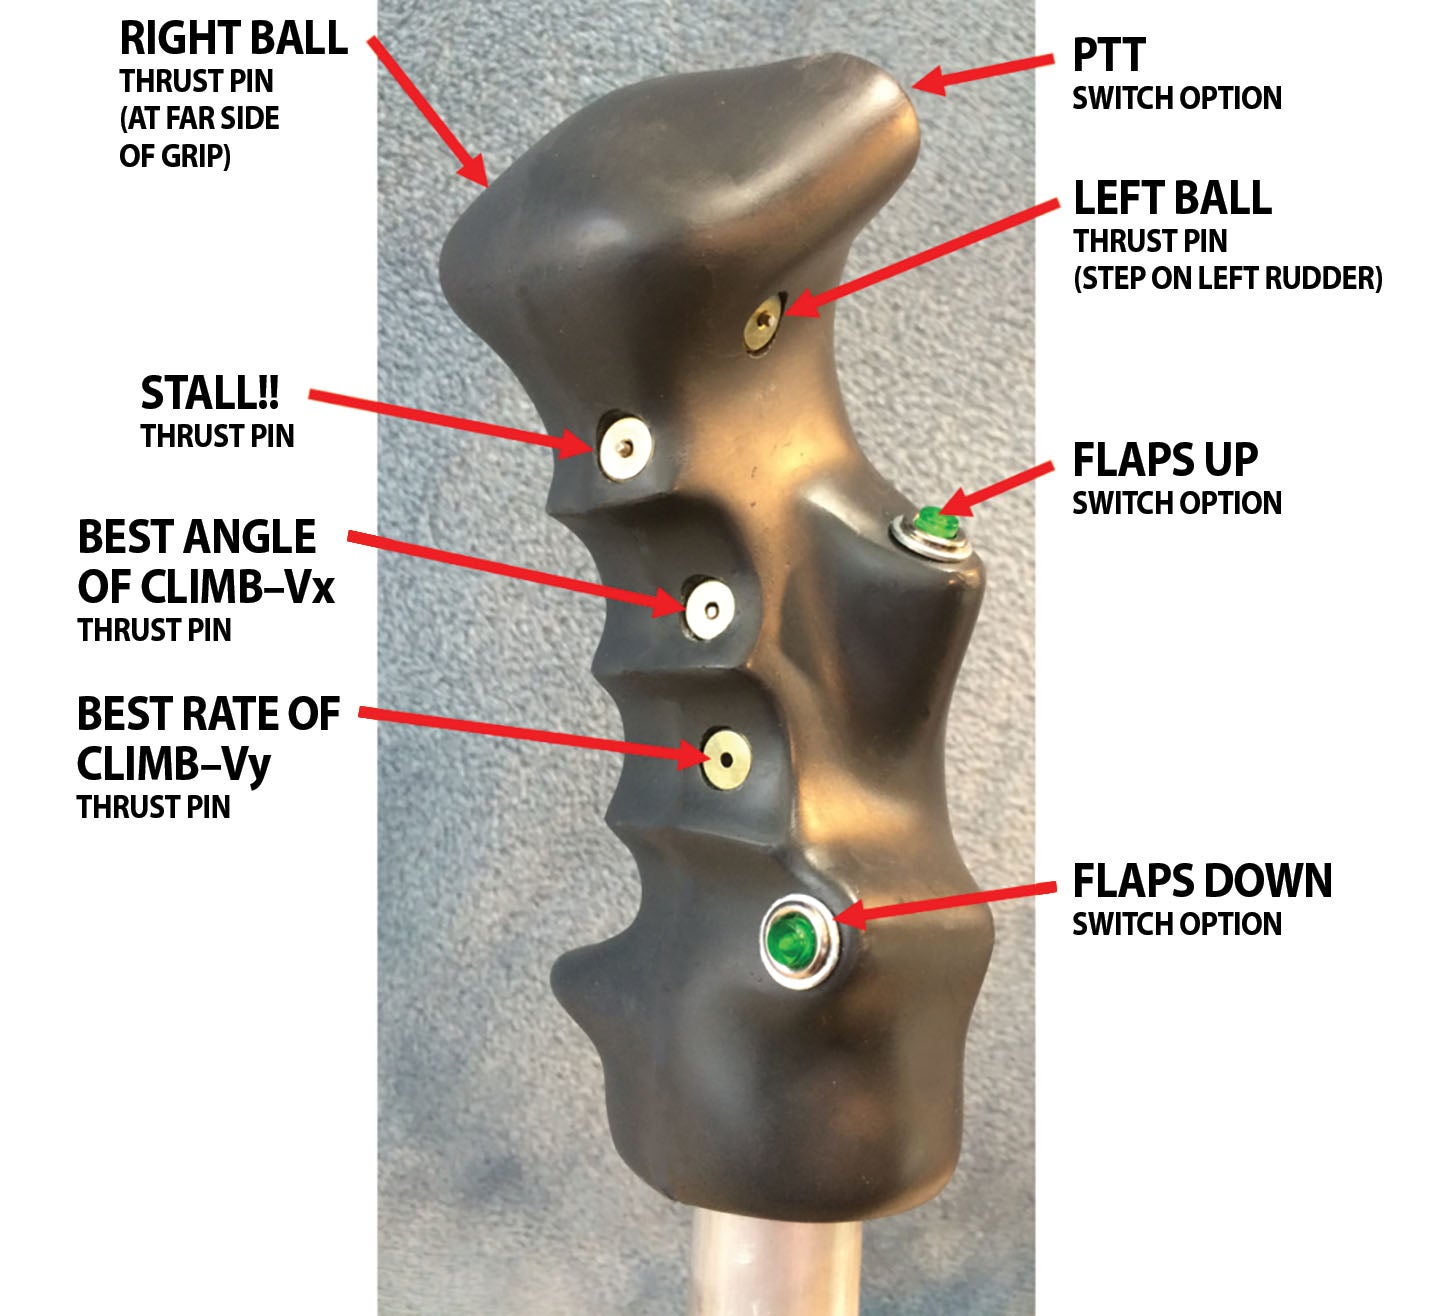
Hohner didn’t win the Founder’s Innovation Prize, but he did pursue the development of his idea, now called the FeelFlight grip. The $2000 basic kit includes the grip itself, fully equipped with little “thumpers” designed to press into your fingers and palm, and several switches that can be used for discrete inputs such as push-to-talk, autopilot disengage, lights, etc. The grip mounts on a 1-inch-diameter stick with a single screw. Grips can be ordered for left- or right-hand operation, and additional grips are $650. Also in the basic kit is the control head, angle of attack vane sensor, cabling and mounting hardware.
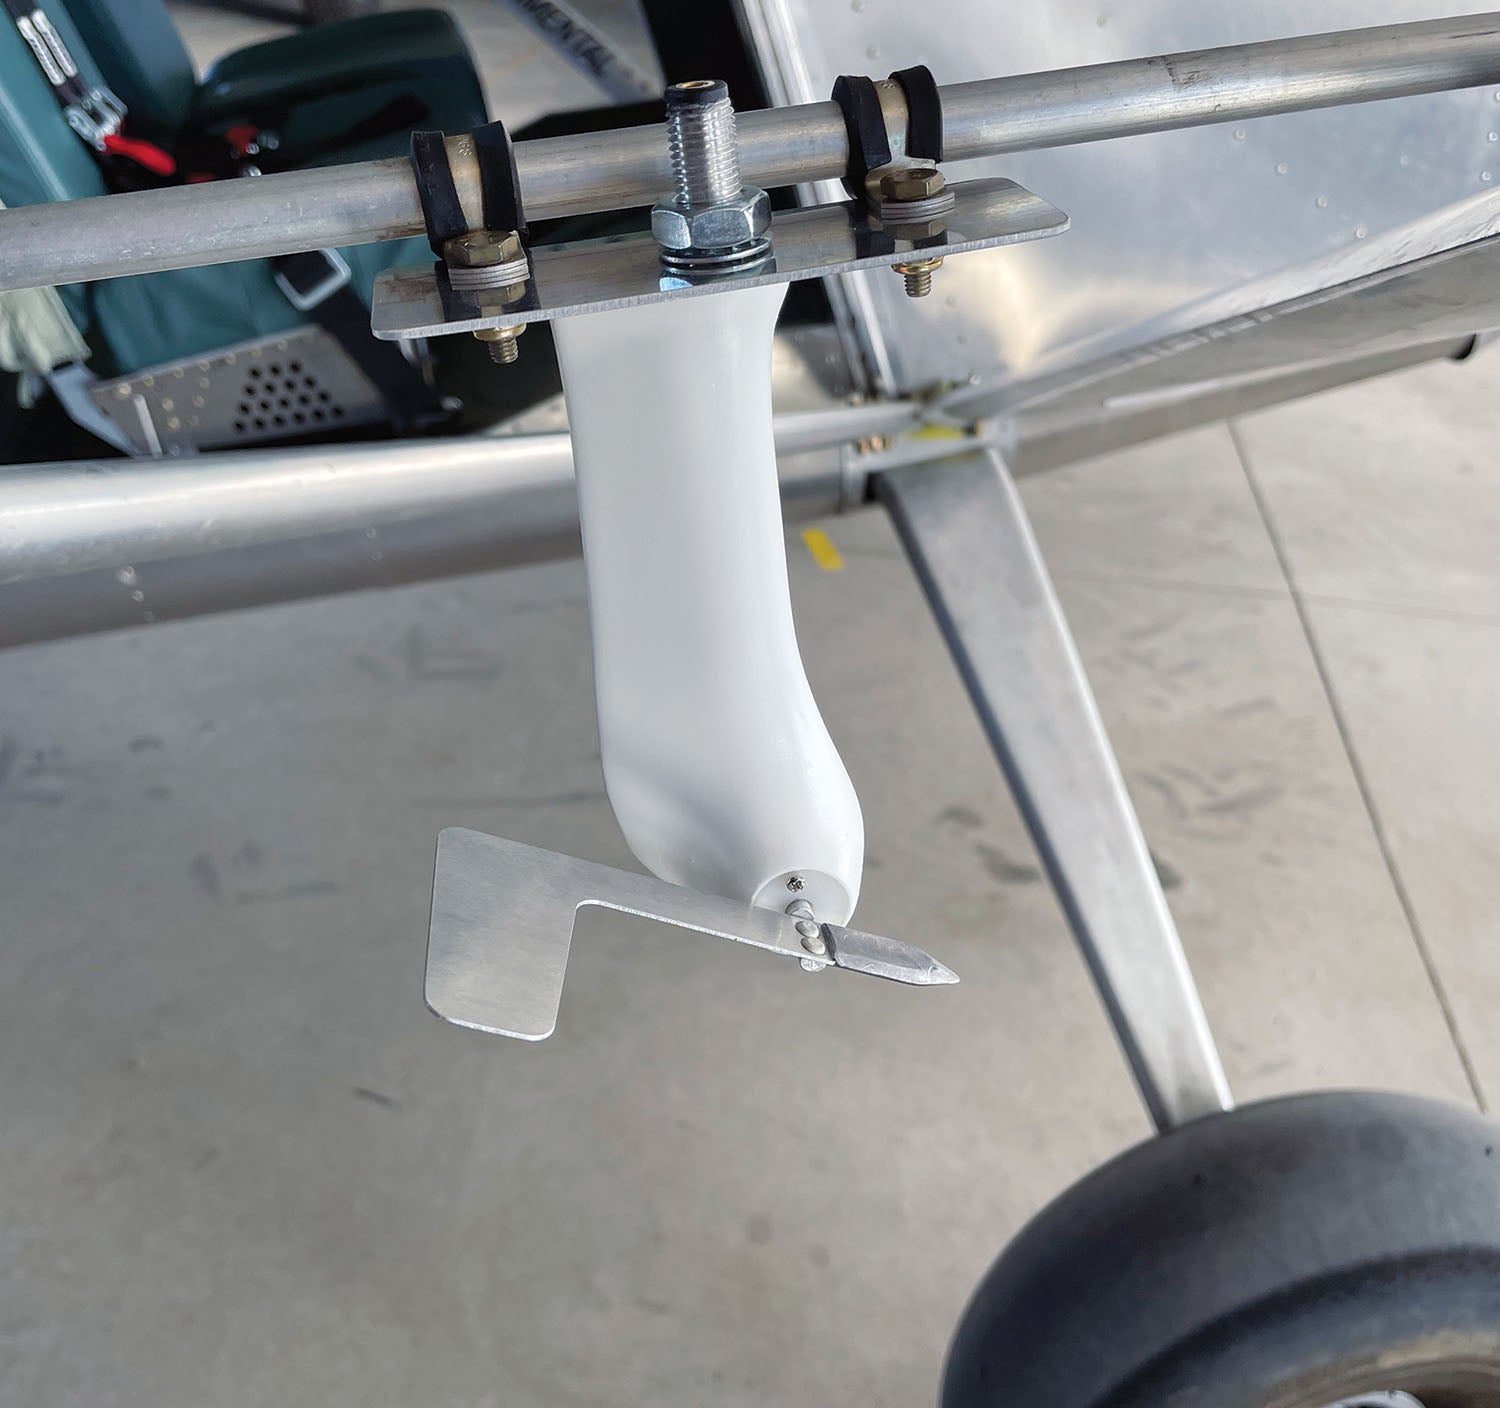
The vane sensor is designed to mount on an inspection cover on the bottom of a wing but could be mounted to the skin itself if you so desired—so long as it is mounted outside of the prop wash. The control head mounts in a standard 3-1/8-inch instrument hole; it needs to be connected to the AoA vane with a supplied cable and the stick grip cable, also supplied. It also needs power and ground. An audio cable is supplied, along with a jack on the back of the control head so that you can pipe sound to your audio system.
Our Test Installation
Testing hardware is always an interesting proposition. Testing portable devices is easy. Testing a product needing a deeply involved installation—like an EFIS or major navigation box—means having to install it in an airplane, no small job. For a system that requires some sort of installation but is not terribly invasive, we try and find a way to temporarily install it that will show us all its features without putting the results in doubt due to how it is installed.
Testing the FeelFlight grip was one of these cases. All of our available aircraft have complex stick grips with lots of switches already wired—changing to the FeelFlight was going to be very involved. The low-wing aircraft (RVs) would also require wiring through the wings, which is also somewhat invasive. But we did have our high-wing bush plane that would make a temporary installation and wiring much simpler.
For this case, we built a bracket for the AoA vane sensor that rode on the horizontal jury strut, well outboard of the prop slipstream. We then taped the single wire cable from the sensor along the struts to the fuselage and over the door sill. Sensor install complete!
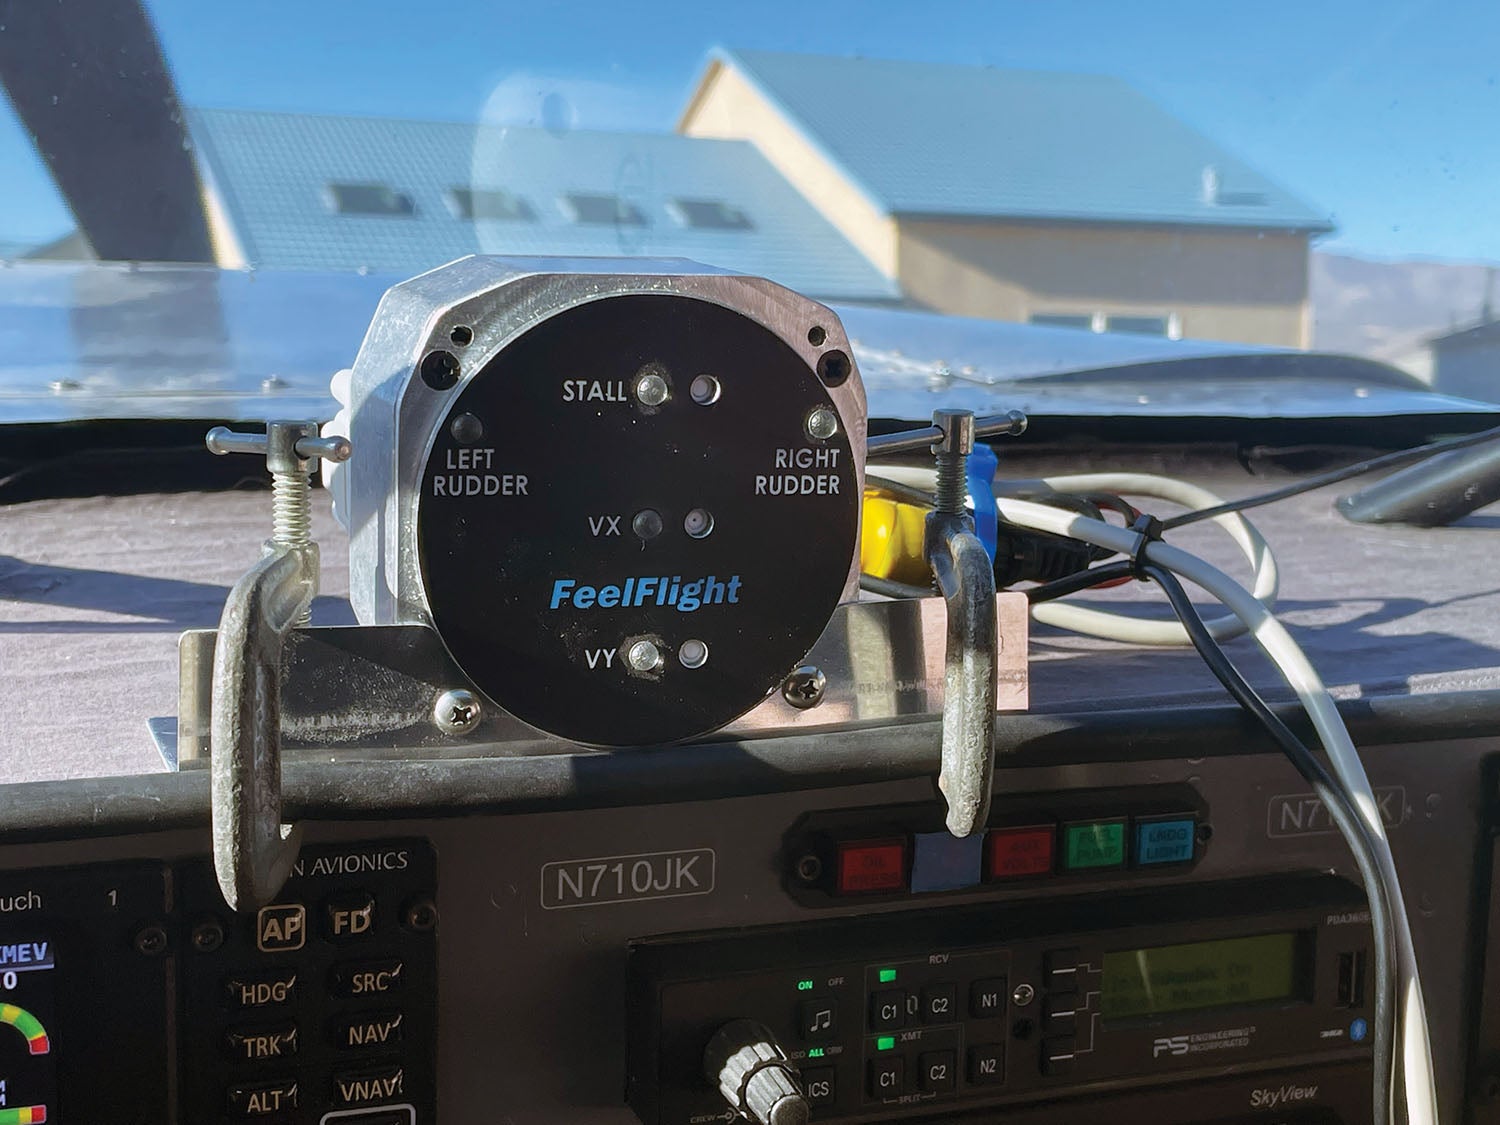
The control head was mounted to a simple bracket that clamped onto the glareshield—we felt it important to have it firmly attached to the ship because of the yaw sensors built into the unit. Power was simple—it needs 12 volts and ground, so we tacked on a cigarette lighter adapter on a short cord and simply plugged it into power for flight.
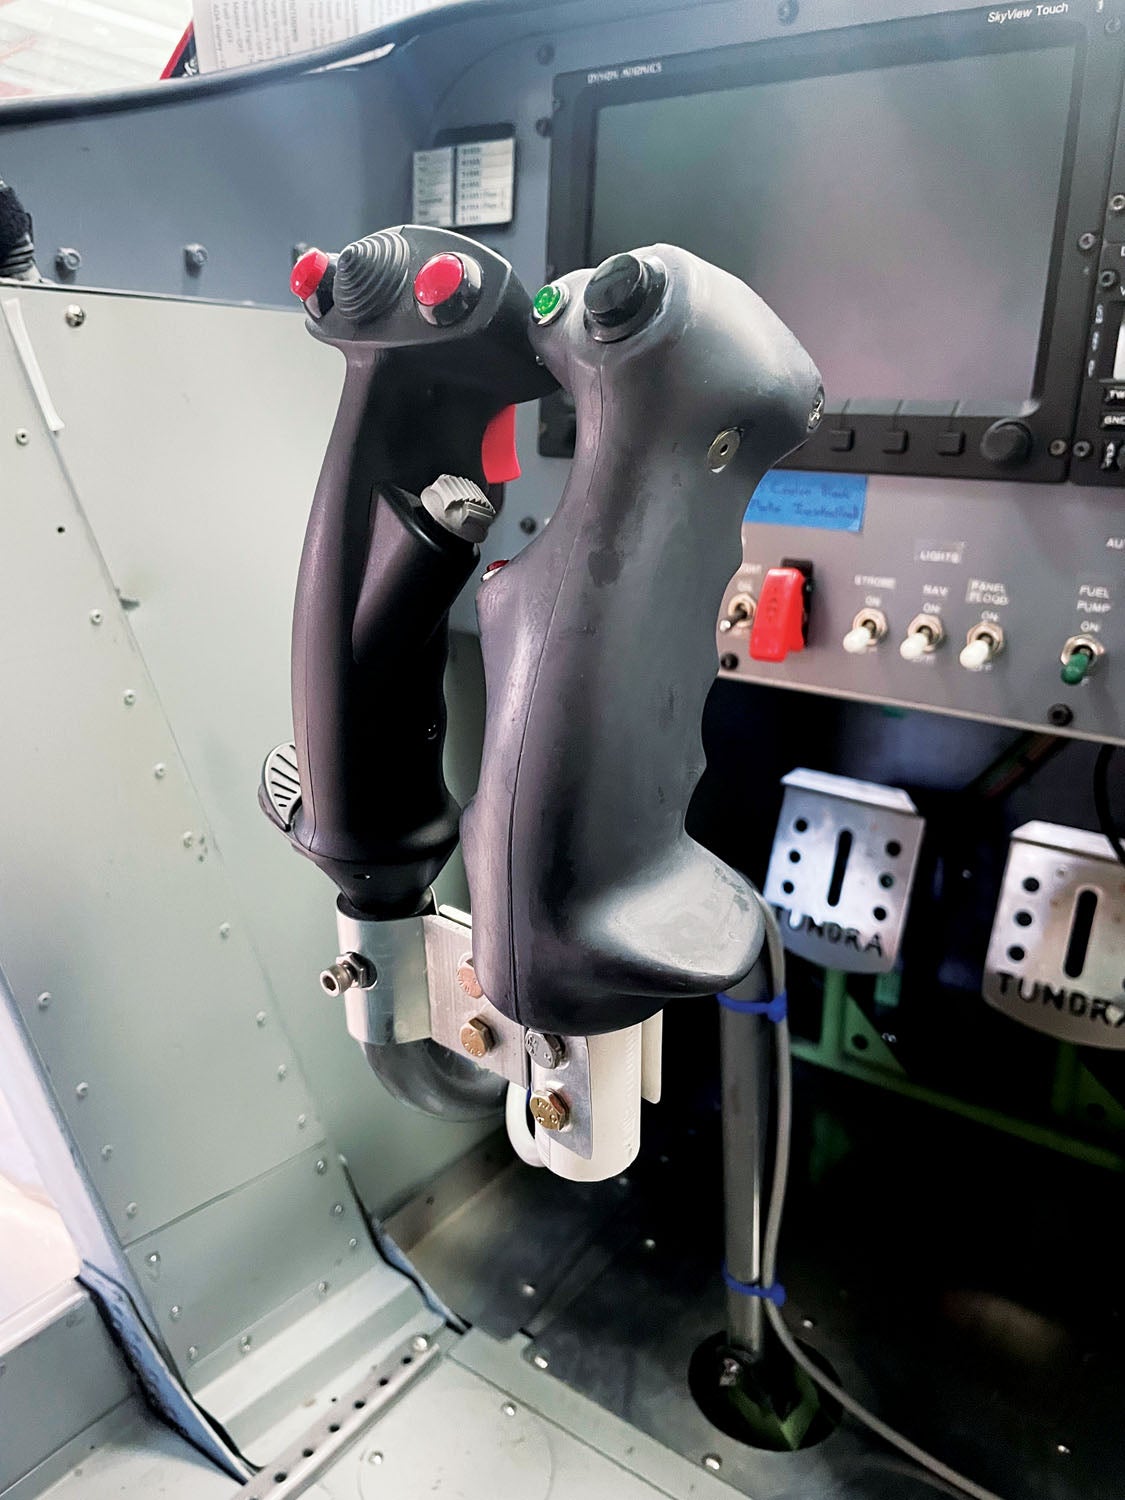
The grip itself was more of a challenge because replacing either one of the existing grips was going to require significant rewiring. Instead, we decided to build a bracket to place the FeelFlight grip on the same stick as the existing Tosten grip, right alongside it. We chose the left seat position because when we tried it on the right, we lost significant control movement when the temporary grip hit the sidewall of the cockpit. This was not a problem on the left since it was on the right side of the left stick. Wiring was simply cable-tied and taped to keep it secure as it was routed to the control head.
The net effect was sort of like having a yoke with a very, very short cross-bar—you could fly with either or both hands and keep your right hand comfortably on the FeelFlight grip, even while flying with the left hand.
The final connection was an audio earbud that plugged into the back of the control head and then was tucked into the ear cup of a headset to provide audible cues without having to wire it into the audio panel.
Flying the Grip
The first thing you’ll notice with the FeelFlight grip is that it is larger than most grips out there. Not a lot larger, but maybe one glove size bigger than you’re used to. This is understandable since it has to incorporate the little “thumper” units, which are larger than the simple microswitches installed in most advanced military-style stick grips. I would say that the FeelFlight grip is sized about the same as a grip designed for a pressure-suit glove—it is perfectly comfortable to fly with, but in this case, it made it just a little finicky in how it was held in order to get the benefit of the thumpers.
My hand is pretty average—I wear a size-large glove, which is actually about the middle of the road in America. When I grip the FeelFlight, my fingers fit nicely in the grooves designed for them and line up well with the thumpers. But the extra size made it more difficult to line up so that the yaw thumpers reliably contacted my fingers—or more precisely, the left thumper (designed to hit the thumb) was difficult to line up so that I hit my thumb. I had to consciously stretch my hand up and around to make it so that I could get both left or right yaw indications in one grip. If I relaxed to a more natural position, I would get the right thumper, but not the left.
With ground testing for freedom of controls completed, we taxied out and noted the thumps for yaw when turning in both directions. The AoA was still uncalibrated, so we got nothing on the index, middle, or ring fingers. Takeoff was normal, and we found that with our funny dual-stick setup, it was remarkably easy to fly with the left hand while keeping our right hand on the FeelFlight grip, following the action with light pressures.
Calibration Runs, Flight Testing
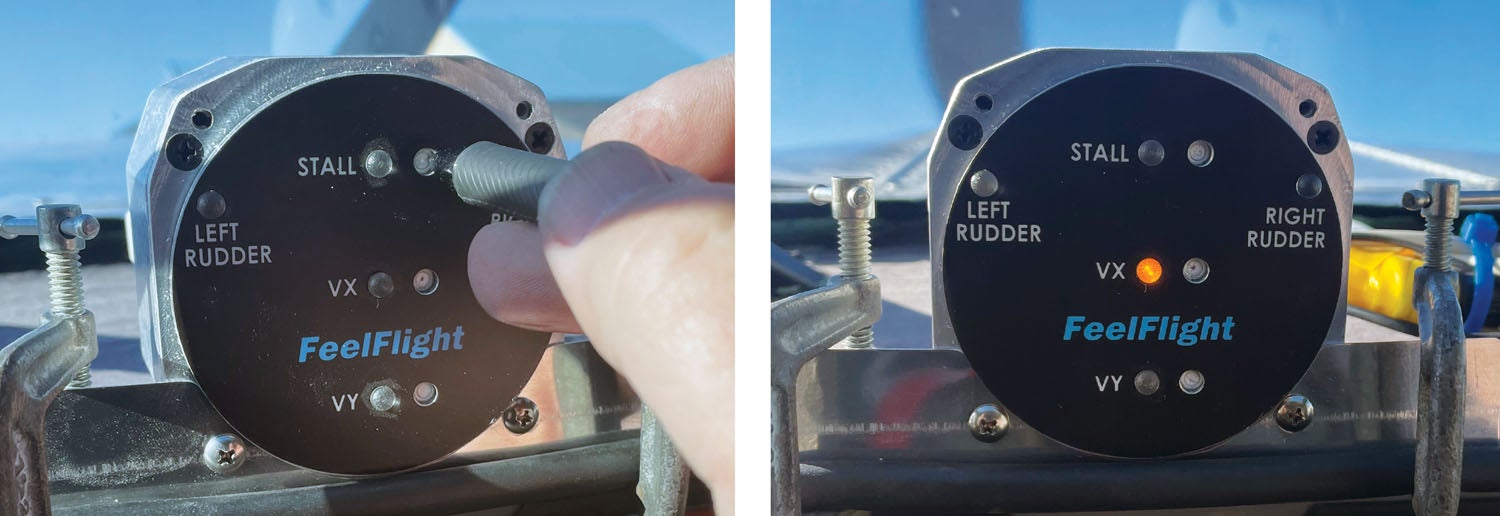
Once we had cleared the traffic pattern, we climbed to altitude, and since we were at best-rate speed, we reached up with our pen and hit the “set” Vy button. Holding that speed, the ring-finger thumper started tapping away. I slowed the airplane to best angle, hit the “set” button with the pen, and now the Vx thumper tapped away. I relaxed back pressure to accelerate, and the ring-finger thumper started up as the middle-finger thumper stopped.
Reaching a safe altitude, I leveled off, did a few clearing turns, then slowed down to a stall and hit the button to set the AoA in the buffet area. Since it is sort of a discrete warning, I figured I’d want it a little faster than the stall break to give a warning, not just a confirmation of the stall. This airplane has a very benign stall with very little break regardless, so the onset of buffet (about 50 knots indicated) was appropriate.
With all three speeds set, I accelerated to about 90 knots, then pulled the power back and slowed through the various speeds to stall, feeling the thumpers come on repeatably at the appropriate points in the speed curve, right to the stall. Along the way, I kicked the rudder in both directions and felt the thumps corresponding to the skid direction. I had to work to get a grip where I could feel the one on the thumb, but it was working just fine—only my hand size made it difficult.
Next up, I wanted to prove to myself that this was true AoA and not simply a speed sensor, so I accelerated again and rolled into a 60° banked turn. Pulling power back, I slowed until I felt the three thumpers, noting that the speeds were considerably higher than in wings-level, unaccelerated flight. The stall warning thumped as the airplane shuddered in the accelerated stall, and I recovered, feeling a brief thump from the faster (lower) fingers as I resumed normal flight.
The last test I did was to lower the flaps and see how the wings-level stall speeds would be affected. In an AoA system using pressure sensors (either on the wing surface or the pitot tube with an additional port), you need a switch on the flaps to tell the computer which configuration you are in. The computer then has to use the appropriate sensor values for that configuration to give you appropriate indications.
The advantage of the FeelFlight’s vane-type sensor is that it automatically adjusts—actually, it doesn’t need to adjust—for the flap condition. While the AoA for flaps changes slightly with wing shape, it is probably within a knot of being accurate, which is close enough for most flying. So when I dropped the flaps and slowed to stall speed, I got the FeelFlight indications for stall down at 42 knots, which is where the airplane breaks with the flaps out. Both of the other AoA systems on the airplane are calibrated for the flaps condition since we don’t have a switch to tell them if the flaps are up or down, and we want the systems accurate in the approach configuration.
As we finished the flight, we noted that with the flaps in normal approach configuration, we got consistent AoA indications from all three systems in the airplane—the FeelFlight was tapping, the lights on the glareshield HUD-type indicator were showing approach speed, and the audible beeps from the Dynon system were happy. It’s good when everyone agrees that the approach is going well. As we touched down, the stall warnings were all going off and continued down to the cut-off speed of about 20 knots—that’s when the FeelFlight vane settled tail-heavy to its resting position. Before it settled, it gave a couple of random blips on all thumpers as it moved around a bit—but most folks aren’t holding tight to the stick grip at that point anyway.

During all of this, the FeelFlight was also providing audio, as well as providing the lights that correspond to the thumpers inside the grip. Quite frankly, the audio was more likely to draw our attention to the display than the visual display was itself. Overall, the FeelFlight system performed exactly as it was supposed to, with accurate repetition at specific speeds and easy calibration. The fact that it worked for both flaps up and flaps down with a single calibration was a bonus.
Is It Right for You?
So the real question is not if the FeelFlight grip works—it does—but whether or not the tactile feedback is superior to or has advantages over visual or aural AoA systems. The answer to that is not black or white—it is going to depend a bit on each pilot and how they fly.
For instance, I find that I rarely actually have my hand wrapped around the stick grip in any airplane I fly. I oftentimes fly with my hand down around the base of the grip or below it, or for much of the flight (cruise), I am not holding it at all, as the autopilot is flying. Of course, for maneuvering flight, such as aerobatics or takeoff and landing—when AoA is really useful—I am likely to have my hand on the grip. But I might not always be holding it in exactly the same way, so some of the thumpers might not line up with their targets.
The need to keep your hand in a single position is potentially problematic for many—but the good news is that what you really want to know (AoA) is most likely going to work because you’ll most likely have your fingers in the proper position. The yaw thumpers are less likely to line up all the time with a pilot’s hand, so while they are interesting (as there are a lot of pilots who fly half a ball out because their “seat of the pants” might not be as sensitive as they’d like), they are not essential to safe flight. The other thing to consider is simply the size of the grip. It is large enough that I couldn’t get my hand around the top to reliably get both yaw thumpers, and my hand is of average size. We did, in fact, have a smaller-handed pilot test the FeelFlight, and she was unable to get the left yaw thumper to ever line up with her thumb—the grip was simply too large.
The other thing to consider when comparing the FeelFlight to other systems is the nature of the warnings themselves. While most AoA displays or aural systems are digital representatives of analog measurements—they give a continuously variable indication of where you are in a range—the FeelFlight system is somewhat coarse, more digital in nature. If we take the old stall warning device in a certified airplane as a starting point, it is either on or off—close to the stall or not. When the horn goes off, you need to take action unless you are trying to stall. In a continuously variable system, you have a better idea of where you are in the AoA continuum, not just “close to the stall.” The FeelFlight system basically gives you three discrete points, which you can arbitrarily set wherever you want. Just before stall, Vy and Vx are the defaults. There is nothing preventing you from setting them as “stall, stall -5 knots, and stall-10 knots” if you want. But they are still fairly coarse indications of where you are in the range.
Sound or Feel
The bigger question is probably: Which is better for you—sound, visual or tactile feedback? I find properly designed audible indications of AoA to be very intuitive. Beeps of increasing intensity with increasing AoA, with the tone becoming continuous as you reach the stall, is hard to ignore or misinterpret. I have flown different styles of light (or digital representations of light) ladders, some of which make intuitive sense and some that take a little interpretation.
After a couple of hours of flying the FeelFlight, I had to remind myself what the indications were telling me—ring, middle or index finger taps I had to take a moment to interpret. And this is where audible alerts have the advantage: You don’t have to interpret the fact that, just like a nervous passenger, the more agitated the AoA sounds, the closer you are to trouble. So from the standpoint of warning of the dangers of an impending stall, the aural is (for me) superior. For that reason, it is great that the FeelFlight provides an audio signal along with the thumpers and visuals.
But what about telling you other points in the AoA regime? How can you tell if you are at best glide or best rate of climb? These are hard to do with a specific tonal signature (although the FlyOnSpeed system—overall winner of the EAA Founder’s Innovation Prize—does this), so it is where a visual or tactile display might do better. Most of the aural AoAs have a visual indicator as well, and they all have some sort of point that shows the best rate of climb AoA. The FeelFlight is set up to give you a discrete point on this as well—a tap on the index finger does it. So that is something to think about if you are choosing a system for yourself. If you are constantly trying to do maximum lift flight, for instance, doing lots of ground reference turning, the tactile feedback might be a plus.
Final Thoughts
The FeelFlight grip system functions and installs exactly as advertised. We found the grip a bit large for our average-sized hand, but it was easy to set up (both mechanically and electrically) and very simple to calibrate—or recalibrate if you didn’t like the points you had set.
In the end, the best thing we can recommend is to give the system a try at one of the major shows where FeelFlight exhibits. Jack Hohner, the creator and owner, is usually at Oshkosh and Sun ’n Fun and is happy to demonstrate the system so that you can put your hands on the grip and see how it feels. That alone will tell you much about the FeelFlight’s suitability for your airplane or project.
For more information, call 509-990-1299 or visit feelflight.com.


")


I found that this article by the NTSB on AOA effectiveness a bit of a surprise.!
https://airfactsjournal.com/2024/09/what-ntsb-reports-say-about-impossible-turns-and-aoa/?
Comments are closed.